dashboard NISSAN X-TRAIL 2001 Service Repair Manual
[x] Cancel search | Manufacturer: NISSAN, Model Year: 2001, Model line: X-TRAIL, Model: NISSAN X-TRAIL 2001Pages: 3833, PDF Size: 39.49 MB
Page 3221 of 3833

EI-1
EXTERIOR & INTERIOR
I BODY
CONTENTS
C
D
E
F
G
H
J
K
L
M
SECTION
A
B
EI
EXTERIOR & INTERIOR
PRECAUTIONS .......................................................... 2
Precautions for Supplemental Restraint System
(SRS) “AIR BAG” and “SEAT BELT PRE-TEN-
SIONER” .................................................................. 2
Precautions .............................................................. 2
CLIP AND FASTENER ............................................... 3
Clip and Fastener ..................................................... 3
FRONT BUMPER ....................................................... 6
Removal and Installation .......................................... 6
REMOVAL ............................................................. 8
INSTALLATION ..................................................... 8
REAR BUMPER .................................................... ..... 9
Removal and Installation .......................................... 9
REMOVAL ............................................................. 9
INSTALLATION ................................................... 10
FRONT GRILLE .........................................................11
Removal and Installation ......................................... 11
REMOVAL ............................................................ 11
INSTALLATION .................................................... 11
COWL TOP ............................................................... 12
Removal and Installation ........................................ 12
REMOVAL ........................................................... 12
INSTALLATION ................................................... 12
FENDER PROTECTOR ............................................ 13
Removal and Installation ........................................ 13
DOOR OUTSIDE MOLDING .................................... 14
Removal and Installation ........................................ 14
REMOVAL ........................................................... 14
INSTALLATION ................................................... 15
SIDE GUARD MOLDING .......................................... 16
Removal and Installation ........................................ 16
DOOR OUTSIDE LOWER MOLDING ...................... 17
Removal and Installation ........................................ 17
SIDE SILL PROTECTOR .......................................... 18
Removal and Installation ........................................ 18ROOF RAIL ............................................................... 19
Removal and Installation ........................................ 19
REMOVAL ........................................................... 19
INSTALLATION ................................................... 20
ROOF SPOILER ....................................................... 21
Removal and Installation ........................................ 21
REMOVAL ........................................................... 21
INSTALLATION ................................................... 21
LICENSE LAMP FINISHER ...................................... 22
Removal and Installation ........................................ 22
REMOVAL ........................................................... 22
INSTALLATION ................................................... 22
DOOR FINISHER ...................................................... 23
Removal and Installation ........................................ 23
FRONT AND REAR ............................................ 23
BACK DOOR TRIM ................................................... 25
Removal and Installation ........................................ 25
BODY SIDE TRIM ..................................................... 26
Removal and Installation ........................................ 26
CENTER PILLAR LOWER GARNISH ................. 26
CENTER PILLAR UPPER GARNISH .................. 27
LUGGAGE SIDE LOWER FINISHER ................. 27
REAR PILLAR FINISHER ................................... 27
DASHBOARD SIDE FINISHER .......................... 27
BODY SIDE WELT .............................................. 27
FLOOR TRIM ............................................................ 28
Removal and Installation ........................................ 28
REMOVAL ........................................................... 28
INSTALLATION ................................................... 28
HEADLINING ............................................................ 29
Removal and Installation ........................................ 29
REMOVAL ........................................................... 29
INSTALLATION ................................................... 30
Page 3246 of 3833

EI-26
BODY SIDE TRIM
BODY SIDE TRIM
PFP:76913
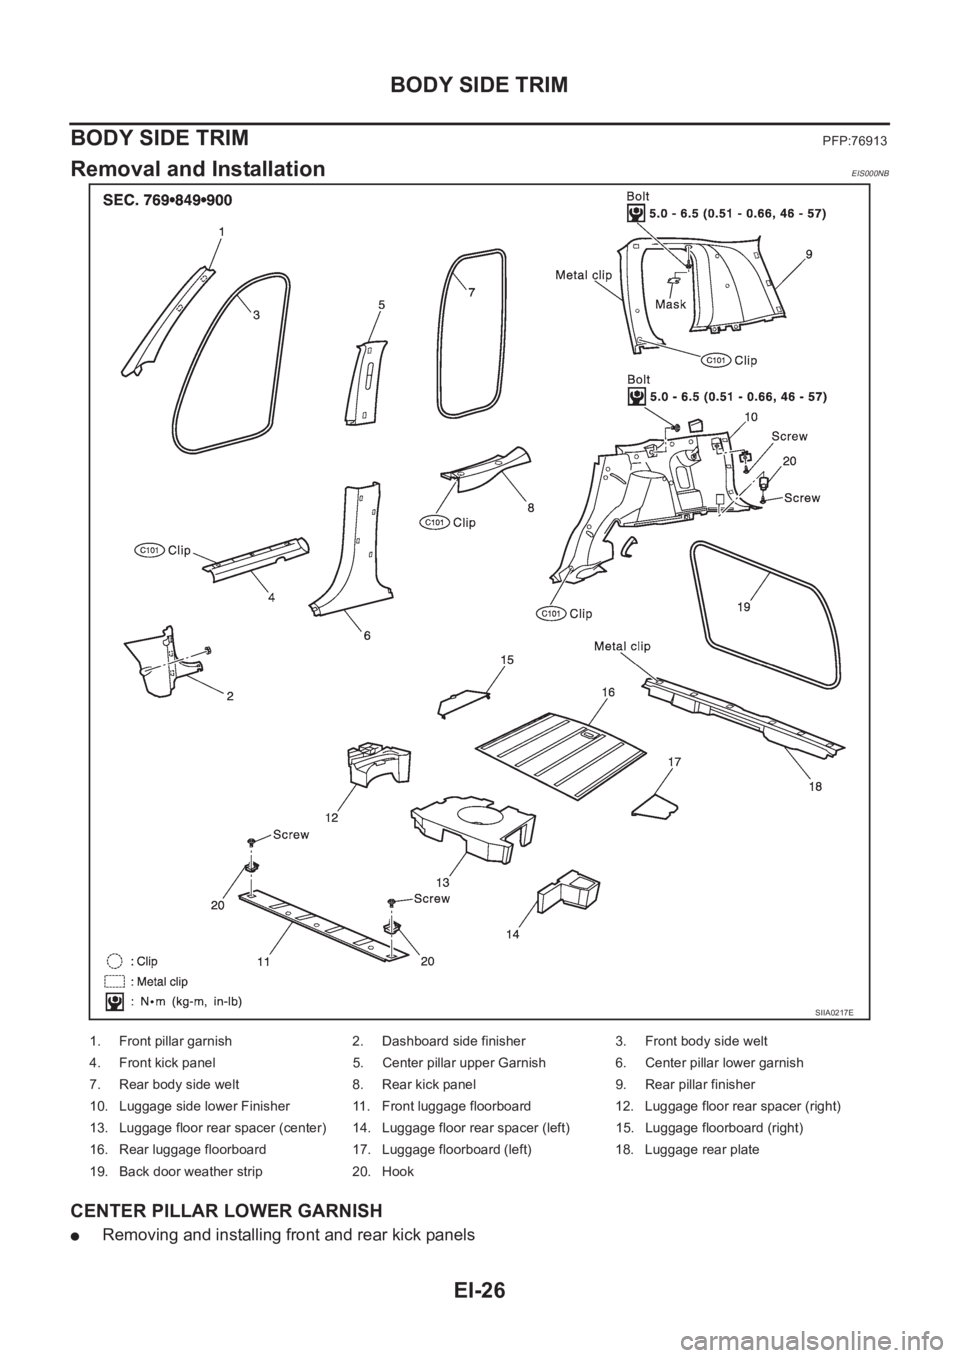
Removal and InstallationEIS000NB
CENTER PILLAR LOWER GARNISH
●Removing and installing front and rear kick panels
SIIA0217E
1. Front pillar garnish 2. Dashboard side finisher 3. Front body side welt
4. Front kick panel 5. Center pillar upper Garnish 6. Center pillar lower garnish
7. Rear body side welt 8. Rear kick panel 9. Rear pillar finisher
10. Luggage side lower Finisher 11. Front luggage floorboard 12. Luggage floor rear spacer (right)
13. Luggage floor rear spacer (center) 14. Luggage floor rear spacer (left) 15. Luggage floorboard (right)
16. Rear luggage floorboard 17. Luggage floorboard (left) 18. Luggage rear plate
19. Back door weather strip 20. Hook
Page 3247 of 3833

BODY SIDE TRIM
EI-27
C
D
E
F
G
H
J
K
L
MA
B
EI
CENTER PILLAR UPPER GARNISH
●Removing and installing the seat belt shoulder anchor. Refer to SB-3, "Removal and Installation of Front
Seat Belt"
●Removing and installing front and rear kick panels
●Removal and installation of center pillar lower garnish
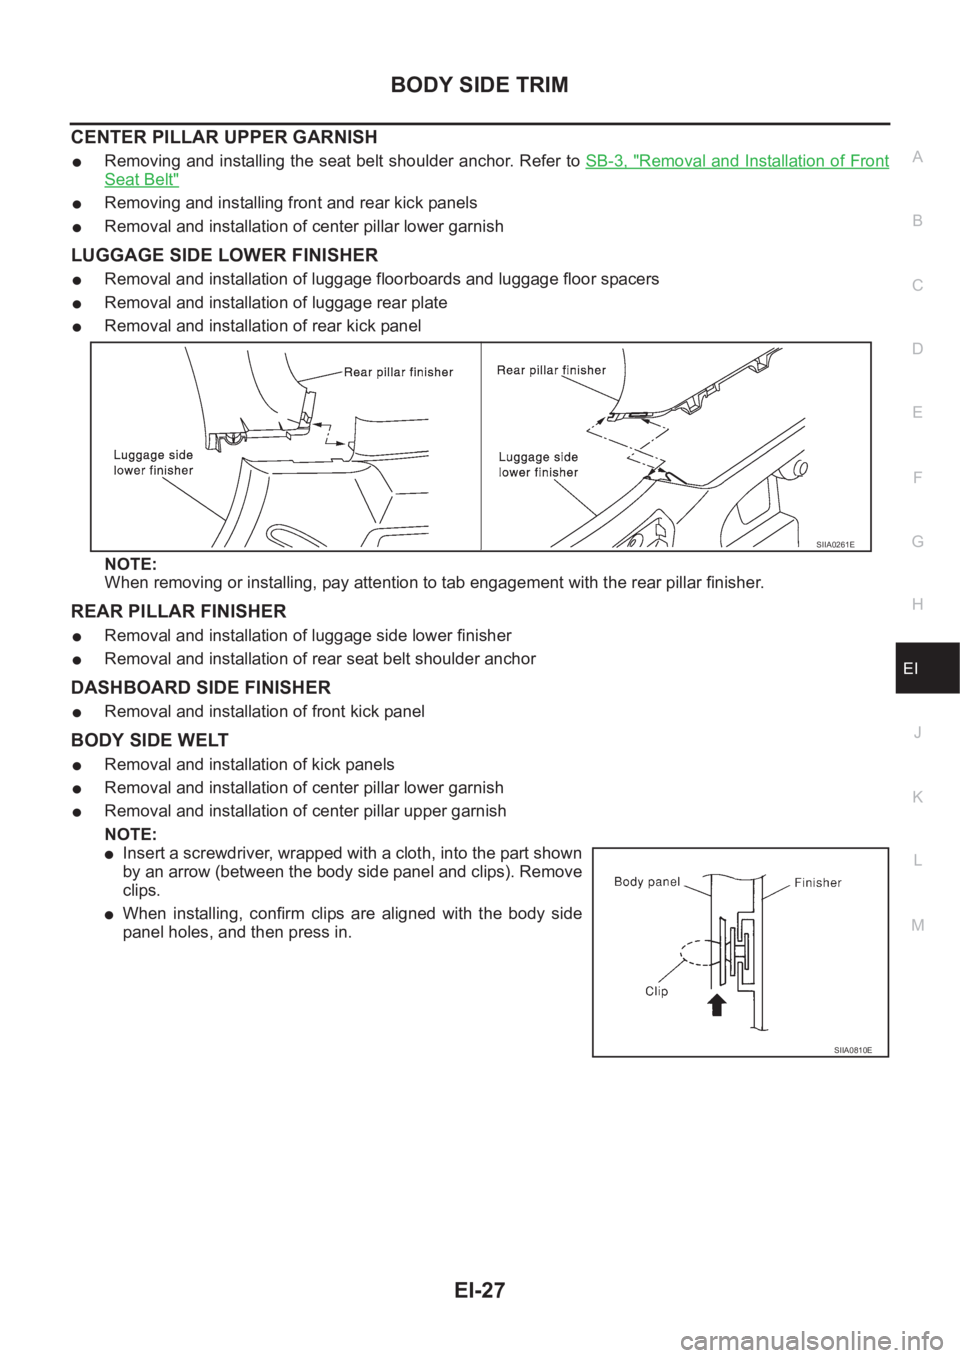
LUGGAGE SIDE LOWER FINISHER
●Removal and installation of luggage floorboards and luggage floor spacers
●Removal and installation of luggage rear plate
●Removal and installation of rear kick panel
NOTE:
When removing or installing, pay attention to tab engagement with the rear pillar finisher.
REAR PILLAR FINISHER
●Removal and installation of luggage side lower finisher
●Removal and installation of rear seat belt shoulder anchor
DASHBOARD SIDE FINISHER
●Removal and installation of front kick panel
BODY SIDE WELT
●Removal and installation of kick panels
●Removal and installation of center pillar lower garnish
●Removal and installation of center pillar upper garnish
NOTE:
●Insert a screwdriver, wrapped with a cloth, into the part shown
by an arrow (between the body side panel and clips). Remove
clips.
●When installing, confirm clips are aligned with the body side
panel holes, and then press in.
SIIA0261E
SIIA0810E
Page 3248 of 3833

EI-28
FLOOR TRIM
FLOOR TRIM
PFP:74902
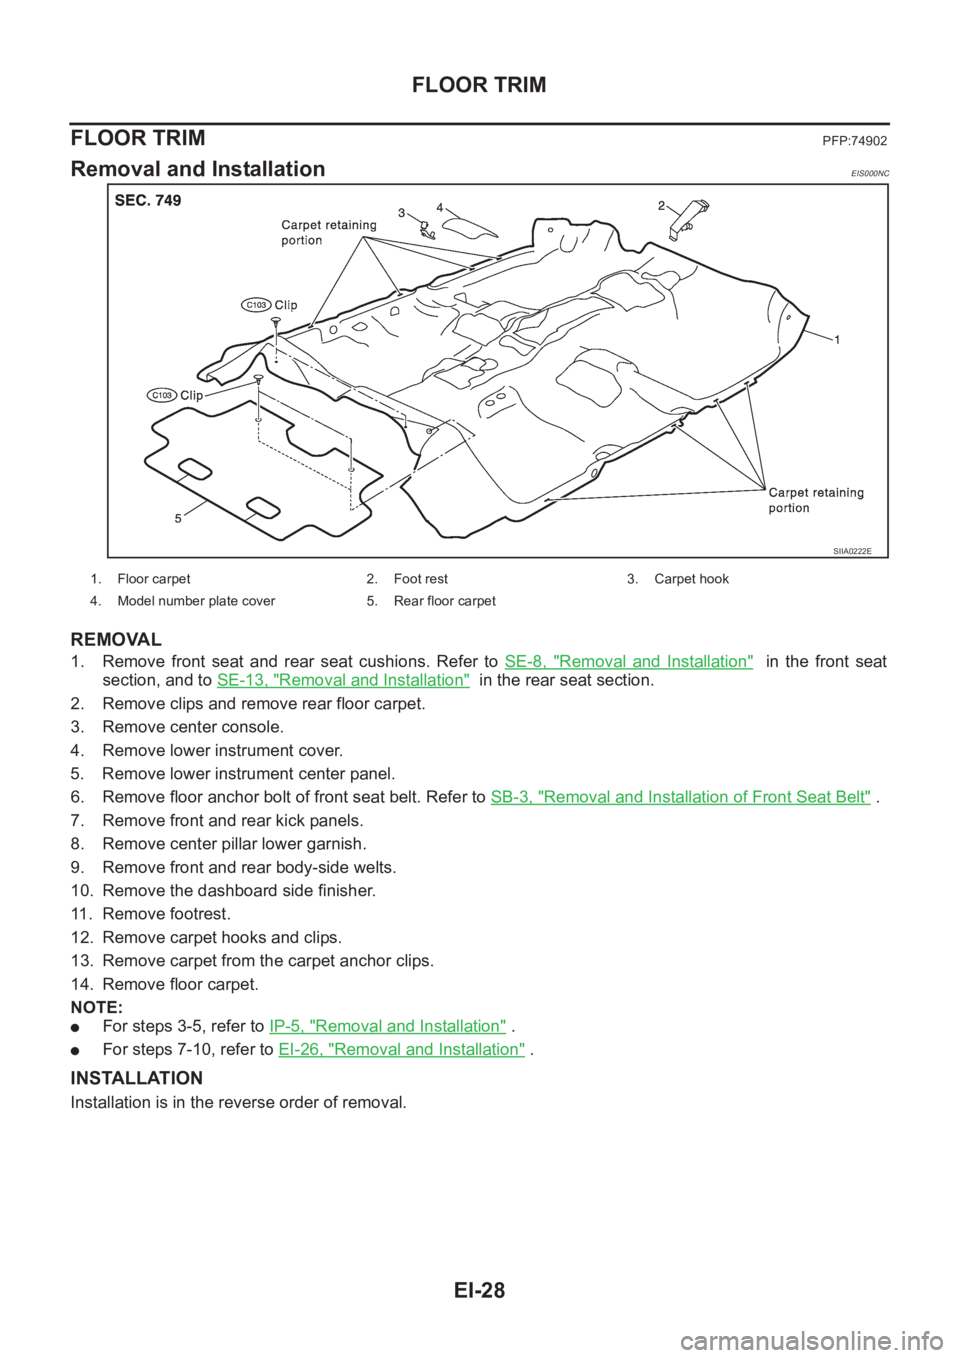
Removal and InstallationEIS000NC
REMOVAL
1. Remove front seat and rear seat cushions. Refer to SE-8, "Removal and Installation" in the front seat
section, and to SE-13, "
Removal and Installation" in the rear seat section.
2. Remove clips and remove rear floor carpet.
3. Remove center console.
4. Remove lower instrument cover.
5. Remove lower instrument center panel.
6. Remove floor anchor bolt of front seat belt. Refer to SB-3, "
Removal and Installation of Front Seat Belt" .
7. Remove front and rear kick panels.
8. Remove center pillar lower garnish.
9. Remove front and rear body-side welts.
10. Remove the dashboard side finisher.
11. Remove footrest.
12. Remove carpet hooks and clips.
13. Remove carpet from the carpet anchor clips.
14. Remove floor carpet.
NOTE:
●For steps 3-5, refer to IP-5, "Removal and Installation" .
●For steps 7-10, refer to EI-26, "Removal and Installation" .
INSTALLATION
Installation is in the reverse order of removal.
SIIA0222E
1. Floor carpet 2. Foot rest 3. Carpet hook
4. Model number plate cover 5. Rear floor carpet