horn NISSAN X-TRAIL 2001 Service Repair Manual
[x] Cancel search | Manufacturer: NISSAN, Model Year: 2001, Model line: X-TRAIL, Model: NISSAN X-TRAIL 2001Pages: 3833, PDF Size: 39.49 MB
Page 1 of 3833
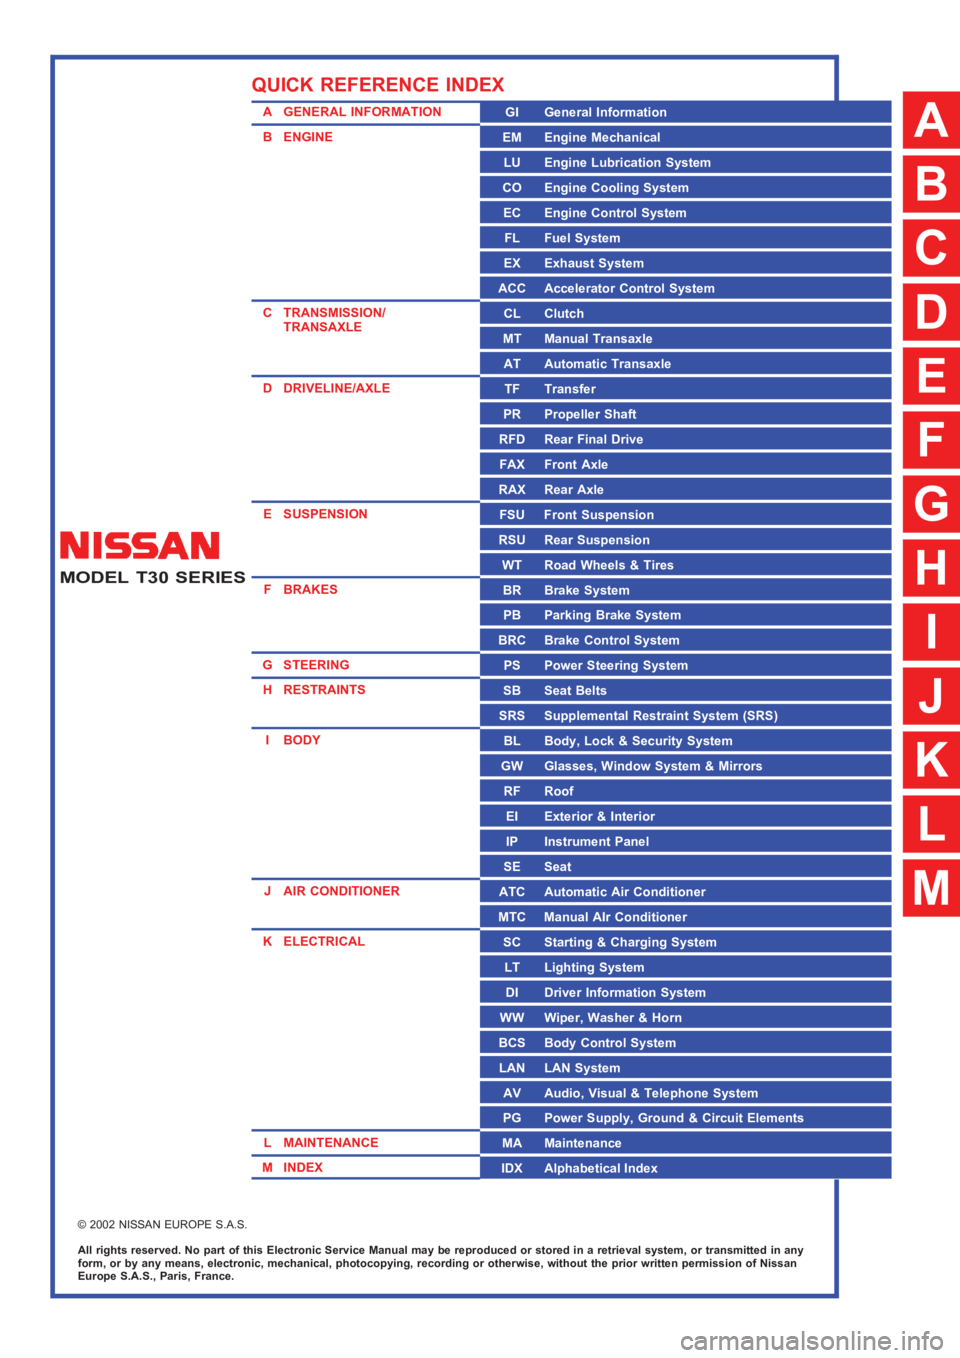
MODEL T30 SERIES
© 2002 NISSAN EUROPE S.A.S.
All rights reserved. No part of this Electronic Service Manual may be reproduced or stored in a retrieval system, or transmitted in any
form, or by any means, electronic, mechanical, photocopying, recording or otherwise, without the prior written permission of Nissan
Europe S.A.S., Paris, France.
A GENERAL INFORMATION
B ENGINE
C TRANSMISSION/
TRANSAXLE
D DRIVELINE/AXLE
E SUSPENSION
F BRAKES
G STEERING
H RESTRAINTS
IBODY
J AIR CONDITIONER
K ELECTRICAL
L MAINTENANCE
M INDEXGI General Information
EM Engine Mechanical
LU Engine Lubrication System
CO Engine Cooling System
EC Engine Control System
FL Fuel System
EX Exhaust System
ACC Accelerator Control System
CL Clutch
MT Manual Transaxle
AT Automatic Transaxle
TF Transfer
PR Propeller Shaft
RFD Rear Final Drive
FAX Front Axle
RAX Rear Axle
FSU Front Suspension
RSU Rear Suspension
WT Road Wheels & Tires
BR Brake System
PB Parking Brake System
BRC Brake Control System
PS Power Steering System
SB Seat Belts
SRS Supplemental Restraint System (SRS)
BL Body, Lock & Security System
GW Glasses, Window System & Mirrors
RF Roof
EI Exterior & Interior
IP Instrument Panel
SE Seat
ATC Automatic Air Conditioner
MTC Manual AIr Conditioner
SC Starting & Charging System
LT Lighting System
DI Driver Information System
WW Wiper, Washer & Horn
BCS Body Control System
LAN LAN System
AV Audio, Visual & Telephone System
PG Power Supply, Ground & Circuit Elements
MA Maintenance
IDX Alphabetical Index
QUICK REFERENCE INDEX
A
B
C
D
E
F
G
H
I
J
K
L
M
Page 319 of 3833
![NISSAN X-TRAIL 2001 Service Repair Manual RADIATOR
CO-13
[QR]
C
D
E
F
G
H
I
J
K
L
MA
CO
●Check radiator cap relief pressure.
●When connecting the radiator cap to the tester, apply engine
coolant to the cap seal part.
●Replace NISSAN X-TRAIL 2001 Service Repair Manual RADIATOR
CO-13
[QR]
C
D
E
F
G
H
I
J
K
L
MA
CO
●Check radiator cap relief pressure.
●When connecting the radiator cap to the tester, apply engine
coolant to the cap seal part.
●Replace](/img/5/57405/w960_57405-318.png)
RADIATOR
CO-13
[QR]
C
D
E
F
G
H
I
J
K
L
MA
CO
●Check radiator cap relief pressure.
●When connecting the radiator cap to the tester, apply engine
coolant to the cap seal part.
●Replace the radiator cap if there is an unusualness in the nega-
tive-pressure valve, or if the open-valve pressure is outside of
the standard values.
Checking RadiatorEBS00KOL
Check radiator for mud or clogging. If necessary, clean radiator as follows.
●Be careful not to bend or damage the radiator fins.
●When radiator is cleaned without removal, remove all surrounding parts such as cooling fan, radiator
shroud and horns. Then tape the harness and connectors to prevent water from entering.
1. Apply water by hose to the back side of the radiator core vertically downwards.
2. Apply water again to all radiator core surface once per minute.
3. Stop washing if any stains no longer flow out from the radiator.
4. Blow air into the back side of radiator core vertically downwards.
●Use compressed air lower than 490 kPa (4.9 bar, 5 kg/cm2 , 71psi) and keep distance more than 30 cm
(11.8 in).
5. Blow air again into all the radiator core surface once per minute until no water sprays out. Standard:
78 - 98 kPa (0.78 - 0.98 bar, 0.8 - 1.0 kg/cm
2 , 11 - 14 psi)
Limit:
59 kPa (0.59 bar, 0.6 kg/cm
2 , 9 psi)
SLC135B
Page 340 of 3833
![NISSAN X-TRAIL 2001 Service Repair Manual CO-34
[YD22DDTi]
RADIATOR
●Check radiator cap relief pressure.
●When connecting the radiator cap to the tester, apply engine
coolant to the cap seal part.
●Replace the radiator cap if NISSAN X-TRAIL 2001 Service Repair Manual CO-34
[YD22DDTi]
RADIATOR
●Check radiator cap relief pressure.
●When connecting the radiator cap to the tester, apply engine
coolant to the cap seal part.
●Replace the radiator cap if](/img/5/57405/w960_57405-339.png)
CO-34
[YD22DDTi]
RADIATOR
●Check radiator cap relief pressure.
●When connecting the radiator cap to the tester, apply engine
coolant to the cap seal part.
●Replace the radiator cap if there is an unusualness in the nega-
tive-pressure valve, or if the open-valve pressure is outside of
the standard values.
Checking RadiatorEBS00BRH
Check radiator for mud or clogging. If necessary, clean radiator as follows.
●Be careful not to bend or damage the radiator fins.
●When radiator is cleaned without removal, remove all surrounding parts such as cooling fan, radiator
shroud and horns. Then tape the harness and connectors to prevent water from entering.
1. Apply water by hose to the back side of the radiator core vertically downwards.
2. Apply water again to all radiator core surface once per minute.
3. Stop washing if any stains no longer flow out from the radiator.
4. Blow air into the back side of radiator core vertically downwards.
●Use compressed air lower than 490 kPa (4.9 bar 5 kg/cm2 , 71psi) and keep distance more than 30
cm(11.8 in).
5. Blow air again into all the radiator core surface once per minute until no water sprays out. Standard : 78 - 98 kPa (0.78 - 0.98 bar, 0.8 - 1.0 kg/
cm
2 , 11 - 14 psi)
Limit : 59 kPa (0.59 bar, 0.6 kg/cm
2 , 9 psi)
SLC135B
Page 2917 of 3833
STEERING WHEEL
PS-7
C
D
E
F
H
I
J
K
L
MA
B
PS
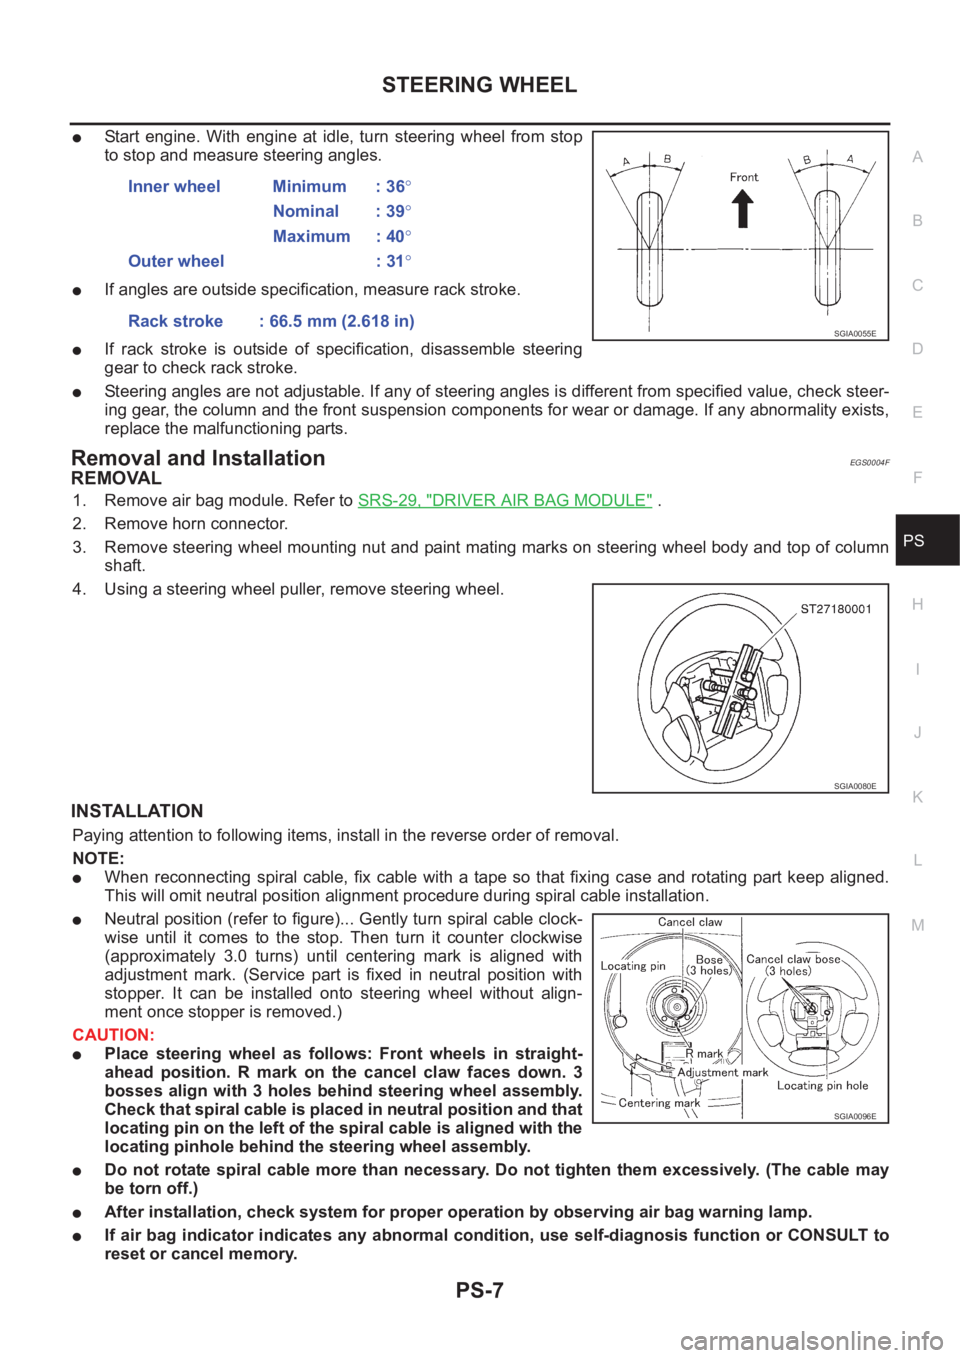
●Start engine. With engine at idle, turn steering wheel from stop
to stop and measure steering angles.
●If angles are outside specification, measure rack stroke.
●If rack stroke is outside of specification, disassemble steering
gear to check rack stroke.
●Steering angles are not adjustable. If any of steering angles is different from specified value, check steer-
ing gear, the column and the front suspension components for wear or damage. If any abnormality exists,
replace the malfunctioning parts.
Removal and InstallationEGS0004F
REMOVAL
1. Remove air bag module. Refer to SRS-29, "DRIVER AIR BAG MODULE" .
2. Remove horn connector.
3. Remove steering wheel mounting nut and paint mating marks on steering wheel body and top of column
shaft.
4. Using a steering wheel puller, remove steering wheel.
INSTALLATION
Paying attention to following items, install in the reverse order of removal.
NOTE:
●When reconnecting spiral cable, fix cable with a tape so that fixing case and rotating part keep aligned.
This will omit neutral position alignment procedure during spiral cable installation.
●Neutral position (refer to figure)... Gently turn spiral cable clock-
wise until it comes to the stop. Then turn it counter clockwise
(approximately 3.0 turns) until centering mark is aligned with
adjustment mark. (Service part is fixed in neutral position with
stopper. It can be installed onto steering wheel without align-
ment once stopper is removed.)
CAUTION:
●Place steering wheel as follows: Front wheels in straight-
ahead position. R mark on the cancel claw faces down. 3
bosses align with 3 holes behind steering wheel assembly.
Check that spiral cable is placed in neutral position and that
locating pin on the left of the spiral cable is aligned with the
locating pinhole behind the steering wheel assembly.
●Do not rotate spiral cable more than necessary. Do not tighten them excessively. (The cable may
be torn off.)
●After installation, check system for proper operation by observing air bag warning lamp.
●If air bag indicator indicates any abnormal condition, use self-diagnosis function or CONSULT to
reset or cancel memory.Inner wheel Minimum : 36°
Nominal : 39°
Maximum : 40°
Outer wheel : 31°
Rack stroke : 66.5 mm (2.618 in)
SGIA0055E
SGIA0080E
SGIA0096E
Page 3032 of 3833
SRS-30
DRIVER AIR BAG MODULE
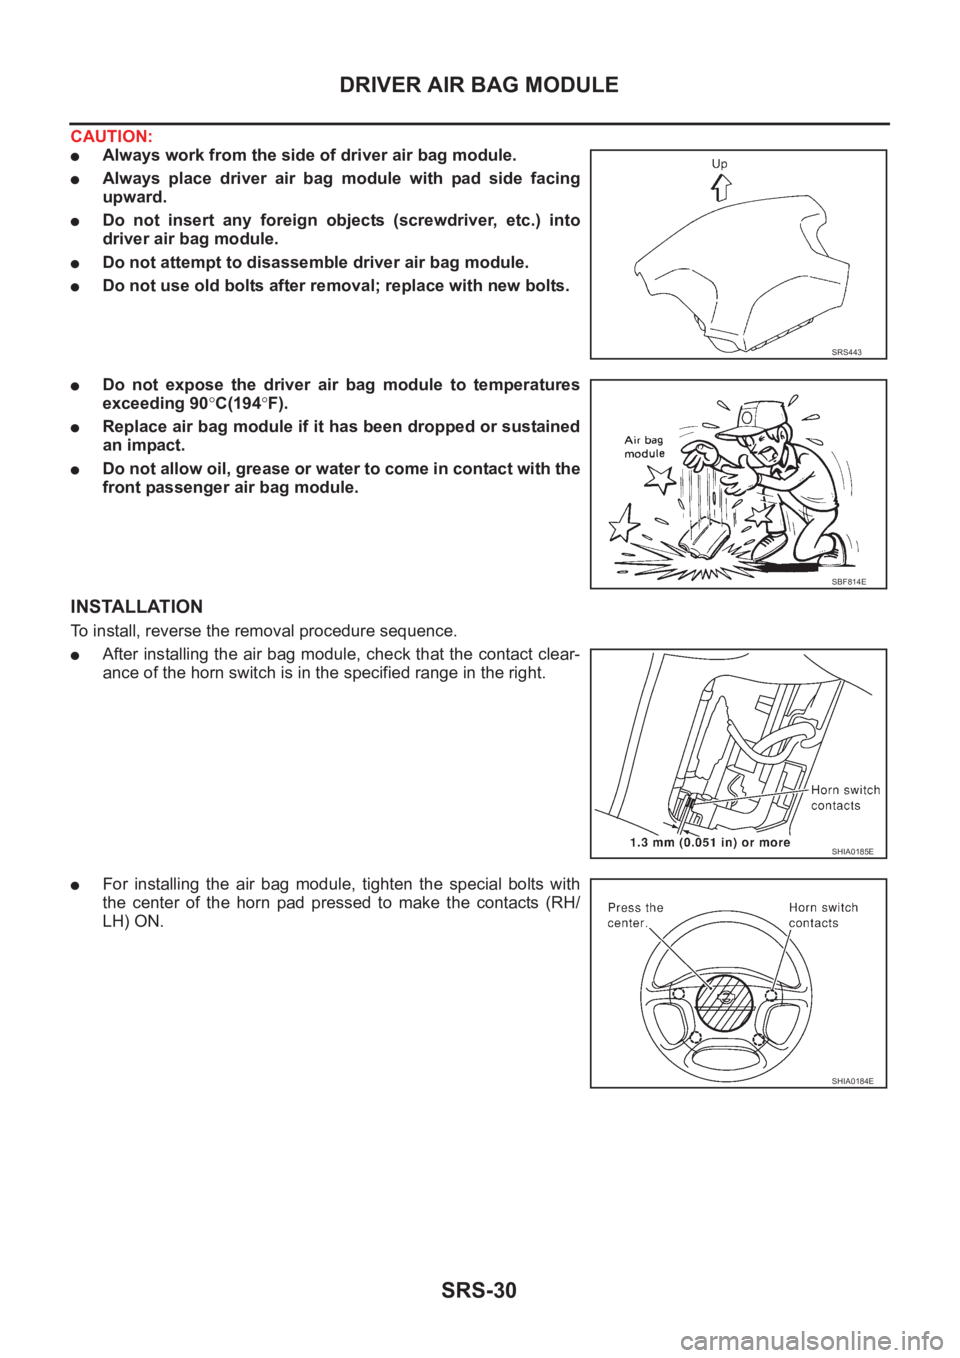
CAUTION:
●Always work from the side of driver air bag module.
●Always place driver air bag module with pad side facing
upward.
●Do not insert any foreign objects (screwdriver, etc.) into
driver air bag module.
●Do not attempt to disassemble driver air bag module.
●Do not use old bolts after removal; replace with new bolts.
●Do not expose the driver air bag module to temperatures
exceeding 90°C(194°F).
●Replace air bag module if it has been dropped or sustained
an impact.
●Do not allow oil, grease or water to come in contact with the
front passenger air bag module.
INSTALLATION
To install, reverse the removal procedure sequence.
●After installing the air bag module, check that the contact clear-
ance of the horn switch is in the specified range in the right.
●For installing the air bag module, tighten the special bolts with
the center of the horn pad pressed to make the contacts (RH/
LH) ON.
SRS443
SBF814E
SHIA0185E
SHIA0184E
Page 3035 of 3833
SPIRAL CABLE
SRS-33
C
D
E
F
G
I
J
K
L
MA
B
SRS
SPIRAL CABLEPFP:25554
Removal and InstallationEHS000D8
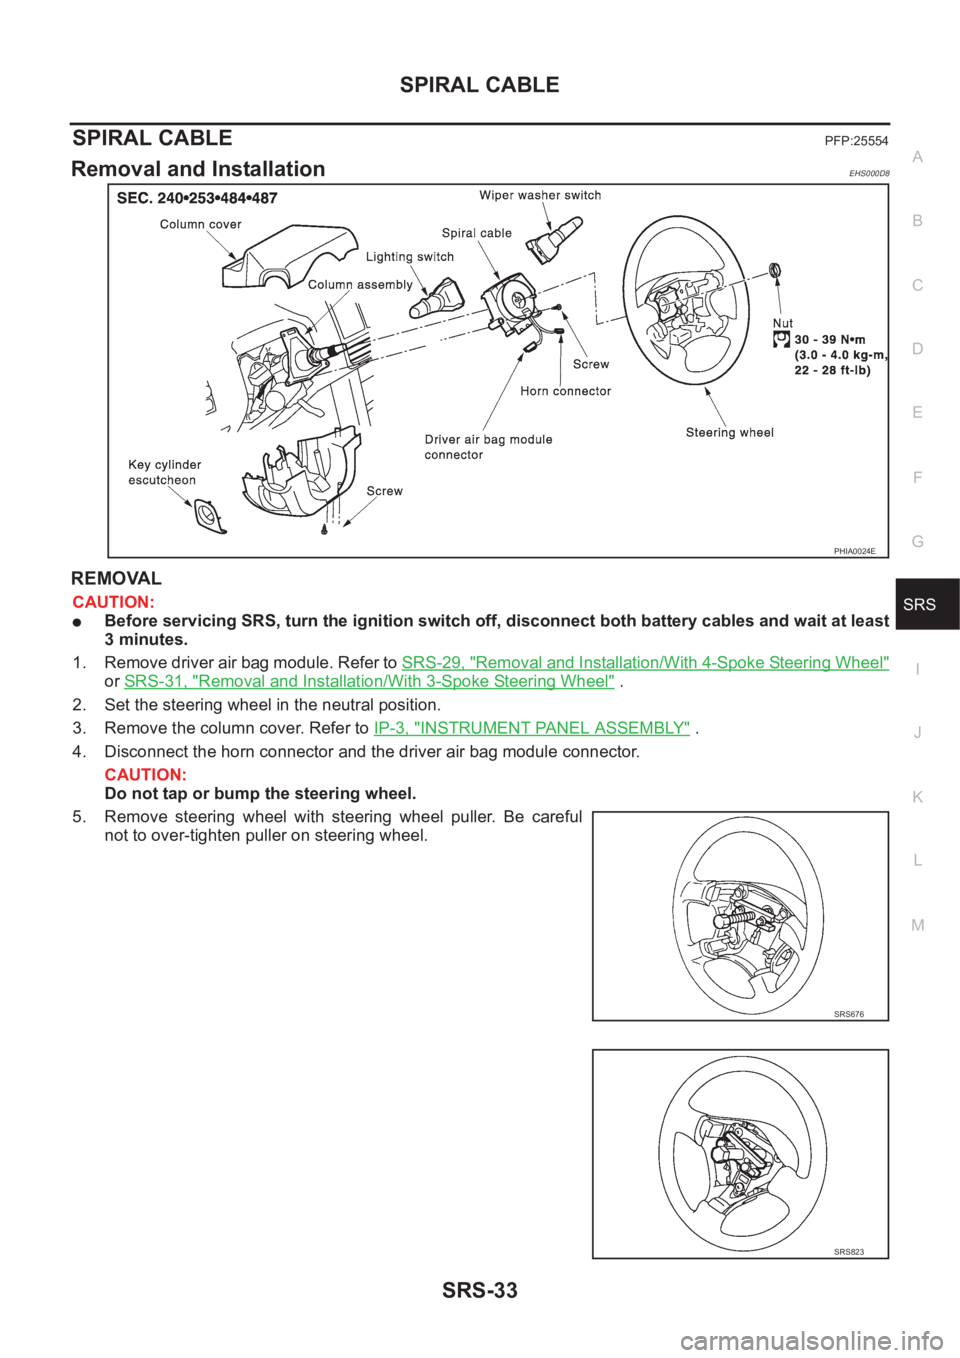
REMOVAL
CAUTION:
●Before servicing SRS, turn the ignition switch off, disconnect both battery cables and wait at least
3 minutes.
1. Remove driver air bag module. Refer to SRS-29, "
Removal and Installation/With 4-Spoke Steering Wheel"
or SRS-31, "Removal and Installation/With 3-Spoke Steering Wheel" .
2. Set the steering wheel in the neutral position.
3. Remove the column cover. Refer to IP-3, "
INSTRUMENT PANEL ASSEMBLY" .
4. Disconnect the horn connector and the driver air bag module connector.
CAUTION:
Do not tap or bump the steering wheel.
5. Remove steering wheel with steering wheel puller. Be careful
not to over-tighten puller on steering wheel.
PHIA0024E
SRS676
SRS823
Page 3036 of 3833
SRS-34
SPIRAL CABLE
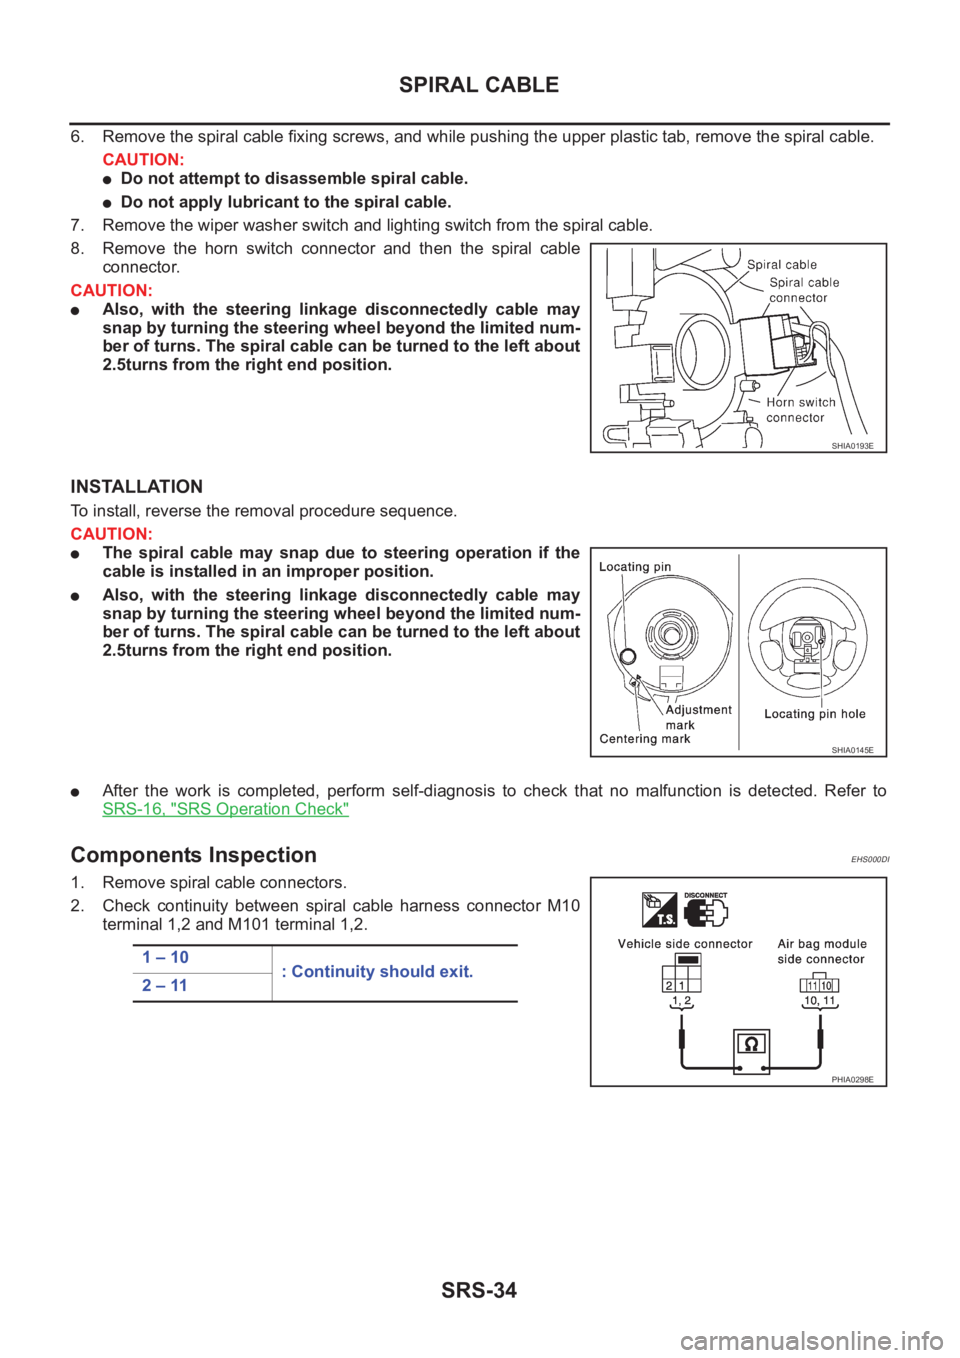
6. Remove the spiral cable fixing screws, and while pushing the upper plastic tab, remove the spiral cable.
CAUTION:
●Do not attempt to disassemble spiral cable.
●Do not apply lubricant to the spiral cable.
7. Remove the wiper washer switch and lighting switch from the spiral cable.
8. Remove the horn switch connector and then the spiral cable
connector.
CAUTION:
●Also, with the steering linkage disconnectedly cable may
snap by turning the steering wheel beyond the limited num-
ber of turns. The spiral cable can be turned to the left about
2.5turns from the right end position.
INSTALLATION
To install, reverse the removal procedure sequence.
CAUTION:
●The spiral cable may snap due to steering operation if the
cable is installed in an improper position.
●Also, with the steering linkage disconnectedly cable may
snap by turning the steering wheel beyond the limited num-
ber of turns. The spiral cable can be turned to the left about
2.5turns from the right end position.
●After the work is completed, perform self-diagnosis to check that no malfunction is detected. Refer to
SRS-16, "
SRS Operation Check"
Components InspectionEHS000DI
1. Remove spiral cable connectors.
2. Check continuity between spiral cable harness connector M10
terminal 1,2 and M101 terminal 1,2.
SHIA0193E
SHIA0145E
1 – 10
: Continuity should exit.
2 – 11
PHIA0298E
Page 3534 of 3833
LT-44
COMBINATION SWITCH
COMBINATION SWITCH
PFP:25567
Removal and InstallationEKS001V6
Refer to SRS-33, "SPIRAL CABLE" in "SUPPLEMENTAL RESTRAINT SYSTEM (SRS)" section for details.
Switch Circuit InspectionEKS001V7
Refer to LT- 2 4 , "Switch Circuit Inspection" in "LIGHTING AND TURN SIGNAL SWITCH" section, and WW-7,
"Terminal and Reference Values for Combination Switch" , WW-15, "Terminal and Reference Values for Com-
bination Switch" in“ WW Wiper/Washer Horn” section for details.
Page 3629 of 3833
WW-1
WIPER, WASHER & HORN
K ELECTRICAL
CONTENTS
C
D
E
F
G
H
I
J
L
M
SECTION
A
B
WW
WIPER, WASHER & HORN
PRECAUTIONS .......................................................... 3
Precautions for Supplemental Restraint System
(SRS) “AIR BAG” and “SEAT BELT PRE-TEN-
SIONER” .................................................................. 3
Wiring Diagrams and Trouble Diagnosis .................. 3
FRONT WIPER AND WASHER SYSTEM .................. 4
System Description .................................................. 4
WIPER OPERATION ............................................ 4
WASHER OPERATION ......................................... 4
Wiring Diagram — WIPER — .................................. 6
Terminal and Reference Values for Combination
Switch ....................................................................... 7
Removal and Installation for Front Wiper Arms,
Adjustment for Wiper Arms Stop Location ............... 7
Removal and Installation for Wiper Motor and Link-
age ........................................................................... 8
REMOVAL ............................................................. 9
INSTALLATION ..................................................... 9
Washer Nozzle Adjustment .................................... 10
Washer Tube Layout .............................................. 10
Removal and Installation for Washer Nozzle .......... 11
REMOVAL ............................................................ 11
INSTALLATION .................................................... 11
Inspection for Washer Nozzle ................................. 11
CHECK VALVE .................................................... 11
Removal and Installation for Wiper and Washer
Switch ...................................................................... 11
REMOVAL ............................................................ 11
INSTALLATION .................................................... 11
Removal and Installation for Washer Tank ............. 12
Removal and Installation for Washer Pump ........... 12
REAR WIPER AND WASHER SYSTEM .................. 13
Wiring Diagram — WIP/R — .................................. 13
Terminal and Reference Values for Combination
Switch ..................................................................... 15
Removal and Installation for Rear Wiper Arms ...... 15
WIPER ARMS ..................................................... 15
Removal and Installation for Wiper Motor and Link-
age ......................................................................... 16REMOVAL ........................................................... 16
INSTALLATION ................................................... 16
Washer Nozzle Adjustment .................................... 17
Removal and Installation for Rear Washer Nozzle ... 17
REMOVAL ........................................................... 17
INSTALLATION ................................................... 17
Inspection for Washer Nozzle ................................. 17
CHECK VALVE .................................................... 17
Removal and Installation for Wiper and Washer
Switch ..................................................................... 18
Removal and Installation for Washer Tank ............. 18
Removal and Installation for Washer Pump ........... 18
Washer Tube Layout .............................................. 18
HEADLAMP WASHER ............................................. 19
System Description ................................................. 19
Wiring Diagram –HLC– ........................................... 20
Removal and Installation for Washer Nozzle .......... 21
REMOVAL ........................................................... 21
INSTALLATION ................................................... 21
Inspection for Washer Nozzle ................................. 21
CHECK VALVE .................................................... 21
Removal and Installation for Washer Tank ............. 21
Removal and Installation for Washer Pump ........... 21
Washer Tube Layout .............................................. 22
HORN ........................................................................ 23
Wiring Diagram — HORN — .................................. 23
Removal and Installation ........................................ 24
REMOVAL ........................................................... 24
INSTALLATION ................................................... 24
CIGARETTE LIGHTER ............................................. 25
Wiring Diagram — CIGAR — ................................. 25
Removal and Installation ........................................ 26
REMOVAL ........................................................... 26
INSTALLATION ................................................... 26
POWER SOCKET ..................................................... 27
Wiring Diagram –POWER SOCKET– .................... 27
Removal and Installation for Front Power Socket ... 28
REMOVAL ........................................................... 28
Page 3651 of 3833
HORN
WW-23
C
D
E
F
G
H
I
J
L
MA
B
WW
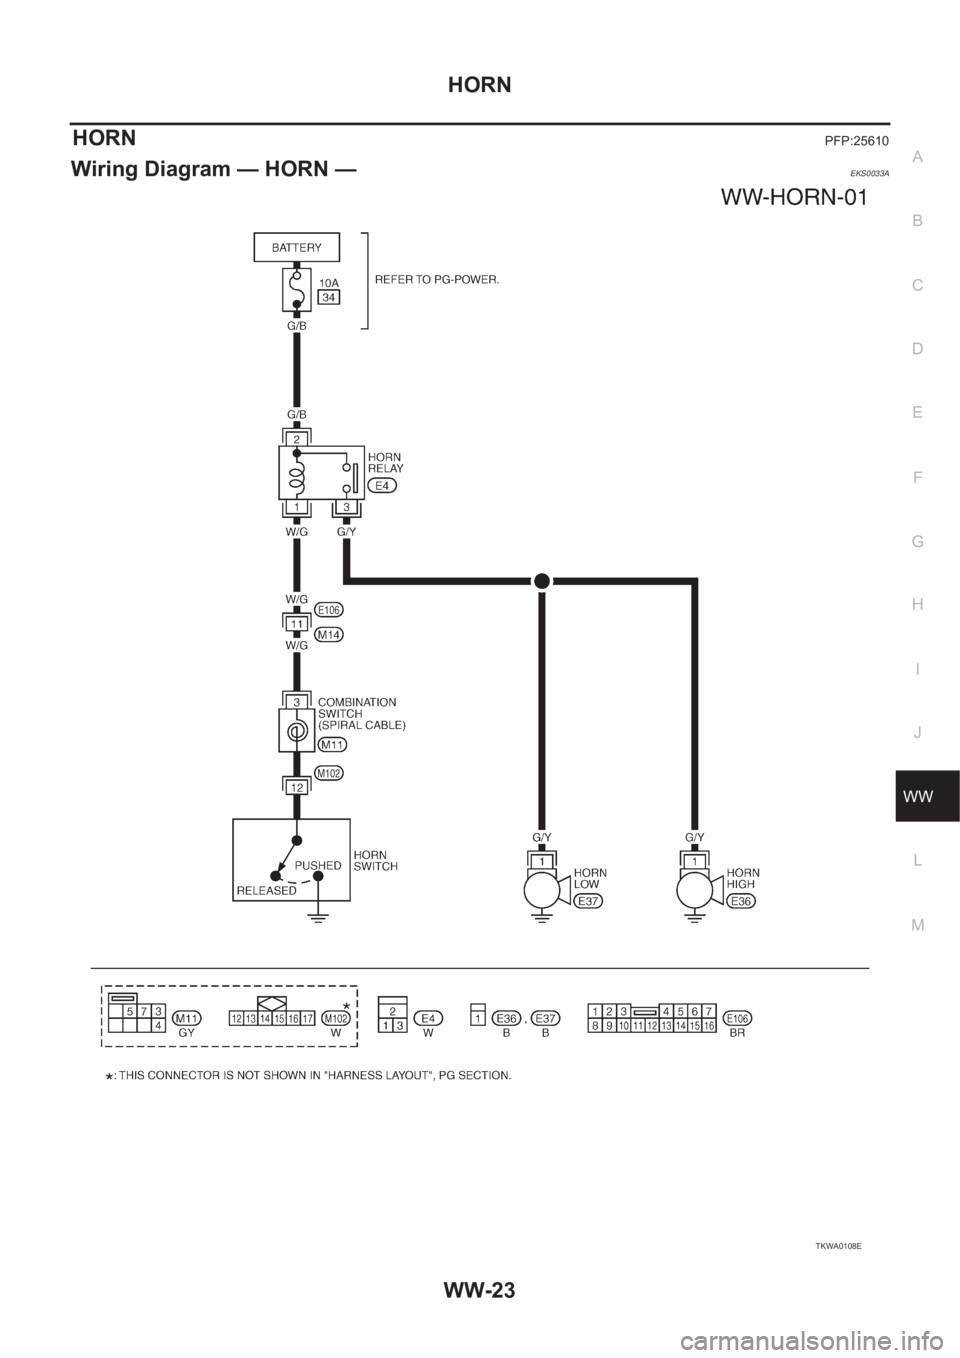
HORNPFP:25610
Wiring Diagram — HORN —EKS0033A
TKWA0108E