washer nozzle NISSAN X-TRAIL 2001 Service Repair Manual
[x] Cancel search | Manufacturer: NISSAN, Model Year: 2001, Model line: X-TRAIL, Model: NISSAN X-TRAIL 2001Pages: 3833, PDF Size: 39.49 MB
Page 3160 of 3833
GW-8
BACK DOOR WINDOW GLASS
BACK DOOR WINDOW GLASS
PFP:90300
Removal and InstallationEIS0045K
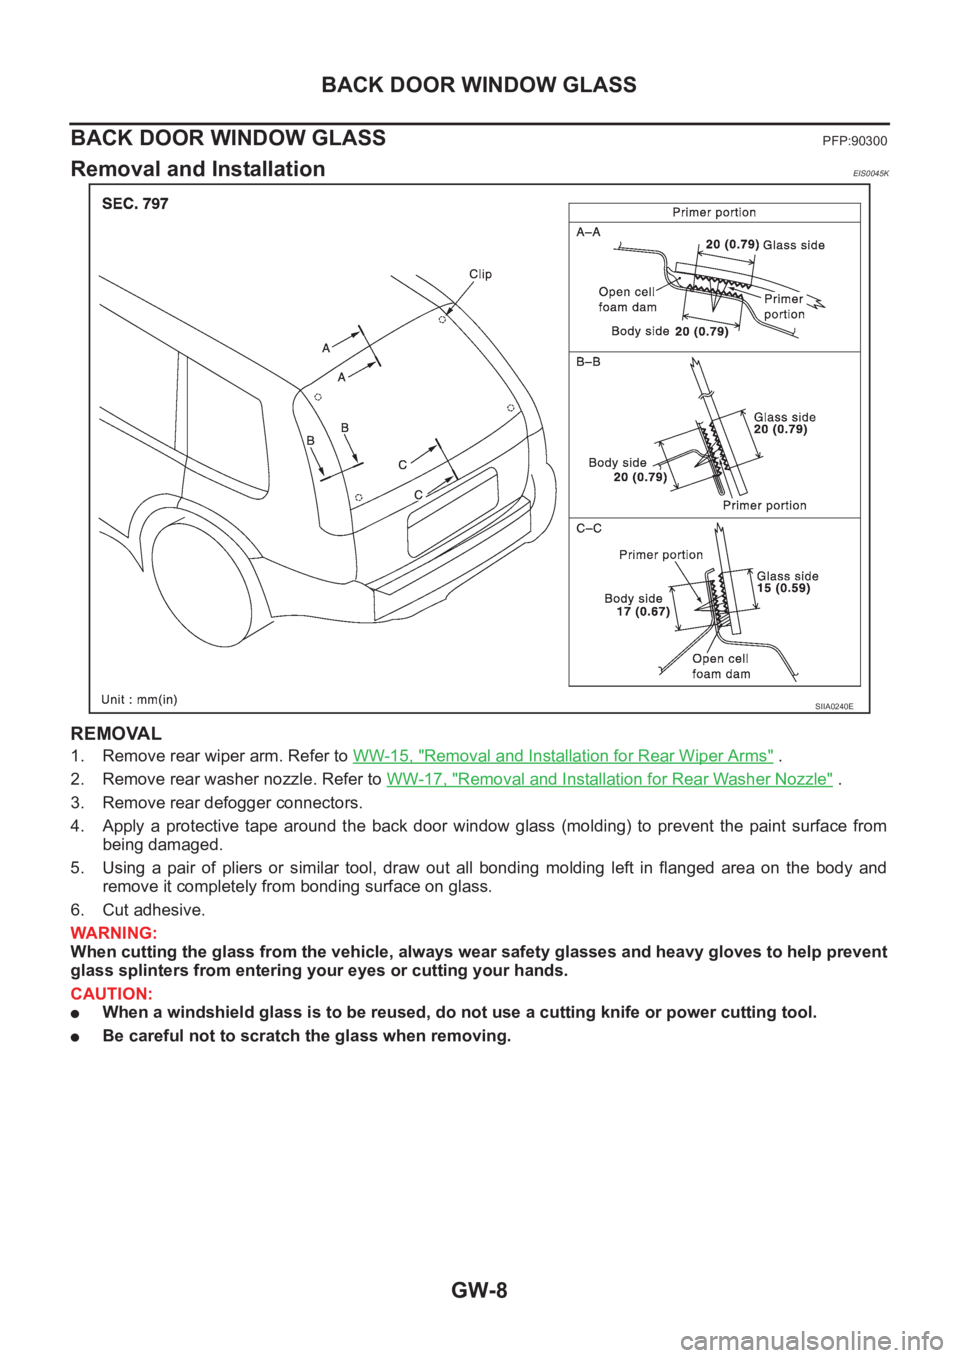
REMOVAL
1. Remove rear wiper arm. Refer to WW-15, "Removal and Installation for Rear Wiper Arms" .
2. Remove rear washer nozzle. Refer to WW-17, "
Removal and Installation for Rear Washer Nozzle" .
3. Remove rear defogger connectors.
4. Apply a protective tape around the back door window glass (molding) to prevent the paint surface from
being damaged.
5. Using a pair of pliers or similar tool, draw out all bonding molding left in flanged area on the body and
remove it completely from bonding surface on glass.
6. Cut adhesive.
WARNING:
When cutting the glass from the vehicle, always wear safety glasses and heavy gloves to help prevent
glass splinters from entering your eyes or cutting your hands.
CAUTION:
●When a windshield glass is to be reused, do not use a cutting knife or power cutting tool.
●Be careful not to scratch the glass when removing.
SIIA0240E
Page 3629 of 3833
WW-1
WIPER, WASHER & HORN
K ELECTRICAL
CONTENTS
C
D
E
F
G
H
I
J
L
M
SECTION
A
B
WW
WIPER, WASHER & HORN
PRECAUTIONS .......................................................... 3
Precautions for Supplemental Restraint System
(SRS) “AIR BAG” and “SEAT BELT PRE-TEN-
SIONER” .................................................................. 3
Wiring Diagrams and Trouble Diagnosis .................. 3
FRONT WIPER AND WASHER SYSTEM .................. 4
System Description .................................................. 4
WIPER OPERATION ............................................ 4
WASHER OPERATION ......................................... 4
Wiring Diagram — WIPER — .................................. 6
Terminal and Reference Values for Combination
Switch ....................................................................... 7
Removal and Installation for Front Wiper Arms,
Adjustment for Wiper Arms Stop Location ............... 7
Removal and Installation for Wiper Motor and Link-
age ........................................................................... 8
REMOVAL ............................................................. 9
INSTALLATION ..................................................... 9
Washer Nozzle Adjustment .................................... 10
Washer Tube Layout .............................................. 10
Removal and Installation for Washer Nozzle .......... 11
REMOVAL ............................................................ 11
INSTALLATION .................................................... 11
Inspection for Washer Nozzle ................................. 11
CHECK VALVE .................................................... 11
Removal and Installation for Wiper and Washer
Switch ...................................................................... 11
REMOVAL ............................................................ 11
INSTALLATION .................................................... 11
Removal and Installation for Washer Tank ............. 12
Removal and Installation for Washer Pump ........... 12
REAR WIPER AND WASHER SYSTEM .................. 13
Wiring Diagram — WIP/R — .................................. 13
Terminal and Reference Values for Combination
Switch ..................................................................... 15
Removal and Installation for Rear Wiper Arms ...... 15
WIPER ARMS ..................................................... 15
Removal and Installation for Wiper Motor and Link-
age ......................................................................... 16REMOVAL ........................................................... 16
INSTALLATION ................................................... 16
Washer Nozzle Adjustment .................................... 17
Removal and Installation for Rear Washer Nozzle ... 17
REMOVAL ........................................................... 17
INSTALLATION ................................................... 17
Inspection for Washer Nozzle ................................. 17
CHECK VALVE .................................................... 17
Removal and Installation for Wiper and Washer
Switch ..................................................................... 18
Removal and Installation for Washer Tank ............. 18
Removal and Installation for Washer Pump ........... 18
Washer Tube Layout .............................................. 18
HEADLAMP WASHER ............................................. 19
System Description ................................................. 19
Wiring Diagram –HLC– ........................................... 20
Removal and Installation for Washer Nozzle .......... 21
REMOVAL ........................................................... 21
INSTALLATION ................................................... 21
Inspection for Washer Nozzle ................................. 21
CHECK VALVE .................................................... 21
Removal and Installation for Washer Tank ............. 21
Removal and Installation for Washer Pump ........... 21
Washer Tube Layout .............................................. 22
HORN ........................................................................ 23
Wiring Diagram — HORN — .................................. 23
Removal and Installation ........................................ 24
REMOVAL ........................................................... 24
INSTALLATION ................................................... 24
CIGARETTE LIGHTER ............................................. 25
Wiring Diagram — CIGAR — ................................. 25
Removal and Installation ........................................ 26
REMOVAL ........................................................... 26
INSTALLATION ................................................... 26
POWER SOCKET ..................................................... 27
Wiring Diagram –POWER SOCKET– .................... 27
Removal and Installation for Front Power Socket ... 28
REMOVAL ........................................................... 28
Page 3638 of 3833
WW-10
FRONT WIPER AND WASHER SYSTEM
Washer Nozzle Adjustment
EKS0032S
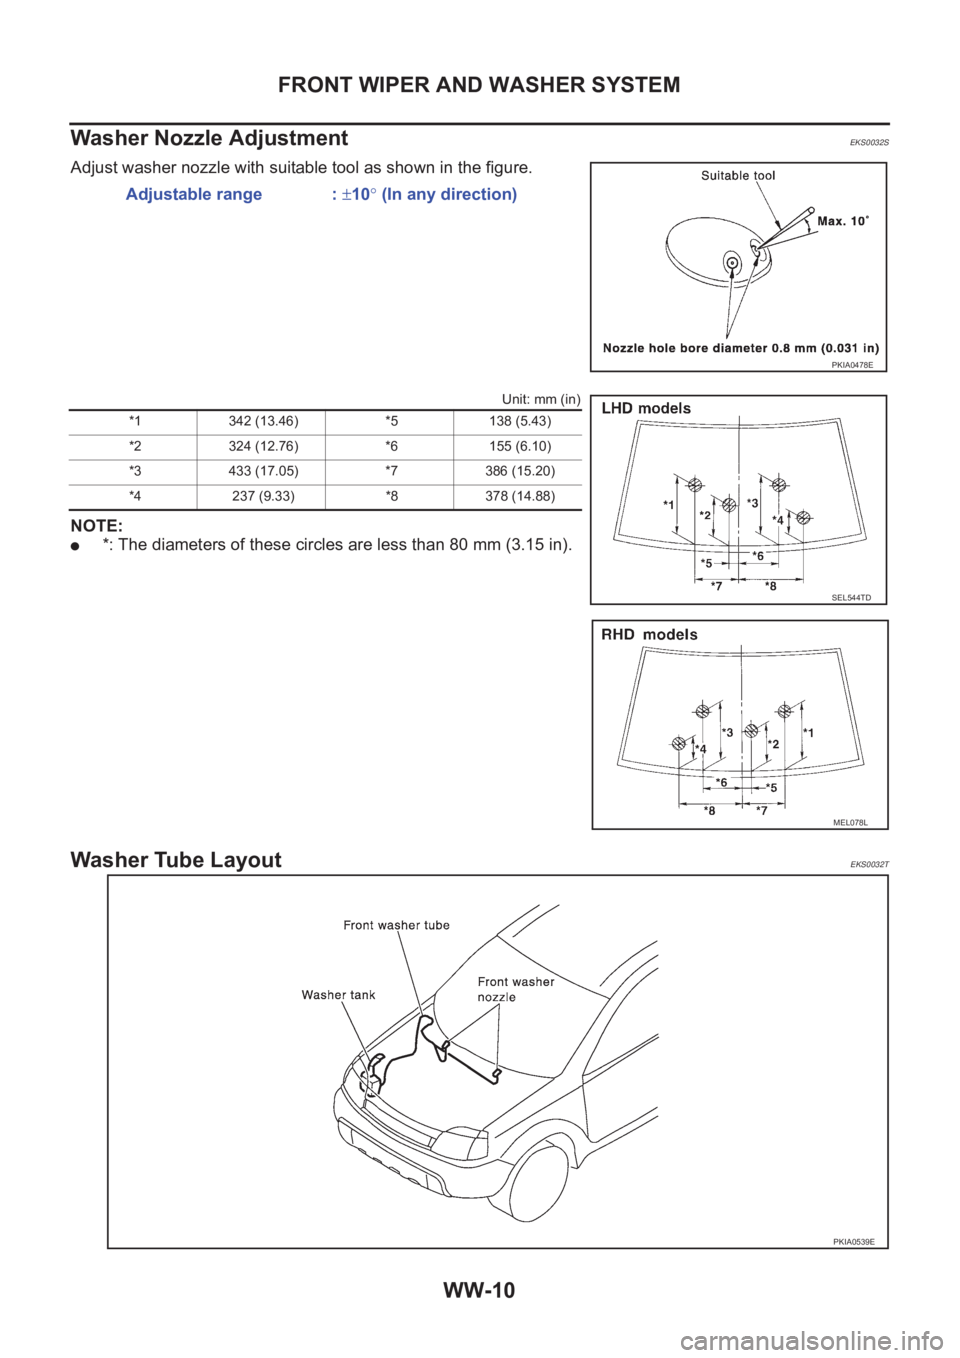
Adjust washer nozzle with suitable tool as shown in the figure.
Unit: mm (in)
NOTE:
●*: The diameters of these circles are less than 80 mm (3.15 in).
Washer Tube LayoutEKS0032T
Adjustable range : ±10° (In any direction)
PKIA0478E
*1 342 (13.46) *5 138 (5.43)
*2 324 (12.76) *6 155 (6.10)
*3 433 (17.05) *7 386 (15.20)
*4 237 (9.33) *8 378 (14.88)
SEL544TD
MEL078L
PKIA0539E
Page 3639 of 3833
FRONT WIPER AND WASHER SYSTEM
WW-11
C
D
E
F
G
H
I
J
L
MA
B
WW
Removal and Installation for Washer Nozzle EKS0032U
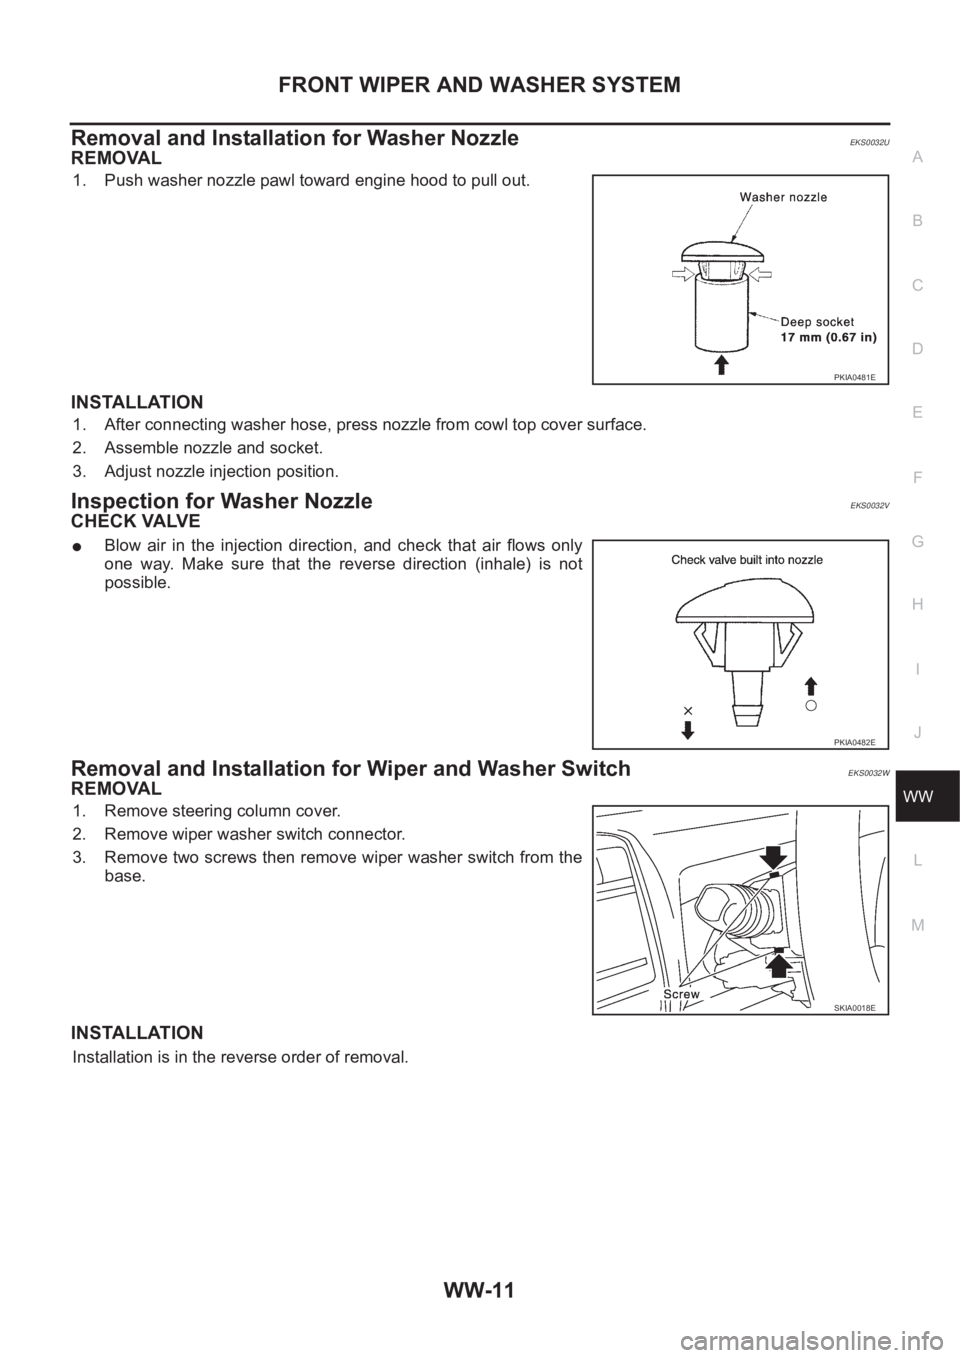
REMOVAL
1. Push washer nozzle pawl toward engine hood to pull out.
INSTALLATION
1. After connecting washer hose, press nozzle from cowl top cover surface.
2. Assemble nozzle and socket.
3. Adjust nozzle injection position.
Inspection for Washer Nozzle EKS0032V
CHECK VALVE
●Blow air in the injection direction, and check that air flows only
one way. Make sure that the reverse direction (inhale) is not
possible.
Removal and Installation for Wiper and Washer Switch EKS0032W
REMOVAL
1. Remove steering column cover.
2. Remove wiper washer switch connector.
3. Remove two screws then remove wiper washer switch from the
base.
INSTALLATION
Installation is in the reverse order of removal.
PKIA0481E
PKIA0482E
SKIA0018E
Page 3645 of 3833

REAR WIPER AND WASHER SYSTEM
WW-17
C
D
E
F
G
H
I
J
L
MA
B
WW
Washer Nozzle AdjustmentEKS00333
●Adjust washer nozzle with suitable tool as shown in the figure at left.
Unit: mm (in)
*: The diameter of this circle is less than 40 mm ( 1.57in).
Removal and Installation for Rear Washer Nozzle EKS00334
REMOVAL
1. Remove washer hose from washer nozzle.
2. Remove washer nozzle installation screw and remove washer
nozzle.
INSTALLATION
1. After connecting washer hose, press nozzle from cowl top cover surface.
2. Assemble nozzle and socket.
3. Adjust nozzle injection position.
Inspection for Washer Nozzle EKS00335
CHECK VALVE
●Blow air in the injection direction, and check that air flows only
one way. Make sure that the reverse direction (inhale) is not
possible. Adjustable range : ±10° (In any direction)
PKIA0487E
*H 90 (3.54)
* L 150 (5.91)
SKIA0091E
SKIA0085E
SKIA0042E
Page 3649 of 3833

HEADLAMP WASHER
WW-21
C
D
E
F
G
H
I
J
L
MA
B
WW
Removal and Installation for Washer NozzleEKS0036J
REMOVAL
1. Remove front bumper, refer toEI-6, "FRONT BUMPER"
2. Remove hose clip and washer nozzle metal clip.
3. Remove washer nozzle from front bumper.
INSTALLATION
Installation is in the reverse order of removal.
Inspection for Washer NozzleEKS0036K
CHECK VALVE
●Blow air in the injection direction, and check that air flows only
one way. Make sure that the reverse direction is not possible.
Removal and Installation for Washer TankEKS0036L
Refer to,WW-12, "Removal and Installation for Washer Tank"
Removal and Installation for Washer PumpEKS0036M
1. Remove front bumper, refer toEI-6, "FRONT BUMPER"
2. Remove washer pump connector and hose.
3. Pull out washer pump in the direction of the arrow in the figure,
and remove the washer pump from the washer tank.
CAUTION:
When installing washer pump, there should be no packing twist,
etc.
PKIA0490E
PKIA0491E
PKIA0494E