NISSAN X-TRAIL 2003 Service Repair Manual
X-TRAIL 2003
NISSAN
NISSAN
https://www.carmanualsonline.info/img/5/57404/w960_57404-0.png
NISSAN X-TRAIL 2003 Service Repair Manual
Trending: load capacity, automatic transmission, differential, battery replacement, jump start, remote start, spark plugs
Page 2461 of 4179
![NISSAN X-TRAIL 2003 Service Repair Manual DISASSEMBLY
AT-425
[ALL]
D
E
F
G
H
I
J
K
L
MA
B
AT
4. Set manual shaft to position P.
5. Remove park/neutral position (PNP) switch.
6. Remove bracket from transaxle case.
7. Remove revolution sensor](/img/5/57404/w960_57404-2460.png "NISSAN X-TRAIL 2003 Service Repair Manual DISASSEMBLY
AT-425
[ALL]
D
E
F
G
H
I
J
K
L
MA
B
AT
4. Set manual shaft to position P.
5. Remove park/neutral position (PNP) switch.
6. Remove bracket from transaxle case.
7. Remove revolution sensor")
DISASSEMBLY
AT-425
[ALL]
D
E
F
G
H
I
J
K
L
MA
B
AT
4. Set manual shaft to position P.
5. Remove park/neutral position (PNP) switch.
6. Remove bracket from transaxle case.
7. Remove revolution sensor from transaxle case.
8. Remove O-ring from revolution sensor.
9. Remove oil pan and oil pan gasket.
�Do not reuse oil pan bolts.
10. Check foreign materials in oil pan to help determine causes of
malfunction. If the fluid is very dark, smells burned, or contains
foreign particles, the frictional material (clutches, band) may
need replacement. A tacky film that will not wipe clean indicates
varnish build up. Varnish can cause valves, servo, and clutches
to stick and can inhibit pump pressure.
�If frictional material is detected, replace radiator after
repair of A/T. Refer to CO-12, "
RADIATOR" .
11. Remove magnets from oil pan.
12. Remove control valve assembly according to the following procedures.
a. Remove snap ring from terminal body.
b. Push terminal body into transaxle case and draw out terminal
cord assembly.
SCIA3154E
SCIA3476E
SCIA4866E
SCIA0801E
Page 2462 of 4179
AT-426
[ALL]
DISASSEMBLY
c. Remove control valve assembly mounting bolts A, B and C .
Bolt length, number and location:
d. Remove control valve assembly from transaxle case.
13. Remove manual valve from control valve assembly.
CAUTION:
Be careful not to drop manual valve and servo release accu-
mulator return springs.
14. Remove O-ring from terminal body.
15. Remove return spring from servo release accumulator piston.
Bolt symbol A B C
Bolt length “ ” mm (in)40.0 mm
(1.575 in)33.0 mm
(1.299 in)43.5 mm
(1.713 in)
Number of bolts 5 6 2
AAT260A
SAT005F
SCIA4741E
Page 2463 of 4179
![NISSAN X-TRAIL 2003 Service Repair Manual DISASSEMBLY
AT-427
[ALL]
D
E
F
G
H
I
J
K
L
MA
B
AT
16. Remove servo release accumulator piston with compressed air.
CAUTION:
�Strong flow of air will push the accumulator piston out
along with a spl](/img/5/57404/w960_57404-2462.png "NISSAN X-TRAIL 2003 Service Repair Manual DISASSEMBLY
AT-427
[ALL]
D
E
F
G
H
I
J
K
L
MA
B
AT
16. Remove servo release accumulator piston with compressed air.
CAUTION:
�Strong flow of air will push the accumulator piston out
along with a spl")
DISASSEMBLY
AT-427
[ALL]
D
E
F
G
H
I
J
K
L
MA
B
AT
16. Remove servo release accumulator piston with compressed air.
CAUTION:
�Strong flow of air will push the accumulator piston out
along with a splash of oil.Cover the area with paper tow-
els and blow air little by little to avoid this.
�Wrap the removed accumulator piston in a paper towel.
17. Remove O-rings from servo release accumulator piston.
18. Remove N-D accumulator piston and return spring with com-
pressed air.
CAUTION:
�Strong flow of air will push the accumulator piston out
along with a splash of oil.Cover the area with paper tow-
els and blow air little by little to avoid this.
�Wrap the removed accumulator piston in a paper towel.
19. Remove O-rings from N-D accumulator piston.
20. Check accumulator pistons and contact surface of transaxle
case for damage.
21. Check accumulator return springs for damage and free length.
22. Remove lip seals.
23. Remove low & reverse brake tube and oil sleeve.
SAT019DA
SAT020D
SAT023DA
SCIA4867E
SCIA3478E
Page 2464 of 4179
AT-428
[ALL]
DISASSEMBLY
24. Remove converter housing according to the following proce-
dures.
a. Remove converter housing mounting bolts.
b. Remove converter housing by tapping it lightly.
c. Remove O-ring from differential oil port.
25. Remove final drive assembly from transaxle case.
26. Remove differential side bearing outer race.
27. Remove differential side bearing adjusting shim from transaxle
case.
ATM0024D
SCIA3281E
SAT228F
SAT010FC
SCIA4742E
Page 2465 of 4179
DISASSEMBLY
AT-429
[ALL]
D
E
F
G
H
I
J
K
L
MA
B
AT
28. Remove differential side bearing outer race from converter
housing.
29. Remove RH differential side oil seal with flat-bladed screwdriver
from converter housing.
CAUTION:
Be careful not to damage converter housing.
30. Remove differential lubricant tube from converter housing.
31. Remove oil pump assembly according to the following procedures.
a. Remove O-ring from input shaft assembly (high clutch drum).
SAT011FC
SCIA3283E
SAT063K
SCIA2979E
Page 2466 of 4179
AT-430
[ALL]
DISASSEMBLY
b. Remove oil pump assembly and gasket from transaxle case.
c. Remove thrust washer and bearing race from oil pump assem-
bly.
32. Remove brake band according to the following procedures.
a. Loosen lock nut, then back off anchor end pin.
CAUTION:
Do not reuse anchor end pin.
b. Remove brake band and strut from transaxle case.
SCIA3282E
SCIA3629E
SCIA4324E
SAT196F
Page 2467 of 4179
DISASSEMBLY
AT-431
[ALL]
D
E
F
G
H
I
J
K
L
MA
B
AT
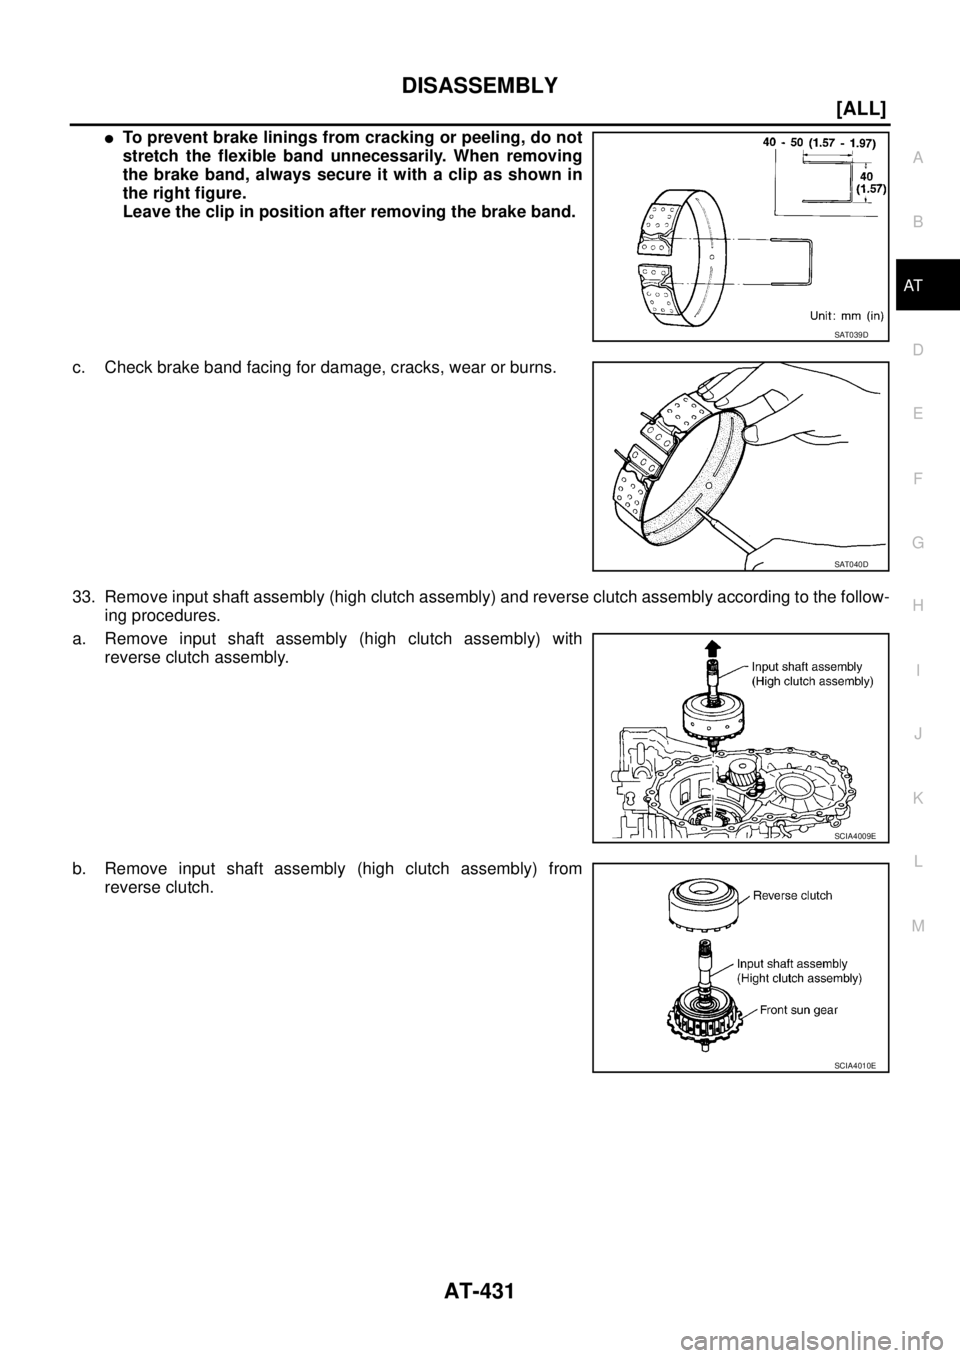
�To prevent brake linings from cracking or peeling, do not
stretch the flexible band unnecessarily. When removing
the brake band, always secure it with a clip as shown in
the right figure.
Leave the clip in position after removing the brake band.
c. Check brake band facing for damage, cracks, wear or burns.
33. Remove input shaft assembly (high clutch assembly) and reverse clutch assembly according to the follow-
ing procedures.
a. Remove input shaft assembly (high clutch assembly) with
reverse clutch assembly.
b. Remove input shaft assembly (high clutch assembly) from
reverse clutch.
SAT039D
SAT040D
SCIA4009E
SCIA4010E
Page 2468 of 4179
AT-432
[ALL]
DISASSEMBLY
c. Remove needle bearing from input shaft assembly (high clutch
drum) and check for damage or wear.
d. Remove high clutch hub (with front sun gear) and needle bear-
ing from input shaft assembly (high clutch drum) and check for
damage or wear.
e. Remove front sun gear and needle bearing from high clutch hab
and check for damage or wear.
f. Remove bearing race from front sun gear and check for damage
or wear.
34. Remove needle bearing from transaxle case and check for dam-
age or wear.
35. Apply compressed air and check to see that low and reverse
brake operates.
SCIA4872E
SCIA5195E
SCIA4013E
SCIA4014E
SAT138F
Page 2469 of 4179
DISASSEMBLY
AT-433
[ALL]
D
E
F
G
H
I
J
K
L
MA
B
AT
36. Remove low one-way clutch and front planetary carrier assembly according to the following procedures.
a. Remove snap ring with flat-bladed screwdriver.
b. Remove low one-way clutch with a hook made of wire.
c. Check low one-way clutch for damage or wear.
d. Remove snap ring with flat-bladed screwdriver.
SCIA4743E
AAT889
SCIA4744E
Page 2470 of 4179
AT-434
[ALL]
DISASSEMBLY
e. Remove front planetary carrier with low & reverse brake piston
and retainer.
f. Remove low and reverse brake spring retainer.
CAUTION:
Do not remove return springs from spring retainer.
g. Check that low one-way clutch rotates in the direction of the
clockwise arrow and locks in the opposite direction.
h. Remove needle bearing, low and reverse brake piston and
retainer from front planetary carrier.
i. Check front planetary carrier, low & reverse brake piston,
retainer and needle bearing for damage or wear.
j. Check front planetary carrier, low one-way clutch and needle
bearing for damage or wear.
k. Check clearance between planetary gears and planetary carrier
with feeler gauge.
Replace front planetary carrier if the clearance exceeds
allowable limit.
SAT023F
SAT148F
SAT048D
SCIA3636E
Standard clearance: 0.20 - 0.70 mm (0.0079 - 0.0276 in)
Allowable limit: 0.80 mm (0.0315 in)
SAT025F
Trending: Dual fan circuit, remote start, fuse box, navigation, air bleeding, MANUAL TRANSAXLE BOX, ENGINE COOLING SYSTEM
![NISSAN X-TRAIL 2003 Service Repair Manual AT-426
[ALL]
DISASSEMBLY
c. Remove control valve assembly mounting bolts A, B and C .
Bolt length, number and location:
d. Remove control valve assembly from transaxle case.
13. Remove manual valve](/img/5/57404/w960_57404-2461.png "NISSAN X-TRAIL 2003 Service Repair Manual AT-426
[ALL]
DISASSEMBLY
c. Remove control valve assembly mounting bolts A, B and C .
Bolt length, number and location:
d. Remove control valve assembly from transaxle case.
13. Remove manual valve")
![NISSAN X-TRAIL 2003 Service Repair Manual AT-428
[ALL]
DISASSEMBLY
24. Remove converter housing according to the following proce-
dures.
a. Remove converter housing mounting bolts.
b. Remove converter housing by tapping it lightly.
c. Remov](/img/5/57404/w960_57404-2463.png "NISSAN X-TRAIL 2003 Service Repair Manual AT-428
[ALL]
DISASSEMBLY
24. Remove converter housing according to the following proce-
dures.
a. Remove converter housing mounting bolts.
b. Remove converter housing by tapping it lightly.
c. Remov")
![NISSAN X-TRAIL 2003 Service Repair Manual DISASSEMBLY
AT-429
[ALL]
D
E
F
G
H
I
J
K
L
MA
B
AT
28. Remove differential side bearing outer race from converter
housing.
29. Remove RH differential side oil seal with flat-bladed screwdriver
from](/img/5/57404/w960_57404-2464.png "NISSAN X-TRAIL 2003 Service Repair Manual DISASSEMBLY
AT-429
[ALL]
D
E
F
G
H
I
J
K
L
MA
B
AT
28. Remove differential side bearing outer race from converter
housing.
29. Remove RH differential side oil seal with flat-bladed screwdriver
from")
![NISSAN X-TRAIL 2003 Service Repair Manual AT-430
[ALL]
DISASSEMBLY
b. Remove oil pump assembly and gasket from transaxle case.
c. Remove thrust washer and bearing race from oil pump assem-
bly.
32. Remove brake band according to the followi](/img/5/57404/w960_57404-2465.png "NISSAN X-TRAIL 2003 Service Repair Manual AT-430
[ALL]
DISASSEMBLY
b. Remove oil pump assembly and gasket from transaxle case.
c. Remove thrust washer and bearing race from oil pump assem-
bly.
32. Remove brake band according to the followi")
![NISSAN X-TRAIL 2003 Service Repair Manual AT-432
[ALL]
DISASSEMBLY
c. Remove needle bearing from input shaft assembly (high clutch
drum) and check for damage or wear.
d. Remove high clutch hub (with front sun gear) and needle bear-
ing from](/img/5/57404/w960_57404-2467.png "NISSAN X-TRAIL 2003 Service Repair Manual AT-432
[ALL]
DISASSEMBLY
c. Remove needle bearing from input shaft assembly (high clutch
drum) and check for damage or wear.
d. Remove high clutch hub (with front sun gear) and needle bear-
ing from")
![NISSAN X-TRAIL 2003 Service Repair Manual DISASSEMBLY
AT-433
[ALL]
D
E
F
G
H
I
J
K
L
MA
B
AT
36. Remove low one-way clutch and front planetary carrier assembly according to the following procedures.
a. Remove snap ring with flat-bladed scre](/img/5/57404/w960_57404-2468.png "NISSAN X-TRAIL 2003 Service Repair Manual DISASSEMBLY
AT-433
[ALL]
D
E
F
G
H
I
J
K
L
MA
B
AT
36. Remove low one-way clutch and front planetary carrier assembly according to the following procedures.
a. Remove snap ring with flat-bladed scre")
![NISSAN X-TRAIL 2003 Service Repair Manual AT-434
[ALL]
DISASSEMBLY
e. Remove front planetary carrier with low & reverse brake piston
and retainer.
f. Remove low and reverse brake spring retainer.
CAUTION:
Do not remove return springs from s](/img/5/57404/w960_57404-2469.png "NISSAN X-TRAIL 2003 Service Repair Manual AT-434
[ALL]
DISASSEMBLY
e. Remove front planetary carrier with low & reverse brake piston
and retainer.
f. Remove low and reverse brake spring retainer.
CAUTION:
Do not remove return springs from s")