ECO mode NISSAN XTERRA 2002 WD22 / 1.G Owners Manual
[x] Cancel search | Manufacturer: NISSAN, Model Year: 2002, Model line: XTERRA, Model: NISSAN XTERRA 2002 WD22 / 1.GPages: 263, PDF Size: 2.22 MB
Page 33 of 263

CAUTION
ORemember that a child restraint left
in a closed vehicle can become very
hot. Check the seating surface and
buckles before placing your child in
the child restraint.
OThe three-point belt in your vehicle
is equipped with an automatic lock-
ing mode retractor which must be
used when installing a child re-
straint.
OFailure to use the retractor's locking
mode will result in the child restraint
not being properly secured. The re-
straint could tip over or otherwise be
unsecured and cause injury to the
child in a sudden stop or collision.
INSTALLATION ON REAR SEAT
CENTER POSITION
Front facing
When you install a child restraint in the rear
center seat, follow these steps:
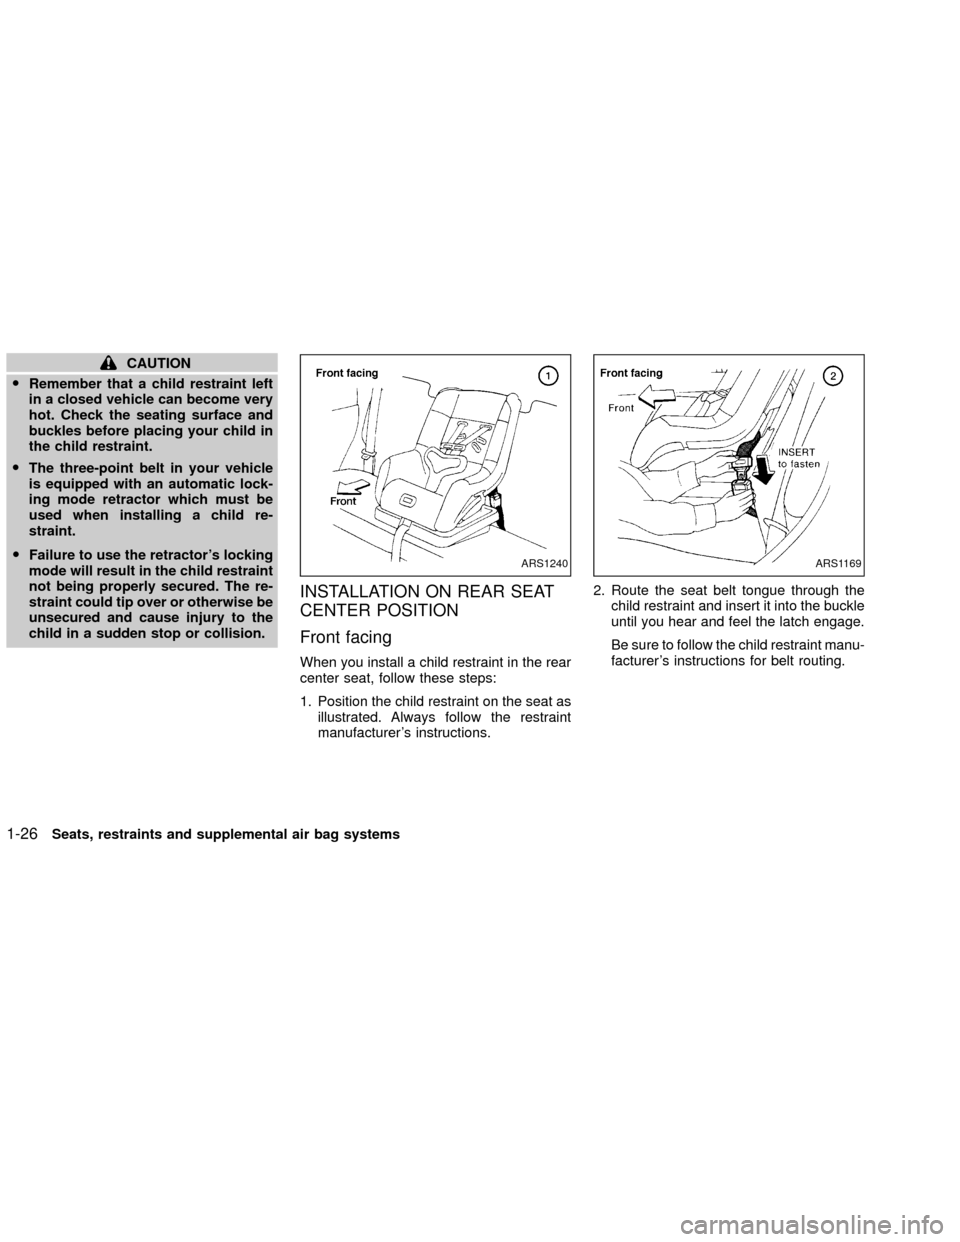
1. Position the child restraint on the seat as
illustrated. Always follow the restraint
manufacturer's instructions.2. Route the seat belt tongue through the
child restraint and insert it into the buckle
until you hear and feel the latch engage.
Be sure to follow the child restraint manu-
facturer's instructions for belt routing.
ARS1240ARS1169
1-26Seats, restraints and supplemental air bag systems
ZX
Page 44 of 263

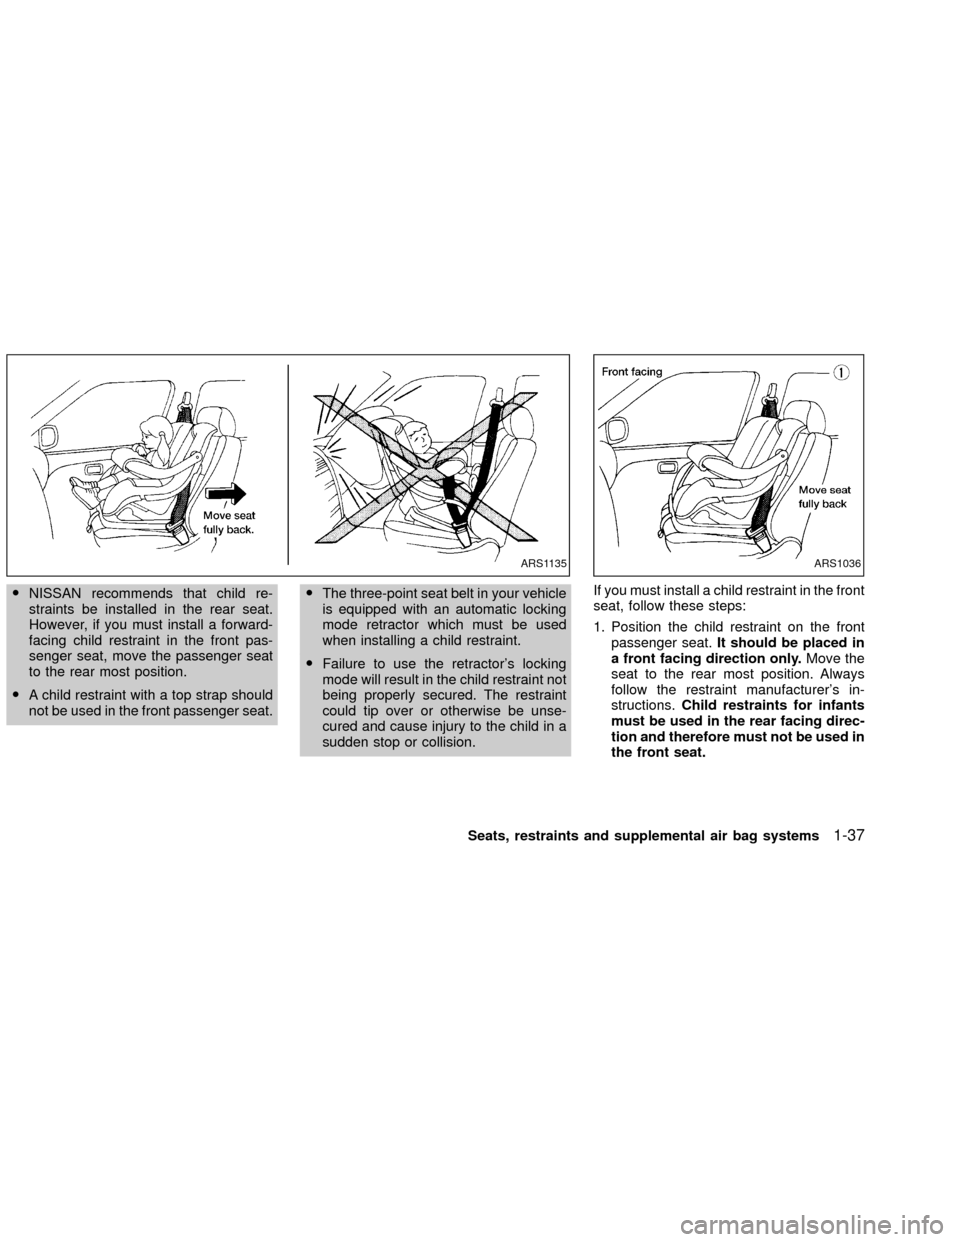
ONISSAN recommends that child re-
straints be installed in the rear seat.
However, if you must install a forward-
facing child restraint in the front pas-
senger seat, move the passenger seat
to the rear most position.
OA child restraint with a top strap should
not be used in the front passenger seat.OThe three-point seat belt in your vehicle
is equipped with an automatic locking
mode retractor which must be used
when installing a child restraint.
OFailure to use the retractor's locking
mode will result in the child restraint not
being properly secured. The restraint
could tip over or otherwise be unse-
cured and cause injury to the child in a
sudden stop or collision.If you must install a child restraint in the front
seat, follow these steps:
1. Position the child restraint on the front
passenger seat.It should be placed in
a front facing direction only.Move the
seat to the rear most position. Always
follow the restraint manufacturer's in-
structions.Child restraints for infants
must be used in the rear facing direc-
tion and therefore must not be used in
the front seat.
ARS1135ARS1036
Seats, restraints and supplemental air bag systems1-37
ZX
Page 54 of 263

OUTSIDE TEMPERATURE DIS-
PLAY
Push the MODE switch when the ignition
key is in the ACC or ON position. The
outside temperature will be displayed in ÉF.
OPush the MODE switch to change from
ÉF to ÉC.
OWhen the outside temperature is be-
tween 130ÉF (55ÉC) and 158ÉF (70ÉC),
the display shows 130ÉF (55ÉC).
OWhen the outside temperature is
lower than -40ÉF (-40ÉC) or higherthan 158ÉF (70ÉC), the display shows
onlyÐÐÐthough it is operating.
This is not a malfunction.
OThe outside temperature sensor is
located in front of the radiator. The
sensor may be affected by road or
engine heat, wind direction and other
driving conditions. The display may
differ from the actual outside tem-
perature or the temperature dis-
played on various signs or bill-
boards.
OTemperature display will not update
unless the vehicle is moving faster
than 12 mph (20 km/h), or the ignition
switch has been OFF for 4 hours.COMPASS DISPLAY
Push the MODE switch when the ignition
key is in the ACC or ON position. The
direction will be displayed.
Zone variation change procedure
The difference between magnetic north and
geographical north is known as variance. In
some areas, this difference can sometimes
be great enough to cause false compass
readings. Follow these instructions to setthe variance for your particular location if
this happens:
1. Establish your location on the zone map.
Refer to the illustration. Record your
zone number.
2. Push the MODE switch in for five sec-
onds until the current zone entry number
is displayed.
3. Press the MODE switch repeatedly until
the new zone entry number is displayed.
Once the desired zone number is displayed,
stop pressing the MODE switch and the
display will show compass direction within a
few seconds.
LIC0115
Instruments and controls2-7
ZX
Page 56 of 263

OIf a magnet is located near the com-
pass or the vehicle is driven where
the terrestrial magnetism is dis-
turbed, the compass display may not
indicate the correct direction.
OIn places where the terrestrial magne-
tism is disturbed, the correction of
the direction starts automatically.
Correction functions of the compass
display
The compass display is equipped with au-
tomatic correction function. If the direction is
not shown correctly, carry out the manual
correction procedure set out below.
Manual correction procedure
1. Push the MODE switch for about 10
seconds. The ``CAL'' will illuminate.
2. Drive the vehicle slowly in an open and
safe area. The initial correction is com-
plete while turning in one or two turns.
In places where the earth's magnetism is
disturbed, the initial correction procedure
may start automatically.
Instruments and controls
2-9
ZX
Page 85 of 263

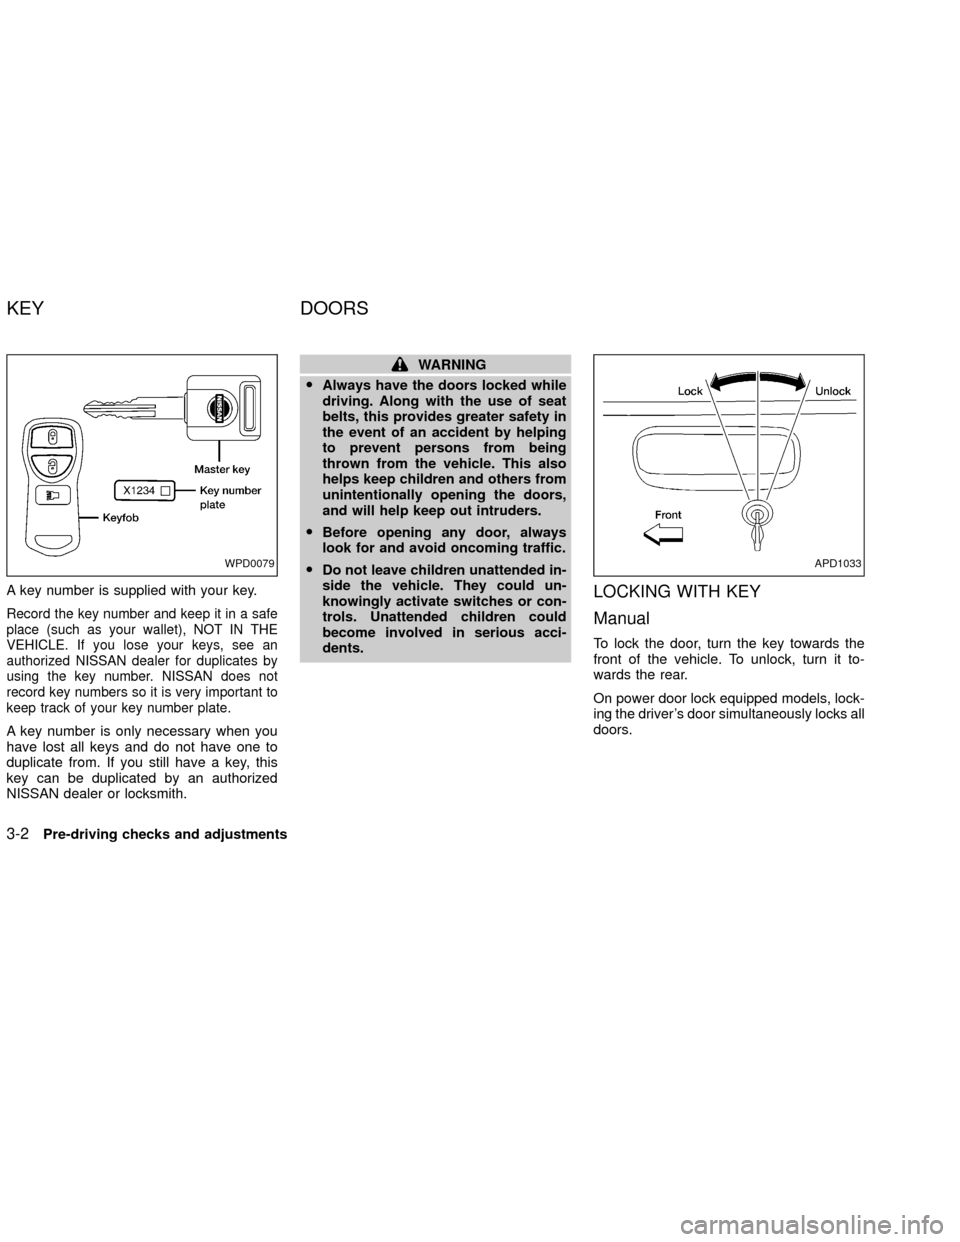
A key number is supplied with your key.
Record the key number and keep it in a safe
place (such as your wallet), NOT IN THE
VEHICLE. If you lose your keys, see an
authorized NISSAN dealer for duplicates by
using the key number. NISSAN does not
record key numbers so it is very important to
keep track of your key number plate.
A key number is only necessary when you
have lost all keys and do not have one to
duplicate from. If you still have a key, this
key can be duplicated by an authorized
NISSAN dealer or locksmith.
WARNING
OAlways have the doors locked while
driving. Along with the use of seat
belts, this provides greater safety in
the event of an accident by helping
to prevent persons from being
thrown from the vehicle. This also
helps keep children and others from
unintentionally opening the doors,
and will help keep out intruders.
OBefore opening any door, always
look for and avoid oncoming traffic.
ODo not leave children unattended in-
side the vehicle. They could un-
knowingly activate switches or con-
trols. Unattended children could
become involved in serious acci-
dents.
LOCKING WITH KEY
Manual
To lock the door, turn the key towards the
front of the vehicle. To unlock, turn it to-
wards the rear.
On power door lock equipped models, lock-
ing the driver's door simultaneously locks all
doors.
WPD0079APD1033
KEY DOORS
3-2Pre-driving checks and adjustments
ZX
Page 102 of 263

WARNING
OThe air conditioner cooling function
operates only when the engine is
running.
ODo not leave children, unreliable
adults, or pets alone in your vehicle.
On hot sunny days, temperatures in
a closed vehicle could quickly be-
come high enough to cause severe
or possibly fatal injuries to people or
animals.
ODo not use the recirculation mode
for long periods as it may cause theinterior air to become stale and the
windows to fog up.
OPositioning of the heater or air con-
ditioner controls should not be done
while driving so full attention may be
given to vehicle operation.
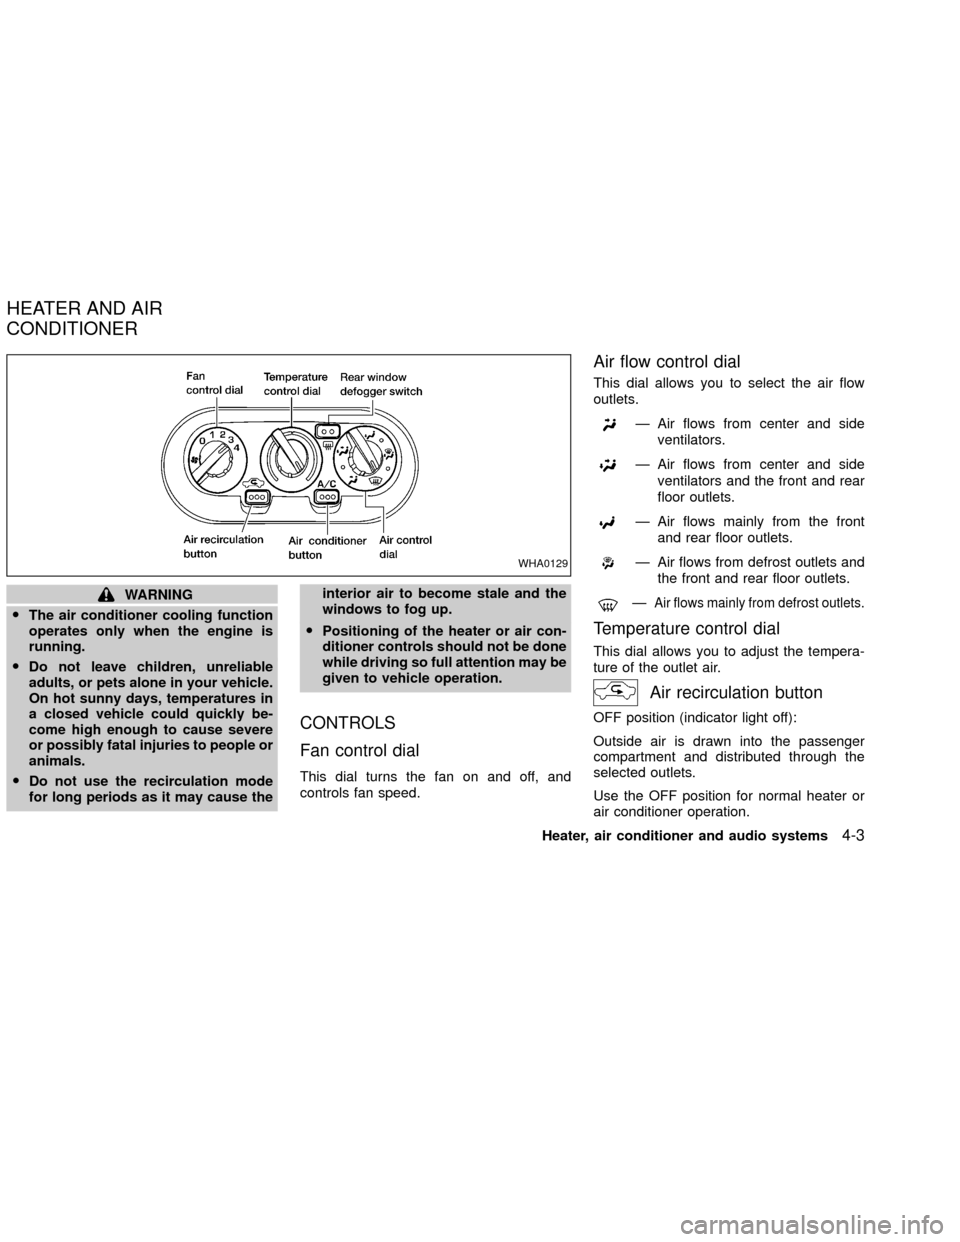
CONTROLS
Fan control dial
This dial turns the fan on and off, and
controls fan speed.
Air flow control dial
This dial allows you to select the air flow
outlets.
Ð Air flows from center and side
ventilators.
Ð Air flows from center and side
ventilators and the front and rear
floor outlets.
Ð Air flows mainly from the front
and rear floor outlets.
Ð Air flows from defrost outlets and
the front and rear floor outlets.
ÐAir flows mainly from defrost outlets.
Temperature control dial
This dial allows you to adjust the tempera-
ture of the outlet air.
Air recirculation button
OFF position (indicator light off):
Outside air is drawn into the passenger
compartment and distributed through the
selected outlets.
Use the OFF position for normal heater or
air conditioner operation.
WHA0129
HEATER AND AIR
CONDITIONER
Heater, air conditioner and audio systems4-3
ZX
Page 112 of 263

FM-AM RADIO WITH COMPACT
DISC (CD) PLAYER (if so
equipped)
Audio main operation
Radio reception is affected by station signal
strength, distance from radio transmitter,
buildings, bridges, mountains, and other
external influences. Intermittent changes in
reception quality normally are caused by
these external influences.
Using a cellular phone in or near the
vehicle may influence radio reception
quality.
PWR/VOL control
Turn the ignition key to the ACC or ON
position, then push the PWR/VOL control
knob button. If you listen to the radio with
the engine not running, turn the key to the
ACC position. The mode (radio or CD)
which was playing immediately before the
system was turned off resumes playing.
When no CD is loaded, the radio comes on.
Push the PWR/VOL control knob button
again turns the system off.Turn the PWR/VOL control knob to the right
to increase volume or to the left to decrease
volume.
Adjusting tone quality and speaker bal-
ance
To adjust the audio levels for bass, treble,
fader, and balance, push the AUDIO button
and adjust the level with the SEEK/TRACK
button. Press the AUDIO button once for
BAS (bass), twice for TRE (treble), three
times for FAD (fader) and four times for BAL
(balance). Once the audio level is set the
display will return back to radio or CD
display mode after 7 seconds or the AUDIO
button can be pressed again within 7 sec-
onds to set the next audio level. Pressing
the AUDIO button a fifth time will return the
display back to radio or CD display mode.
Fader adjusts the sound level between the
front and rear speakers, balance adjusts the
sound level between the right and left
speakers.
Clock set
Press and hold the MENU button for more
than 2 seconds the radio beeps and the
hours flash, use the SEEK/TRACK button to
set the hour, press the MENU button again
until the radio beeps and the minutes flash,
LHA0118
Heater, air conditioner and audio systems4-13
ZX
Page 113 of 263

use the SEEK/TRACK button to set the
minutes. The display will return to regular
clock display in 7 seconds or you may press
the MENU button again to return to the
regular clock display.
FM-AM radio operation
FM-AM band select
Push the
button to change from AM
to FM reception.
The FM stereo indicator, ST, illuminates
during FM stereo reception. When the ste-
reo broadcast signal is weak, the radio
automatically changes from stereo to mon-
aural reception.
SEEK/manual/SCAN
tuning
When the
button is pushed while the
radio is playing, tuning mode is cycled be-
tween:
SEEK tuning!manual tuning!SCAN
mode.
``TUNE'' and ``SCAN'' are shown in the
display for each mode. No icon is displayed
for SEEK mode.
WARNING
The radio should not be tuned while
driving so full attention may be given to
vehicle operation.
SEEK tuning
Push the SEEK/SCAN tuning button
orfor less than 1.5 seconds. SEEK tuning
begins from low to high frequencies or high
to low frequencies, depending on which
button is pressed, and stops at the next
broadcasting station. If using the
button
once the highest broadcasting station is
reached, the radio continues in the SEEK
mode at the lowest broadcasting station. If
using the
button once the lowest broad-
casting station is reached, the radio contin-
ues in the SEEK mode at the highest broad-
casting station.
Manual tuning
Use the
andbuttons for manual
tuning. To move quickly through the chan-
nels, hold either of the tuning buttons down.
SCAN tuning
Push and hold the SEEK/SCAN tuning but-
ton
orfor more than 1.5 seconds.SCAN illuminates in the display window,
and the radio station blinks. SCAN tuning
begins from low to high frequencies or from
high to low frequencies, depending on
which button is pressed. SCAN tuning stops
at each broadcasting station for five sec-
onds. When scanning, SCAN is solid and
the radio station blinks. When temporarily
stopped on a station, SCAN blinks and the
station display is solid. Pushing the button
again during this five second period stops
SCAN tuning and the radio remains tuned to
that station.
4-14Heater, air conditioner and audio systems
ZX
Page 114 of 263

Station memory operations
Each preset mode (A, B or C) has 6 presets,
capable of storing any combination of AM,
FM and FM RDS stations.Press the PRESET ABC button to change
between the presets:
A!B!C
The radio displays icon A, B or C to indicate
which set of presets is active.
1. Tune to the desired station.
2. Push the desired station select button for
more than 3 seconds. For example, in
the illustrations ch2 is to be memorized.
The radio mutes when the select button
is pushed.
3. When the indicator illuminates in the
display and the sound resumes, memo-
rizing is complete.
4. Other station select buttons can be set in
the same manner.
If the battery cable is disconnected, or if the
radio fuse opens, the radio memory is can-
celled. In that case, reset the desired stations.
Compact disc (CD) player operation
Turn the ignition key to the ACC or ON
position and carefully insert the compact
disc into the slot with the label side up. The
compact disc is automatically pulled into the
slot and starts to play.If the radio is already operating, it automati-
cally turns off and the compact disc begins
to play.
CAUTION
Do not force the compact disc into the
slot. This could damage the player.
CD/CHG
When the
button is pushed with the
compact disc loaded or the radio playing,
the radio turns off and compact disc starts to
play.
Track up/down, FF/REV
Track up/down
When the
button is pushed while the
compact disc is playing, the selection fol-
lowing the present one starts to play from
the beginning. Push the
button several
times to skip several selections. Each time
the button is pushed, the CD advances one
additional selection. The number appears in
the display window. (When the last selection
on the compact disc is skipped, the first
selection is played.)
When the
button is pushed, the selection
LHA0119
Heater, air conditioner and audio systems4-15
ZX
Page 115 of 263

being played returns to the beginning. Push
thebutton several times to skip back
several selections. Each time the button is
pushed, the CD moves back one selection.
If the play pattern is in MIX mode when the
orbuttons are pushed the next selec-
tion will be chosen at random.
FF (Fast Forward)/REV (Reverse)
When the
orbutton is pushed while
the compact disc is playing, the compact
disc plays at an increased speed while fast
forwarding or rewinding. When the button is
released, the compact disc returns to nor-
mal play speed.
MENU
When the
button is pushed while the
compact disc is playing, the play pattern
changes as follows.
RPT:The current selection is repeated.
MIX:Selections are played at random, not
following the sequence on the compact
disc. The same program may be repeated
twice. If the
button is pushed in the MIX
mode, selections will be chosen at random.Blank(no symbol): All selections are played
repeatedly in sequence.
When a new compact disc is inserted,
the play pattern automatically changes
to ALL.
CD EJECT
When the
button is pushed with a com-
pact disc loaded, the compact disc ejects.
When the
button is pushed while the
compact disc is playing, the compact disc
ejects and the system turns off.
If the compact disc ejects and is not
removed within 10 seconds, it is pulled
back into the slot.
DISC indicator light
This light comes on
when a compact
disc is loaded into the player.
4-16Heater, air conditioner and audio systems
ZX