turn signal NISSAN XTERRA 2002 WD22 / 1.G Owners Manual
[x] Cancel search | Manufacturer: NISSAN, Model Year: 2002, Model line: XTERRA, Model: NISSAN XTERRA 2002 WD22 / 1.GPages: 263, PDF Size: 2.22 MB
Page 47 of 263

2 Instruments and controls
Instrument panel ....................................................2-2
Meters and gauges ................................................2-3
Speedometer and odometer .............................2-3
Tachometer ........................................................2-5
Engine coolant temperature gauge ...................2-5
Fuel gauge ........................................................2-6
Compass and outside temperature display
(if so equipped) ......................................................2-6
Outside temperature display .............................2-6
Compass display ...............................................2-7
Warning/indicator lights and audible
reminders..............................................................2-10
Checking bulbs ................................................2-10
Warning lights .................................................. 2-11
Indicator lights .................................................2-13
Audible reminders............................................2-14
Security system ....................................................2-15
Vehicle security system (if so equipped).........2-15
Windshield wiper and washer switch ...................2-18
Switch operation ..............................................2-18
Rear window wiper and washer switch................2-19
Rear window defogger switch ..............................2-20Headlight and turn signal switch ..........................2-20
Headlight switch ..............................................2-20
Turn signal switch............................................2-21
Front fog light switch (if so equipped)..................2-22
Hazard warning flasher switch .............................2-22
Horn ......................................................................2-23
Cigarette lighter and ash tray (accessories) ........2-23
Power point (if so equipped) ................................2-24
Storage .................................................................2-25
Map pocket ......................................................2-25
Cup holders .....................................................2-26
Glove box ........................................................2-27
Console box (if so equipped) ..........................2-27
Luggage hooks (if so equipped) .....................2-28
Tonneau cover (if so equipped).......................2-29
Windows .............................................................2-30
Power windows (if so equipped) .....................2-30
Manual windows ..............................................2-31
Sunroof (if so equipped).......................................2-32
Tilting the sunroof ............................................2-32
Removing/installing..........................................2-33
Interior light...........................................................2-33
ZX
Page 49 of 263

1. Headlight/turn signal switch
2. Meters and gauges
3. Windshield wiper/washer switch
4. Power point
5. Heater and air conditioner
6. Front passenger supplemental air bag
7. Glove box
8. Audio system
9. Hazard warning flasher switch
10. Automatic/manual selector lever
11. Transfer cased shift lever
12. Parking brake release lever
13. Cruise control main/set switch
14. Driver supplemental air bag
15. Steering wheel switch for audio controls
WIC0150
INSTRUMENT PANEL
2-2Instruments and controls
ZX
Page 57 of 263
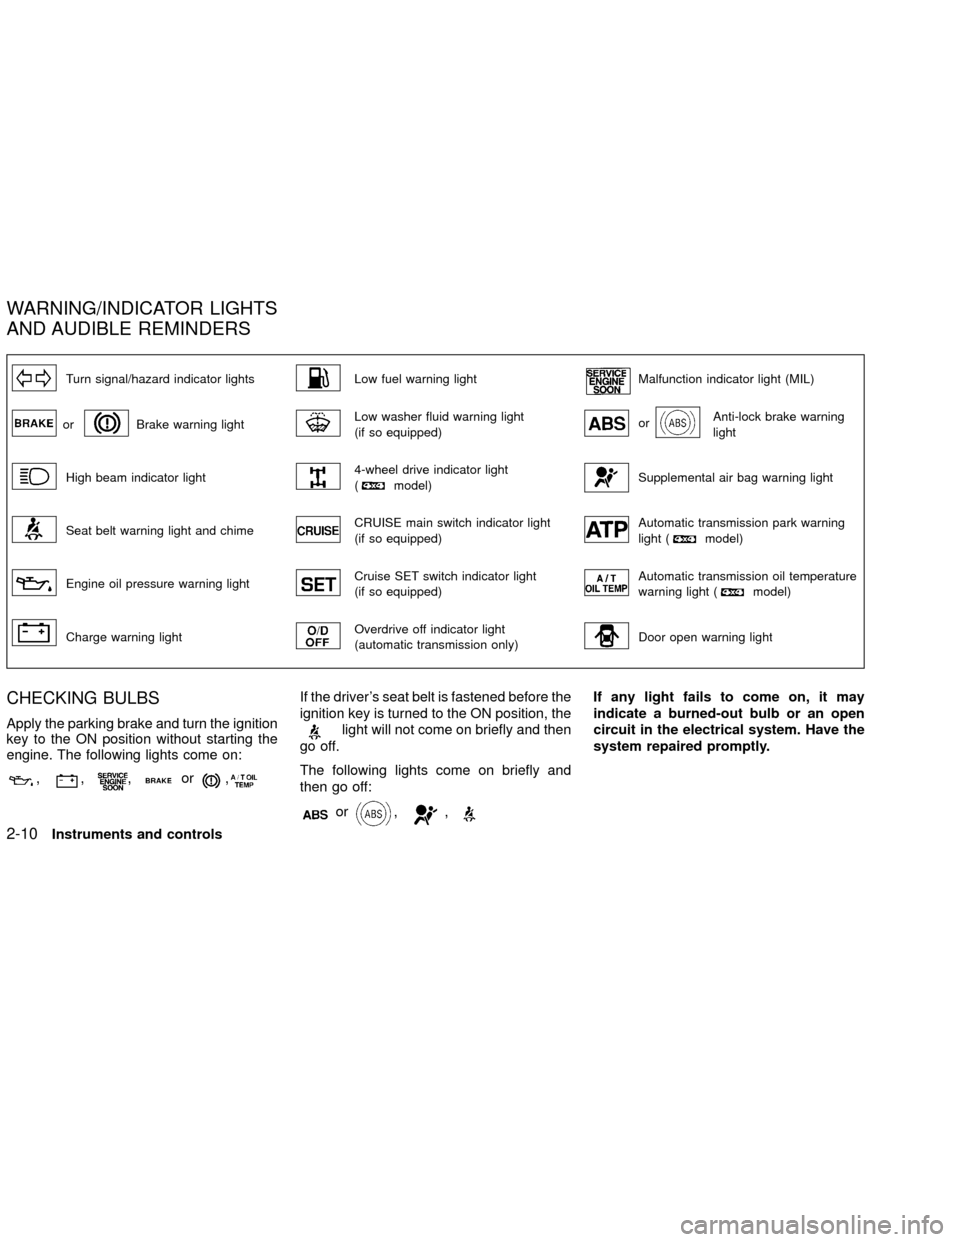
Turn signal/hazard indicator lightsLow fuel warning lightMalfunction indicator light (MIL)
orBrake warning lightLow washer fluid warning light
(if so equipped)orAnti-lock brake warning
light
High beam indicator light4-wheel drive indicator light
(model)Supplemental air bag warning light
Seat belt warning light and chimeCRUISE main switch indicator light
(if so equipped)Automatic transmission park warning
light (model)
Engine oil pressure warning lightCruise SET switch indicator light
(if so equipped)Automatic transmission oil temperature
warning light (model)
Charge warning lightOverdrive off indicator light
(automatic transmission only)Door open warning light
CHECKING BULBS
Apply the parking brake and turn the ignition
key to the ON position without starting the
engine. The following lights come on:
,,,or,
If the driver's seat belt is fastened before the
ignition key is turned to the ON position, the
light will not come on briefly and then
go off.
The following lights come on briefly and
then go off:
or,,
If any light fails to come on, it may
indicate a burned-out bulb or an open
circuit in the electrical system. Have the
system repaired promptly.
WARNING/INDICATOR LIGHTS
AND AUDIBLE REMINDERS
2-10Instruments and controls
ZX
Page 61 of 263
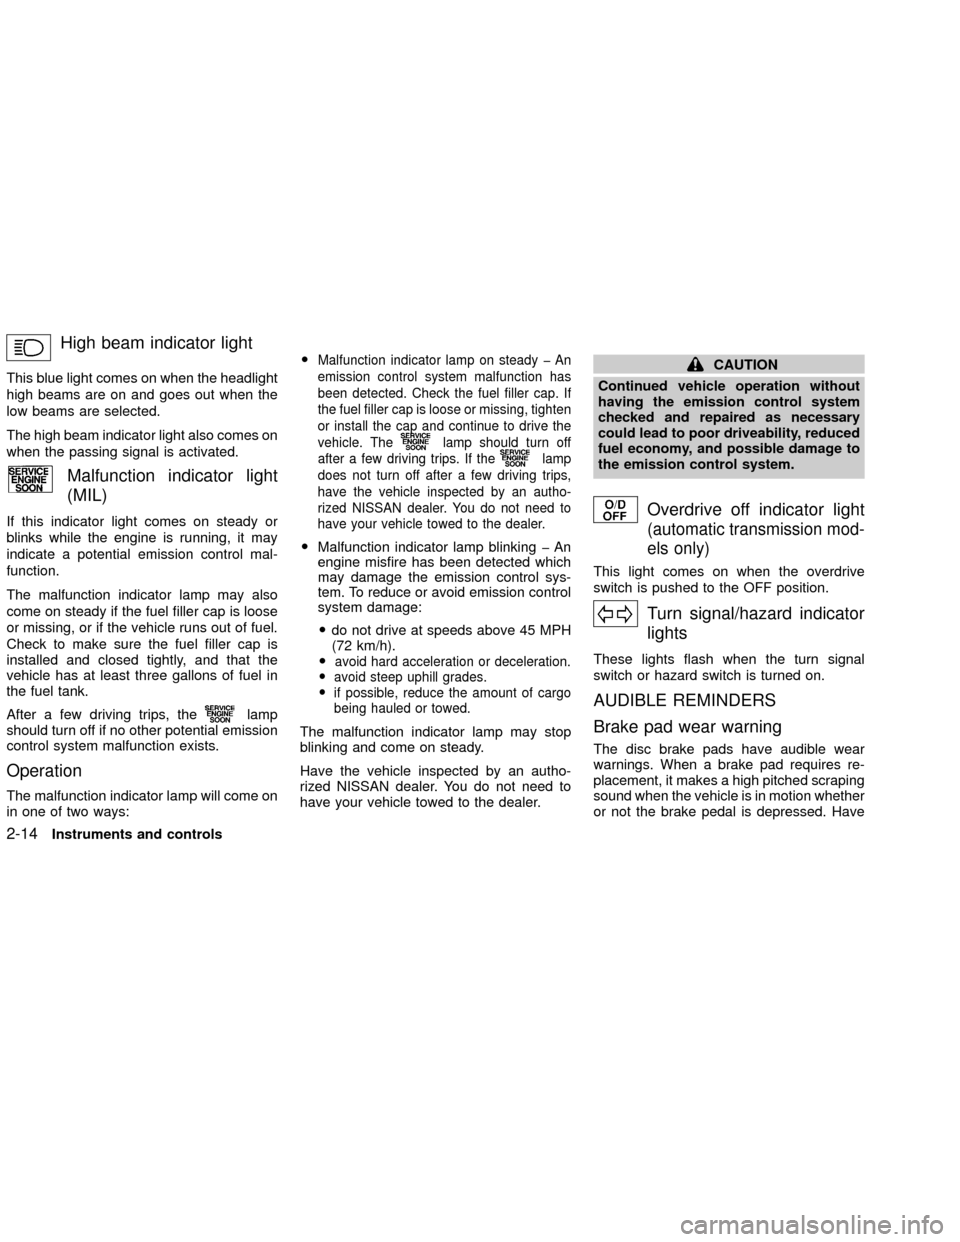
High beam indicator light
This blue light comes on when the headlight
high beams are on and goes out when the
low beams are selected.
The high beam indicator light also comes on
when the passing signal is activated.
Malfunction indicator light
(MIL)
If this indicator light comes on steady or
blinks while the engine is running, it may
indicate a potential emission control mal-
function.
The malfunction indicator lamp may also
come on steady if the fuel filler cap is loose
or missing, or if the vehicle runs out of fuel.
Check to make sure the fuel filler cap is
installed and closed tightly, and that the
vehicle has at least three gallons of fuel in
the fuel tank.
After a few driving trips, the
lamp
should turn off if no other potential emission
control system malfunction exists.
Operation
The malfunction indicator lamp will come on
in one of two ways:O
Malfunction indicator lamp on steady þ An
emission control system malfunction has
been detected. Check the fuel filler cap. If
the fuel filler cap is loose or missing, tighten
or install the cap and continue to drive the
vehicle. The
lamp should turn off
after a few driving trips. If the
lamp
does not turn off after a few driving trips,
have the vehicle inspected by an autho-
rized NISSAN dealer. You do not need to
have your vehicle towed to the dealer.
OMalfunction indicator lamp blinking þ An
engine misfire has been detected which
may damage the emission control sys-
tem. To reduce or avoid emission control
system damage:
Odo not drive at speeds above 45 MPH
(72 km/h).
O
avoid hard acceleration or deceleration.
Oavoid steep uphill grades.
Oif possible, reduce the amount of cargo
being hauled or towed.
The malfunction indicator lamp may stop
blinking and come on steady.
Have the vehicle inspected by an autho-
rized NISSAN dealer. You do not need to
have your vehicle towed to the dealer.
CAUTION
Continued vehicle operation without
having the emission control system
checked and repaired as necessary
could lead to poor driveability, reduced
fuel economy, and possible damage to
the emission control system.
Overdrive off indicator light
(automatic transmission mod-
els only)
This light comes on when the overdrive
switch is pushed to the OFF position.
Turn signal/hazard indicator
lights
These lights flash when the turn signal
switch or hazard switch is turned on.
AUDIBLE REMINDERS
Brake pad wear warning
The disc brake pads have audible wear
warnings. When a brake pad requires re-
placement, it makes a high pitched scraping
sound when the vehicle is in motion whether
or not the brake pedal is depressed. Have
2-14Instruments and controls
ZX
Page 62 of 263

the brakes checked as soon as possible if
the warning sound is heard.
Key reminder chime
The chime sounds when the driver's door is
opened and the key is in the ignition switch.
Take the ignition key when you leave the
vehicle.
Light reminder chime
A chime sounds if the driver's door is
opened with the headlight switch on unless
the ignition key is in the ON position. Turn
the headlight switch off when you leave the
vehicle.
VEHICLE SECURITY SYSTEM
(if so equipped)
The vehicle security system provides visual
and audio alarm signals if parts of the
vehicle are disturbed.
Security indicator light
The security indicator light shows the status
of the vehicle security system.
The light operates whenever the ignition
switch is in the LOCK, OFF, or ACC posi-
tion.
The vehicle security system has four
phases. For each phase the operation of the
security indicator light is different.
IC0005LIC0093
SECURITY SYSTEM
Instruments and controls2-15
ZX
Page 67 of 263
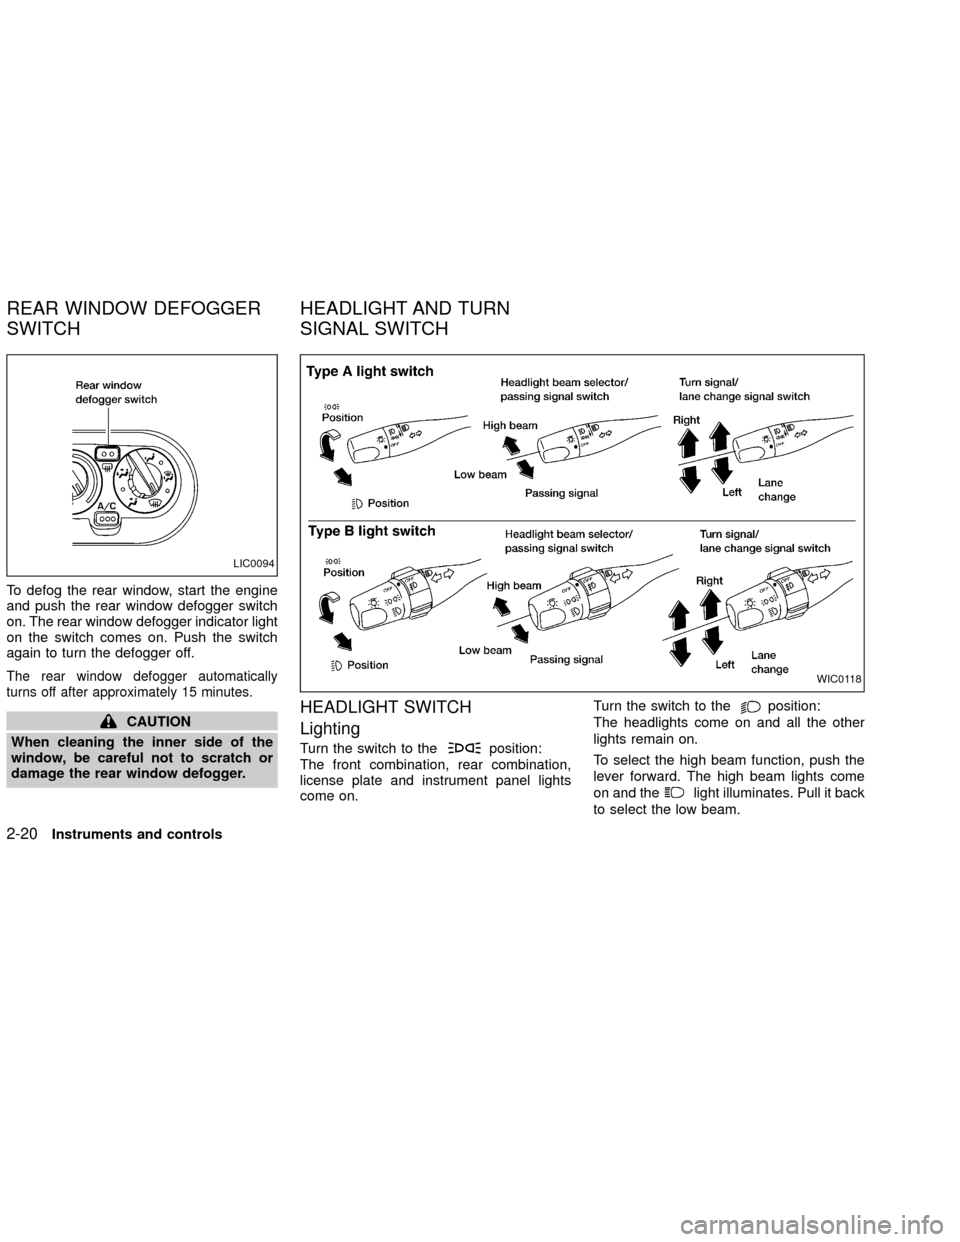
To defog the rear window, start the engine
and push the rear window defogger switch
on. The rear window defogger indicator light
on the switch comes on. Push the switch
again to turn the defogger off.
The rear window defogger automatically
turns off after approximately 15 minutes.
CAUTION
When cleaning the inner side of the
window, be careful not to scratch or
damage the rear window defogger.HEADLIGHT SWITCH
Lighting
Turn the switch to theposition:
The front combination, rear combination,
license plate and instrument panel lights
come on.Turn the switch to the
position:
The headlights come on and all the other
lights remain on.
To select the high beam function, push the
lever forward. The high beam lights come
on and the
light illuminates. Pull it back
to select the low beam.
LIC0094
WIC0118
REAR WINDOW DEFOGGER
SWITCHHEADLIGHT AND TURN
SIGNAL SWITCH
2-20Instruments and controls
ZX
Page 68 of 263
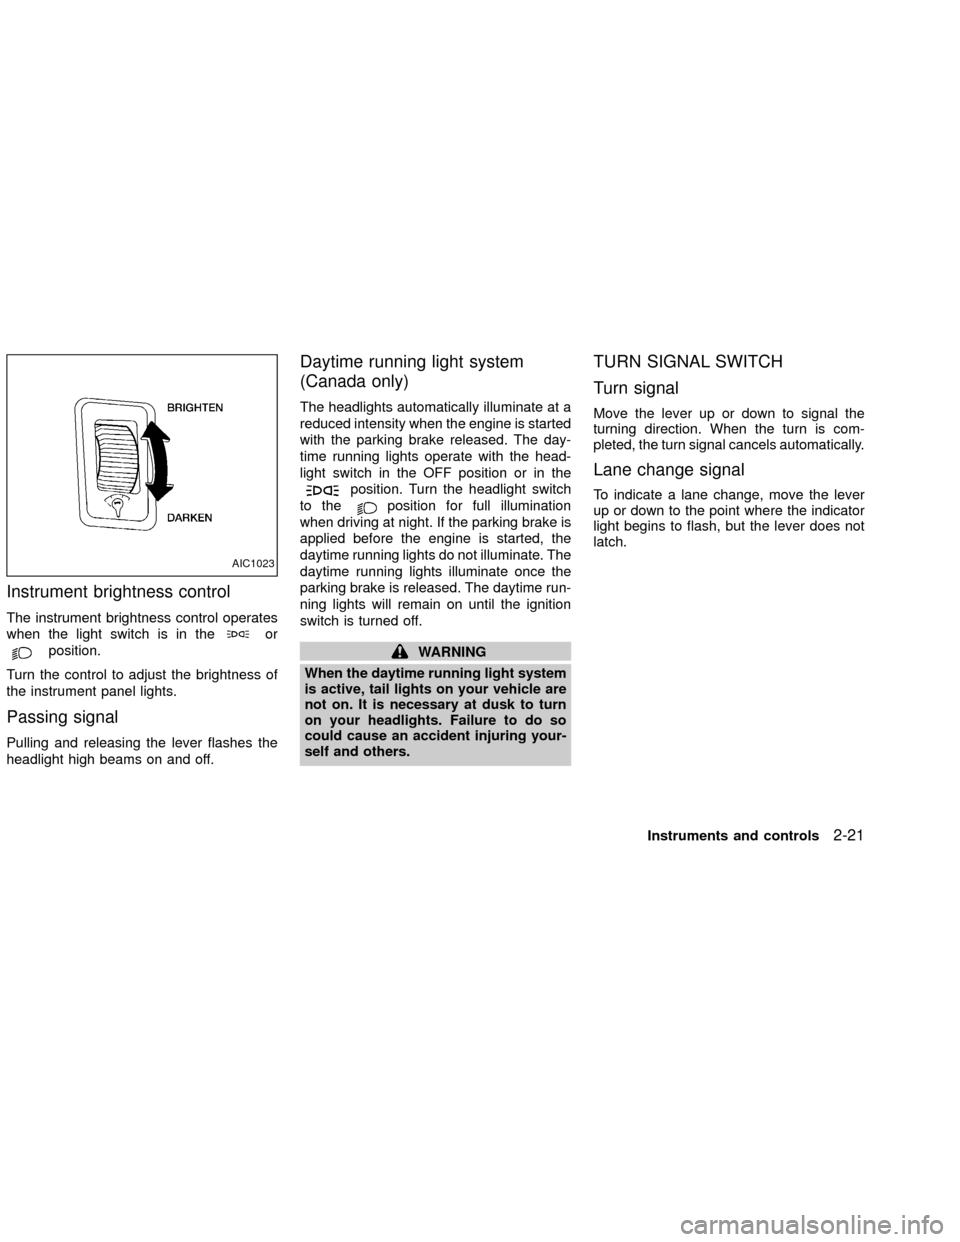
Instrument brightness control
The instrument brightness control operates
when the light switch is in the
or
position.
Turn the control to adjust the brightness of
the instrument panel lights.
Passing signal
Pulling and releasing the lever flashes the
headlight high beams on and off.
Daytime running light system
(Canada only)
The headlights automatically illuminate at a
reduced intensity when the engine is started
with the parking brake released. The day-
time running lights operate with the head-
light switch in the OFF position or in the
position. Turn the headlight switch
to the
position for full illumination
when driving at night. If the parking brake is
applied before the engine is started, the
daytime running lights do not illuminate. The
daytime running lights illuminate once the
parking brake is released. The daytime run-
ning lights will remain on until the ignition
switch is turned off.
WARNING
When the daytime running light system
is active, tail lights on your vehicle are
not on. It is necessary at dusk to turn
on your headlights. Failure to do so
could cause an accident injuring your-
self and others.
TURN SIGNAL SWITCH
Turn signal
Move the lever up or down to signal the
turning direction. When the turn is com-
pleted, the turn signal cancels automatically.
Lane change signal
To indicate a lane change, move the lever
up or down to the point where the indicator
light begins to flash, but the lever does not
latch.
AIC1023
Instruments and controls2-21
ZX
Page 69 of 263
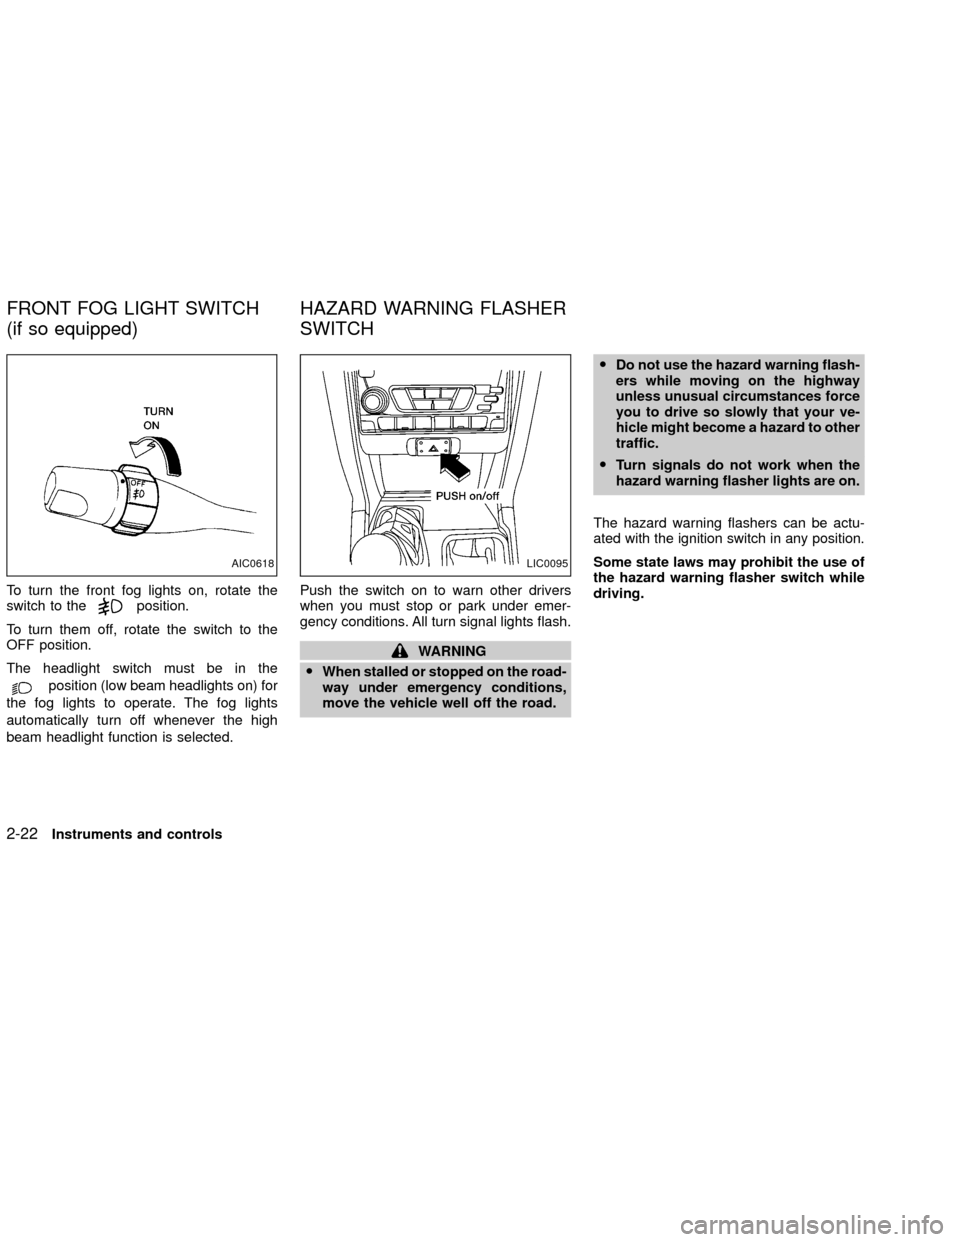
To turn the front fog lights on, rotate the
switch to theposition.
To turn them off, rotate the switch to the
OFF position.
The headlight switch must be in the
position (low beam headlights on) for
the fog lights to operate. The fog lights
automatically turn off whenever the high
beam headlight function is selected.Push the switch on to warn other drivers
when you must stop or park under emer-
gency conditions. All turn signal lights flash.
WARNING
OWhen stalled or stopped on the road-
way under emergency conditions,
move the vehicle well off the road.ODo not use the hazard warning flash-
ers while moving on the highway
unless unusual circumstances force
you to drive so slowly that your ve-
hicle might become a hazard to other
traffic.
OTurn signals do not work when the
hazard warning flasher lights are on.
The hazard warning flashers can be actu-
ated with the ignition switch in any position.
Some state laws may prohibit the use of
the hazard warning flasher switch while
driving.
AIC0618LIC0095
FRONT FOG LIGHT SWITCH
(if so equipped)HAZARD WARNING FLASHER
SWITCH
2-22Instruments and controls
ZX
Page 109 of 263

RADIO
Turn the ignition key to ACC or ON and
press the power on switch to turn on the
radio. If you listen to the radio with the
engine not running, the key should be
turned to the ACC position.
Radio reception is affected by station signal
strength, distance from radio transmitter,
buildings, bridges, mountains and other ex-
ternal influences. Intermittent changes in
reception quality normally are caused by
these external influences.
Using a cellular phone in or near the
vehicle may influence radio reception
quality.
Radio reception
Your NISSAN radio system is equipped with
state-of-the-art electronic circuits to en-
hance radio reception. These circuits are
designed to extend reception range, and to
enhance the quality of that reception.
However there are some general character-
istics of both FM and AM radio signals that
can affect radio reception quality in a mov-
ing vehicle, even when the finest equipment
is used. These characteristics are com-pletely normal in a given reception area,
and do not indicate any malfunction in your
NISSAN radio system.
Reception conditions will constantly change
because of vehicle movement. Buildings,
terrain, signal distance and interference
from other vehicles can work against ideal
reception. Described below are some of the
factors that can affect your radio reception.
FM RADIO RECEPTION
Range: FM range is normally limited to 25 to
30 miles (40 to 48 km), with monaural
(single channel) FM having slightly more
range than stereo FM. External influences
may sometimes interfere with FM station
reception even if the FM station is within 25
miles (40 km). The strength of the FM signal
is directly related to the distance between
the transmitter and receiver. FM signals
follow a line-of-sight path, exhibiting many
of the same characteristics as light. For
example they will reflect off objects.
Fade and drift: As your vehicle moves away
from a station transmitter, the signals will
tend to fade and/or drift.
Static and flutter: During signal interference
from buildings, large hills or due to antennaposition, usually in conjunction with in-
creased distance from the station transmit-
ter, static or flutter can be heard. This can be
reduced by adjusting the treble control
counterclockwise to reduce treble re-
sponse.
Multipath reception: Because of the reflec-
tive characteristics of FM signals, direct and
reflected signals reach the receiver at the
same time. The signals may cancel each
other, resulting in momentary flutter or loss
of sound.
AM RADIO RECEPTION
AM signals, because of their low frequency,
can bend around objects and skip along the
ground. In addition, the signals can be
bounced off the ionosphere and bent back
to earth. Because of these characteristics.
AM signals are also subject to interference
as they travel from transmitter to receiver.
Fading: Occurs while the vehicle is passing
through freeway underpasses or in areas
with many tall buildings. It can also occur for
several seconds during ionospheric turbu-
lence even in areas where no obstacles
exist.
Static: Caused by thunderstorms, electrical
AUDIO SYSTEM
4-10Heater, air conditioner and audio systems
ZX
Page 112 of 263

FM-AM RADIO WITH COMPACT
DISC (CD) PLAYER (if so
equipped)
Audio main operation
Radio reception is affected by station signal
strength, distance from radio transmitter,
buildings, bridges, mountains, and other
external influences. Intermittent changes in
reception quality normally are caused by
these external influences.
Using a cellular phone in or near the
vehicle may influence radio reception
quality.
PWR/VOL control
Turn the ignition key to the ACC or ON
position, then push the PWR/VOL control
knob button. If you listen to the radio with
the engine not running, turn the key to the
ACC position. The mode (radio or CD)
which was playing immediately before the
system was turned off resumes playing.
When no CD is loaded, the radio comes on.
Push the PWR/VOL control knob button
again turns the system off.Turn the PWR/VOL control knob to the right
to increase volume or to the left to decrease
volume.
Adjusting tone quality and speaker bal-
ance
To adjust the audio levels for bass, treble,
fader, and balance, push the AUDIO button
and adjust the level with the SEEK/TRACK
button. Press the AUDIO button once for
BAS (bass), twice for TRE (treble), three
times for FAD (fader) and four times for BAL
(balance). Once the audio level is set the
display will return back to radio or CD
display mode after 7 seconds or the AUDIO
button can be pressed again within 7 sec-
onds to set the next audio level. Pressing
the AUDIO button a fifth time will return the
display back to radio or CD display mode.
Fader adjusts the sound level between the
front and rear speakers, balance adjusts the
sound level between the right and left
speakers.
Clock set
Press and hold the MENU button for more
than 2 seconds the radio beeps and the
hours flash, use the SEEK/TRACK button to
set the hour, press the MENU button again
until the radio beeps and the minutes flash,
LHA0118
Heater, air conditioner and audio systems4-13
ZX