display NISSAN XTERRA 2005 N50 / 2.G User Guide
[x] Cancel search | Manufacturer: NISSAN, Model Year: 2005, Model line: XTERRA, Model: NISSAN XTERRA 2005 N50 / 2.GPages: 296, PDF Size: 4.89 MB
Page 150 of 296

pressed, and stops at the next broadcasting sta-
tion. If using thebutton, once the highest
broadcasting station is reached, the radio contin-
ues in the SEEK mode at the lowest broadcasting
station. If using the
button, once the lowest
broadcasting station is reached, the radio contin-
ues in the SEEK mode at the highest broadcast-
ing station.
Manual tuning
Use the
andbuttons for manual
tuning. To move quickly through the channels,
hold either of the tuning buttons down.
SCAN tuning
Push and hold the SEEK/TRACK tuning button
(
or) for more than 1.5 seconds.
SCAN illuminates in the display window, and the
radio station blinks. SCAN tuning begins from
low to high frequencies or high to low frequen-
cies, depending on which button is pressed.
SCAN tuning stops at each broadcasting station
for 5 seconds. When scanning, SCAN is solid
and the radio station blinks. When temporarily
stopped on a station, SCAN blinks and the sta-
tion display is solid. Pushing the button again
during this 5 second period stops SCAN tuning
and the radio remains tuned to that station.Station memory operations
Each preset mode (A, B or C) has 6 presets,
capable of storing any combination of AM and FM
stations.Press the PRESET ABC button to change be-
tween the presets:
A!B!C
The radio displays icon A, B or C to indicate
which set of presets is active.
To store a radio station in a preset:
1. Select the desired preset by pressing PRE-
SET ABC.
2. Tune to the desired station.
3. Press the desired station select button for
more than 3 seconds. For example, in the
illustrations, ch2 is to be memorized. The
radio mutes when the select button is
pushed.
4. When the indicator illuminates in the display
and the sound resumes, memorizing is com-
plete.
5. Other station select buttons can be set in
the same manner.
If the battery cable is disconnected, or if the radio
fuse opens, the radio memory is canceled. In that
case, reset the desired stations.
Compact disc (CD) player operation
Turn the ignition key to the ACC or ON position,
and carefully insert the compact disc into the slot
LHA0119
4-18Heater, air conditioner and audio systems
ZREVIEW COPYÐ2005 Xterra(xtr)
Owners ManualÐUSA_English(nna)
11/15/04Ðdebbie
X
Page 151 of 296
with the label side up. The compact disc is auto-
matically pulled into the slot and starts to play.
If the radio is already operating, it automatically
turns off and the compact disc begins to play.
CAUTION
Do not force a compact disc into the CD
insert slot. This could damage the CD
and/or CD changer/player.
CD button
When the CD button is pushed with a compact
disc loaded and the radio playing, the radio turns
off and the compact disc starts to play.
Track up/down, FF/REV
(rewind) buttons
Track up/down
When the
button is pushed and released
while the compact disc is playing, the selection
following the present one starts to play from the
beginning. Push the
button several times to
skip several selections. Each time the button is
pushed, the CD advances 1 additional selection.
The number appears in the display window.
(When the last selection on the compact disc is
skipped, the first selection is played.)When the
button is pushed and released, the
selection being played returns to the beginning.
Push the
button several times to skip back
several selections. Each time the button is
pushed, the CD moves back 1 selection.
If the play pattern is in MIX mode when the
orbutton is pushed the next selection will be
chosen at random.
FF (Fast Forward)/REV (Reverse)
When the
orbutton is pushed and held
while the compact disc is playing, the compact
disc plays at an increased speed while fast for-
warding or rewinding. When the button is re-
leased, the compact disc returns to normal play
speed.
MENU
When the
button is pushed while the com-
pact disc is playing, the play pattern changes as
follows:
RPT:The current selection is repeated.
MIX:Selections are played at random, not fol-
lowing the sequence on the compact disc. The
same program may be repeated twice. If the
button is pushed in the MIX mode, selections will
be chosen at random.Blank(no symbol): All selections are played
repeatedly in sequence.
When a new compact disc is inserted, the
play pattern automatically changes to ALL.
CD EJECT button
When the
button is pushed with a com-
pact disc loaded, the compact disc ejects.
When the
button is pushed while the com-
pact disc is playing, the compact disc ejects and
the system turns off.
DISC indicator light
This light
comes on when a compact disc
is loaded into the player.
Heater, air conditioner and audio systems4-19
ZREVIEW COPYÐ2005 Xterra(xtr)
Owners ManualÐUSA_English(nna)
11/15/04Ðdebbie
X
Page 152 of 296
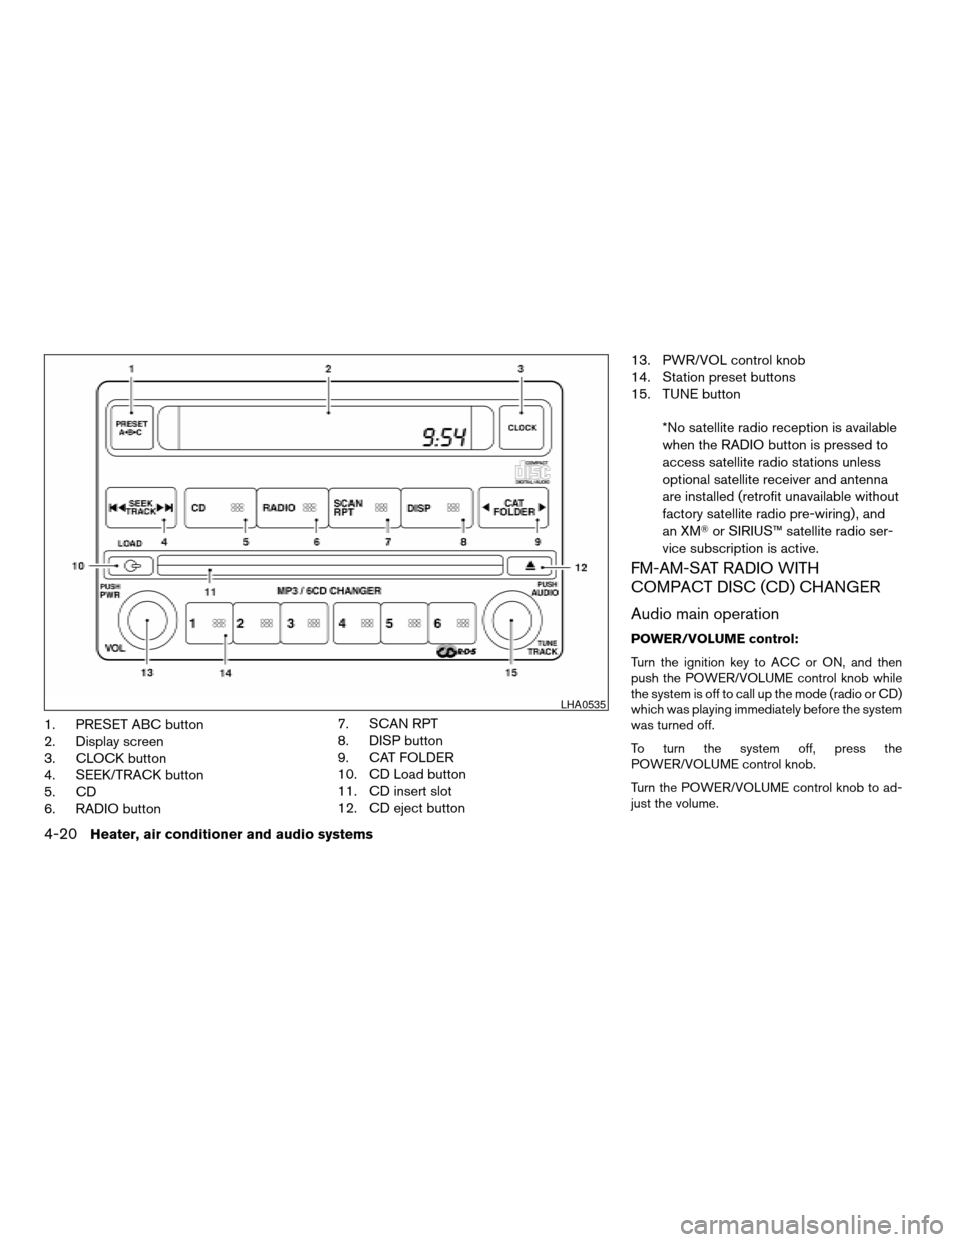
1. PRESET ABC button
2. Display screen
3. CLOCK button
4. SEEK/TRACK button
5. CD
6. RADIO button7. SCAN RPT
8. DISP button
9. CAT FOLDER
10. CD Load button
11. CD insert slot
12. CD eject button13. PWR/VOL control knob
14. Station preset buttons
15. TUNE button
*No satellite radio reception is available
when the RADIO button is pressed to
access satellite radio stations unless
optional satellite receiver and antenna
are installed (retrofit unavailable without
factory satellite radio pre-wiring) , and
an XMTor SIRIUS™ satellite radio ser-
vice subscription is active.
FM-AM-SAT RADIO WITH
COMPACT DISC (CD) CHANGER
Audio main operation
POWER/VOLUME control:
Turn the ignition key to ACC or ON, and then
push the POWER/VOLUME control knob while
the system is off to call up the mode (radio or CD)
which was playing immediately before the system
was turned off.
To turn the system off, press the
POWER/VOLUME control knob.
Turn the POWER/VOLUME control knob to ad-
just the volume.
LHA0535
4-20Heater, air conditioner and audio systems
ZREVIEW COPYÐ2005 Xterra(xtr)
Owners ManualÐUSA_English(nna)
11/15/04Ðdebbie
X
Page 153 of 296

This vehicle may be equipped with speed sensi-
tive control volume (SSV) for audio. The audio
volume changes as the driving speed changes.
AUDIO knob (BASS, MIDRANGE, TREBLE,
FADE, BALANCE and SSV if so equipped):
Press the AUDIO knob to change the mode as
follows:
BASS!MID!TREBLE!FADE!BALANCE
!SSV (if so equipped)
To adjust Bass, Mid (Midrange) , Treble, Fade and
Balance, press the AUDIO knob until the desired
mode appears in the display. Turn the Tuning
knob to adjust Bass and Treble to the desired
level. You can also use the Tuning knob to adjust
Fader and Balance modes. Fader adjusts the
sound level between the front and rear speakers
and Balance adjusts the sound between the right
and left speakers.
To change the SSV mode to OFF, LOW, MID or
HIGH, turn the Tuning knob to the right or left.
Once you have adjusted the sound quality to the
desired level, press the AUDIO knob repeatedly
until the radio or CD display reappears. Other-
wise, the radio or CD display will automatically
reappear after about 10 seconds.Clock set
1. Press the CLOCK button until it beeps
(>1.5 seconds) .
2. The hours will start flashing. Press CAT
FOLDER (
or) or SEEK TRACK
(or) to adjust the hours.
3. Press the CLOCK button again to switch to
the minute adjustment.
4. Press CAT FOLDER (
or)or
SEEK-TRACK (or) to adjust
the minutes.
5. Press the CLOCK button again to exit the
clock set mode.
The display will return to the regular clock display
after 7 seconds, or you may press the CLOCK
button again to return to the regular clock display.
DISP (display) button:
This DISP (display) button will show text about
MP3, SAT or CD information in the audio display.
CD display mode
To change the text displayed while playing a CD
with text, press the DISP button. The DISP button
will allow you to scroll through CD text as follows:
Disc titleÃ!Track title.To change the default display mode push the
tune knob to display mode and rotate the knob to
select the following display mode: Disc titleÃ!
Track titleÃ!Track number.
Once the display mode is selected press the tune
knob to store your selection. If the tuning knob is
not pressed after 8 seconds the display will re-
fresh with the last selected display mode setting.
cTrack title mode displays the title of the se-
lected CD track.
cDisk title mode displays the title of the CD
being played.
cTrack number mode displays the number
selected disc and the track that is currently
being played on the disk.
MP3 display mode
To change the text displayed when listening to an
MP3 with MP3 text (when CD with text is being
used) , press the DISP button. The DISP button
will scroll through the CD text as follows: Disc
titleÃ!Track titleÃ!Folder title.
To change the default display mode push the
tune knob to display mode and rotate the knob to
select the following display mode: Folder number
Ã!Track titleÃ!Folder titleÃ!Disc title
Ã!Disc number.
Heater, air conditioner and audio systems4-21
ZREVIEW COPYÐ2005 Xterra(xtr)
Owners ManualÐUSA_English(nna)
11/15/04Ðdebbie
X
Page 154 of 296
Once a display mode is selected press the tune
knob again to store the setting.
cFolder number mode displays the folder
number and the file number of the folder
currently being played.
cDisc number mode displays the number se-
lected disc and the track that is currently
being played.
cTrack title mode displays the ID3 track title of
the MP3 file.
cDisc title mode displays the ID3 disc title of
the MP3 file.
cFolder title mode displays the folder name
given to the MP3 folder.
Display satellite radio display mode (if so
equipped)
To change the text displayed when listening to
satellite radio (if so equipped) press the DISP
button. The DISP button will scroll through the
broadcasted information as follows: NameÃ!
TitleÃ!Current display mode.
To change the default display mode push the
tune knob to display mode and rotate the knob to
select the following display modes: Channel
numberÃ!Channel nameÃ!NameÃ!
Title. Once the display mode is selected press
the tune knob again to store the setting. If thetuning knob is not pressed after 8 seconds the
display will refresh with the last selected display
mode setting.
cChannel number mode displays the channel
number of the selected satellite radio sta-
tion.
cChannel name mode displays the channel
name of the selected satellite radio station.
cName mode displays the name of the artist,
host or weather condition of the selected
satellite radio station.
cTitle mode displays the song title, show
name, or temperature of the selected satel-
lite radio station.
FM/AM/SAT radio operation
FM/AM/SAT band select:
Pushing the RADIO button will change the band
as follows:
AMÃ!FM1 or SAT (Satellite, if so equipped)
When the RADIO button is pushed while the
ignition switch is in the ACC or ON position, the
radio will come on at the station last played.
The last station played will also come on when
the POWER/VOLUME control knob is de-
pressed to ON.No satellite radio reception is available when the
RADIO button is pressed to access satellite radio
stations unless optional satellite receiver and an-
tenna are installed (retrofit unavailable without
factory satellite radio pre-wiring) , and an XMTor
SIRIUS™ satellite radio service subscription is
active. If satellite radio is not operational then the
RADIO button is used to toggle between AM and
FM bands.
If a compact disc is playing when the RADIO
button is pushed, the compact disc will automati-
cally be turned off and the last radio station
played will come on.
The FM stereo indicator ST will glow during FM
stereo reception. When the stereo broadcast
signal is weak, the radio will automatically change
from stereo to monaural reception.CAT FOLDER (Tuning):
WARNING
The radio should not be tuned while driv-
ing so full attention may be given to ve-
hicle operation.
To manually tune the radio, push the CAT
FOLDER tune button (
or) or turn
the tuning knob to right or left.
4-22Heater, air conditioner and audio systems
ZREVIEW COPYÐ2005 Xterra(xtr)
Owners ManualÐUSA_English(nna)
11/15/04Ðdebbie
X
Page 155 of 296
To move quickly through the channels, hold either
theorbutton down for more than
1.5 seconds.
SEEK tuning:
Push the SEEK/TRACK button (
or)
for less than 1.5 seconds to tune from high to low
or low to high frequencies and stop at the next
broadcasting station.
To seek quickly through the channels, press and
hold the SEEK/TRACK button for more than 1.5
seconds. When the button is released the radio
will seek to the next broadcasting station.
SCAN RPT tuning:
Push the SCAN RPT button to stop at each
broadcasting station (AM, FM or SAT if so
equipped) for 5 seconds. Pushing the button
again during this 5 second period will stop SCAN
tuning and the radio will remain tuned to that
station. If the SCAN RPT button is not pushed
within 5 seconds, SCAN tuning moves to the
next station.
PRESET A-B-C (Station memory opera-
tions):
18 stations can be set for the FM, AM and SAT
(Satellite-if so equipped) radio to the A, B and C
preset button in any combination of FM, AM or
SAT stations.1. Choose preset channel A, B or C using the
preset select button.
2. Select the desired FM, AM or SAT station
band.
3. Tune to the desired station using manual,
SEEK or SCAN tuning. Push and hold any of
the desired station memory buttons (1 – 6)
until a beep sound is heard.
4. The channel indicator will then come on and
the sound will resume. Memorizing is now
complete.
5. Other buttons can be set in the same man-
ner.
If the battery cable is disconnected, or if the fuse
blows, the radio memory will be canceled. In that
case, reset the desired stations.
Radio data system (RDS):
RDS stands for Radio Data System, and is a data
information service transmitted by some radio
stations on the FM band (not AM band) . Cur-
rently, most RDS stations are in large cities, but
many stations are now considering broadcasting
RDS data.
RDS can display:
cStation call sign, such as “WHFR 98.3”.
cStation name, such as “The Groove”.If the station broadcasts RDS information, the
RDS icon is displayed.
Compact disc (CD) changer operation
CAUTION
cDo not force a compact disc into the CD
insert slot. This could damage the CD
and/or CD changer/player.
cTrying to load a CD with the CD door
closed could damage the CD and/or CD
changer.
Turn the ignition key to the ACC or ON position
and insert the compact disc into the slot with the
label side facing up. The compact disc will be
guided automatically into the slot and start play-
ing. To insert the disc, first push the LOAD button.
If the radio is already operating, it will automati-
cally turn off and the compact disc will play.
If the system has been turned off while the com-
pact disc was playing, pushing the
POWER/VOLUME control knob will start the
compact disc.
LOAD button:
To insert a CD in the CD changer, push the load
button
for less than 1.5 seconds. Select
Heater, air conditioner and audio systems4-23
ZREVIEW COPYÐ2005 Xterra(xtr)
Owners ManualÐUSA_English(nna)
11/15/04Ðdebbie
X
Page 156 of 296

the loading slot by pushing the CD insert select
button (1 – 6) , then insert the CD.
To insert 6 CDs to the CD changer, push the load
button for more than 1.5 seconds.
The slot numbers (1 – 6) will illuminate on the
display when CDs are loaded into the changer.
CD button:
When the CD button is pushed with the system
off and the compact disc loaded, the system will
turn on and the compact disc will start to play.
When the CD button is pushed with the compact
disc loaded with the radio playing, the radio will
automatically be turned off and the compact disc
will start to play.
SEEK/TRACK:
When the
button is pushed for less than 1.5
seconds while a compact disc is playing, the
track being played returns to its beginning. Push
several times to skip back through tracks. The
compact disc will go back the number of times
the button is pushed.
When the
button is pushed for less than 1.5
seconds while the compact disc is playing, the
next track will start to play from its beginning.
Push several times to skip through tracks. The
compact disc will advance the number of timesthe button is pushed. (When the last track on the
compact disc is skipped through, the first track
will be played.)
When the
orbutton is pushed for
more than 1.5 seconds while a CD is playing, the
CD plays at an increased speed while fast for-
warding or rewinding through the existing track
being played. When the button is released the
CD returns to normal play speed.
CD select buttons:
To play another CD that has been loaded, push a
CD select button (1 – 6) .
SCAN/RPT:
When the SCAN/RPT play button is pushed
while the compact disc is played, the play pattern
can be changed as follows:
ALL DISC RPT!1 DISC RPT!1 TRACK RPT
!ALL DISC RDM!1 DISC RDM!ALL DISC
RPT
ALL DISC RPT: All discs loaded will be repeated.
1 DISC RPT: The disc that is currently playing will
be repeated.
1 TRACK RPT: The track that is currently playing
will be repeated
ALL DISC RDM: Tracks from all discs will be
played randomly1 DISC RDM: Tracks from the disc that is cur-
rently playing will be played randomly
CD EJECT:
Current disc:
cPress the slot number (1 – 6) for the desired
disc, then press the
button. The com-
pact disc will be ejected. If the disc is not
removed within 15 seconds, the disc will
reload (except 3.1 in [8 cm] diameter com-
pact discs) .
All discs:
cPress and hold the
button for more
than 1.5 seconds. The compact discs will be
ejected one by one. If a disc is not removed
within 15 seconds, or the
button is
pressed again during the eject sequence,
the entire disc eject sequence will be can-
celed.
When this button is pushed while the compact
disc is being played, the compact disc will eject
and the last source will be played.
CD IN indicator:
The slot numbers (1 – 6) will illuminate if CDs
have been loaded into the changer.
4-24Heater, air conditioner and audio systems
ZREVIEW COPYÐ2005 Xterra(xtr)
Owners ManualÐUSA_English(nna)
11/15/04Ðdebbie
X
Page 183 of 296
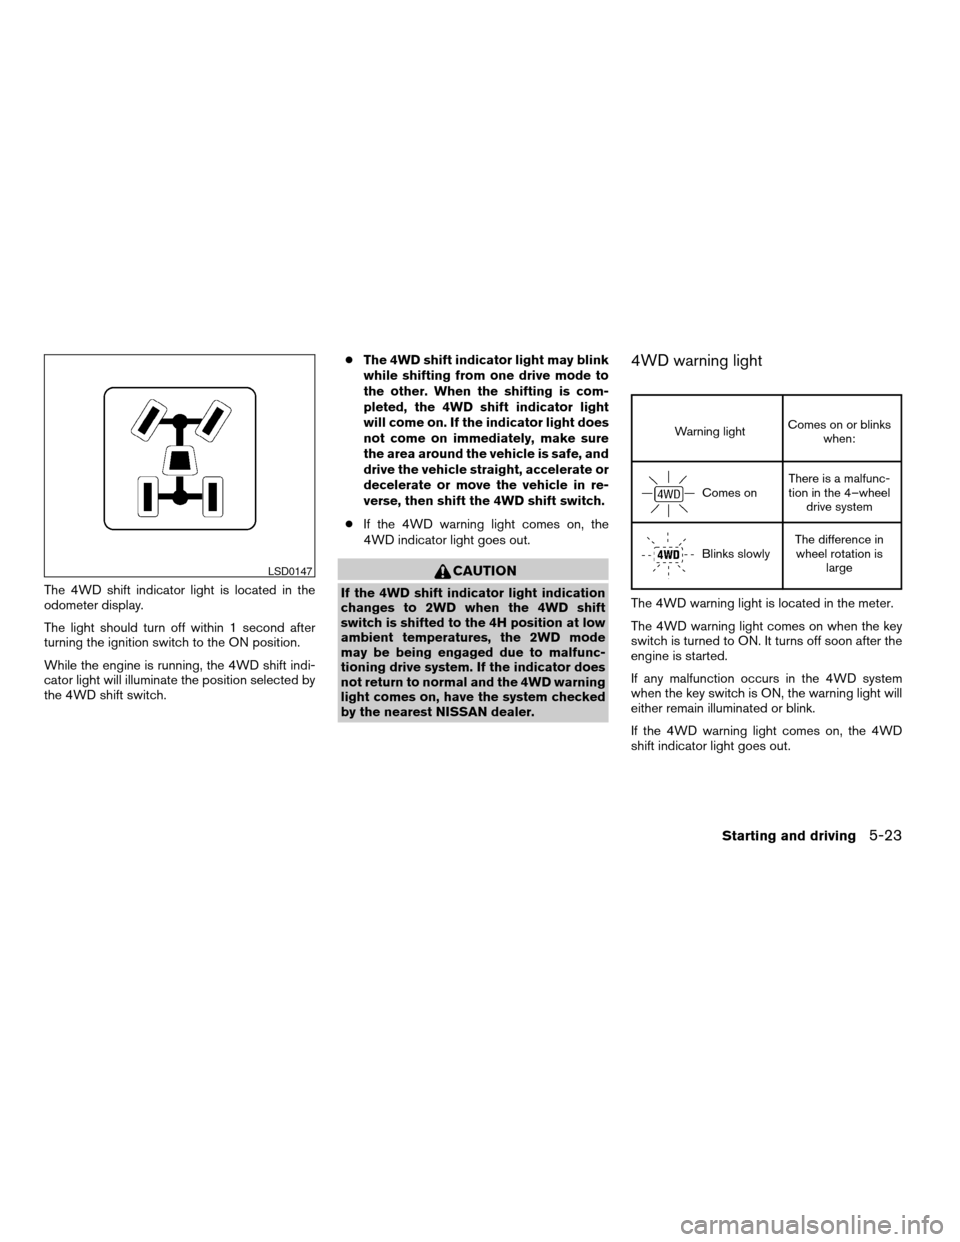
The 4WD shift indicator light is located in the
odometer display.
The light should turn off within 1 second after
turning the ignition switch to the ON position.
While the engine is running, the 4WD shift indi-
cator light will illuminate the position selected by
the 4WD shift switch.cThe 4WD shift indicator light may blink
while shifting from one drive mode to
the other. When the shifting is com-
pleted, the 4WD shift indicator light
will come on. If the indicator light does
not come on immediately, make sure
the area around the vehicle is safe, and
drive the vehicle straight, accelerate or
decelerate or move the vehicle in re-
verse, then shift the 4WD shift switch.
cIf the 4WD warning light comes on, the
4WD indicator light goes out.
CAUTION
If the 4WD shift indicator light indication
changes to 2WD when the 4WD shift
switch is shifted to the 4H position at low
ambient temperatures, the 2WD mode
may be being engaged due to malfunc-
tioning drive system. If the indicator does
not return to normal and the 4WD warning
light comes on, have the system checked
by the nearest NISSAN dealer.
4WD warning light
Warning lightComes on or blinks
when:
Comes onThere is a malfunc-
tion in the 4–wheel
drive system
Blinks slowlyThe difference in
wheel rotation is
large
The 4WD warning light is located in the meter.
The 4WD warning light comes on when the key
switch is turned to ON. It turns off soon after the
engine is started.
If any malfunction occurs in the 4WD system
when the key switch is ON, the warning light will
either remain illuminated or blink.
If the 4WD warning light comes on, the 4WD
shift indicator light goes out.
LSD0147
Starting and driving5-23
ZREVIEW COPYÐ2005 Xterra(xtr)
Owners ManualÐUSA_English(nna)
11/15/04Ðdebbie
X
Page 196 of 296

A first aid kit is located on the back door trim
panel. To remove the first aid kit:
s1Squeeze the latch buttons.
s2Pull the two straps apart to unfasten.
LOW TIRE PRESSURE WARNING
SYSTEM
This vehicle is equipped with the low tire pres-
sure warning system. It monitors tire pressure of
all tires except the spare. When the tire pressure
monitoring system warning light is lit, one or more
of your tires is significantly under-inflated. If
equipped, the system also displays pressure of
all tires (except the spare tire) on the display
screen by sending a signal from a sensor that is
installed in each wheel. If the vehicle is being
driven with low tire pressure (lower than 28 psi,
193 kPa) , the low tire pressure warning system
will activate and warn you of it by the low tire
pressure warning light. This system will activate
only when the vehicle is driven at speeds above
20 MPH (32 km/h) . For more details, refer to
“Warning/indicator lights and audible reminders”
in the “Instruments and controls” section, “Tire
pressure information” in the “Display screen,
heater, air conditioner and audio systems” sec-
tion and “Low tire pressure warning system” in
the “Starting and driving” section.
LCE0114
FIRST AID KITFLAT TIRE
6-2In case of emergency
ZREVIEW COPYÐ2005 Xterra(xtr)
Owners ManualÐUSA_English(nna)
11/15/04Ðdebbie
X
Page 247 of 296
If you have a flat tire, see the “In case of
emergency” section of this manual.
TIRE PRESSURE
Low tire pressure warning system (if
so equipped)
This vehicle is equipped with the low tire pres-
sure warning system. It monitors tire pressure of
all tires except the spare. When the tire pressure
monitoring system warning light is lit, one or more
of your tires is significantly underinflated.
The low tire pressure warning system will activate
only when the vehicle is driven at speeds above
20 MPH (32 km/h) . Also, this system may not
detect a sudden drop in tire pressure (for ex-
ample a flat tire while driving) .
For more details, refer to “Low tire pressure warn-
ing light” in the “Instruments and controls” sec-
tion, ”Tire pressure information” in the “Display
screen, heater, air conditioner and audio sys-
tems” section, “Low tire pressure warning sys-
tem” in the “Starting and driving” section, and
“Flat tire” in the “In case of emergency” section.
Tire inflation pressure
Check the tire pressures (including the spare)
often and always prior to long distance trips. The
recommended tire pressure specifications areshown on the FMVSS label or the Tire and Load-
ing Information label (if so equipped) under the
9Recommended Cold Tire Inflation Pressure9
heading. The Tire and Loading Information label
is affixed to the driver side center pillar. Tire
pressures should be checked regularly because:
cMost tires naturally lose air over time.
cTires can lose air suddenly when driven over
potholes or other objects or if the vehicle
strikes a curb while parking.
The tire pressures should be checked when the
tires are cold. The tires are considered COLD
after the vehicle has been parked for 3 or more
hours, or driven less than 1 mile (1.6 km) at
moderate speeds.
Incorrect tire pressure, including under in-
flation, may adversely affect tire life and
vehicle handling.
WARNING
cImproperly inflated tires can fail sud-
denly and cause an accident.cThe Gross Maximum Weight rating is
located on the FMVSS label. The ve-
hicle weight capacity is indicated on the
Tire and Loading Information label (if so
equipped) . Do not load your vehicle be-
yond this capacity. Overloading your ve-
hicle may result in reduced tire life, un-
safe operating conditions due to
premature tire failure, or unfavorable
handling characteristics and could also
lead to a serious accident. Loading be-
yond the specified capacity may also
result in failure of other vehicle
components.
cBefore taking a long trip, or whenever
you heavily load your vehicle, use a tire
pressure gauge to ensure that the tire
pressures are at the specified level.
cDo not drive your vehicle over 85 MPH
(137 km/h) unless it is equipped with
high speed rated tires. Driving faster
than 85 MPH (137 km/h) may result in
tire failure, loss of control and possible
injury.
cFor additional information regarding
tires, refer to “Important Tire Safety In-
formation” (US) or “Tire Safety Informa-
tion” (Canada) in the Warranty Informa-
tion Booklet.
WHEELS AND TIRES
Maintenance and do-it-yourself8-31
ZREVIEW COPYÐ2005 Xterra(xtr)
Owners ManualÐUSA_English(nna)
11/15/04Ðdebbie
X