flat tire NISSAN XTERRA 2006 N50 / 2.G Owner's Manual
[x] Cancel search | Manufacturer: NISSAN, Model Year: 2006, Model line: XTERRA, Model: NISSAN XTERRA 2006 N50 / 2.GPages: 304, PDF Size: 4.93 MB
Page 276 of 304
5. Determine the combined weight of
luggage and cargo being loaded on
the vehicle. That weight may not
safely exceed the available cargo and
luggage load capacity calculated in
Step 4.
6. If your vehicle will be towing a trailer,
load from your trailer will be trans-
ferred to your vehicle. Consult this
manual to determine how this re-
duces the available cargo and lug-
gage load capacity of your vehicle.
Before driving a loaded vehicle, confirm
the you do not exceed the Gross Vehicle
Weight Rating (GVWR) or the Gross Axle
Weight Rating (GAWR) for your vehicle.
See “Measurement of Weights” later in
this section.
Also check tires for proper inflation pres-
sures. See the Tire and Loading label.
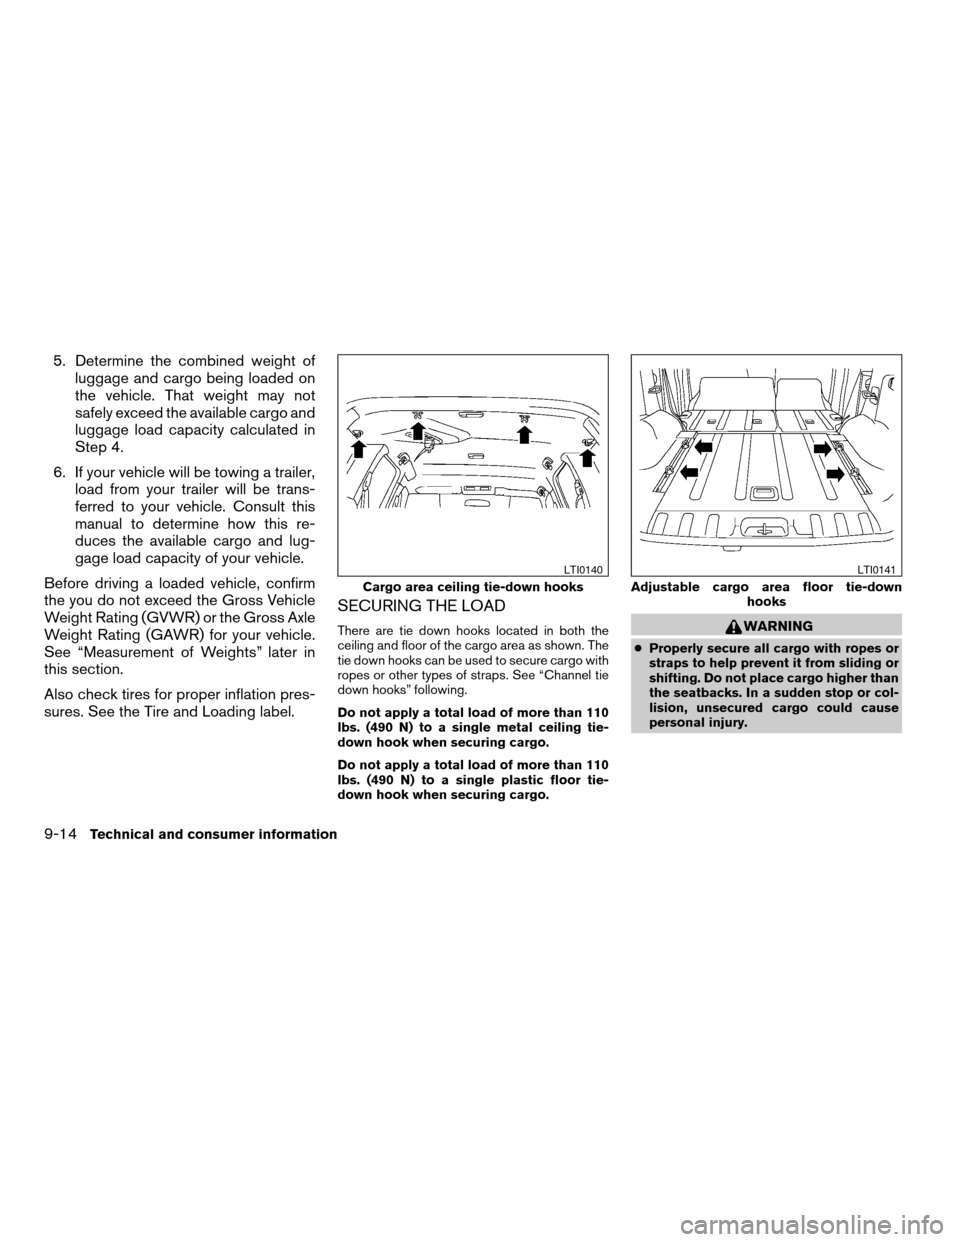
SECURING THE LOAD
There are tie down hooks located in both the
ceiling and floor of the cargo area as shown. The
tie down hooks can be used to secure cargo with
ropes or other types of straps. See “Channel tie
down hooks” following.
Do not apply a total load of more than 110
lbs. (490 N) to a single metal ceiling tie-
down hook when securing cargo.
Do not apply a total load of more than 110
lbs. (490 N) to a single plastic floor tie-
down hook when securing cargo.WARNING
cProperly secure all cargo with ropes or
straps to help prevent it from sliding or
shifting. Do not place cargo higher than
the seatbacks. In a sudden stop or col-
lision, unsecured cargo could cause
personal injury.
Cargo area ceiling tie-down hooks
LTI0140
Adjustable cargo area floor tie-down
hooks
LTI0141
9-14Technical and consumer information
ZREVIEW COPYÐ2006 Xterra(xtr)
Owners ManualÐUSA_English(nna)
08/01/05Ðdebbie
X
Page 284 of 304
cAfter the hitch is removed, seal the bolt
holes to prevent exhaust fumes, water
or dust from entering the passenger
compartment.
cRegularly check that all trailer hitch
mounting bolts are securely mounted.
cWhen towing with the hitch ball
mounted to the rear bumper, do not
make sharp turns. The trailer may con-
tact the bumper and cause damage to
the bumper or trailer.
Tire pressures
cWhen towing a trailer, inflate the ve-
hicle tires to the recommended cold
tire pressure indicated on the Tire
and Loading Information label.
cTrailer tire condition, size, load rating
and proper inflation pressure should
be in accordance with the trailer and
tire manufacturer’s specifications.
Safety chains
Always use suitable safety chains between your
vehicle and the trailer. The safety chains should
be crossed and should be attached to the hitch,
not to the vehicle bumper or axle. The safetychains can be attached to the bumper if the hitch
ball is mounted to the bumper. Be sure to leave
enough slack in the chains to permit turning
corners.
Trailer lights
CAUTION
When splicing into the vehicle electrical
system, a commercially available power-
type module/converter must be used to
provide power for all trailer lighting. This
unit uses the vehicle battery as a direct
power source for all trailer lights while
using the vehicle tail light, stoplight and
turn signal circuits as a signal source. The
module/converter must draw no more
that 15 milliamps from the stop and tail
lamp circuits. Using a module/converter
that exceeds these power requirements
may damage the vehicle’s electrical sys-
tem. See a reputable trailer dealer to ob-
tain the proper equipment and to have it
installed.
Trailer lights should comply with federal and/or
local regulations. For assistance in hooking up
trailer lights, contact a NISSAN dealer or repu-
table trailer dealer. Vehicles equipped with the
optional trailer tow package are equipped with a
7-pin trailer harness connector. If your trailer isequipped with a flat 4-pin connector, an adapter
will be needed to connect the trailer lights to the
vehicle. Adapters are available at auto parts
stores and hitch retailers.
Trailer brakes
If your trailer is equipped with a braking system,
make sure it conforms to federal and/or local
regulations and that it is properly installed.
WARNING
Never connect a trailer brake system di-
rectly to the vehicle brake system.
Electric trailer brake controller
Trailers equipped with electric brakes may re-
quire the installation of an aftermarket trailer
brake controller.
A Genuine NISSAN jumper harness is available
that is specifically designed to be used when
installing an aftermarket brake controller.
Install the aftermarket electric trailer brake con-
troller according to the manufacturer’s instruc-
tions.
9-22Technical and consumer information
ZREVIEW COPYÐ2006 Xterra(xtr)
Owners ManualÐUSA_English(nna)
08/01/05Ðdebbie
X
Page 287 of 304

DOT (Department of Transportation) Quality
Grades: All passenger car tires must conform to
federal safety requirements in addition to these
grades.
Quality grades can be found where applicable on
the tire sidewall between tread shoulder and
maximum section width. For example:
Treadwear 200 Traction AA Temperature A
Treadwear
Treadwear grade is a comparative rating based
on tire wear rate when tested under controlled
conditions on specified government test courses.
For example, a tire graded 150 would wear one
and a half (1-1/2) times as well on the govern-
ment course as a tire graded 100. However,
relative tire performance depends on actual driv-
ing conditions, and may vary significantly due to
variations in driving habits, service practices and
differences in road characteristics and climate.
Traction AA, A, B and C
The traction grades, from highest to lowest, are
AA, A, B, and C. Those grades represent the
tire’s ability to stop on wet pavement as mea-
sured under controlled conditions on specified
government test surfaces of asphalt and con-
crete. A tire marked C may have poor traction
performance.WARNING
The traction grade assigned to your ve-
hicle tires is based on straight-ahead
braking traction tests and does not in-
clude acceleration, cornering, hydroplan-
ing or peak traction characteristics.
Temperature A, B and C
Temperature grades are A (the highest) , B, and
C. They represent a tire’s resistance to heat
build-up, and its ability to dissipate heat when
tested under controlled conditions on a specified
indoor laboratory test wheel. Sustained high tem-
perature can cause tire material to degenerate,
reducing tire life. Excessive temperatures can
lead to sudden tire failure. Grade C corresponds
to a performance level which all passenger car
tires must meet under the Federal Motor Vehicle
Safety Standard No. 109. Grades A and B rep-
resent higher levels of performance on laboratory
test wheels than the minimum required by law.
WARNING
The temperature grade for this tire is es-
tablished for a tire that is properly inflated
and not overloaded. Excessive speed,
under-inflation, or excessive loading, ei-
ther separately or in combination, can
cause heat build-up and possible tire
failure.
UNIFORM TIRE QUALITY GRADING
Technical and consumer information9-25
ZREVIEW COPYÐ2006 Xterra(xtr)
Owners ManualÐUSA_English(nna)
08/01/05Ðdebbie
X
Page 294 of 304

C.M.V.S.S. certification label..........9-10
Cold weather driving..............5-33
Compact disc (CD) player...........4-19
Console box...................2-32
Controls
Audio controls (steering wheel)......4-25
Heater and air conditioner controls.....4-2
Coolant
Capacities and recommended
fuel/lubricants.................9-2
Changing engine coolant..........8-8
Checking engine coolant level........8-7
Engine coolant temperature gauge.....2-6
Corrosion protection...............7-5
Cruise control..................5-17
Cup holders...................2-34
Curtain side-impact and rollover air bag . . .1-51
D
Daytime running light system
(Canada only)..................2-24
Defroster switch
Rear window and outside mirror defroster
switch....................2-22
Dimensions and weights.............9-8
Dimmer switch for instrument panel......2-24
Door locks....................3-3
Door open warning light............2-11
Drive belts....................8-16
Driving
Cold weather driving............5-33
Driving with automatic transmission. . . .5-11
Driving with manual transmission.....5-14
Precautions when starting and driving . . .5-2E
Economy - fuel.................5-19
Electronic locking rear differential (E-Lock)
system......................5-25
Electronic locking rear differential (E-Lock)
system switch..................2-28
Emission control information label.......9-10
Emission control system warranty.......9-26
Engine
Before starting the engine..........5-9
Capacities and recommended
fuel/lubricants.................9-2
Changing engine coolant..........8-8
Changing engine oil.............8-9
Changing engine oil filter..........8-10
Checking engine coolant level........8-7
Checking engine oil level..........8-8
Engine compartment check locations. . . .8-7
Engine coolant temperature gauge.....2-6
Engine cooling system............8-7
Engine oil...................8-8
Engine oil and oil filter recommendation . .9-5
Engine oil pressure warning light.....2-11
Engine oil viscosity..............9-5
Engine serial number............9-10
Engine specifications.............9-7
Starting the engine.............5-10
Engine oil pressure gauge............2-8
Event data recorders..............9-27
Exhaust gas (Carbon monoxide)........5-2F
First aid kit....................6-2
Flashers
(See hazard warning flasher switch)......2-25
Flat tire......................6-2
Floor mat positioning aid.............7-4
Fluid
Brake fluid..................8-12
Capacities and
recommended fuel/lubricants........9-2
Clutch fluid.................8-12
Engine coolant................8-7
Engine oil...................8-8
Power steering fluid.............8-11
Window washer fluid............8-13
F.M.V.S.S. certification label..........9-10
Fog light switch.................2-25
Front air bag system
(See supplemental restraint system).....1-46
Front seats....................1-2
Fuel
Capacities and recommended
fuel/lubricants.................9-2
Fuel economy................5-19
Fuel gauge..................2-7
Fuel octane rating..............9-4
Fuel recommendation............9-3
Fuel-filler door and cap...........3-9
Fuses......................8-23
Fusible links...................8-24
10-2
ZREVIEW COPYÐ2006 Xterra(xtr)
Owners ManualÐUSA_English(nna)
08/01/05Ðdebbie
X
Page 298 of 304

Theft (NISSAN vehicle immobilizer system) ,
engine start..............2-20, 3-2, 5-9
Three-way catalyst................5-2
Tilting steering wheel..............3-11
Tire
Flat tire....................6-2
Spare tire...................6-4
Tire chains..................8-38
Tire placard.................9-11
Tire pressure................8-31
Tire rotation.................8-38
Tires of 4-wheel drive............8-40
Types of tires................8-37
Uniform tire quality grading.........9-25
Wheels and tires..............8-31
Wheel/tire size................9-8
Tire pressure
Low tire pressure warning light......2-12
Tire pressure monitoring system........5-3
Top tether strap child restraint.........1-30
Towing
2-wheel drive models............6-12
4-wheel drive models............6-13
Flat towing..................9-24
Tow truck towing..............6-11
Towing load/specification.........9-20
Trailer towing................9-18
Transmission
Driving with automatic transmission. . . .5-11
Driving with manual transmission.....5-14
Selector lever lock release.........5-13
Travel (See registering your vehicle in another
country)......................9-9
Trip computer...................2-5
Trip odometer...................2-4
Turn signal switch................2-25U
Uniform tire quality grading...........9-25
V
Vanity mirror...................3-12
Vehicle dimensions and weights........9-8
Vehicle dynamic control (VDC) off switch. . .2-26
Vehicle dynamic control (VDC) system. . . .5-30
Vehicle identification...............9-9
Vehicle identification number (VIN)
(Chassis number).................9-9
Vehicle identification number (VIN) plate. . . .9-9
Vehicle loading information...........9-12
Vehicle recovery..............6-14, 7-2
Vehicle security system.............2-18
Vehicle security system (NISSAN vehicle
immobilizer system) , engine start . .2-20, 3-2, 5-9
Ventilators.....................4-2
Visors......................3-11
Voltmeter.....................2-8
W
Warning
4WD warning light.............2-12
Air bag warning light.........1-54, 2-14
Anti-lock brake warning light........2-10
Battery charge warning light........2-11
Brake warning light.............2-11
Door open warning light..........2-11
Engine oil pressure warning light.....2-11Hazard warning flasher switch.......2-25
Low fuel warning light...........2-12
Low tire pressure warning light......2-12
Low washer fluid warning light.......2-13
Passenger air bag and status light.....1-48
Seat belt warning light...........2-12
Vehicle security system...........2-18
Warning labels (for SRS)..........1-53
Warning/indicator lights and audible
reminders...................2-9
Warning lights..................2-9
Washer switch
Rear window wiper and washer
switches...................2-22
Windshield wiper and washer switch . . .2-21
Weights (See dimensions and weights). . . .9-8
Wheels and tires................8-31
Wheel/tire size..................9-8
When traveling or registering your vehicle in
another country..................9-9
Window washer fluid..............8-13
Windows
Locking passengers’ windows.......2-43
Manual windows..............2-44
Power rear windows............2-43
Power windows...............2-42
Rear power windows............2-43
Windshield wiper and washer switch.....2-21
Wiper
Rear window wiper and washer
switches...................2-22
Windshield wiper and washer switch . . .2-21
Wiper blades................8-19
10-6
ZREVIEW COPYÐ2006 Xterra(xtr)
Owners ManualÐUSA_English(nna)
08/01/05Ðdebbie
X