trailer NISSAN XTERRA 2006 N50 / 2.G Owners Manual
[x] Cancel search | Manufacturer: NISSAN, Model Year: 2006, Model line: XTERRA, Model: NISSAN XTERRA 2006 N50 / 2.GPages: 304, PDF Size: 4.93 MB
Page 130 of 304
FUEL-FILLER CAP
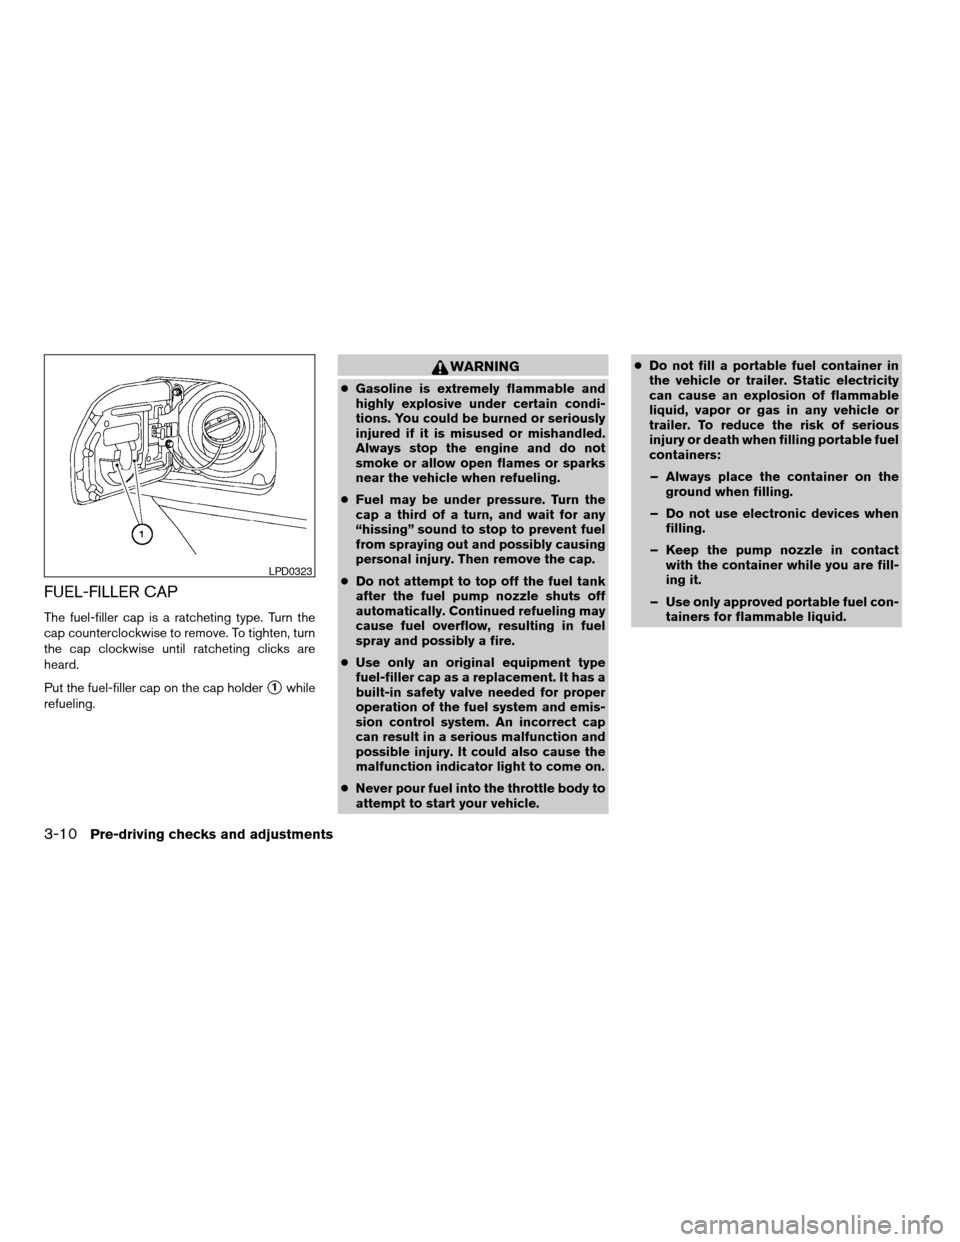
The fuel-filler cap is a ratcheting type. Turn the
cap counterclockwise to remove. To tighten, turn
the cap clockwise until ratcheting clicks are
heard.
Put the fuel-filler cap on the cap holder
s1while
refueling.
WARNING
cGasoline is extremely flammable and
highly explosive under certain condi-
tions. You could be burned or seriously
injured if it is misused or mishandled.
Always stop the engine and do not
smoke or allow open flames or sparks
near the vehicle when refueling.
cFuel may be under pressure. Turn the
cap a third of a turn, and wait for any
“hissing” sound to stop to prevent fuel
from spraying out and possibly causing
personal injury. Then remove the cap.
cDo not attempt to top off the fuel tank
after the fuel pump nozzle shuts off
automatically. Continued refueling may
cause fuel overflow, resulting in fuel
spray and possibly a fire.
cUse only an original equipment type
fuel-filler cap as a replacement. It has a
built-in safety valve needed for proper
operation of the fuel system and emis-
sion control system. An incorrect cap
can result in a serious malfunction and
possible injury. It could also cause the
malfunction indicator light to come on.
cNever pour fuel into the throttle body to
attempt to start your vehicle.cDo not fill a portable fuel container in
the vehicle or trailer. Static electricity
can cause an explosion of flammable
liquid, vapor or gas in any vehicle or
trailer. To reduce the risk of serious
injury or death when filling portable fuel
containers:
– Always place the container on the
ground when filling.
– Do not use electronic devices when
filling.
– Keep the pump nozzle in contact
with the container while you are fill-
ing it.
– Use only approved portable fuel con-
tainers for flammable liquid.
LPD0323
3-10Pre-driving checks and adjustments
ZREVIEW COPYÐ2006 Xterra(xtr)
Owners ManualÐUSA_English(nna)
08/01/05Ðdebbie
X
Page 164 of 304
WARNING
cDo not leave children or adults who
would normally require the assistance
of others alone in your vehicle. Pets
should also not be left alone. They
could accidentally injure themselves or
others through inadvertent operation of
the vehicle. Also, on hot, sunny days,
temperatures in a closed vehicle could
quickly become high enough to cause
severe or possibly fatal injuries to
people or animals.
cProperly secure all cargo with ropes or
straps to help prevent it from sliding or
shifting. Do not place cargo higher than
the seatbacks. In a sudden stop or col-
lision, unsecured cargo could cause
personal injury.
EXHAUST GAS (carbon monoxide)
WARNING
cDo not breathe exhaust gases; they
contain colorless and odorless carbon
monoxide. Carbon monoxide is danger-
ous. It can cause unconsciousness or
death.cIf you suspect that exhaust fumes are
entering the vehicle, drive with all win-
dows fully open, and have the vehicle
inspected immediately.
cDo not run the engine in closed spaces
such as a garage.
cDo not park the vehicle with the engine
running for any extended length of time.
cKeep the lift gate and rear windows
closed while driving, otherwise exhaust
gases could be drawn into the passen-
ger compartment. If you must drive with
the lift gate or rear windows open, fol-
low these precautions:
1. Open all the windows.
2. Set the
air recirculation but-
ton (if so equipped) to off and the fan
control dial to 4 (high) to circulate
the air.
cIf electrical wiring or other cable con-
nections must pass to a trailer through
the seal on the lift gate or the body,
follow the manufacturer’s recommen-
dation to prevent carbon monoxide en-
try into the vehicle.cThe exhaust system and body should be
inspected by a qualified mechanic
whenever:
a. The vehicle is raised for service.
b. You suspect that exhaust fumes are
entering into the passenger
compartment.
c. You notice a change in the sound of
the exhaust system.
d. You have had an accident involving
damage to the exhaust system, un-
derbody, or rear of the vehicle.
THREE-WAY CATALYST
The three-way catalyst is an emission control
device installed in the exhaust system. Exhaust
gases in the three-way catalyst are burned at
high temperatures to help reduce pollutants.
WARNING
cThe exhaust gas and the exhaust sys-
tem are very hot. Keep people, animals
or flammable materials away from the
exhaust system components.
cDo not stop or park the vehicle over
flammable materials such as dry grass,
waste paper or rags. They may ignite
and cause a fire.
PRECAUTIONS WHEN STARTING
AND DRIVING
5-2Starting and driving
ZREVIEW COPYÐ2006 Xterra(xtr)
Owners ManualÐUSA_English(nna)
08/01/05Ðdebbie
X
Page 181 of 304
cPush and hold the ACCEL/RES switch.
When the vehicle attains the speed you de-
sire, release the switch.
cPush and release the ACCEL/RES switch.
Each time you do this, the set speed in-
creases by about 1 MPH (1.6 km/h) .
To reset at a slower cruising speed,use one
of the following three methods.
cLightly tap the brake pedal. When the ve-
hicle attains the desired speed, push the
COAST/SET switch and release it.
cPush and hold the COAST/SET switch. Re-
lease the switch when the vehicle slows to
the desired speed.
cPush and release the COAST/SET switch.
Each time you do this, the set speed de-
creases by about 1 MPH (1.6 km/h) .
To resume the preset speed,push and re-
lease the ACCEL/RES switch. The vehicle re-
turns to the last set cruising speed when the
vehicle speed is over 25 MPH (40 km/h) .CAUTION
During the first 1,200 miles (2,000 km) ,
follow these recommendations to obtain
maximum engine performance and en-
sure the future reliability and economy of
your new vehicle. Failure to follow these
recommendations may result in short-
ened engine life and reduced engine
performance.
cAvoid driving for long periods at constant
speed, either fast or slow, and do not run the
engine over 4,000 rpm.
cDo not accelerate at full throttle in any gear.
cAvoid quick starts.
cAvoid hard braking as much as possible.
cDo not tow a trailer for the first 500 miles
(800 km) . Your engine, axle or other parts
could be damaged.cAccelerate slowly and smoothly. Maintain
cruising speeds with a constant accelerator
position.
cDrive at moderate speeds on the highway.
Driving at high speed lowers fuel economy.
cAvoid unnecessary stopping and braking.
Maintain a safe distance behind other ve-
hicles.
cUse a proper gear range which suits road
conditions. On level roads, shift into high
gear as soon as possible.
cAvoid unnecessary engine idling.
cKeep your engine tuned up.
cFollow the recommended periodic mainte-
nance schedule.
cKeep the tires inflated to the correct pres-
sure. Low tire pressure increases tire wear
and lowers fuel economy.
cKeep the front wheels in correct alignment.
Improper alignment increases tire wear and
lowers fuel economy.
cAir conditioner operation lowers fuel
economy. Use the air conditioner only when
necessary.
BREAK-IN SCHEDULE INCREASING FUEL ECONOMY
Starting and driving5-19
ZREVIEW COPYÐ2006 Xterra(xtr)
Owners ManualÐUSA_English(nna)
08/01/05Ðdebbie
X
Page 263 of 304

9 Technical and consumer information
Capacities and recommended fuel/lubricants.........9-2
Fuel recommendation...........................9-3
Engine oil and oil filter recommendation...........9-5
Recommended SAE viscosity number............9-6
Air conditioner system refrigerant and oil
recommendations..............................9-6
Specifications.....................................9-7
Engine........................................9-7
Wheels and tires...............................9-8
Dimensions and weights........................9-8
When traveling or registering your vehicle in
another country...................................9-9
Vehicle identification...............................9-9
Vehicle identification number (VIN) plate..........9-9
Vehicle identification number
(chassis number)...............................9-9
Engine serial number...........................9-10
F.M.V.S.S./C.M.V.S.S. certification label..........9-10
Emission control information label...............9-10
Tire and loading information label................9-11
Air conditioner specification label................9-11Installing front license plate........................9-11
Vehicle loading information........................9-12
Terms........................................9-12
Vehicle load capacity..........................9-12
Securing the load..............................9-14
Channel tie-down hooks.......................9-15
Loading tips..................................9-17
Measurement of weights.......................9-17
Towing a trailer...................................9-18
Maximum load limits...........................9-18
Towing load/specification.......................9-20
Towing safety.................................9-20
Flat towing....................................9-24
Uniform tire quality grading........................9-25
Emission control system warranty..................9-26
Reporting safety defects (US only).................9-26
Readiness for inspection/maintenance (I/M) test.....9-26
Event data recorders..............................9-27
Owner’s Manual/Service Manual order information . . . 9-28
In the event of a collision.......................9-28
ZREVIEW COPYÐ2006 Xterra(xtr)
Owners ManualÐUSA_English(nna)
08/01/05Ðdebbie
X
Page 268 of 304
Change intervals
The oil and oil filter change intervals for your
engine are based on the use of the specified
quality oils and filters. Using engine oil and filters
that are not of the specified quality, or exceeding
recommended oil and filter change intervals
could reduce engine life. Damage to the engine
caused by improper maintenance or use of incor-
rect oil and filter quality and/or viscosity is not
covered by the NISSAN new vehicle warranty.
Your engine was filled with a high-quality engine
oil when it was built. You do not have to change
the oil before the first recommended change
interval. Oil and filter change intervals depend
upon how you use your vehicle.
Operation under the following conditions may
require more frequent oil and filter changes:
crepeated short distance driving at cold out-
side temperatures
cdriving in dusty conditions
cextensive idling
ctowing a trailer
cstop and go commuting
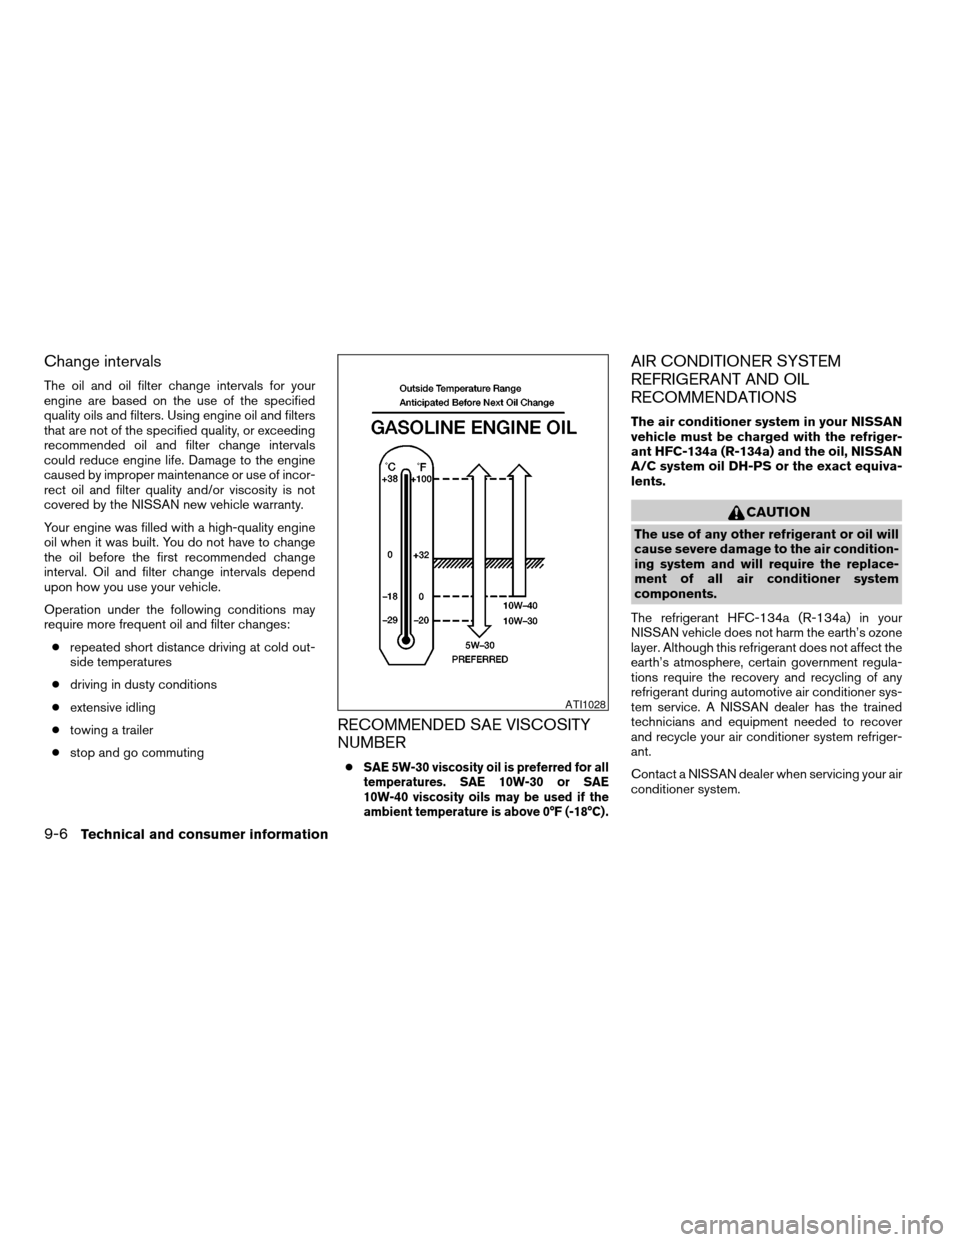
RECOMMENDED SAE VISCOSITY
NUMBER
cSAE 5W-30 viscosity oil is preferred for all
temperatures. SAE 10W-30 or SAE
10W-40 viscosity oils may be used if the
ambient temperature is above 0°F (-18°C) .
AIR CONDITIONER SYSTEM
REFRIGERANT AND OIL
RECOMMENDATIONS
The air conditioner system in your NISSAN
vehicle must be charged with the refriger-
ant HFC-134a (R-134a) and the oil, NISSAN
A/C system oil DH-PS or the exact equiva-
lents.
CAUTION
The use of any other refrigerant or oil will
cause severe damage to the air condition-
ing system and will require the replace-
ment of all air conditioner system
components.
The refrigerant HFC-134a (R-134a) in your
NISSAN vehicle does not harm the earth’s ozone
layer. Although this refrigerant does not affect the
earth’s atmosphere, certain government regula-
tions require the recovery and recycling of any
refrigerant during automotive air conditioner sys-
tem service. A NISSAN dealer has the trained
technicians and equipment needed to recover
and recycle your air conditioner system refriger-
ant.
Contact a NISSAN dealer when servicing your air
conditioner system.
ATI1028
9-6Technical and consumer information
ZREVIEW COPYÐ2006 Xterra(xtr)
Owners ManualÐUSA_English(nna)
08/01/05Ðdebbie
X
Page 274 of 304
WARNING
cIt is extremely dangerous to ride
in a cargo area inside a vehicle. In
a collision, people riding in these
areas are more likely to be seri-
ously injured or killed.
cDo not allow people to ride in any
area of your vehicle that is not
equipped with seats and seat
belts.
cBe sure everyone in your vehicle
is in a seat and using a seat belt
properly.
TERMS
It is important to familiarize yourself with
the following terms before loading your
vehicle:
cCurb Weight (actual weight of your
vehicle) - vehicle weight including:
standard and optional equipment, flu-
ids, emergency tools, and spare tire
assembly. This weightdoes notin-
clude passengers and cargo.cGVW (Gross Vehicle Weight) - curb
weight plus the combined weight of
passengers and cargo.
cGVWR (Gross Vehicle Weight Rat-
ing) - maximum total combined
weight of the unloaded vehicle, pas-
sengers, luggage, hitch, trailer
tongue load and any other optional
equipment. This information is lo-
cated on the F.M.V.S.S. label.
cGAWR (Gross Axle Weight Rating) -
maximum weight (load) limit specified
for the front or rear axle. This informa-
tion is located on the F.M.V.S.S. label.
cGCWR (Gross Combined Weight
rating) - The maximum total weight
rating of the vehicle, passengers,
cargo, and trailer.
cVehicle Capacity Weight, Load limit,
Total load capacity - maximum total
weight limit specified of the load
(passengers and cargo) for the ve-
hicle. This is the maximum combined
weight of occupants and cargo that
can be loaded into the vehicle. If thevehicle is used to tow a trailer, the
trailer tongue weight must be in-
cluded as part of the cargo load. This
information is located on the Tire and
Loading Information label (if so
equipped) .
cCargo capacity - permissible weight
of cargo, the subtracted weight of
occupants from the load limit.
VEHICLE LOAD CAPACITY
Do not exceed the load limit of your ve-
hicle shown as9The combined weight of
occupants and cargo9on the Tire and
Loading Information label. Do not exceed
the number of occupants shown as
9Seating Capacity9on Tire and Loading
Information label.
To get9the combined weight of occu-
pants and cargo9, add the weight of all
occupants, then add the total luggage
weight. Examples are shown below.
VEHICLE LOADING INFORMATION
9-12Technical and consumer information
ZREVIEW COPYÐ2006 Xterra(xtr)
Owners ManualÐUSA_English(nna)
08/18/05Ðrhinson
X
Page 276 of 304
5. Determine the combined weight of
luggage and cargo being loaded on
the vehicle. That weight may not
safely exceed the available cargo and
luggage load capacity calculated in
Step 4.
6. If your vehicle will be towing a trailer,
load from your trailer will be trans-
ferred to your vehicle. Consult this
manual to determine how this re-
duces the available cargo and lug-
gage load capacity of your vehicle.
Before driving a loaded vehicle, confirm
the you do not exceed the Gross Vehicle
Weight Rating (GVWR) or the Gross Axle
Weight Rating (GAWR) for your vehicle.
See “Measurement of Weights” later in
this section.
Also check tires for proper inflation pres-
sures. See the Tire and Loading label.
SECURING THE LOAD
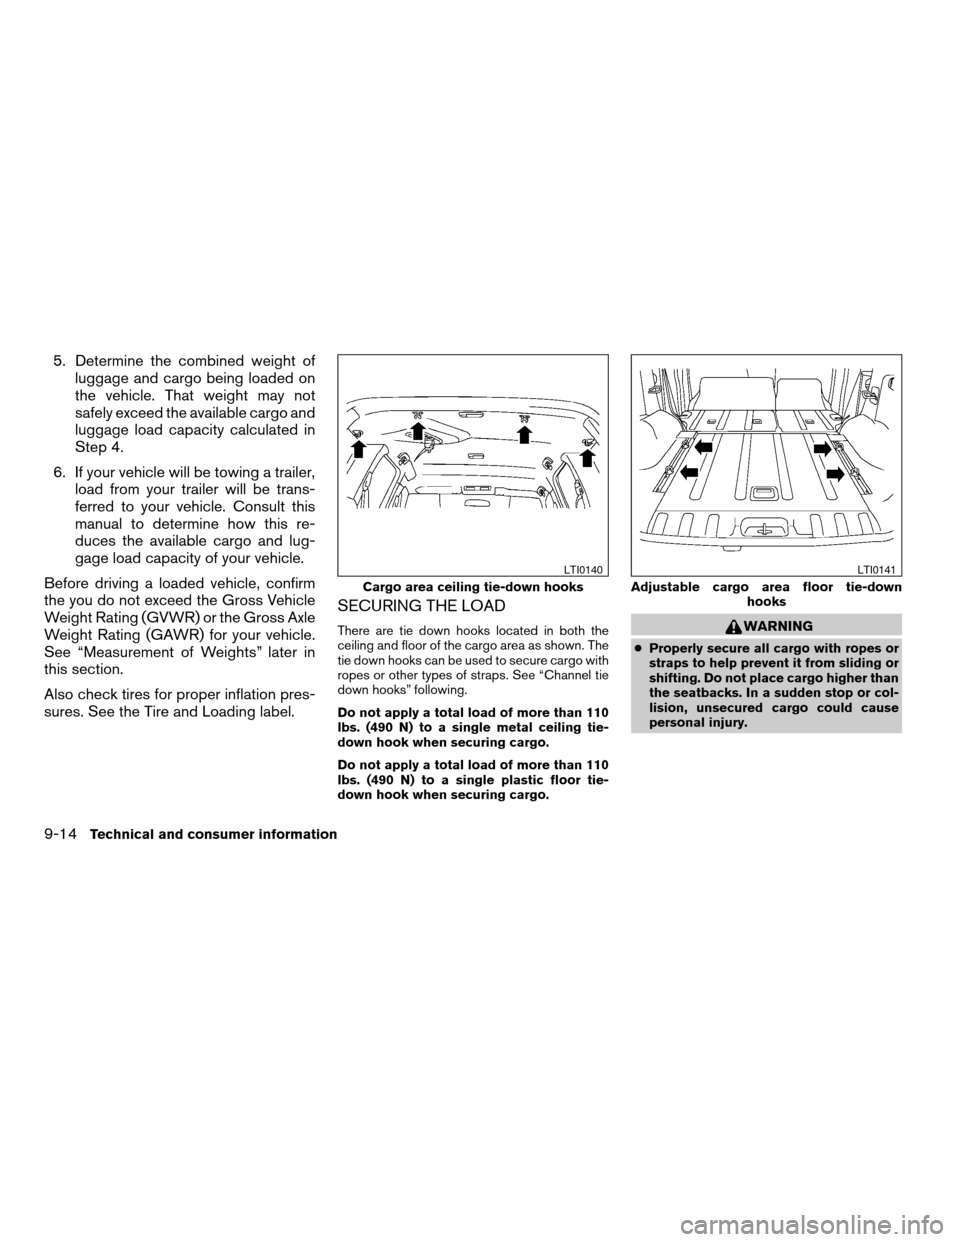
There are tie down hooks located in both the
ceiling and floor of the cargo area as shown. The
tie down hooks can be used to secure cargo with
ropes or other types of straps. See “Channel tie
down hooks” following.
Do not apply a total load of more than 110
lbs. (490 N) to a single metal ceiling tie-
down hook when securing cargo.
Do not apply a total load of more than 110
lbs. (490 N) to a single plastic floor tie-
down hook when securing cargo.WARNING
cProperly secure all cargo with ropes or
straps to help prevent it from sliding or
shifting. Do not place cargo higher than
the seatbacks. In a sudden stop or col-
lision, unsecured cargo could cause
personal injury.
Cargo area ceiling tie-down hooks
LTI0140
Adjustable cargo area floor tie-down
hooks
LTI0141
9-14Technical and consumer information
ZREVIEW COPYÐ2006 Xterra(xtr)
Owners ManualÐUSA_English(nna)
08/01/05Ðdebbie
X
Page 280 of 304
WARNING
Overloading or improper loading of a
trailer and its cargo can adversely affect
vehicle handling, braking and perfor-
mance and may lead to accidents.
CAUTION
cDo not tow a trailer or haul a heavy load
for the first 500 miles (800 km) . Your
engine, axle or other parts could be
damaged.
cFor the first 500 miles (800 km) that you
tow a trailer, do not drive over 50 mph
(80 km/h) and do not make starts at full
throttle. This helps the engine and other
parts of your vehicle wear in at the
heavier loads.
Your new vehicle was designed to be used pri-
marily to carry passengers and cargo. Remember
that towing a trailer places additional loads on
your vehicle’s engine, drive train, steering, brak-
ing and other systems.
MAXIMUM LOAD LIMITS
Maximum trailer loads
Never allow the total trailer load to exceed the
value specified in the following Towing
Load/Specification Chart found later in this sec-
tion. The total trailer load equals trailer weight
plus its cargo weight.
cWhen towing a trailer load of 1,000 lbs.
(454 kg) or more, trailers with a brake sys-
tem MUST be used.
The maximum GCWR (Gross Combined Weight
Rating) should not exceed the value specified in
the following Towing Load/ Specification Chart.
The GCWR equals the combined weight of the
towing vehicle (including passengers and cargo)
plus the total trailer load. Towing loads greater
than these or using improper towing equipment
could adversely affect vehicle handling, braking
and performance.
The ability of your vehicle to tow a trailer is not
only related to the maximum trailer loads, but also
the places you plan to tow. Tow weights appro-
priate for level highway driving may have to be
reduced on very steep grades or in low traction
situations (for example, on slippery boat ramps) .
Temperature conditions can also affect towing.
For example, towing a heavy trailer in high outsidetemperatures on graded roads can affect engine
performance and cause overheating. The engine
protection mode, which helps reduce the chance
of engine damage, could activate and automati-
cally decrease engine power. Vehicle speed may
decrease under high load. Plan your trip carefully
to account for trailer and vehicle load, weather
and road conditions.
WARNING
Overheating can result in reduced engine
power and vehicle speed. The reduced
speed may be lower than other traffic,
which could increase the chance of a col-
lision. Be especially careful when driving.
Pull to the side of the road to a safe area.
Allow the engine to cool and return to
normal operation. See “If your vehicle
overheats” in the “In case of emergency”
section of this manual.
CAUTION
Vehicle damage resulting from improper
towing procedures is not covered by
NISSAN warranties.
TOWING A TRAILER
9-18Technical and consumer information
ZREVIEW COPYÐ2006 Xterra(xtr)
Owners ManualÐUSA_English(nna)
08/01/05Ðdebbie
X
Page 281 of 304
Tongue load
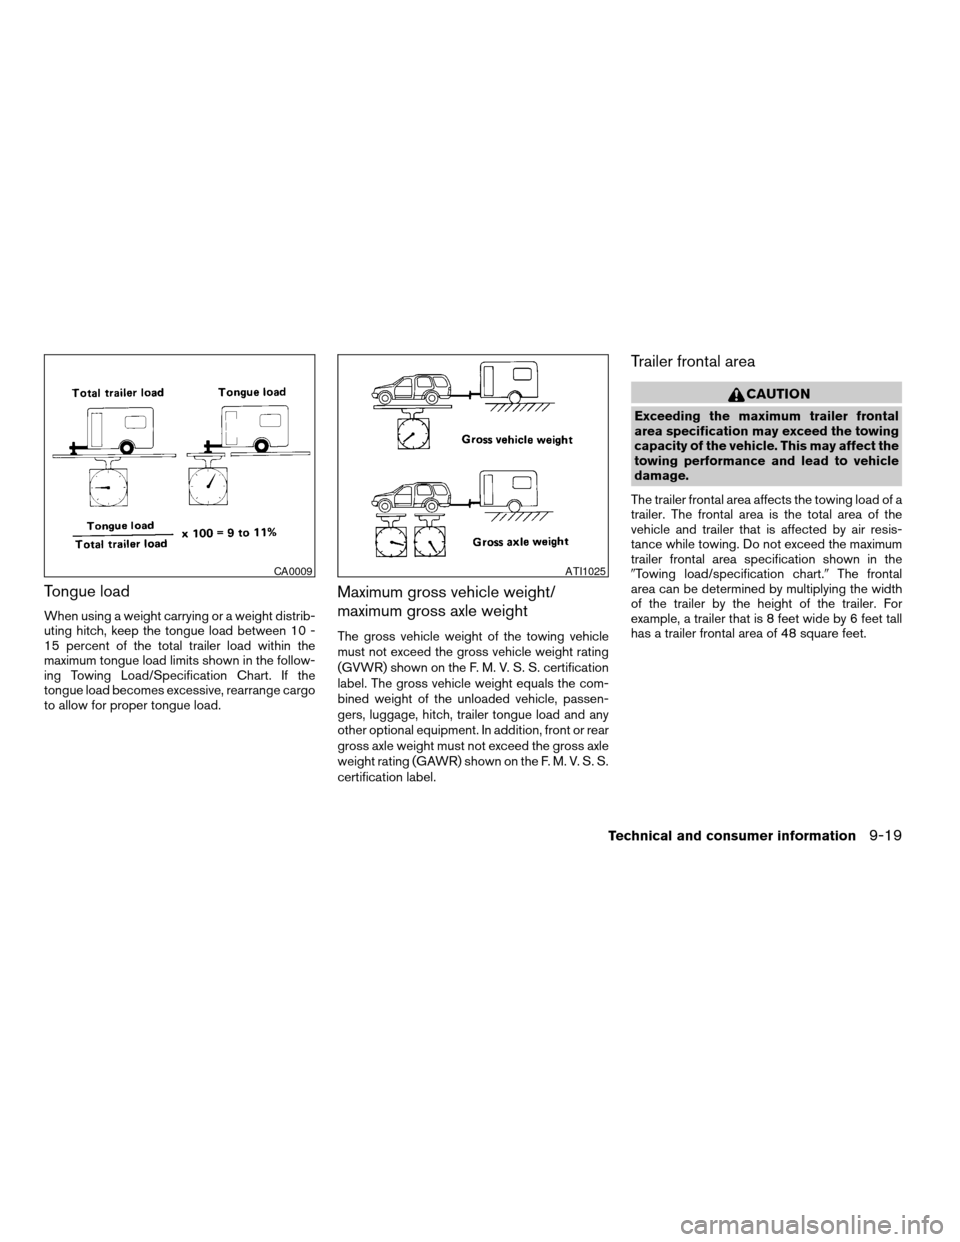
When using a weight carrying or a weight distrib-
uting hitch, keep the tongue load between 10 -
15 percent of the total trailer load within the
maximum tongue load limits shown in the follow-
ing Towing Load/Specification Chart. If the
tongue load becomes excessive, rearrange cargo
to allow for proper tongue load.
Maximum gross vehicle weight/
maximum gross axle weight
The gross vehicle weight of the towing vehicle
must not exceed the gross vehicle weight rating
(GVWR) shown on the F. M. V. S. S. certification
label. The gross vehicle weight equals the com-
bined weight of the unloaded vehicle, passen-
gers, luggage, hitch, trailer tongue load and any
other optional equipment. In addition, front or rear
gross axle weight must not exceed the gross axle
weight rating (GAWR) shown on the F. M. V. S. S.
certification label.
Trailer frontal area
CAUTION
Exceeding the maximum trailer frontal
area specification may exceed the towing
capacity of the vehicle. This may affect the
towing performance and lead to vehicle
damage.
The trailer frontal area affects the towing load of a
trailer. The frontal area is the total area of the
vehicle and trailer that is affected by air resis-
tance while towing. Do not exceed the maximum
trailer frontal area specification shown in the
9Towing load/specification chart.9The frontal
area can be determined by multiplying the width
of the trailer by the height of the trailer. For
example, a trailer that is 8 feet wide by 6 feet tall
has a trailer frontal area of 48 square feet.
CA0009ATI1025
Technical and consumer information9-19
ZREVIEW COPYÐ2006 Xterra(xtr)
Owners ManualÐUSA_English(nna)
08/01/05Ðdebbie
X
Page 282 of 304
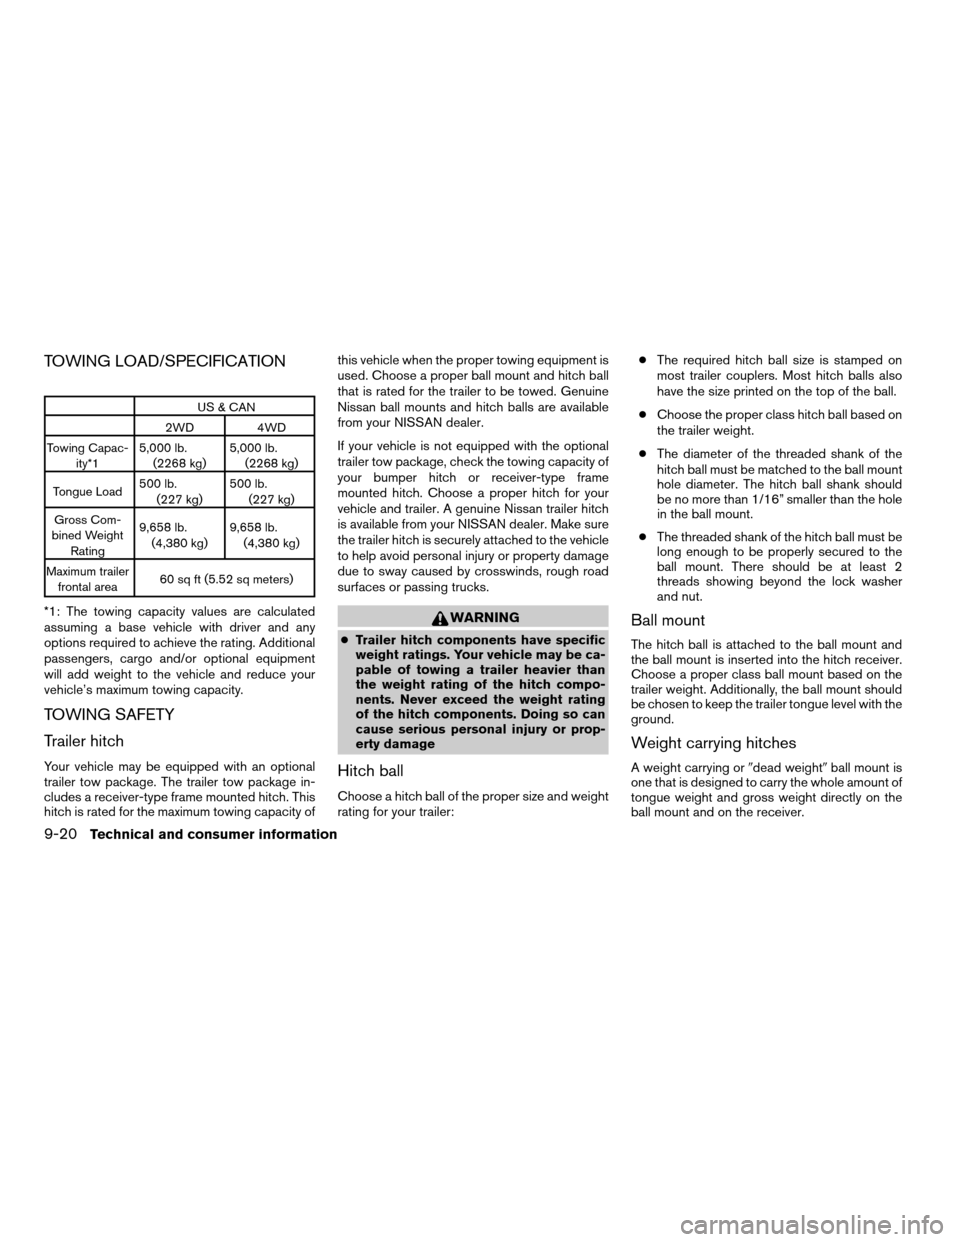
TOWING LOAD/SPECIFICATION
US & CAN
2WD 4WD
Towing Capac-
ity*15,000 lb.
(2268 kg)5,000 lb.
(2268 kg)
Tongue Load500 lb.
(227 kg)500 lb.
(227 kg)
Gross Com-
bined Weight
Rating9,658 lb.
(4,380 kg)9,658 lb.
(4,380 kg)
Maximum trailer
frontal area60 sq ft (5.52 sq meters)
*1: The towing capacity values are calculated
assuming a base vehicle with driver and any
options required to achieve the rating. Additional
passengers, cargo and/or optional equipment
will add weight to the vehicle and reduce your
vehicle’s maximum towing capacity.
TOWING SAFETY
Trailer hitch
Your vehicle may be equipped with an optional
trailer tow package. The trailer tow package in-
cludes a receiver-type frame mounted hitch. This
hitch is rated for the maximum towing capacity ofthis vehicle when the proper towing equipment is
used. Choose a proper ball mount and hitch ball
that is rated for the trailer to be towed. Genuine
Nissan ball mounts and hitch balls are available
from your NISSAN dealer.
If your vehicle is not equipped with the optional
trailer tow package, check the towing capacity of
your bumper hitch or receiver-type frame
mounted hitch. Choose a proper hitch for your
vehicle and trailer. A genuine Nissan trailer hitch
is available from your NISSAN dealer. Make sure
the trailer hitch is securely attached to the vehicle
to help avoid personal injury or property damage
due to sway caused by crosswinds, rough road
surfaces or passing trucks.
WARNING
cTrailer hitch components have specific
weight ratings. Your vehicle may be ca-
pable of towing a trailer heavier than
the weight rating of the hitch compo-
nents. Never exceed the weight rating
of the hitch components. Doing so can
cause serious personal injury or prop-
erty damage
Hitch ball
Choose a hitch ball of the proper size and weight
rating for your trailer:cThe required hitch ball size is stamped on
most trailer couplers. Most hitch balls also
have the size printed on the top of the ball.
cChoose the proper class hitch ball based on
the trailer weight.
cThe diameter of the threaded shank of the
hitch ball must be matched to the ball mount
hole diameter. The hitch ball shank should
be no more than 1/16” smaller than the hole
in the ball mount.
cThe threaded shank of the hitch ball must be
long enough to be properly secured to the
ball mount. There should be at least 2
threads showing beyond the lock washer
and nut.
Ball mount
The hitch ball is attached to the ball mount and
the ball mount is inserted into the hitch receiver.
Choose a proper class ball mount based on the
trailer weight. Additionally, the ball mount should
be chosen to keep the trailer tongue level with the
ground.
Weight carrying hitches
A weight carrying or9dead weight9ball mount is
one that is designed to carry the whole amount of
tongue weight and gross weight directly on the
ball mount and on the receiver.
9-20Technical and consumer information
ZREVIEW COPYÐ2006 Xterra(xtr)
Owners ManualÐUSA_English(nna)
08/01/05Ðdebbie
X