trunk OLDSMOBILE AURORA 1995 User Guide
[x] Cancel search | Manufacturer: OLDSMOBILE, Model Year: 1995, Model line: AURORA, Model: OLDSMOBILE AURORA 1995Pages: 372, PDF Size: 19.14 MB
Page 153 of 372

SEEK A/V: When you press SEEK while playing a
tape,
it will search for the next higher or lower selection
and stop. There must be at least
a four-second gap
between selections on the tape.
SCAN: When you press SCAN while playing a tape,
you’ll hear the first few seconds
of each selection. Press
SCAN again to stop on a selection. The tape
will be
muted while scanning and “SCAN“ will appear
on the
display.
FWD (Fast Forward): Press to advance a cassette tape
rapidly; press again to play
the tape.
REV (Reverse): Press to reverse a cassette tape rapidly;
press again to play the tape.
PROG (Program): Press to play the other side of
the tape.
TAPE/AUX: If you have a tape inserted and the radio is
playing, press TAPE/AUX to play your tape. To return
to the radio while the tape
is playing, press AM/FM. The
tape will remain safely inside the radio for future
listening.
EJECT: Press to eject the cassette tape. The radio will
then play.
Trunk-Mounted CD Changer (Option)
To Play a Compact Disc
If you have the optional compact disc changer, you can
play up to
12 discs continuously. Normal size discs can
be played using the trays supplied
in the cartridge. The
small
8 cm discs can be played only with specially
designed trays.
I NOTICE:
Objects in the trunk which may shift or slide
during driving could damage your CD changer.
Protect your CD changer by using the
convenience net whenever possible. Place large
objects in the trunk appropriately
so that they
will not come into contact with the CD changer.
ProCarManuals.com
Page 160 of 372

Steering Wheel Touch Controls for Audio
System
Some audio system
functions described
in the
previous pages can also be
operated with the Steering
Wheel Touch Controls.
Other touch controls also operate some climate controls.
See “Steering Wheel Touch Controls for Climate
Control” earlier in
this section.
VOL (Volume): Press to increase or decrease volume.
SEEK: Each time you press SEEK, you will tune in a
radio station higher on the AM or FM band.
When playing
a tape, press SEEK to listen to the next
selection on the tape. There must be
at least a
four-second gap between selections on the tape. When playing
a CD, press SEEK to listen
to the next
selection
on the disc,
PROG (Program): Press PROG to tune in a preset
radio station higher on the AM or
FM band.
When playing
a tape, press PROG to play the other side
of the tape.
When playing a CD
in the trunk-mounted CD changer,
press
PROG to select the next disc in the cartridge.
Understanding Radio Reception
FM Stereo
FM stereo will give you the best sound, but FM signals
will reach only about
10 to 40 miles (1 6 to 65 km). Tall
buildings or hills can interfere with FM signals, causing
the sound to come and
go.
AM
The range for most AM stations is greater than for FM,
especially at night. The longer range, however, can
cause stations to interfere with each other. AM can also
pick up noise from things like storms and power lines.
To lower this noise, try reducing the treble level by
turning the
TREB knob or, if you have the TONE
feature, by selecting the VOCAL tone setting.
3-28
ProCarManuals.com
Page 187 of 372

Winter Driving
0 Know how to go uphill. Shift down to THIRD (3).
This will help cool your engine and transaxle, and
you can climb the hill better.
POWER mode for better performance.
0 In hilly terrain, you may want to switch to the
@ Stay in your own lane when driving on two-lane
roads in hills or mountains. Don’t swing wide or cut
across the center of the road. Drive at speeds that let
you stay in your
own lane.
As you go over the top of a hill, be alert. There could be
something in your lane, like a stalled car or an accident.
0 You may see highway signs on mountains that warn
of special problems. Examples are long grades,
passing or no-passing
zones, a falling rocks area. or
winding roads. Be alert to these- and take appropriate
action. Here
are some tips fix winter driving:
0 Have
your Aurora in good shape for winter. Be sure
your engine coolant mix is correct.
0 You may want to put winter emergency supplies in
your trunk.
4-23
ProCarManuals.com
Page 192 of 372

Loading Your Vehicle
TIRE-LOADING INFORMATION
OCCUPANTS VEHICLE CAP. WT
FRT. CTR. RR. TOTAL
LBS. KG
MAX. LOADING & GVWR SAME AS VEHICLE
CAPACITY
WEIGHT XXX COLD TIRE
TIRE SIZE SPEED PRESSURE
RTG PSI;KPa
FRT.
RR.
SPA.
IF TIRES ARE HOT, ADD 4PSI.'28KPa
SEE OWNER'S MANUAL FOR ADDITIONAL
[ INFORMATION
Two labels on your vehicle show how much weight it
may properly carry. The Tire-Loading Information label
found on the rear edge of the driver's door tells
you the
proper size, speed rating and recommended inflation
pressure for the tires on your vehicle.
It also gives YOLI
important information about the number of people that
can be
in your vehicle and the total weight that you can
carry. This weight is called the Vehicle Capacity Weight
and includes the weight of
all occupants, cargo, and all
nonfactory-installed options.
MFD BY GENERAL MOTORS CORP
DATE GVWR GAWR
FRT GAWR RR
THIS VEHICLE CONFORMS TO ALL APPLI-
CABLE U.S. FEDERAL MOTOR VEHICLE
SAFETY, BUMPER, AND THEFT PREVENTION
STANDARDS IN EFFECT
ON THE DATE OF
MANUFACTURE SHOWN ABOVE.
The other label is the Certification label, found on the
rear edge of the driver's door.
It tells you the gross
weight capacity
of your vehicle, called the GVWR
(Gross Vehicle Weight Rating). The GVWR includes
the weight of the vehicle, all occupants, f~~el and cargo.
Never exceed the GVWR for your vehicle, or the Gross
Axle Weight Rating (GAWR) for either the
front of rear
axle.
And,
if you do have a heavy load, you should spread
it out. Don't carry more than I76 lbs. (80 kg) in your
trunk.
ProCarManuals.com
Page 222 of 372

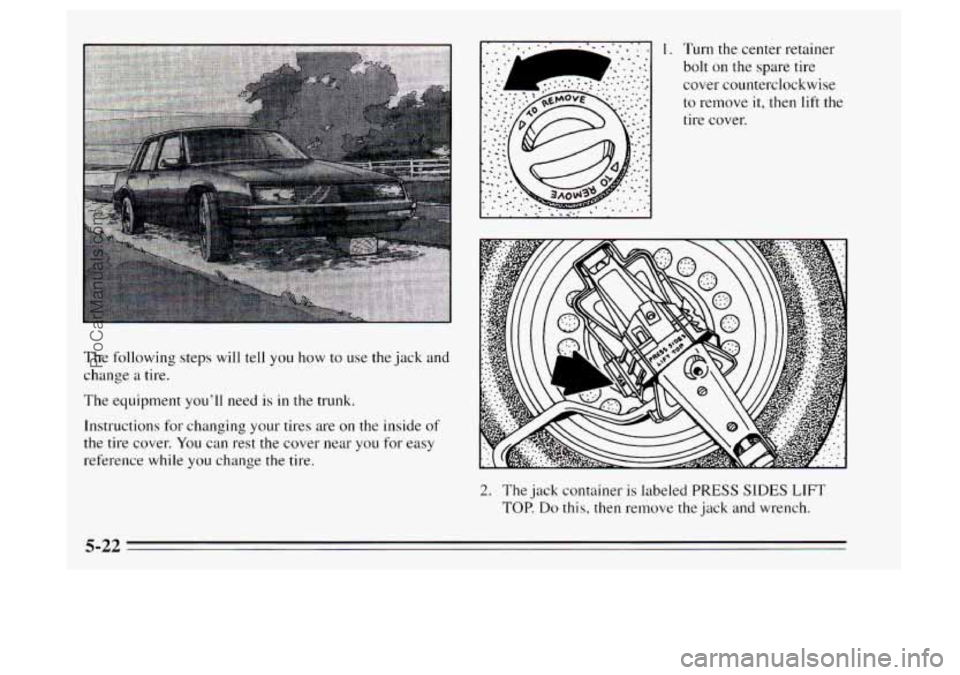
The following steps will tell you how to use the jack and
change a tire.
The equipment you’ll need is
in the trunk.
Instructions for changing your tires are on the inside of
the tire cover.
You can rest the cover near you for easy
reference while
you change the tire.
1. Turn the center retainer
bolt on the spare tire
cover counterclockwise
to remove
it, then lift the
tire cover.
2. The jack container is labeled PRESS SIDES LIFT
TOP. Do this, then remove the jack and wrench.
5-22
ProCarManuals.com
Page 223 of 372

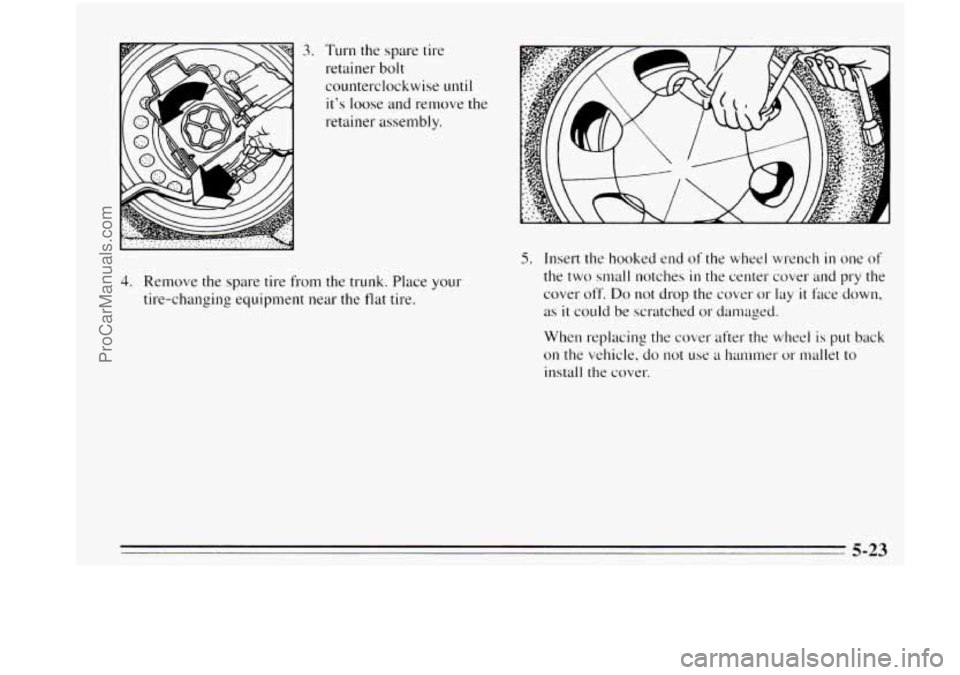
3. Turn the spare tire
retainer bolt
counterclockwise
until
it’s loose and remove the
retainer assembly.
4. Remove the spare tire from the trunk. Place your
tire-changing equipment near the flat tire.
5. Insert the hooked end of the wlleel wrench in one of
the two small notches
in the center cover and pry the
cover off.
Do not drop the cover or lay it face down,
as
it could be scratched or damaged.
When replacing the cover after the wheel is
put back
on the vehicle, do not use a han~mer or mallet to
install the cover.
5-23
ProCarManuals.com
Page 228 of 372

Don’t try to put the wheel cover on the compact spare tire.
It won’t fit. Store the wheel cover
in the trunk until you
have replaced the compact spare tire with a regular tire.
NOTICE:
Wheel covers won’t fit on your compact spare. If
you try to put a wheel cover on your compact
spare, you could damage the cover or the
1 spare.
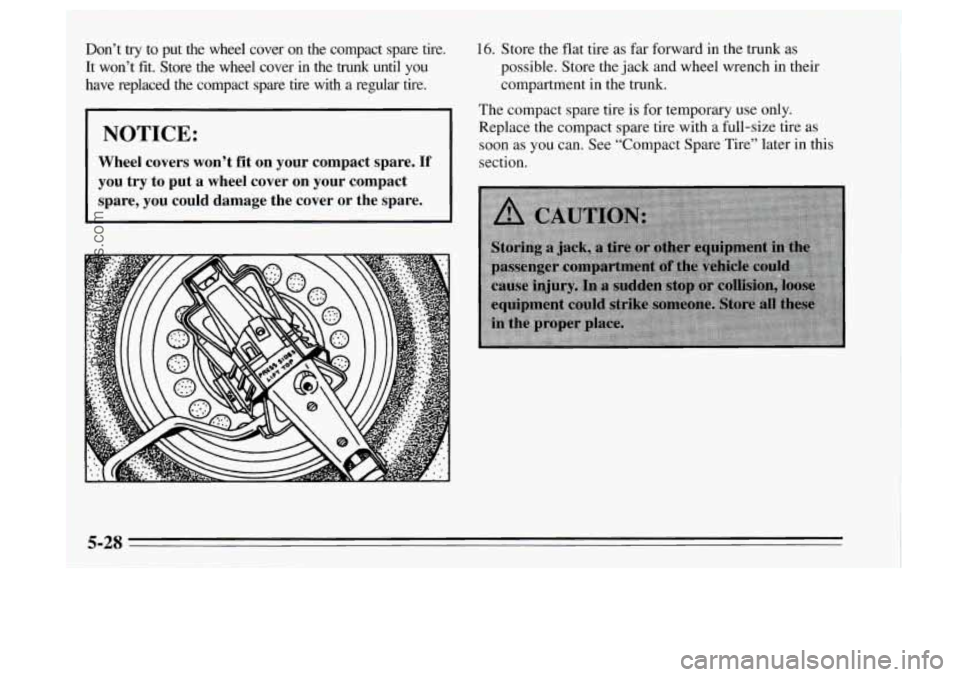
16. Store the flat tire as far forward in the trunk as
possible. Store the jack and wheel wrench in their
compartment in the trunk.
The compact spare tire is for temporary use only.
Replace the compact spare tire with a full-size tire as
soon as you can. See “Compact Spare Tire’’ later in this
section.
5-28
ProCarManuals.com
Page 234 of 372

Fuels in Foreign Countries
If you plan on driving in another country outside the
U.S. or Canada, unleaded fuel may be hard to find. Do
not use leaded gasoline. If you use even one tankful,
your emission controls won't work well or at
all. With
continuous use, spark
plugs can get fouled, the exhaust
system can corrode, and your engine oil can deteriorate
quickly. Your vehicle's oxygen sensor
will be damaged.
All of that means costly repairs that wouldn't be covered
by your warranty.
To check on fuel availability, ask an auto club, or
contact
a major oil company that does business in the
country where you'll be driving.
You can also write us at the following address for
advice. Just tell
LIS where you're going and give your
Vehicle Identification Number
(VIN).
General Motors Overseas Distribution Corporation
North American Export Sales (NAES)
1908 Colonel Sam Drive
Oshawa, Ontario
LlH 8P7
Remote Fuel Door Release
The remote fuel door release can help keep your fuel
tank from being siphoned. Always be sure the fuel door
is closed and latched after refueling.
To open the fuel door
(on the left of the
vehicle), press the
button next to the
trunk release button,
to
the right of the
steering column. The
ignition need
not be
on. The remote fuel
door release
will work
in all transaxle
positions.
6-4
ProCarManuals.com
Page 235 of 372

Remote Fuel Door Manual Release
The fuel door can be
opened lnanually
in
case of an electrical
power failure.
To do
so, first open the trunk.
The release nlechanisln
is on the driver’s side
of the vehicle, at the
top of the
trunk
compartment. Pull the
tab toward you to
release the
fuel door.
NOTICE:
Prying on a locked fuel filler door could damage
it. Use the remote fuel door manual release
located in the trunk.
Filling Your Tank
The cap is behind a hinged door on the left side of your
vehicle.
6-5
ProCarManuals.com
Page 262 of 372

Taillamp Bulb Replacement
For the type of bulb, see “Replacement Bulbs” in the
Index.
1. In the trunk, remove the convenience net from the
hooks. Next remove the plastic screws holding the
carpeting
in place and pull back the carpeting.
2. Unscrew the
convenience net
attachment nut. Open
the trim panel door.
3. Remove the two wing
nuts now exposed
6-32
ProCarManuals.com