fuse OLDSMOBILE AURORA 1995 Owners Manual
[x] Cancel search | Manufacturer: OLDSMOBILE, Model Year: 1995, Model line: AURORA, Model: OLDSMOBILE AURORA 1995Pages: 372, PDF Size: 19.14 MB
Page 7 of 372

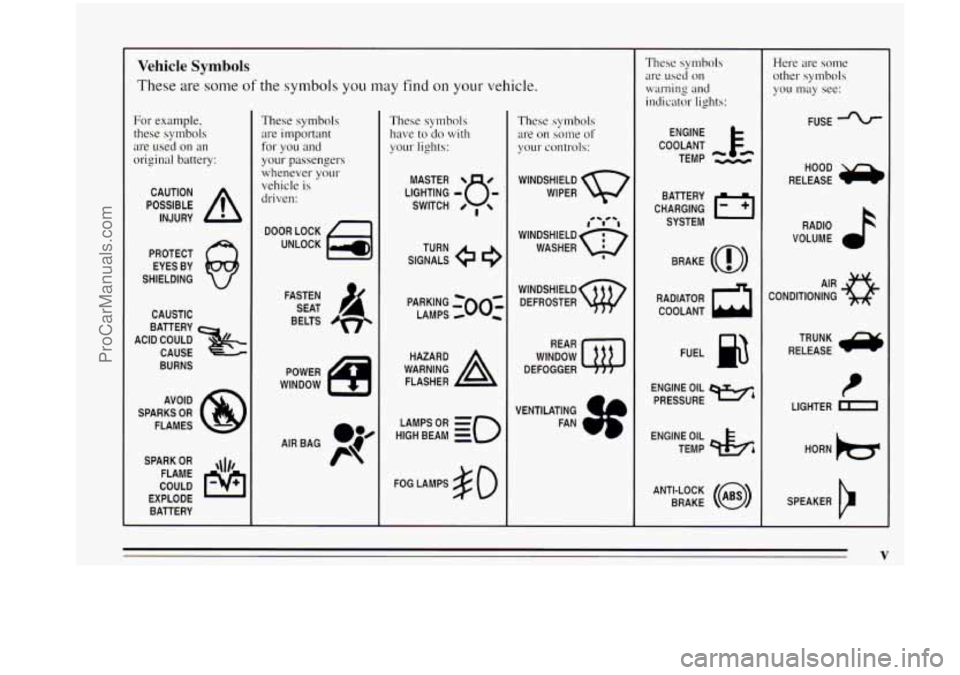
Vehicle Symbols
These are some of the symbols you may find on your vehicle.
For example,
these symbols
are used on an
original battery:
POSSIBLE A
CAUTION
INJURY
PROTECT EYES BY
SHIELDING
CAUSTIC
ACID COULD
&
BATTERY
CAUSE
BURNS
AVOID
SPARKS
OR
FLAMES
SPARK
OR ,111,
COULD FLAME
EXPLODE BATTERY
These symbols are important
for
you and
your passengers
whenever
~OLI~
vehicle is
driven:
DOOR LOCK
UNLOCK
BELTS
4
POWER
WINDOW
These symbols have to
do with
your lights:
SIGNALS e
TURN
PARKING
=OOz
LAMPS c
HIGH LAMPSoR BEAM = -0
FOG LAMPS $0
These sytnbols
are on some of
your controls:
WINDSHIELD
WIPER
WINDSHIELD DEFROSTER
WINDOW
DEFOGGER
VENTILATING FAN COOLANT
F&
TEMP --
ENGINE
CHARGING BATTERY
SYSTEM
BRAKE
(0)
RADIATOR COOLANT
a
FUEL
ENGINE OIL
PRESSURE
Wb
TEMP OIL ctb
ANTI-LOCK (@)
BRAKE
Here are some
other sytnbols
you n~ap see:
FUSE
RELEASE
a
RADIO
VOLUME
CONDITIONING
AIR a
RELEASE
t
LIGHTER m
HORN )tr
SPEAKER
cr
V
ProCarManuals.com
Page 65 of 372

PASS-Key@II
Your vehicle is equipped with the PASS-Key@II
(Personalized Automotive Security System) theft
deterrent system. PASS-Key@II is a passive theft
deterrent system. This means
you don’t have to do
anything different to arm or disarm the system.
It works
when you insert
or remove the key from the ignition.
PASS-Key@II uses
a resistor pellet in the ignition key
that matches a decoder
in your vehicle. When
the PASS-Key% system senses that someone is
using the wrong
key, it shuts down the vehicle’s starter
and fuel systems. For about three minutes, the starter
won’t work and fuel won’t
go to the engine. If someone
tries to start your vehicle again or uses another key
during this time, the vehicle
will not start. This
discourages someone from randomly trying different
keys
with different resistor pellets in an attempt to make
a match.
The ignition key must be clean and dry before it’s inserted\
in the ignition or the engine may not start. If the engine
does not stat and the SECURITY light is on or
you get
the CLEAN KEY. ..WAIT
3 MINUTES message, the key
may be dirty or wet. Turn the ignition off.
Clean and dry the key. Wdit about three minutes and try
again. The security light may remain on during this
time.
If the starter still won’t work, and the key appears
to be clean and dry, wait about three minutes
and try
another ignition key. At this time. you may also want to
check the fuses (see ”Fuses and Circuit Breakers”
in the
Index).
If the starter won’t work with the other key, your
vehicle needs service.
If your vehicle does start, the first
ignition key may be faulty. See your Aurora retailer or a
locksmith
who can service the PASS-Key@II.
2-13
ProCarManuals.com
Page 86 of 372

If you leave the turn signal on, a chime will sound after
you drive about
3/4 of a mile (1.2 km).
Cruise Control
A green arrow on the instrument panel will flash in the
direction of the turn or lane change.
To signal a lane change, just raise or lower the lever
until the green arrow starts to flash. Hold it there until
you complete your lane change. The lever
will return by
itself when you release
it.
As you signal a turn or a lane change, if the arrows don’t
flash but just stay on, a signal bulb may be burned out
and other drivers won’t see your turn signal.
If a bulb
is burned out, replace it to help avoid an
accident.
If the green arrows don’t go on at all when you signal a
turn, check the fuse (see “Fuses and Circuit Breakers” in
the Index) and for burned-out bulbs. With
cruise control, you can maintain a speed
of about
25 mph (40 km/h) or more without keeping your foot on
the accelerator. This can really help on long trips.
2-34
ProCarManuals.com
Page 122 of 372

Malfunction Indicator Lamp (Service Engine Soon Light)
A computer monitors
operation of your fuel,
0
ignition and emission
controls systems. This light
should come on when you
start your engine
as a check
to show you
it is working.
SERVICE
ENGINE SOON
If it does not come on at all, have it fixed right away.
If it stays on, or it comes on while you are driving, the
computer is indicating that you have
a problem. You
should take your vehicle
in for service soon.
~
NOTICE:
If you keep driving your vehicle with this light
on, after a while the emission controls won’t
work as well, your fuel economy won’t be as
good, and your engine may not run as smoothly.
This could lead
to costly repairs not covered by
your warranty.
Oil Pressure Warning Light
OIL
If you have a problem with
your oil, this light may stay
on after you start your
engine, or come on when
you are driving. A warning
chime and the message
LOW
OIL PRESSURE may
also come on.
These indicate that oil is not going through your engine
quickly enough
to keep it cool. The engine could be low
on oil, or could have some other oil problem. Have
it
fixed right away.
The oil light could
also come on in three other
situations:
0 When the ignition is on but the engine is not running,
the light
will come on as a test to show you it is
working, but the light will go out when you turn the
ignition
to START. If it doesn’t come on with the
ignition
on, you may have a problem with the fuse or
bulb. Have it fixed right away.
2-70
ProCarManuals.com
Page 126 of 372

Fuel
Press FUEL to see how much fuel has been used since
you last pressed the reset button. The display will show
a reading such as:
10.4 GALLONS USED or
39.4 LITERS USED
To learn how much fuel will be used from a specific
starting point, first press FUEL to display fuel used, then
press RESET.
Don’t confuse fuel used with the amount of fuel in your
tank.
Fuel Range
RANGE calculates the remaining distance you can drive
without refueling. It’s based on fuel economy and the
fuel remaining
in the tank. The display will show a
reading such as:
FUEL RANGE
235 MI or
FUEL RANGE
378 KM
If the range is less than 50 miles (80 km), the display
will read LOW
FUEL RANGE. The
fuel economy data used to determine fuel range
is
an average of recent driving conditions. As your driving
conditions change, this data is gradually updated.
Resetting
fuel range causes the fuel economy data to be
updated immediately.
To reset fuel range, press
RANGE, then RESET.
Average Speed
The calculation for average speed begins when SPEED
is reset. Press SPEED to display the average speed, such
as:
AVG SPEED
56 MPH or
AVG SPEED 90 KM/H
To reset the average speed, press SPEED and then
RESET.
ProCarManuals.com
Page 282 of 372

Add-on Electrical Equipment
NOTICE:
Don’t add anything electrical to your Aurora
unless you check with your retailer first. Some
electrical equipment can damage your vehicle
and the damage wouldn’t be covered by your
warranty. Some add-on electrical equipment can
keep other components from working as they
should.
Your vehicle
has an air bag system. Before attempting to
add anything electrical to your AL~I-o~~, see “Servicing
Your Air Bag-Equipped Aurora”
in the Index.
Removing the Rear Seat Cushion
To access the battery and main fuse boxes, the rear seat
cushion must be removed. You may wish to have your
retailer do this for you.
NOTICE:
The battery and main fuse boxes are located
under the rear seat cushion. The battery’s ground
terminal and some relay wires are exposed. To
help avoid damage to the battery and wires, be
careful when removing or reinstalling the seat
cushion.
Do not remove covers from covered
parts.
Do not store anything under the seat, as
objects could touch exposed wires and cause
a
short.
To Remove the Rear Seat Cushion
1. Pull up on the front of the cushion to release the
front
hooks.
2. Pull the cushion up and out toward the front of the
vehicle.
ProCarManuals.com
Page 284 of 372

4. Check to make sure the safety belts are properly
routed and that
no portion of any safety belt is
trapped under
the seat. Also make sure the seat
cushion
is secured.
Fuses and Circuit Breakers
The wiring circuits in your vehicle are protected from
short circuits by
a combination of fuses and circuit
breakers. This greatly reduces the chance
of damage
caused by electrical problems.
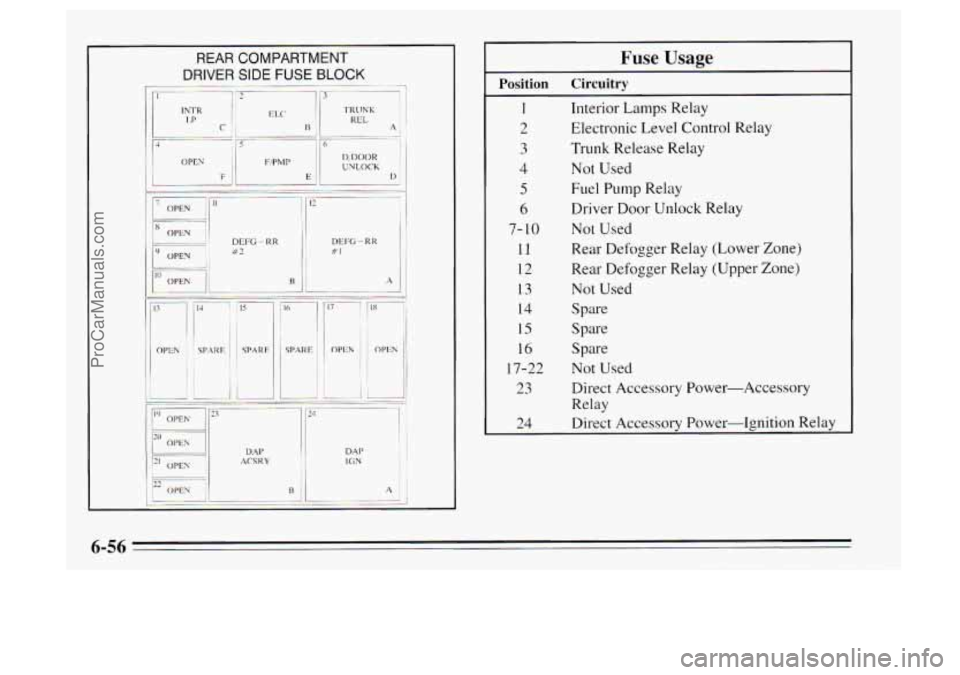
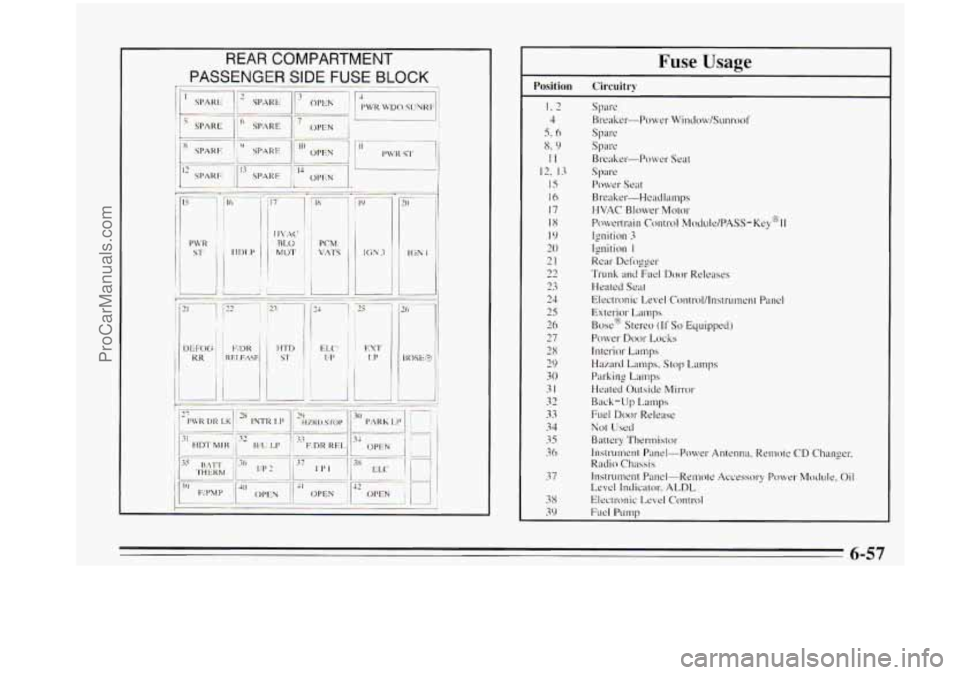
There are three main fuse panels.
Two are located under
the rear seat.
To access these panels, you’ll need to
remove the seat. See the previous description under
“Removing
the Rear Seat Cushion” to see how. This
procedure
is somewhat difficult. You may wish to have
your retailer replace the fuse, instead.
V
Once the seat is removed,
you’ll find two fuse panels
on the driver’s side of the
battery. Each
is protected by
a plastic box with four tabs.
Pull up on all four tabs at
the same time to loosen
them and pull off the box.
Of these two panels, the cover on the passenger-side
fuse panel
has an extra plastic cap attachment. You’ll
need to slide this out of the grooves which hold it there
before removing the rest
of the box.
To replace the covers, line the four tabs up and simply
snap
them back into place. The extra plastic cap
attachment slides back into place.
6-54
ProCarManuals.com
Page 285 of 372

The third fuse panel is located on the left side of the
instrument panel.
To open it, simply pull on the latch
and the door will open.
You’ll find
a fuse puller clipped to the inside of the
cover. Place the wide end of the fuse puller over the
plastic end
of the fuse. Squeeze the ends over the fuse
and pull
it out. To close the fuse door, press the door
closed and
it will latch. Two
spare fuses are located below the fuse puller. You’ll
also find spare fuses
in the slots labeled “Spare” on the
following charts.
Look at the silver-colored band inside the fuse. If the
band is broken or melted, replace the fuse. Be sure you
replace a bad fuse with a new one of the correct amp
rating.
6-55
ProCarManuals.com
Page 286 of 372

REAR COMPARTMENT
DP’
ER SIDE FUSE BLOCK
-. -~ 113 J
DEI% - RR B2
ACS K Y DM’ DM IC.; N ‘I j
Fuse Usage
1 Interior Lamps Relay
2 Electronic Level Control Relay
3 Trunk Release Relay
5 Fuel Pump Relay
Position Circuitry
4 Not Used
6 Driver Door Unlock Relay
7- 10 Not Used
11 Rear Defogger Relay (Lower Zone)
12 Rear Defogger Relay (Upper Zone)
13 Not Used
14 Spare
15 Spare
16 Spare
17-22 Not Used
23 Direct Accessory Power-Accessory
Relay
24 Direct Accessory Power-Ignition Relay
6-56
ProCarManuals.com
Page 287 of 372

r.
Fuse Usage
Position Circuitry
I. 2
4
5. 6
x. 9
II
12, 13
15
16
17
18
I9
20
21
22
23
24
25
26
27
28
29
30
31
32
33
34
35
36
37
38
39
Spare
Breaker-Power Window/Sunrool'
Spare
Spre
Breaker-Power Seat
spa re
Power Seat
Breaker.-Headlamps
HVAC Blower Mo~or
Ignition 3
Ignition I
Rear Defogger
Trunk and FLKI Door Releases
Heated Seat
Electronic Level Control/lnstrument Panel
Exterior Lamps
Box@ Stereo
(If So Equipped)
Power Door Locks
Interior Lamp
Hazard Lamps. Stop Lamps
Parking
Lamps
Heated Outside h4irror
Back-Up Lamps
Fuel
Door Release
Not Used
Battery Thertmislor
Instrument Panel-Power Antenna, Remote CD Changer.
Rndio
Chassis
Instrument Panel-Remote Accessory Power Module. Oil
Level Indicator, ALDL
Electronic Level Control
Fuel Pump
Powertrain
control MOCIUI~/PASS-K~~@II
6-57
ProCarManuals.com