trunk OLDSMOBILE AURORA 1996 Owners Manual
[x] Cancel search | Manufacturer: OLDSMOBILE, Model Year: 1996, Model line: AURORA, Model: OLDSMOBILE AURORA 1996Pages: 388, PDF Size: 20.24 MB
Page 64 of 388

Remote Lock Control
You can lock and unlock
your doors or unlock your
trunk from up to
30 feet
(9 m) away using the key
chain transmitter supplied
with your vehicle.
Your Remote Lock Control operates on a radio
frequency subject to Federal Communications
Commission (FCC) Rules.
This device complies with Part
15 of the FCC Rules.
Operation is subject to the following two conditions:
(1) This device may not cause harmful interference,
and
(2) This device must accept any interference
received, including interference that may cause
undesired operation. Should interference to this system
occur, try this:
0 Check to determine if battery replacement is necessary.
See
the instructions on battery replacement.
0 Check the distance. You may be too far from your
0 Check the location. Other vehicles or objects may
vehicle. This product has
a maximum range.
be blocking the signal.
See your Aurora retailer or a qualified technician
Changes or modifications to this system by other than an
authorized service facility could void authorization to
use this equipment.
for
service.
2-8
ProCarManuals.com
Page 65 of 388

Operation
The driver’s door will unlock when UNLOCK is pressed.
If pressed again within
25 seconds, all doors will unlock.
Pressing the UNLOCK button will also illuminate the interior lamps. (See “Illuminated Entry”
in the Index.)
All doors will lock when
LOCK is pressed.
The trunk will unlock when the opened trunk symbol is
pressed, but only when the ignition is off. The trunk
symbol will also work when the ignition is on, but only
while in PARK
(P) or NEUTRAL (N).
Panic Mode
When the button with the horn symbol on the key
transmitter is pressed, the horn will sound and the
headlamps and taillamps will flash for up to two
minutes. This can be turned off by pressing the panic
button again, unlocking the vehicle with a key or by
turning the ignition to
on.
If only the panic button works, the transmitter needs to
be resynchronized to the receiver. Do this by pressing
and holding both the
LOCK and UNLOCK buttons for
about eight seconds; you must be within range of the
vehicle. Once the transmitter has been resynchronized,
the horn will chirp and the exterior lamps will flash
once. The system should now operate properly.
Personalization Features
Each key transmitter can be programmed to the driver’s
preference for programmable automatic door locks, key
transmitter response and perimeter lighting. See each
feature in the Index.
The transmitters can also be programmed to move the
driver’s seat and outside mirrors to a set memory position
when the key transmitter’s
UNLOCK button is pressed.
To program the system:
1.
2.
3.
4.
Adjust the driver’s seat to a comfortable position.
Adjust both outside mirrors to suit you. See “Outside
Mirrors” in the Index.
Press the SET button on the driver’s door armrest.
You will hear one beep.
Within five seconds, press one of the two memory
buttons on the armrest. You will hear two beeps
to
confirm that the mirror and the seat positions are
entered into memory.
Press the UNLOCK button on the appropriate
transmitter within five seconds. You will hear
two beeps.
The second key transmitter can be programmed to
record a different seat and mirror position by following
the same steps.
2-9
. -~ ..
ProCarManuals.com
Page 66 of 388

This provides feedback to the driver when the vehicle
receives a command from the key transmitter. The
following modes may be selected:
Mode Transmitter Response
Y' .
0
1
2
3
4
5
No transmitter response when locking or
unlocking vehicle
No transmitter response when locking;
exterior lamps flash when unlocking vehicle
Exterior lamps flash when locking; no
transmitter response when unlocking vehicle
Exterior lamps flash when locking and when
unlocking vehicle
Exterior lamps flash and horn chirps when
locking; no transmitter response when
unlocking vehicle
Exterior lamps flash and horn chirps when
locking; exterior lamps flash when unlocking Vehicles
are delivered programmed in Mode
5. To
change to another mode:
1. Press and hold the power door lock switch.
2. Press the opened trunk button on the transmitter. The
3. Press the opened trunk button again. Each time the
opened trunk button is pressed, the transmitter will
advance to the next mode.
transmitter will remain
in its current mode.
4. Release the power door lock switch.
De ng (Option)
Note: This feature is available only if you request your
retailer
to activate this option. After initial activation,
you can turn this feature
on and off by using the
following procedure.
This feature lets the driver delay the actual locking of
the vehicle. When the power door lock switch is
pressed, with the key removed from the ignition and the
driver's door open, a chime will sound three times to
signal that the lock delay mode is active. When all doors
have been closed, the doors will lock automatically after
five seconds. If any door is opened before this, the
five-second timer will reset itself once all the doors have
been closed again.
ProCarManuals.com
Page 69 of 388

Trunk
Trunk Lock Release
To unlock the trunk from the outside, insert the door key
and turn it.
Remote Trunk Release
Remote Trunk Release Lockout
Press the TRUNK release
button located to the right
of the steering column to
release the trunk lid. The
trunk release override
switch must be in the
ON position.
Move the trunk release switch to
off, lock the glove box
and take the key with you. Now the trunk release to the
right
of the steering column will not open the trunk.
ON
OFF
RELEASE
'/
The trunk release
switch
in the glove
box allows you
to secure items in
the trunk.
The trunk release button will work
if the transaxle is in
the
PARK (P) position. The system also works with the
Remote Lock Control.
ProCarManuals.com
Page 70 of 388

Trunk Security Override
The Remote Lock Control transmitter will open the
trunk even if the override switch is
in the OFF position.
It can be dangerous to drive with the trunk lid
open because carbon monoxide (CO) gas can
come into your vehicle. You can’t see or smell
CO. It can cause unconsciousness and even death.
If you must drive with the trunk lid open or if
electrical wiring or other cable connections must
pass through the seal between the body and the
trunk lid:
0 Make sure all windows are shut.
Turn the fan on your heating or cooling
system to its highest speed with the setting
on on any airflow selection except RECIRC.
That
will force outside air into your vehicle.
See “Comfort Controls” in the Index.
If you have air outlets on or under the
instrument panel, open them all the way.
See “Engine Exhaust’’ in the Index.
Theft
Vehicle theft is big business, especially in some cities.
Although your Aurora has a number
of theft-deterrent
features, we know that nothing we put on it can make it
impossible to steal. However, there are ways you can help.
Key in the Ignition
If you leave your vehicle with the keys inside, it’s an
easy target for joy riders or professional thieves
-- so
don’t do it.
With the ignition
OFF and the driver’s door open, you’ll
hear a chime reminding you to remove your key from
the ignition and take it with you. Always do this.
Your
steering wheel will be locked, and so will your ignition
and transaxle. And remember to lock the doors.
ProCarManuals.com
Page 71 of 388

Parking at Night
Park in a lighted spot, close all windows and lock your
vehicle. Remember to keep your valuables out of sight.
Put them in a storage area, or take them with you.
Parking Lots
If you park in a lot where someone will be watching
your vehicle, it’s best to lock it up and take your keys.
But what if you have to leave your ignition key? What if
you have to leave something valuable in your vehicle?
0 Put your valuables in a storage area, like your trunk
or glove
box.
0 Move the trunk security override switch to OFF.
Lock the glove box.
0 Lock all the doors except the driver’s.
0 Then take the door key and Remote Lock Control
keychain with
you.
Universal Theft-Deterrent
Your Aurora has this feature, it is a theft-deterrent alarm
system. With this system, the SECURITY light will
flash as you open the door (if your ignition is
off).
This light reminds you to activate the theft-deterrent
system. Here’s how to do it:
1. Open the door.
2. Lock the door with the power door lock switch or
Remote Lock Control System. The SECURITY light
should come on and stay on.
3. Close all doors. The SECURITY light should go off
after about 30 seconds. The security system is not
armed until the SECURITY light is off.
If the
SECURITY light stays on when the ignition
is
turned on, there is a problem with the system and the
vehicle should be serviced.
If a door or the trunk is opened without the key or
Remote Lock Control System, the alarm will go off.
It will also go off if the trunk lock is damaged. Your
vehicle’s lamps will flash and the horn will sound for
several minutes, then will go off to save battery power,
ProCarManuals.com
Page 103 of 388

Front Reading Lamps Rear Reading Lamps
These lamps and the interior courtesy lamps will come
on when you open a door. They will turn off when you
turn on the ignition. If the door is
left open, they will
turn off after about
10 minutes.
To turn on the reading lamps when the doors are closed,
press the button behind the lamp you want on. Press
it
again to turn the lamp off.
These lamps work even when the ignition is
off. To avoid
draining your vehicle’s battery, be sure to
turn off all
front and rear reading lamps when leaving your vehicle. These lamps
go on when
you open the doors. You can
also turn them on by pressing the button to the side
of
the lamp. Press it again to turn them off.
Trunk Lamp
When you open the trunk to its full open position, a
lamp will come
on inside the trunk. This lamp will
automatically turn off when the trunk
is closed.
Inadvertent Load Protection
This feature shuts off the courtesy, reading, trunk, glove
box and visor vanity mirror lamps,
if any are left on for
more than
10 minutes when the ignition is off. This will
keep your battery from running
down.
ProCarManuals.com
Page 107 of 388

Convenience Net
Your vehicle has a convenience net just inside the back
wall of the trunk.
Put small loads, like grocery bags, behind the net.
It can
help keep them from falling over during sharp turns or
quick starts and stops.
The net isn’t for larger, heavier loads. Store them in the
trunk as far forward as
you can. You can unhook the net
so that it will lie flat when you’re not using it.
Two positions exist for the convenience net, depending
on the size of the cargo.
Use this position for slightly larger loads.
When installing the net in either position, be sure the
“up label”
(A) is pointing up.
Use this position for small loads.
.
2-51
ProCarManuals.com
Page 115 of 388

15. Selectable Shift
The
Aurora instrument panel is designed to let you know at a glance how your vehicle is running. You’ll know how
fast you’re going, how much fuel you’re using, and many other things you’ll need to drive safely and economically.
The main components of your instrument panel are: 1. Power Mirrors Control Switch
2. Fog Lamp Switch
3. Turn Signal/Multifunction Lever
4. Instrument Cluster/Gages
5. Hazard Warning Flashers Switch
6. Horn
7. Windshield Wipermasher Control
8. Driver Information Center
9. Climate Controls
10. Audio System 11. Glove
Box (Trunk Security Override Switch inside)
12. Passenger Side Air Bag
13. Accessory Power Outlet
14. Gearshift Lever 16. Traction Control Button
17. Ashtray and Lighter
18. Fuel Door Release Switch
19. Trunk Release Switch
20. Steering
Wheel Touch Controls for Audio System
21. Ignition Switch 22. Driver Side Air Bag
23. Tilt Steering Wheel Lever
24. Steering Wheel Touch Controls for Climate
Control System
25, Twilight Sentinel Control
26. Instrument Panel Intensity Controlflnterior Lamp Control
ProCarManuals.com
Page 152 of 388

SCAN: Press this button to listen to each selection for a
few seconds. The tape will go to the next selection, stop
for a few seconds, then go on to the next selection. Press
this button again to stop scanning. The sound will be
muted and SCAN will appear on the display.
AM-FM: Press this button to play the radio when a tape
is in the player. The tape will stop but remain in the
player.
TAPE-CD: Press this button to change to the tape
function when the radio is on. A box will appear around
TP on the display when the tape is active. Press AM-FM
to return to the radio while a tape is playing.
EJECT Press this button to remove the tape. The radio
will play. EJECT may be activated with either the
ignition or radio off. Cassettes may be loaded with the
radio off if this button is pressed first.
CLN: This message may appear on the display. If it
does, your cassette tape player needs to be cleaned. It
will still play tapes, but you should clean
it as soon as
possible to prevent damage to your tapes and pliyer. See
“Care of Your Cassette Tape Player” in the Index. After
you clean the player, press and hold EJECT for five
seconds to reset the CLN indicator. The radio will
display
--- to show the indicator was reset.
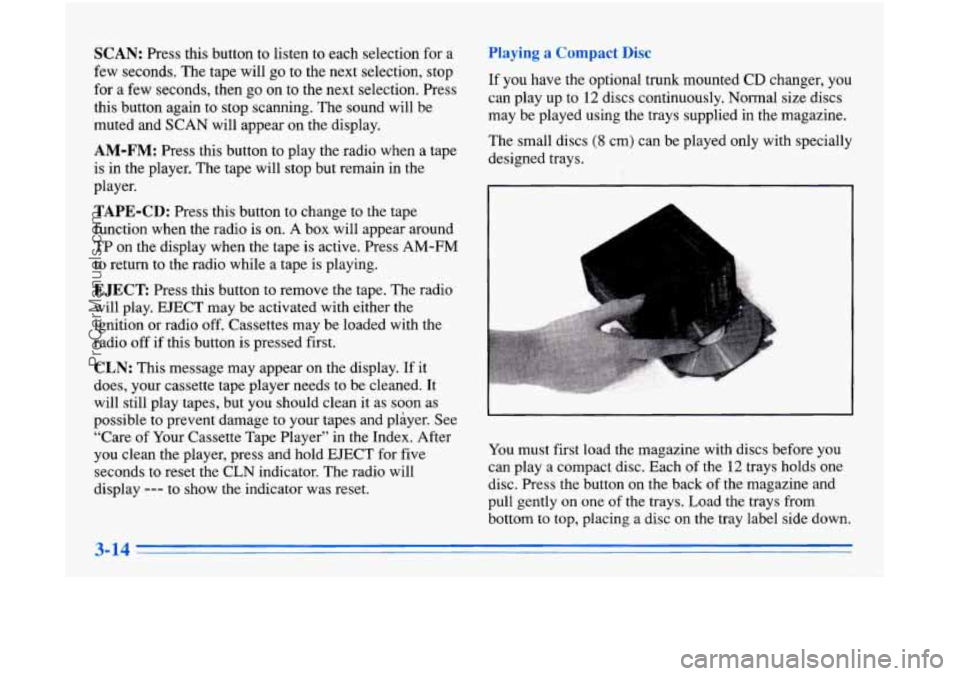
Playing a Compact Disc
If you have the optional trunk mounted CD changer, you
can play up to
12 discs continuously. Normal size discs
may be played using the trays supplied in the magazine.
The small discs
(8 cm) can be played only with specially
designed trays.
I
I
A L
You must first load the magazine with discs before you
can play a compact disc. Each of the
12 trays holds one
disc. Press the button on the back of the magazine and
pull gently on one of the trays. Load
the trays from
bottom to top, placing a disc on the tray label side down.
ProCarManuals.com