window Oldsmobile Aurora 1997 s User Guide
[x] Cancel search | Manufacturer: OLDSMOBILE, Model Year: 1997, Model line: Aurora, Model: Oldsmobile Aurora 1997Pages: 404, PDF Size: 20.75 MB
Page 108 of 404

Compass Calibration
Once the compass is calibrated, it does not need to be
recalibrated as long
as the mirror is left in your vehicle
and the vehicle remains in the same geographical zone.
To calibrate the compass:
1. Set the switch on the mirror control to
C/M.
2. Turn the vehicle’s ignition switch on. If the letter C
is not displayed in the mirror compass window, hold
the
CAL switch (on the bottom of the mirror) for
more than
10 seconds. To hold in the CAL switch,
insert a paper clip into the small hole on the bottom
of the mirror housing. The display will show a
number first, but keep holding until the letter
C
appears.
For quick calibration, drive the vehicle
in a
360-degree circle at less than 5 mph (Skdh) until
the display reads
a compass direction.
For normal calibration, drive the vehicle on
your everyday routine, and the compass will
eventually calibrate.
Compass Variance
Variance is the difference between magnetic north and
geographic north.
Tn some areas, the difference between
the two can be great enough to cause false compass
readings. If this happens, follow these instructions to set
the variance
for your particular location:
1. Find your location on the zone map. Note your
zone number.
2-52
Page 109 of 404

2. Hold in the CAL switch (on the bottom of the mirror
housing) for five seconds until the current zone entry
number appears
on the display. To hold in the CAL
switch, insert a paper clip into the small hole on the
bottom of the mirror housing.
Repeatedly press the
CAL switch until the number
for the new zone entry is displayed.
Once the desired zone number is displayed, stop
pressing the CAL switch and the display will show
compass direction within a few seconds.
Power Remote Control Mirror
The controls on the far left
of the instrument panel
control both outside
rearview mirrors. Move the
center switch
to the left to
select the driver’s side
rearview mirror, or to the
right to select the
passenger’s side rearview mirror. Then
press the arrows to adjust each mirror
so that you
can just see the side of your vehicle when you are sitting
in
a comfortable driving position.
To lock the controls, leave
the selector switch in the
middle position.
When you operate the rear window defogger, a defogger
also warms the driver’s and passenger’s outside
rearview mirrors to help clear them of ice and snow.
Parallel Park Assist Mirror
The passenger’s outside rearview mirror also includes a
tilt-down feature that operates when the shift lever is in
reverse. This feature assists
the driver with improved
rear obstacle detection.
Move the power remote control mirror switch to the
left
(L) or center position to enable this feature. Move
the switch to the right (R) to turn this feature off.
Page 110 of 404
Convex Outside Mirror
Your passenger’s side mirror is convex. A convex
mirror’s surface is curved
so you can see more from the
driver’s seat.
I
A convex mirror can make things (like other
vehicles) look farther away than they really are.
If you cut too sharply into the right lane, you
could hit
a vehicle on your right. Check your
inside mirror or glance over your shoulder before
changing lanes.
Heated Outside Rearview Mirror
When you operate the rear window defogger, a defogger
also
warms the heated driver’s and passenger’s outside
rearview mirrors to help clear them
of ice and snow.
Storage Compartments
Glove Box
Use the door key to lock and unlock the glove box. To
open, pull the latch release on the left side of the glove
box door.
2-54
Page 145 of 404
@ Section 3 Comfort Controls and Audio Systems
In this section, you’ll find out how to operate the comfort control and audio systems offered with your Aurora. Be
sure to read about the particular systems supplied with your vehicle.
3-2 3-2 3-6
3
-7
3-7
3-9
3 -9
3-10
3-10
3-1
1
3-1 1
Comfort Controls
Automatic Electronic Climate Control
Air Conditioning
Heating
Ventilation System
Defogging and Defrosting
Rear Window Defogger
Passenger Temperature Control
Steering Wheel Controls for Climate Control
Setting the Clock
AM-FM Stereo with Cassette
Tape and
Compact Disc Player with Automatic
Tone Control 3-
17
3-22
3-25
3-28
3-29
3-29
3-30
3-30
3-3 1
Delco-Bose@ AM-FM Stereo with Cassette
Tape and Compact Disc Player with
Automatic Tone Control
Trunk Mounted CD Changer
Theft-Deterrent Feature Steering Wheel Controls for-Audio System
Understanding Radio Reception
Tips About Your Audio System
Care of Your Cassette Tape Player
Care
of Your Compact Discs
Power Antenna Mast Care
3-1
Page 149 of 404
Manual Operation
You may override the automatic airflow distribution by
rotating the AUTO-PUSH knob. After you rotate this
knob, the comfort setting will be displayed for five
seconds, then the outside temperature will be displayed.
The fan control will remain
in the automatic control
mode unless you rotate the AUTO
FAN knob to select a
manual fan speed.
fl UPPER: This setting directs airflow through the
@.
upper air outlets located in the instrument panel and
door panels.
fl BI-LEVEL: This setting directs the airflow
through both the upper air outlets and the lower floor
outlets. There is also a small amount of air directed to
the front defroster and the side window defrosters.
tflo HEAT This setting directs most of the airflow to
the lower floor outlets with some airflow directed to the
side window defrosters. There is also a small amount of
airflow directed to the front defroster.
w ' # DEFOG: This setting directs the majority of the
airflow to the lower floor outlets and the front defroster.
A
small amount of airflow is directed to the side window
defroster outlets.
This mode can be useful to remove the
moisture from the inside of the windshield when the
outside temperature
is cold or the humidity is high.
DEF (Defrost): This setting directs the majority of
the airflow to the windshield with some airflow to the
side window defrosters and lower floor outlets. To
increase the fan speed, rotate the AUTO
FAN knob to
the right.
RECIRC: Press this button to limit the amount of
outside air entering your vehicle. This
is helpful when
you are trying to cool the interior of
the vehicle quickly
or limit the amount of outside air entering your vehicle
for some other reason. The RECIRC button and the
AUTO-PUSH knob may be selected at the same time.
The system will remain in RECIRC until the ignition is
turned off, then the system will return back to the
previously selected mode. RECIRC may be selected in
all manual airflow modes except front defrost.
3-5
Page 150 of 404
Operating the RECIRC mode in cold temperatures or
under high humidity conditions may cause moisture
to
form on the inside of the windshield. If this condition
occurs, deselect the RECIRC button.
A/C ON: Press this button to turn the air conditioning
on and
off. If the system is operating in the automatic
mode, the A/C
ON indicator light will automatically
illuminate. In the auto mode, the A/C compressor will
only operate when the system determines
it is needed.
OFF: Rotate the AUTO-PUSH knob to OFF. Turning
the system off will cause the fan to turn off and the
airflow to be directed
out the lower floor outlets. The
system will still try to keep the interior of the vehicle at
the previously chosen comfort setting. The outside
temperature will show in the display when the system is set to
OFF.
Air Conditioning
The air conditioner cools, dehumidifies and filters the
air for the inside of the vehicle.
The air conditioning compressor is enabled in all modes
unless the A/C
ON button is in the off position
(indicator light will not be illuminated). However, the
air conditioning compressor will not operate when the
outside temperature is below
44°F (7°C). When the air
conditioner is on,
you may sometimes notice slight
changes in your vehicle's engine speed and power. This
is normal, because the system is designed
to cycle the
compressor on and off to keep the desired cooling and
help
fuel economy.
On very
hot days, open the windows long enough to let
the hot air out. This reduces the time required to cool the
interior
of the vehicle to a comfortable level. If the
system
is in the automatic mode (AUTO-PUSH knob
indicator light is
on), during very hot days the system
will automatically
go to the RECIRC mode and the
temperature door will be positioned
at the full cold
position for maximum cooling. You can choose
the
extreme comfort setting of 60°F (16"C), but the
system
will not cool any faster by choosing the extreme
comfort setting.
Page 152 of 404
Ventilation Tips
Keep the hood and front air inlet area between the
base
of the windshield and the hood free of ice,
snow, or any other obstruction (such as leaves). The
defroster and heater will work far better, reducing
the chance of fogging the inside of your windows
if
this area is clear.
0 Keep the air path under the front seats clear of
objects. This helps air to circulate throughout
your vehicle.
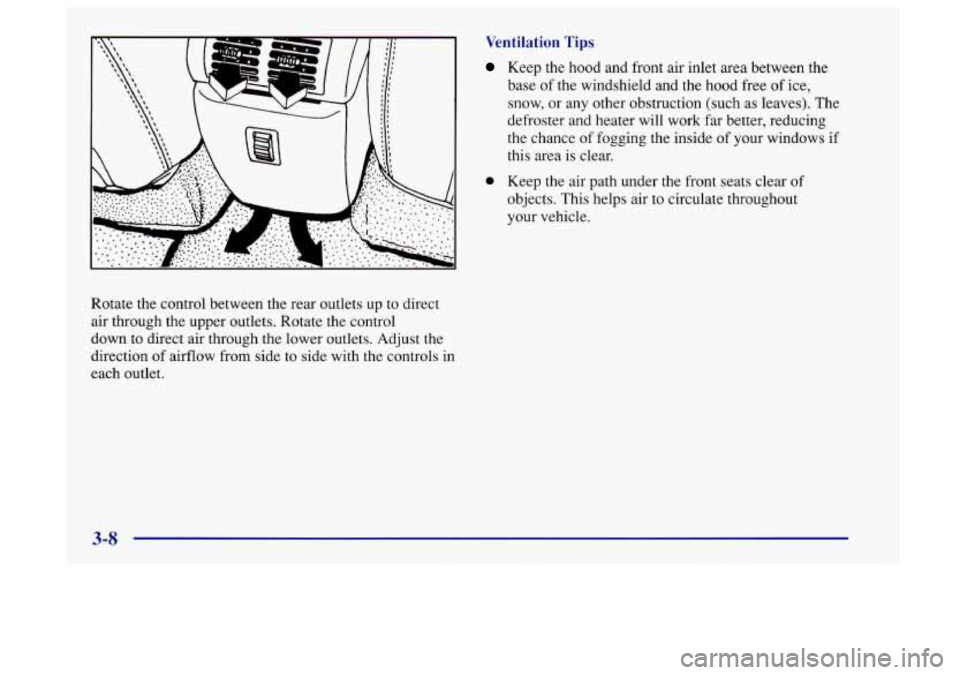
Rotate the control between the rear outlets up to direct
air through the upper outlets. Rotate the control
down to direct air through the lower outlets. Adjust the
direction
of airflow from side to side with the controls in
each outlet.
3-8
Page 153 of 404

Defogging and Defrosting
On cool, humid days use the defog setting to keep the
windows clear while also providing heat through the
lower outlets. Press
DEF to quickly remove fog or ice
from the windshield.
Rear Window Defogger
//I R. DEFOG: Press
this button
to warm the
defogger grid on
the rear
window. An indicator light
in the button will glow
while the rear window
defogger is operating.
At speeds above
30 mph (48 km/h), the rear defogger
will stay
on until you press the R. DEFOG button
again. At speeds below
30 mph (48 km/h), the rear
window defogger will turn off automatically after about
10 minutes of use. If you press it again, the defogger
will operate for about five minutes only. You can also
turn the defogger off by turning off the ignition.
Do not attach a temporary vehicle license across the
defogger grid
on the rear window.
When you operate the rear window defogger, the
outside rearview mirrors are also heated
to help remove
ice and fog.
3-9
Page 154 of 404
1 NOTICE: I
Don’t use a razor blade or something else sharp
on the inside
of the rear window. If you do, you
could cut or damage the warming grid, and the
repairs wouldn’t be covered by your warranty.
Passenger Temperature Control
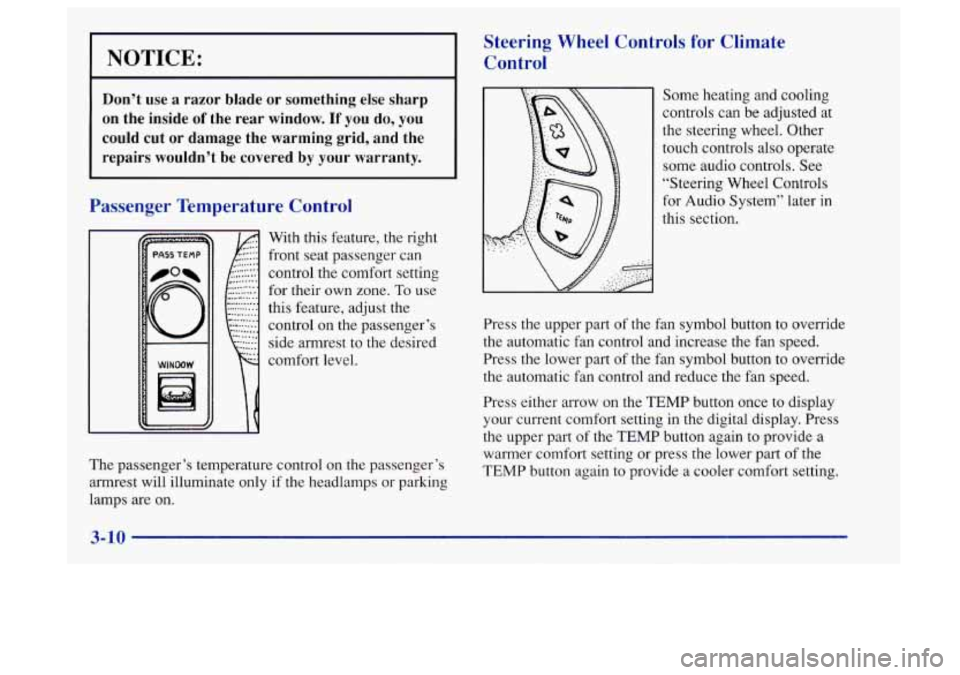
With this feature, the right
front seat passenger can
control the comfort setting
for their own zone. To use
this feature, adjust the
control on the passenger’s side armrest to the desired
comfort level.
Steering Wheel Controls for Climate
Control
The passenger’s temperature control on the passenger’s
armrest will illuminate only if
the headlamps or parking
lamps are on. Some
heating and cooling
controls can be adjusted at
the steering wheel. Other
touch controls also operate
some audio controls. See
“Steering Wheel Controls
for Audio System” later in
this section.
Press the upper part of the fan symbol button to override
the automatic fan control and increase the fan speed.
Press the lower part of the fan symbol button to override
the automatic fan control and reduce the fan speed.
Press either arrow on the
TEMP button once to display
your current comfort setting in the digital display. Press
the upper part of the TEMP button again to provide a
warmer comfort setting or press the lower part of the
TEMP button again to provide
a cooler comfort setting.
3-10
Page 199 of 404
Just before you leave the lane, glance quickly over your
shoulder to make sure there isn’t another vehicle in your
“blind” spot.
Once you are moving on the freeway, make certain
you
allow a reasonable following distance. Expect to move
slightly slower at night.
When you want to leave the freeway, move
to the proper
lane well in advance. If you miss your exit, do not,
under any circumstances, stop and back up. Drive on to
the next exit.
The exit ramp can be curved, sometimes quite sharply.
The exit speed
is usually posted.
Reduce your speed according to your speedometer, not
to your sense of motion. After driving for any distance
at higher speeds, you may tend to think you are going
slower than you actually are.
Before Leaving on a Long T_ In
Make sure you’re ready. Try to be well restea. If you
must start when you’re not fresh
-- such as after a day’s
work
-- don’t plan to make too many miles that first part
of the journey. Wear comfortable clothing
and shoes you
can easily drive in.
Is your vehicle ready for a long trip? If you keep it
serviced and maintained, it’s ready
to go. If it needs
service, have it done before starting out. Of course,
you’ll find experienced and able service experts in
Aurora retail facilities all across North America. They’ll
be ready and willing to help if you need it.
Here are some things you can check before a trip:
0
0
0
0
0
0
Windshield Washer Fluid: Is the reservoir full? Are
all windows clean inside and outside?
Wiper Blades: Are they in good shape?
Fuel, Engine Oil, Other Fluids: Have you checked
all levels?
Lumps: Are they all working? Are the lenses clean?
Tires: They are vitally important to a safe,
trouble-free trip. Is the tread good enough for
long-distance driving? Are the tires all inflated
to the
recommended pressure?
Weather Forecasts: What’s the weather outlook
along your route? Should you delay your trip a short
time to avoid a major storm system?
Maps: Do you have up-to-date maps?