lock Oldsmobile Aurora 1998 Owner's Manuals
[x] Cancel search | Manufacturer: OLDSMOBILE, Model Year: 1998, Model line: Aurora, Model: Oldsmobile Aurora 1998Pages: 380, PDF Size: 19.75 MB
Page 11 of 380
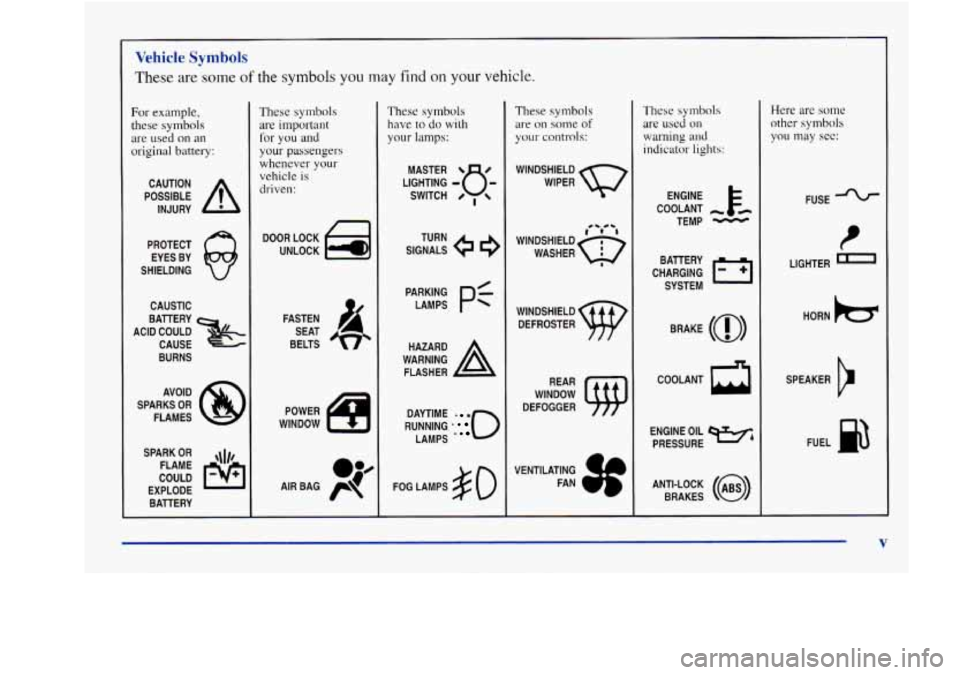
Vehicle Symbols
These are some of the symbols you may find on your vehicle.
For example,
these
symbols
are used on an
original battery:
POSSIBLE A
CAUTION
INJURY
PROTECT EYES BY
SHIELDING
CAUSTIC
BURNS AVOID
SPARKS
OR
FLAMES
SPARK
OR ,\I/,
COULD FLAME
EXPLODE BATTERY
These symbols
are important
for you and
your passengers
whenever
your
vehicle is
driven:
DOOR LOCK
UNLOCK
FASTEN SEAT
BELTS
POWER
WINDOW
These symbols have
to do with
your lamps:
SIGNALS e e3
TURN
RUNNING
* 0
DAYTIME - a
LAMPS .
FOG LAMPS # 0
These symbols
are on some of
your controls:
WINDSHIELD
WIPER
WINDOW
DEFOGGER
VENTILATING FAN
These symbols
are used on
warning and
indicator lights:
COOLANT -
TEMP -
CHARGING I-1
BATTERY
SYSTEM
BRAKE
(0)
h
ENGINE OIL e,
PRESSURE
ANTI-LOCK
(@)
BRAKES
Here are some
other symbols
you may see:
FUSE -%-
LIGHTER n
HORN )tr
SPEAKER
b
FUEL E3
V
Page 16 of 380
The seat cushion and mirror positions will be stored
for the number pressed. Repeat the procedure to store
another position with the other number if desired.
To
adjust the seat and mirrors to the stored position, press
the number corresponding to the position. The memory
function will only work with the gearshift in PARK
(P).
To stop the automatic movement, move the seat switch
in any direction. For easier exiting, press the
1 and 2
buttons at the same time to move the seat completely
down and back.
Memory Seat and Mirror
Personalization Feature
The transmitters can also be programmed to move the
driver’s seat and outside mirors to a set memory position
when the transmitter’s
UNLOCK button is pressed.
To program the system:
1.
2.
3.
4.
Adjust the driver’s seat to a comfortable position.
Adjust both outside mirrors to suit you. See
“Mirrors” in the Index.
Press the SET button on the driver’s door panel.
You will hear one beep.
Within five seconds, press one
of the two memory
buttons on the door panel. You will hear two beeps
to confirm that the mirror and the seat cushion
positions are entered into memory.
Press the
UNLOCK button on the appropriate
transmitter within five seconds.
You will hear
two beeps.
The second transmitter can be programmed to record
a different seat and mirror position by following the
same steps.
Page 17 of 380
If you prefer to program the exit seat position, which
moves the seat completely down and back, follow
these steps:
1. Press the SET button on the driver’s door panel.
You will hear one beep.
2. Press one of the memory buttons on the driver’s
door panel. You will hear one beep, but the seat
will not move at this time.
3. Press the UNLOCK button on the appropriate
transmitter within five seconds. You will hear
two beeps.
This personalization feature will work only when the
vehicle is in
PARK (P). A beep will sound inside the
vehicle when the UNLOCK button on the transmitter
is pressed to move the seat and mirrors.
To turn this feature off, press
SET and then UNLOCK
within five seconds.
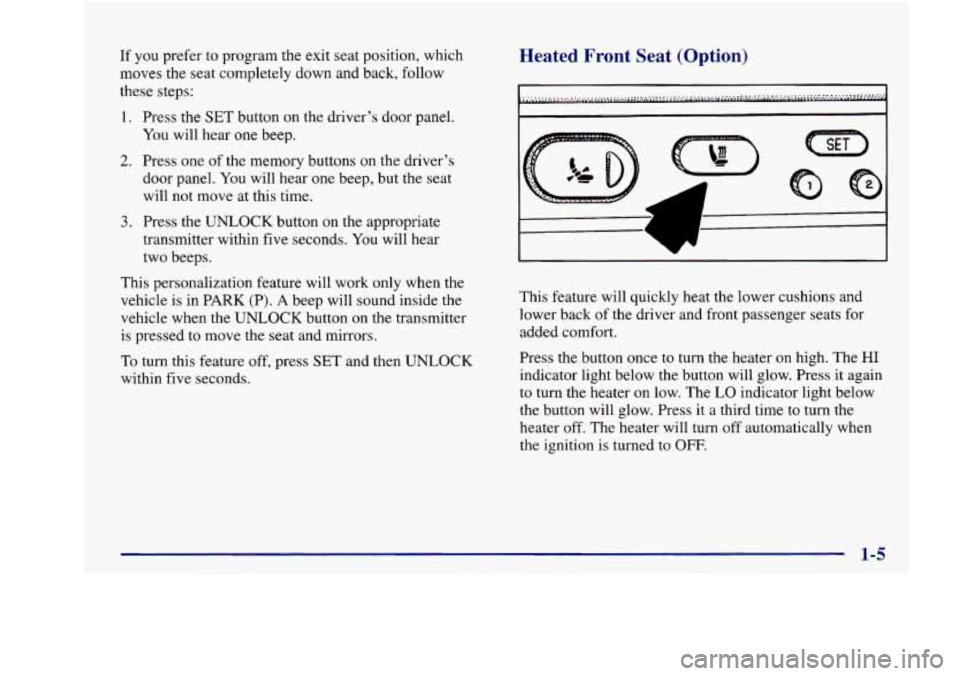
Heated Front Seat (Option)
7- I
This feature will quickly heat the lower cushions and
lower back of the driver and front passenger seats for
added comfort.
Press the button once to turn the heater on high. The
HI
indicator light below the button will glow. Press it again
to turn the heater on low. The
LO indicator light below
the button will glow. Press it a third time to turn the
heater off. The heater will turn
off automatically when
the ignition is turned to
OFF.
Page 19 of 380
Head Restraints
Slide the head restraint up or down so that the top of the
restraint is closest to the top
of your ears. This position
reduces the chance
of a neck injury in a crash.
The head restraints tilt forward and rearward also.
There are four different positions. Just grasp the top
of the restraint and move it forward the way you want it
to
go until you hear a click. It will then be locked into
that position until you need to move it again. Pulling it
forward past the last position will allow the headrest to
return to
its full rear position.
Safety Belts: They’re for Everyone
This part of the manual tells you how to use safety belts
properly. It also tells you
some things you should not do
with safety belts.
And it explains the Supplemental Restraint System
(SRS), or air bag system.
Don’t let anyone ride where he or she can’t wear
a safety belt properly.
If you are in a crash and
you’re not wearing
a safety belt, your injuries
can be much worse.
You can hit things inside the
vehicle or be ejected from it. You can be seriously
injured or killed. In the same crash, you might
not be if you are buckled up. Always fasten your
safety belt, and check that your passengers’ belts
are fastened properly too.
Page 25 of 380
How to Wear Safety Belts Properly
Adults
This part is only for people of adult size.
Be aware that there are special things to know about
safety belts and children. And there
are different rules
for smaller children and babies. If a child will be riding
in your vehicle, see the part of this manual called
“Children.” Follow those rules for everyone’s protection.
First, you’ll want to know which restraint systems your
vehicle has.
We’ll start with the driver position.
Driver Position
This part describes the driver’s restraint system.
Lap-Shoulder Belt
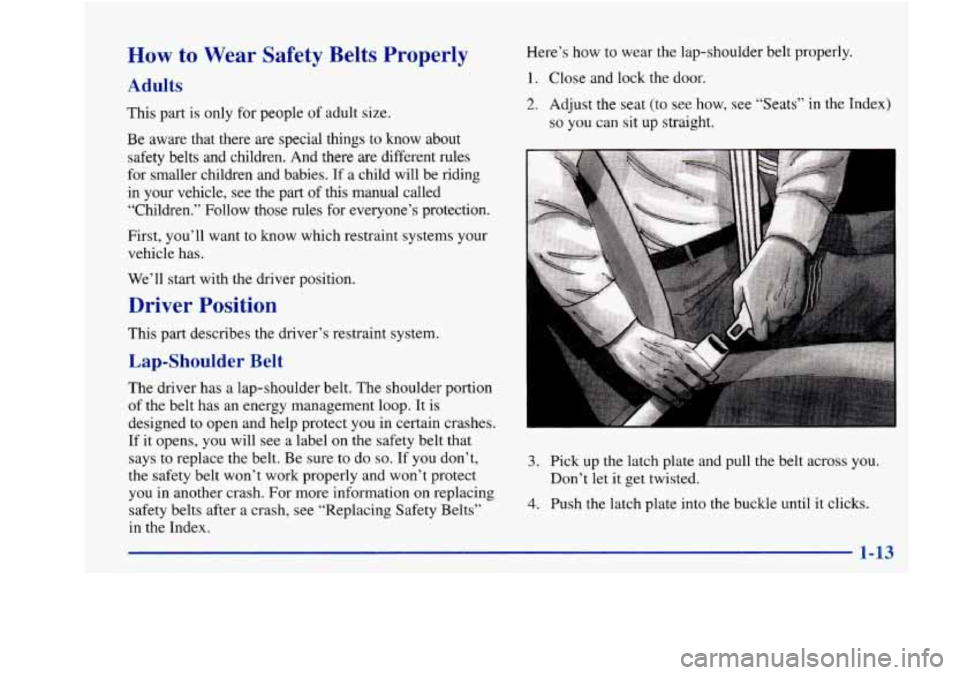
Here’s how to wear the lap-shoulder belt properly.
1. Close and lock the door.
2. Adjust the seat (to see how, see “Seats” in the Index)
so you can sit up straight.
R I
The driver has a lap-shoulder belt. The shoulder portion
of the belt has an energy management loop. It is
designed
to open and help protect you in certain crashes.
If it opens, you will
see a label on the safety belt that
says to replace the belt. Be sure
to do so. If you don’t,
the safety belt won’t work properly and won’t protect
you in another crash. For more information on replacing
safety belts after a crash, see “Replacing Safety Belts’’
in the Index.
1-13
3. Pick up the latch plate and pull the belt across you.
Don’t let it get twisted.
4. Push the latch plate into the buckle until it clicks.
Page 26 of 380
YUII up on tne latcn plate to maKe sure It 1s secure. IT
the belt isn’t long enough, see “Safety Belt
Extender” at the end of this section.
Make sure the release button on the buckle is
positioned
so you would be able to unbuckle the
safety belt quickly
if you ever had to.
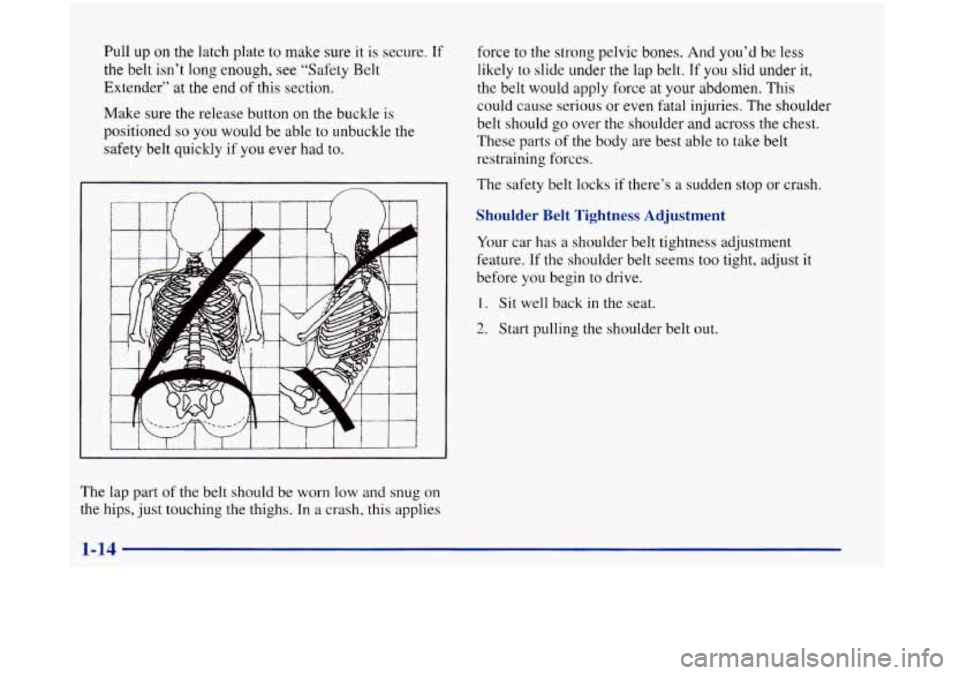
The lap part of the belt should be worn low and snug on
the hips, just touching the thighs. In a crash, this applies force
to the strong pelvic bones. And you’d be
less
likely to slide under the lap belt. If you slid under it,
the belt would apply force at your abdomen. This
could cause serious or even fatal injuries. The shoulder
belt should go over the shoulder and across the chest.
These parts
of the body are best able to take belt
restraining forces.
The safety belt locks if there’s a sudden stop
or crash.
Shoulder Belt Tightness Adjustment
Your car has a shoulder belt tightness adjustment
feature. If the shoulder belt seems too tight, adjust it
before you begin to drive.
I. Sit well back in the sear.
2. Start pulling the shoulder belt out.
1-14
Page 33 of 380
The best way to protect the fetus is to protect the
mother. When
a safety belt is worn properly, it’s more
likely that the fetus won’t be hurt in a crash. For
pregnant women, as for anyone, the key to making
safety belts effective
is wearing them properly.
Right Front Passeng . Position
To learn how to wear the right front passenger’s safety belt
properly,
see “Driver Position’’ earlier in this section.
The right front passenger’s safety belt works the same way as
the driver’s safety belt
-- except for one thing. If you ever pull
the lap portion of the belt out all
the way, you will engage the
child restraint locking feature.
If this happens, just let the belt
go back all the way and start again.
Supplemental Restraint System (SRS)
This part explains the Supplemental Restraint System
(SRS) or air bag system.
Your vehicle has “Next Generation” reduced-force
frontal air bags
-- one air bag for the driver and another
air bag for the right front passenger.
Reduced-force frontal air bags are designed
to help
reduce the
risk of injury from the force of an inflating
air bag. But even these air bags must inflate very
quickly
if they are to do their job and comply with
federal regulations. Here
are the most important things to know about the air
bag system:
I
You can be severely injured or killed in a crash if
you aren’t wearing your safety belt
-- even if you
have air bags. Wearing your safety belt during a
crash helps reduce your chance of hitting things
inside the vehicle or being ejected from it. Air
bags are “supplemental restraints’’ to the safety
belts. All air bags are designed to work with
safety belts, but don’t replace them. Air bags
are designed to work only in moderate to severe
crashes where the front of your vehicle hits
something. They aren’t designed to inflate at
all in rollover, rear, side or low-speed frontal
crashes. Everyone in your vehicle should wear a
safety belt properly
-- whether or not there’s an
air bag for that person.
i
1-21
Page 41 of 380
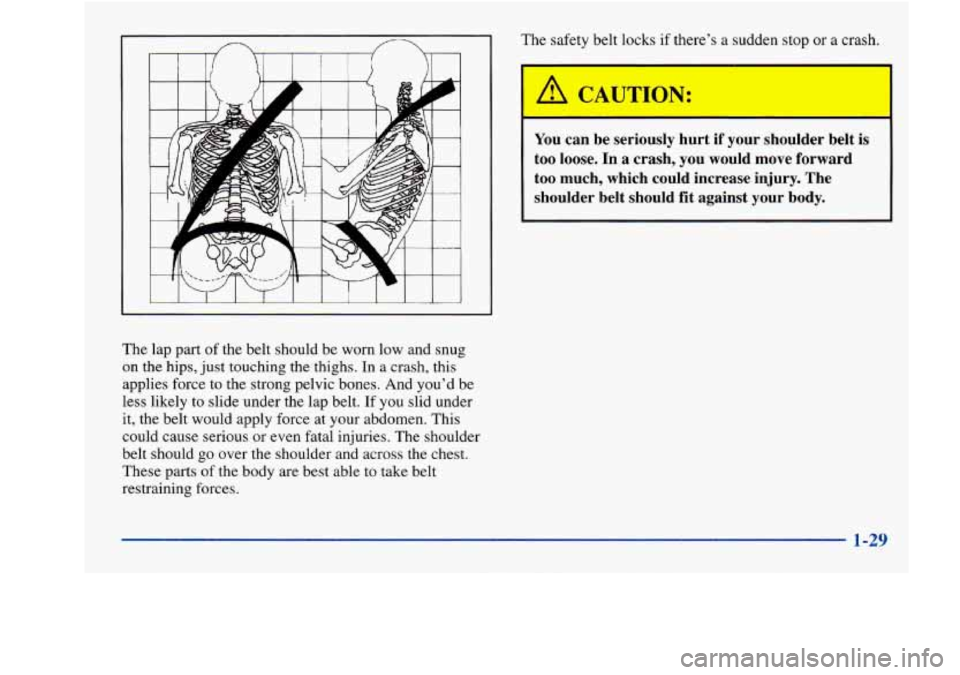
The lap part of the belt should be worn low and snug
on the hips, just touching the thighs. In a crash, this
applies force to the strong pelvic bones. And you’d be
less likely to slide under the lap belt. If you slid under
it, the belt would apply force at your abdomen. This
could cause serious
or even fatal injuries. The shoulder
belt should go over the shoulder and across the chest.
These parts of the body are best able to take belt
restraining forces. The
safety belt locks if there’s a sudden stop or a crash.
You can be seriously hurt if your shoulder belt is
too loose. In a crash, you would move forward
too much, which could increase injury. The
shoulder belt should fit against your body.
1-29
Page 59 of 380
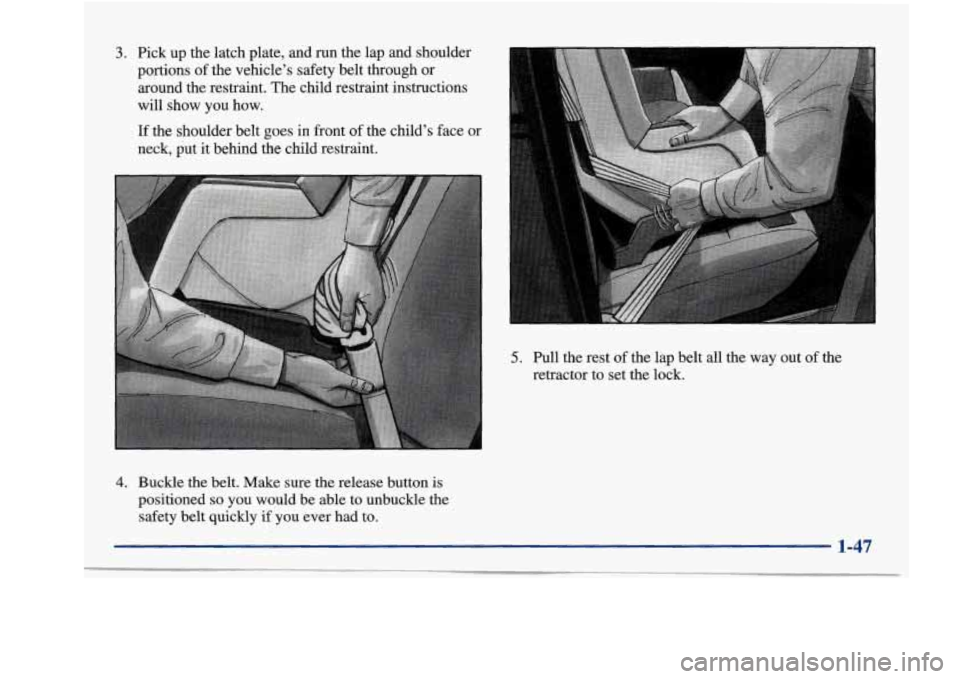
3. Pick up the latch plate, and run the lap and shoulder
portions of the vehicle’s safety belt through or
around the restraint. The child restraint instructions
will show you how.
If the shoulder belt goes in front of the child’s face or
neck, put it behind the child restraint.
5. Pull the rest of the lap belt all the way out of the
retractor to set the lock.
4. Buckle the belt. Make sure the release button is
positioned so you would be able to unbuckle the
safety belt quickly
if you ever had to.
1-47
Page 67 of 380
Section 2 Features and Controls
Here you can learn about the many standard and optional features on your vehicle, and information on starting,
shifting
and braking. Also explained are the instrument panel and the warning systems that tell you if everything is
working properly
-- and what to do if you have a problem.
2-2
2-4
2-9
2- 14
2-15
2- 16
2-1s
2- 19
2-20
2-21
2-23
2-27
2-28
2-30
2-3
1
Keys
Door Locks
Remote Lock Control TrUIlk
Theft
Universal Theft-Deterrent
PASS-Key(%
New Vehicle “Break-In”
Ignition Positions Starting Your Engine
Engine Coolant Heater (Option)
Parking Brake
Shifting Into PARK (P)
Shifting Out of PARK (P)
Parking Over Things That Burn 2-3 1
2-3
3
2-34
2-34
2-42
2-45
2-48
2-52
2-55
2-55 2-55
2-56
2-60
2-64
2-75 Engine Exhaust
Windows
Tilt Wheel
Turn SignaVMultifunction Lever
Exterior Lamps Interior Lamps
Mirrors
Storage Compartments
Cellular Telephone (Option)
Accessory Power Outlet
Sunroof (Option)
Universal Transmitter
Instrument Panel
Warning Lights, Gages and Indicators
Driver Information Center
2-1