mirror Oldsmobile Aurora 1998 s User Guide
[x] Cancel search | Manufacturer: OLDSMOBILE, Model Year: 1998, Model line: Aurora, Model: Oldsmobile Aurora 1998Pages: 380, PDF Size: 19.75 MB
Page 121 of 380
Sun Visors
To block out glare, you can swing down the visors. You
can also remove them from the center mount and swing
them to the side, while the auxiliary visor remains
to
block glare from the front.
To extend the visor at the sides, pull out the extension.
Illuminated Visor Vanity Mirrors
When you open the cover to the driver or passenger side
visor vanity mirror, the lamps will come on. You can
adjust the brightness of the lamps with the switch by
sliding the lever up or down.
Cellular Telephone (Option)
If your vehicle is equipped with the cellular telephone
readiness package, your vehicle has been pre-wired for
the installation
of a cellular telephone. If you choose to
install a cellular telephone, contact your retailer.
Accessory Power Outlet
The power outlet inside the front ashtray can be used to
plug in electrical equipment such as a cellular telephone,
CB radio, etc. Follow the proper installation instructions
that are included with any electrical equipment you
install. The accessory power outlet is
off if the ignition
is turned off.
NOTICE:
When using the accessory power outlet, the
maximum load
of any electrical equipment
should not exceed
15 amps.
Garment Hook
For your convenience, you will find a two-hanger
capacity garment hook above each rear door near the
reading lamps.
Garment hooks are not designed to support clothing
bars. Use assist straps for this if possible.
Assist Handles
A folding handle above each rear door and the front
passenger’s door can be used to help you get in or out
of your vehicle.
Sunroof (Option)
Your express-open sunroof provides an airy, spacious
feel to your vehicle’s interior and can also increase
ventilation. It includes a sliding glass panel and a
sliding sunshade. The control switch will work only
when the ignition is on, or when retained accessory
power is active.
2-55
Page 127 of 380
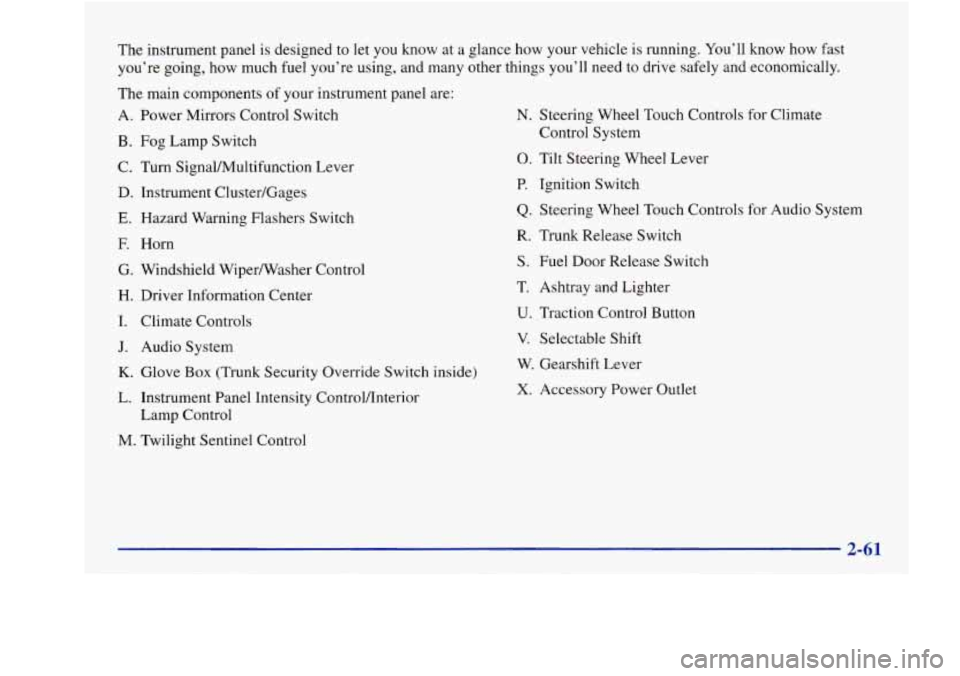
The instrument panel is designed to let you know at a glance how your vehicle is running. You’ll know how fast
you’re going, how much fuel you’re using, and many other things you’ll need to drive safely and economically.
The main components of your instrument panel are:
A. Power Mirrors Control Switch
B. Fog Lamp Switch
C. Turn SignalMultifunction Lever
D. Instrument Cluster/Gages
E. Hazard Warning Flashers Switch
E Horn
G. Windshield WiperNasher Control
H. Driver Information Center
I. Climate Controls
J. Audio System
K. Glove Box (Trunk Security Override Switch inside)
L. Instrument Panel Intensity ControVInterior
Lamp Control
M. Twilight Sentinel Control
N. Steering Wheel Touch Controls for Climate
Control System
0. Tilt Steering Wheel Lever
P. Ignition Switch
Q. Steering Wheel Touch Controls for Audio System
R. Trunk Release Switch
S. Fuel Door Release Switch
T. Ashtray and Lighter
U. Traction Control Button
V. Selectable Shift
W. Gearshift Lever
X. Accessory Power Outlet
Page 159 of 380
Defogging and Defrosting
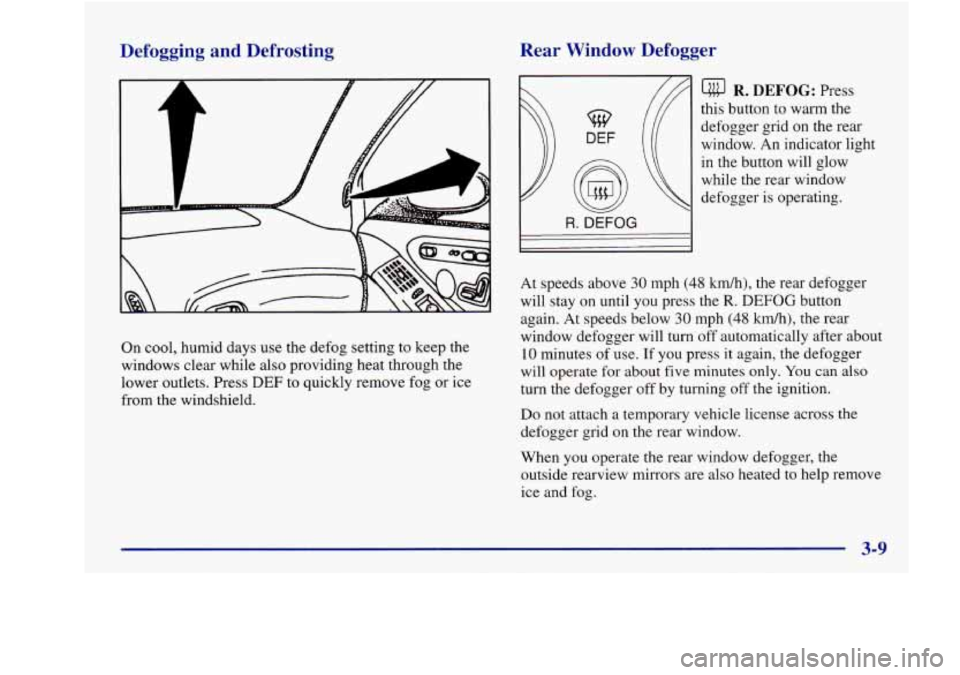
On cool, humid days use the defog setting to keep the
windows clear while also providing heat through the
lower outlets. Press
DEF to quickly remove fog or ice
from the windshield.
Rear Window Defogger
w
DEF
R. DEFOG
lluJ R. DEFOG: Press
this button to warm the
defogger grid on the rear
window. An indicator light
in the button will glow
while the rear window
defogger is operating.
At speeds above
30 mph (48 kdh), the rear defogger
will stay on until you press
the R. DEFOG button
again. At speeds below
30 mph (48 km/h), the rear
window defogger will turn
off automatically after about
10 minutes of use. If you press it again, the defogger
will operate for about five minutes only.
You can also
turn the defogger off by turning
off the ignition.
Do not attach a temporary vehicle license across the
defogger grid on the rear window.
When you operate the rear window defogger, the
outside rearview mirrors are also heated to help remove
ice and
fog.
Page 192 of 380

Do nor get too close to the vehicle you want to
pass while you’re awaiting an opportunity. For one
thing, following too closely reduces your area of
vision, especially if you’re following a larger
vehicle. Also,
you won’t have adequate space if
the vehicle ahead suddenly slows or stops. Keep
back a reasonable distance.
When it looks like a chance to pass is coming up,
start to accelerate but stay in the right lane and don’t
get too close. Time your move
so you will be
increasing speed as the time comes to move into the
other lane. If the way is clear to pass, you will have
a “running start” that more than makes up for the
distance
you would lose by dropping back. And if
something happens to cause you to cancel your pass,
you need only slow down and drop back again and
wait for another opportunity.
If other cars are lined up to pass a slow vehicle, wait
your turn. But take care that someone isn’t trying to
pass you as
you pull out to pass the slow vehicle.
Remember to glance over your shoulder and check
the blind spot.
Check your mirrors, glance over your shoulder, and
start your left lane change signal before moving out
of the right lane to pass. When you are far enough
0
0
0
ahead of the passed vehicle to see its front in your
inside mirror, activate your right lane change signal
and move back into the right lane. (Remember that
your right outside mirror is convex. The vehicle you
just passed may seem to be farther away from you
than it really
is.)
Try not to pass more than one vehicle at a time
on two-lane roads. Reconsider before passing the
next vehicle.
Don’t overtake a slowly moving vehicle too rapidly.
Even though the brake lamps are not flashing, it may
be slowing down or starting to turn.
If you’re being passed, make it easy for the
following driver to get ahead of you. Perhaps you
can ease a little to the right.
Loss of Control
Let’s review what driving experts say about what
happens when the three control systems (brakes, steering
and acceleration) don’t have enough friction where the
tires meet the road to do what the driver has asked.
In any emergency, don’t give up. Keep trying to
steer and constantly seek an escape route
or area of
less danger.
Page 193 of 380
Skidding
In a skid, a driver can lose control of the vel-ucle.
Defensive drivers avoid most skids by taking reasonable
care suited to existing conditions, and by not “overdriving”
those conditions. But skids
are always possible.
The three types of skids correspond to your vehicle’s
three control systems. In the braking skid, your wheels
aren’t rolling. In the steering or cornering skid, too
much speed or steering in a curve causes tires to slip
and lose cornering force. And in the acceleration skid,
too much throttle causes the driving wheels to spin.
A cornering skid is best handled by easing your foot off
the accelerator pedal.
Remember: Any traction control system helps avoid
only the acceleration skid.
If your traction control system is off, then an
acceleration skid is also best handled by easing your
foot off the accelerator pedal.
If your vehicle starts
to slide, ease your foot off the
accelerator pedal and quickly steer the way you want the vehicle to go.
If
you start steering quickly enough, your
vehicle may straighten out. Always be ready for a
second skid if it occurs.
Of course, traction is reduced when water, snow, ice,
gravel or other material
is on the road. For safety, you’ll
want to slow down and adjust your driving
to these
conditions. It is important to slow down on slippery
surfaces because stopping distance will be longer and
vehicle control more limited.
While driving on a surface with reduced traction, try
your best to avoid sudden steering, acceleration
or
braking (including engine braking by shifting to a
lower gear). Any sudden changes could cause the tires
to slide. You may not realize the surface is slippery until
your vehicle is skidding. Learn to recognize warning
clues
-- such as enough water, ice or packed snow on
the road to make a “mirrored surface”
-- and slow down
when you have any doubt.
Remember: Any anti-lock brake system (ABS) helps
avoid only the braking skid.
Page 199 of 380
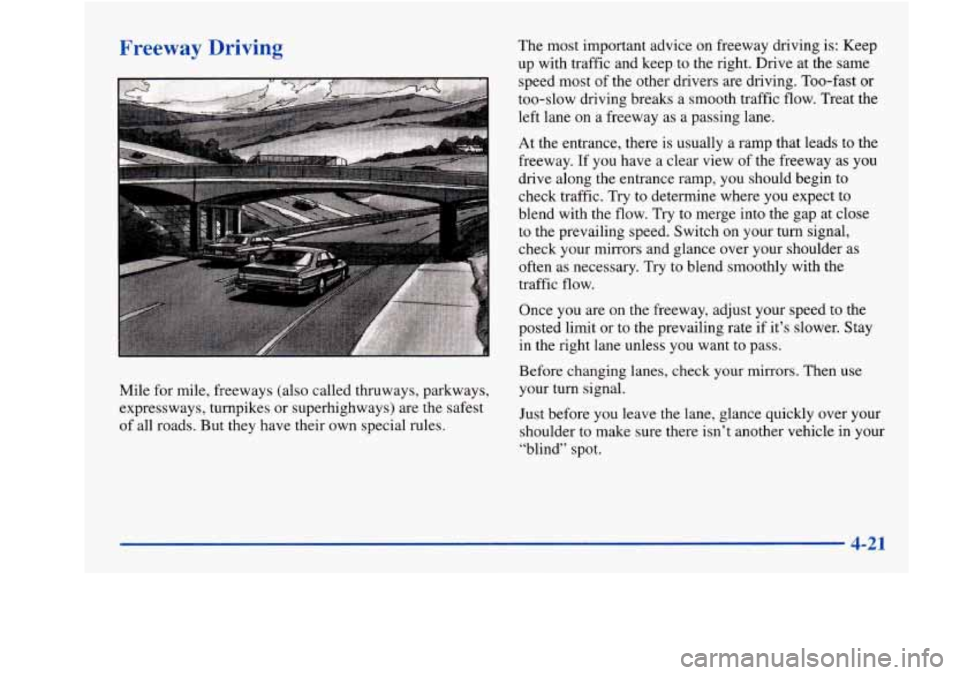
Freeway Driving The most important advice on freeway driving is: Keep
up with traffic and keep to the right. Drive at the same
speed most of the other drivers
are driving. Too-fast or
too-slow driving breaks a smooth traffic flow. Treat the
left lane on a freeway as a passing lane.
At the entrance, there is usually a ramp that leads to the
freeway. If you have a clear view
of the freeway as you
drive along the entrance ramp, you should begin to
check traffic. Try to determine where you expect
to
blend with the flow. Try to merge into the gap at close
to the prevailing speed. Switch on your turn signal,
check your mirrors and glance over your shoulder as
often as necessary. Try to blend smoothly with the
traffic flow.
Once you are
on the freeway, adjust your speed to the
posted limit or to the prevailing rate if it’s slower. Stay
in the right lane unless you want to pass.
Mile
for mile, freeways (also called thruways, parkways,
expressways, turnpikes or superhighways) are the safest
of all roads. But they have their own special rules. Before changing
lanes, check your mirrors.
Then use
your turn signal.
Just before you leave the lane, glance quickly over your
shoulder to make sure there isn’t another vehicle in your
“blind” spot.
4-21
Page 201 of 380

Highway Hypnosis
Is there actually such a condition as “highway hypnosis”?
Or is it just plain falling asleep at the wheel? Call it
highway hypnosis, lack
of awareness, or whatever.
There is something about an easy stretch
of road with the
same scenery, along with the hum
of the tires on the road,
the drone
of the engine, and the rush of the wind against
the vehicle that can make you sleepy. Don’t let it happen
to you! If it does, your vehicle can leave the road in
less
than a secund, and you could crash and be injured.
What can you do about highway hypnosis? First, be
aware that it can happen.
Then here are some tips:
0
0
0
Make sure your vehicle is well ventilated, with a
comfortably cool interior.
Keep your eyes moving. Scan the road ahead and to
the sides. Check your rearview mirrors and your
instruments frequently.
If
you get sleepy, pull off the road into a rest, service
or parking area and take a nap, get
some exercise, or
both. For safety, treat drowsiness on the highway as
an emergency.
Hill and Mountain Roads
Driving on steep hills or mountains is different from
driving in flat or rolling terrain.
4-23
Page 213 of 380

Driving with a Trailer
Towing a trailer requires a certain amount of experience.
Before setting out for the open road, you’ll want to get
to know your rig. Acquaint yourself with the feel of
handling and braking with the added weight of the
trailer. And always keep in mind that the vehicle you are
driving is now a good deal longer and not nearly as
responsive
as your vehicle is by itself.
Before you start, check the trailer hitch and platform
(and attachments), safety chains, electrical connector,
lamps, tires and mirror adjustment. If the trailer has
electric brakes, start your vehicle and trailer moving and
then apply the trailer brake controller by hand to be sure
the brakes are working. This lets you check your
electrical connection at the same time.
During your trip, check occasionally to be sure that the
load is secure, and that the lamps and any trailer brakes
are still working.
Following Distance
Stay at least twice as far behind the vehicle ahead as you
would when driving your vehicle without a trailer. This
can help you avoid situations that require heavy braking
and sudden turns.
Passing
You’ll need more passing distance up ahead when
you’re towing a trailer. And, because you’re a good
deal longer, you’ll need to go much farther beyond the
passed vehicle before you can return
to your lane.
Backing Up
Hold the bottom of the steering wheel with one hand.
Then, to move the trailer to the left, just move that hand
to the left.
To move the trailer to the right, move your
hand to the right. Always back up slowly and, if
possible, have someone guide
you.
4-35
Page 320 of 380
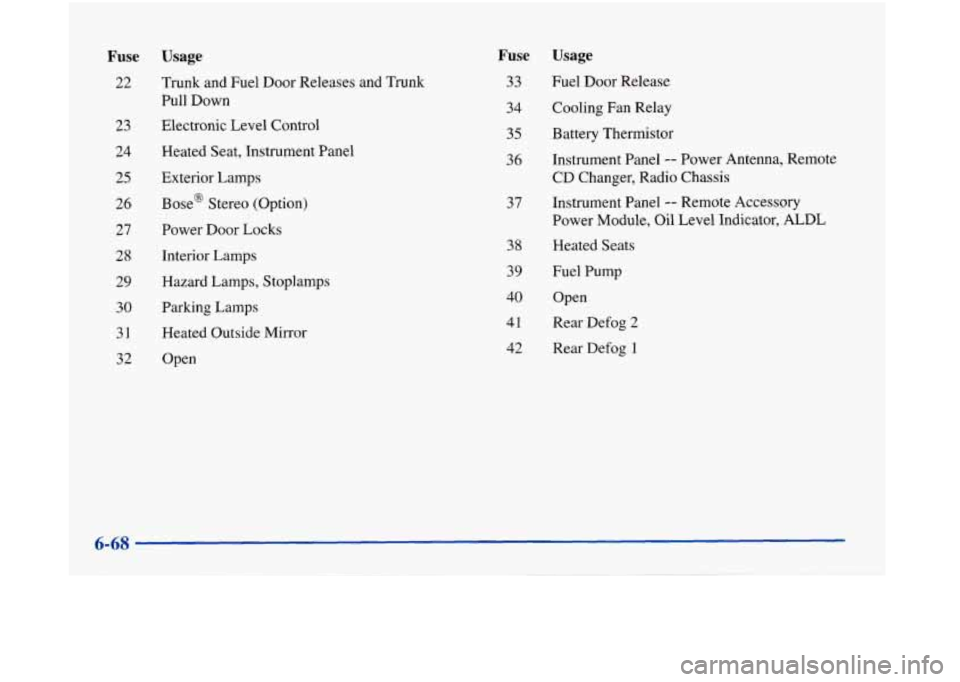
Fuse
22
23 24
25
26
27
28
29
30
31
32
Usage
Trunk and Fuel Door Releases and Trunk Pull Down
Electronic Level Control
Heated Seat, Instrument Panel Exterior Lamps
Base@ Stereo (Option)
Power Door Locks
Interior Lam]
Hazard Lamps, xoplamps
Parking Lamps
Heated Outside
Mirror
Open
Fuse Usage
33 Fuel Door Release
34 Cooling Fan Relay
35 Battery Thermistor
36 Instrument Panel
-- Power Antenna, Remote
CD Changer, Radio Chassis
Instrument Panel -- Remote Accessory
Power Module, Oil Level Indicator,
ALDL
37
38
39
40
41
42
Heated Seats
Fuel Pump
Open
Rear Defog
2
Rear Defog 1
Page 365 of 380
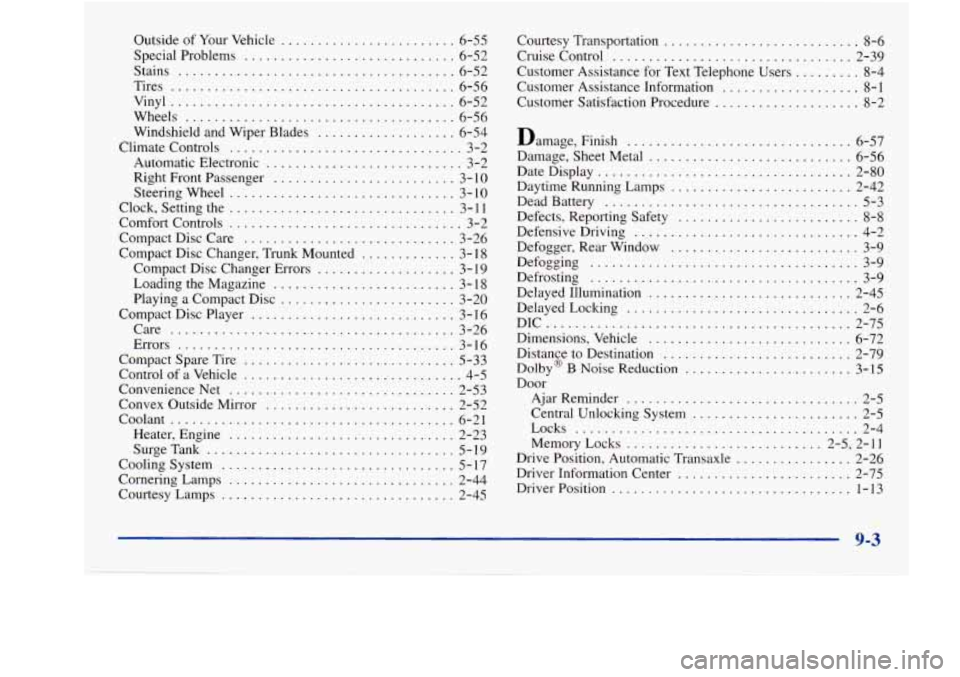
Outside of Your Vehicle ........................ 6-55
Special Problems
............................. 6-52
Stains
...................................... 6-52
Tires
....................................... 6-56
Vinyl
....................................... 6-52
Wheels
..................................... 6-56
Windshield and Wiper Blades
................... 6-54
Climate Controls
................................ 3-2
Automatic Electronic
........................... 3-2
Right Front Passenger
......................... 3- 10
SteeringWheel
............................... 3-10
Clock. Setting the
............................... 3- 11
Comfort Controls ................................ 3-2
Compact Disc Care
............................. 3-26
Compact Disc Changer. Trunk Mounted
............. 3- 18
Compact Disc Changer Errors
................... 3- 19
Loading the Magazine
......................... 3- 18
Playing a Compact Disc
........................ 3-20
Compact Disc Player
............................ 3-16
Care
....................................... 3-26
Errors
...................................... 3-1 6
Compact Spare Tire
............................. 5-33
Control of
a Vehicle .............................. 4-5
ConvenienceNet
............................... 2-53
Convex Outside Mirror
.......................... 2-52
Coolant
....................................... 6-21
Heater. Engine
............................... 2-23
SurgeTank
.................................. 5-19
Cooling System
................................ 5- 17
Cornering Lamps ............................... 2-44
Courtesy Lamps
................................ 2-45 Courtesy
Transportation
........................... 8-6
Cruise Control
................................. 2-39
Customer Assistance for Text Telephone Users
......... 8-4
Customer Assistance Information
................... 8-1
Customer Satisfaction Procedure .................... 8-2
Damage. Finish
............................... 6-57
Damage. Sheet Metal
............................ 6-56
DateDisplay
................................... 2-80
Daytime Running Lamps
......................... 2-42
Dead Battery
................................... 5-3
Defensive Driving
............................... 4-2
Defogger. Rear Window
.......................... 3-9
Defogging
..................................... 3-9
Defrosting
..................................... 3-9
Delayed Illumination
............................ 2-45
DelayedLocking
................................ 2-6
DIC
.......................................... 2-75
Dimensions. Vehicle
............................ 6-72
Distance to Destination
.......................... 2-79
Door Defects.
Reporting Safety
......................... 8-8
Dolby@ B Noise Reduction ....................... 3-15
Ajar Reminder
................................ 2-5
Central Unlocking System
....................... 2-5
Locks
....................................... 2-4
Memory Locks
........................... 2-5. 2-11
Drive Position. Automatic Transaxle
................ 2-26
Driver Information Center
........................ 2-75
DriverPosition
................................. 1-13
9-3