start stop button Oldsmobile Aurora 1998 Owner's Manuals
[x] Cancel search | Manufacturer: OLDSMOBILE, Model Year: 1998, Model line: Aurora, Model: Oldsmobile Aurora 1998Pages: 380, PDF Size: 19.75 MB
Page 26 of 380

YUII up on tne latcn plate to maKe sure It 1s secure. IT
the belt isn’t long enough, see “Safety Belt
Extender” at the end of this section.
Make sure the release button on the buckle is
positioned
so you would be able to unbuckle the
safety belt quickly
if you ever had to.
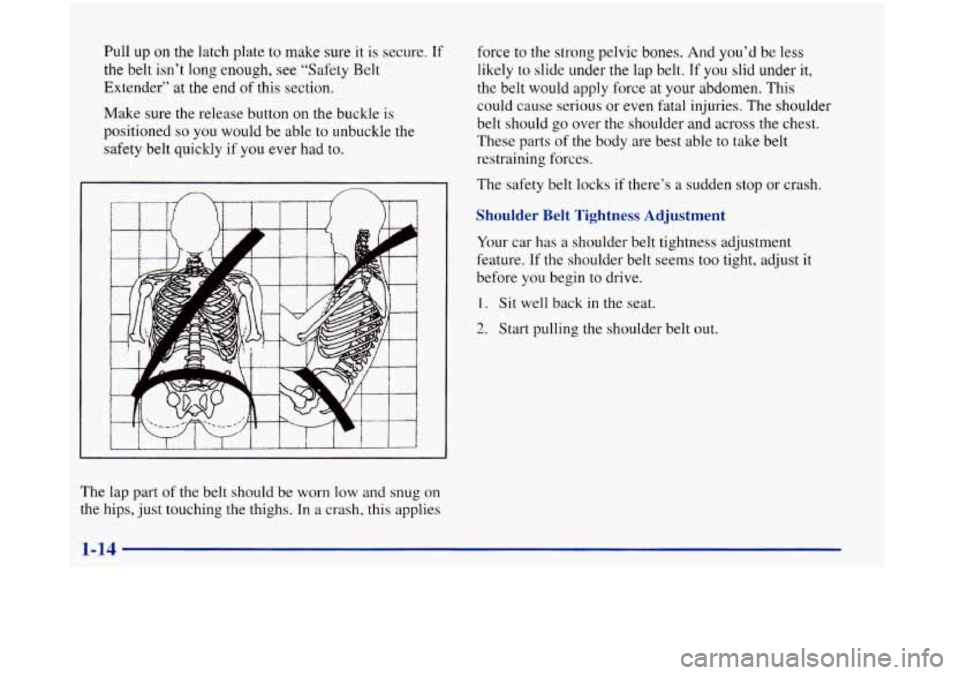
The lap part of the belt should be worn low and snug on
the hips, just touching the thighs. In a crash, this applies force
to the strong pelvic bones. And you’d be
less
likely to slide under the lap belt. If you slid under it,
the belt would apply force at your abdomen. This
could cause serious or even fatal injuries. The shoulder
belt should go over the shoulder and across the chest.
These parts
of the body are best able to take belt
restraining forces.
The safety belt locks if there’s a sudden stop
or crash.
Shoulder Belt Tightness Adjustment
Your car has a shoulder belt tightness adjustment
feature. If the shoulder belt seems too tight, adjust it
before you begin to drive.
I. Sit well back in the sear.
2. Start pulling the shoulder belt out.
1-14
Page 123 of 380

This device complies with Part 15 of the FCC Rules.
Operation is subject to the following two conditions:
(1) this device may not cause harmful interference,
and
(2) this device must accept any interference
received, including interference that may cause
undesired operation.
This device complies with
RSS-210 of Industry Canada.
Operation is subject to the following two conditions:
(1) this device may not cause interference, and (2) this
device must accept any interference, including
interference that may cause undesired operation
of
the device.
Changes and modifications to this system by other than
an authorized service facility could void authorization
to use this equipment.
Programming the Transmitter
Do not use the universal transmitter with any garage
door opener that does not have the “stop and reverse”
safety feature. This includes any garage door opener
model manufactured before April
1, 1982.
rse sure that people and objects are clear of the garage
door you are programming. Your
vehicle’s engine should be turned off while
programming your transmitter. Follow these steps to
program up to three channels:
1. If you have previously programmed a universal
transmitter channel, proceed to Step
2. Otherwise,
hold down the two outside buttons on the universal
transmitter until the red light begins to flash rapidly
(approximately
20 seconds). Then release the
buttons. This procedure initializes the memory and
erases any previous settings for all three channels.
2. Hold the end of your hand-held transmitter against
the bottom surface of the universal transmitter
so
that you can still see the red light.
3. Decide which one of the three channels you want to
program. Using both hands, press the hand-held
transmitter button and the desired button on the
universal transmitter. Continue to hold both buttons
through Step
4.
4. Hold down both buttons until you see the red light
on the universal transmitter flash slowly then
rapidly. The rapid flashing, which could take up
to
90 seconds, indicates that the universal transmitter
has been programmed. Release both buttons
three seconds after the light starts to flash rapidly.
2-57
Page 167 of 380

TONE: Press this button to select a tone while playing a
compact disc. The tone will be automatically set
whenever you play a compact disc. (This button is not
available on the Bose radio.)
SEEK: Press the down arrow to go to the start of the
current track if more than eight seconds have played.
Press the up arrow to go to the next track. If you hold
the button or press it more than once, the player will
continue moving rearward or forward through the disc.
SCAN: Press this button to listen to each selection for a
few seconds. The disc will go to the next selection, stop
for a few seconds, then go on to the next selection. Press
this button again to stop scanning. The sound will mute
while scanning, SCAN will appear on the display.
RCL: Press this button to see which track is playing.
Press it again within five seconds to see how long it has
been playing. To change what is normally shown on the
display (track or elapsed time), press the button until
you see the display you want, then hold the button until
the display flashes. While elapsed time is showing, EL
TM will appear on the display.
AM-FM: Press this button to play the radio when a disc
is in the player.
TAPE-CD: Press this button to change to the tape or
disc function when the radio is on and either a tape or
CD is inserted. Press AM-FM to return to the radio
while a CD or tape
is playing. The inactive tape or CD
will remain safely inside the radio for future listening. If
you have
the optional CD changer and the CD changer
is loaded, the TAPE-CD button will activate the changer
and a box will be lighted around CDC in the display.
EJECT Press this button to remove the compact disc or
cassette tape. The icon with the box around it on the
display will eject and the radio will play. EJECT may be
activated with either
the ignition or radio off. Cassettes
and compact discs may be loaded with the radio and
ignition
off if this button is pressed first.
Page 171 of 380

RCL: Press this button to see what track is currently
playing. Press RCL again within five seconds to see how
long the track has been playing. EL TM will appear on
the display when in elapsed time mode. When a new
track starts to play, the track number will also appear.
Press RCL a third time and the time of day will
be displayed.
SEEK: Press the SEEK down arrow while playing a CD
to go back to the start of the current track if more than
eight seconds have played. If you press it again, the
changer will
go to previous tracks. Press the SEEK up
arrow and it will go to the next higher track on the disc.
SCAN: Press this button and release to listen to each
selection for a few seconds. The first
few seconds of
each selection on the current disc will be played. The
sound will mute while scanning and SCAN will appear
on the display. Press this button again to stop scanning.
P SCAN: Press and hold the SCAN button for two
seconds to hear the first selection of each loaded disc for
a few seconds. The sound will mute while scanning and
P SCAN will appear on the display. Press SCAN again
to stop scanning.
TAPEKD: Press this button to play a CD if you have a
magazine loaded
in the changer and the radio is playing.
To return to the radio while a CD is playing, press
AM-FM.
You can also press this button to switch
between a cassette tape, CD or the CD changer if all
three are loaded.
Theft-Deterrent Feature
THEFTLOCK@ is designed to discourage theft of your
radio. It works by using a secret code to disable all radio
functions whenever battery power is removed.
The THEFTLOCK feature for the radio may be used or
ignored. If ignored, the system plays normally and the
radio is not protected by the feature. If THEFTLOCK is
activated, your radio will not operate if stolen.
When THEFTLOCK is activated, the radio will display
LOC to indicate a locked condition anytime battery
power
is removed. If your battery loses power for any
reason, you must unlock the radio with the secret code
before it will operate.