instrument panel OLDSMOBILE AURORA 2003 Owner's Manual
[x] Cancel search | Manufacturer: OLDSMOBILE, Model Year: 2003, Model line: AURORA, Model: OLDSMOBILE AURORA 2003Pages: 387, PDF Size: 18.05 MB
Page 132 of 387
Theater Dimming Parade Dimming
This feature allows for a three to five-second fade out of
the overhead courtesy lamps instead of immediate
turn
off after you remove the key from the ignition. They
will not fade
if the interior lamps are manually turned
on. The lower instrument panel courtesy lamps will not
fade out.
Delayed Exit Lighting
This feature will turn on the interior lamps for 25 seconds
after you remove the key from the ignition while the
doors are closed and it is night. This will give you time
to find the door handle or lock switches as you exit
the vehicle. When the
25 seconds are up, or if the key
is reinserted into the ignition, the lights will be turned
off by the theater dimming system. The lamps will turn
off immediately by pressing the lock symbol on the
remote keyless entry transmitter, by turning the ignition
key to ON or by activating the power door locks. To activate the instrument panel backlighting during the
day,
turn the exterior lamps control to the parking
lamp position. Dimming
of the instrument panel display
is not possible during daylight hours. The instrument
panel display can only be adjusted when the parking
lamps are on and it is dark outside.
Perimeter Lighting
When the unlock symbol on the remote keyless entry
transmitter is pressed, the DRL headlamps, parking
lamps and back-up lamps will turn on for approximately
25 seconds if it is dark enough outside.
This feature can be programmed to be on or
off for
each transmitter. You can also program how long the
exterior lamps will stay on after unlocking the vehicle.
You must program this feature through the
DIC. See DIC
Vehicle Personalization on page 3-52.
3-1 9
ProCarManuals.com
Page 137 of 387

Do not cover the solar sensor located in the center of
the instrument panel, near the windshield. For more
information on the solar sensor, see “Sensors” later
in
this section.
To change the automatic climate control display from an
English display to a metric display, push the
OFF
button located in the Driver Information Center (DIC) for
several seconds. The display in the
DIC will also
change from an English to a metric display.
To return to
an English display, repeat the procedure.
Manual Operation
FAN: Turn the right knob clockwise or counterclockwise
to increase or decrease the fan speed. Turning this
knob cancels automatic operation and places the system
in manual mode. Press the knob to return to automatic
operation.
Temperature Control: Maintain the temperature inside
the vehicle using the red and blue arrows located
below the digital display. Push the red arrow for a
warmer temperature level and the blue arrow for
a cooler temperature level. Your selected temperature
setting will be shown on the digital display for five
seconds, and then the outside temperature will be
displayed. To change
the current mode, use the left knob
to select
one of the following:
OFF: Turning the left knob to OFF will cause the fan to
turn
off and the airflow to be directed through the
floor outlets. The display will show the outside
temperature when the system is set to OFF.
/I‘ (Vent): This mode directs air to the instrument
panel outlets. #
(Bi-Level): This mode directs approximately half of
the air to the instrument panel outlets, and then
directs most of the remaining air to the floor outlets.
Some air may be directed toward the windshield.
In automatic operation, cooler air is directed to the upper
outlets and warmer air to the floor outlets.
I# (Floor): This mode directs most of the air to the
floor outlets with some air directed to the outboard
outlets (for the side windows) and some air directed to
the windshield.
The left knob can also be used to select the defog or
defrost mode. Information on defogging and defrosting
can be found later in this section.
3-24
ProCarManuals.com
Page 138 of 387

(Recirculation): Press this button to limit the
amount of outside air coming into the vehicle.
It can be
used to prevent outside air and odors from entering
your vehicle or to help heat or cool the air inside your
vehicle more quickly. Press this button to turn the
recirculation mode on or
off. When the button is pressed,
an indicator light will come on. The recirculation mode
cannot be used with the defrost mode.
a AK (Air Conditioning): Press this button to
override the automatic system and turn the air
conditioning system on or
off. When A/C is pressed, an
indicator light in the button will come on to let you
know that air conditioning is activated. When in
AUTO
the air conditioning compressor will come on
automatically, as necessary.
On hot days, open the windows to let hot inside air
escape; then close them. This helps reduce the time it
takes for your vehicle to cool down. It also helps
the system to operate more efficiently.
For quick cool down on hot days, do the following:
1. Select the vent mode.
2. Select the recirculation mode.
3. Select NC.
4. Select the coolest temperature.
5. Select the highest fan speed.
Using these settings together for long periods of time
may cause the air inside of your vehicle to become too
dry. To prevent this from happening, after the air in
your vehicle has cooled, turn the recirculation mode off.
The air conditioning system removes moisture from
the air,
so you may sometimes notice a small amount of
water dripping underneath your vehicle while idling or
after turning off the engine. This is normal.
Sensors
The solar sensor on your vehicle monitors the solar
radiation and the air inside of your vehicle, then uses the
information to maintain the selected temperature by
initiating needed adjustments to the temperature, the fan
speed and the air delivery system. The system may
also supply cooler air to the side of the vehicle facing the
sun. The recirculation mode will also be activated, as
necessary no not cover the solar sensor located in the
center of the instrument panel, near the windshield,
or the system will not work properly.
3-25
ProCarManuals.com
Page 144 of 387
Instrument Panel Cluster
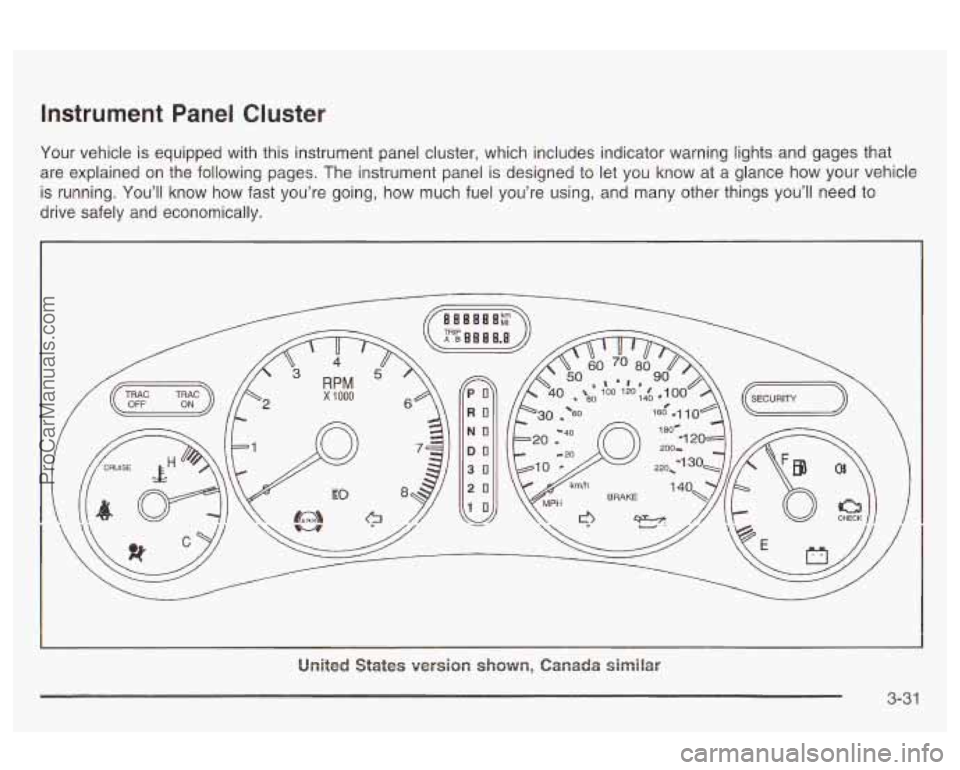
Your vehicle is equipped with this instrument panel cluster, which includes indicator warning lights and gages that
are explained on the following pages. The instrument panel is designed to let you know at a glance how your vehicle
is running. You’ll know how fast you’re going, how much fuel you’re using, and many other things you’ll need to
drive safely and economically.
PO
RO
NO
DO
30
20
10
United States version shown, Canada similar
3-3 1
ProCarManuals.com
Page 145 of 387
Speedometer and Odometer
Your speedometer lets you see your speed in both
miles per hour (mph) and kilometers per hour (km/h).
Your odometer shows how far your vehicle has
been driven, in either miles (used in the United States)
, or kilometers (used in Canada).
The speedometer shows a top speed of
140 mph
(220 km/h). This is not intended to be the vehicle’s top
speed.
You may wonder what happens
if your vehicle needs a
new odometer installed. If the new one can be set to
the mileage total of the old odometer, then it must
be. But
if it can’t, then it’s set at zero and a label must
be put on the driver’s door to show the old mileage
reading when the new odometer was installed.
Trip Odometers
Your trip odometer tells you how far you have driven
since you last reset it. Your vehicle is equipped with two
trip odometers,
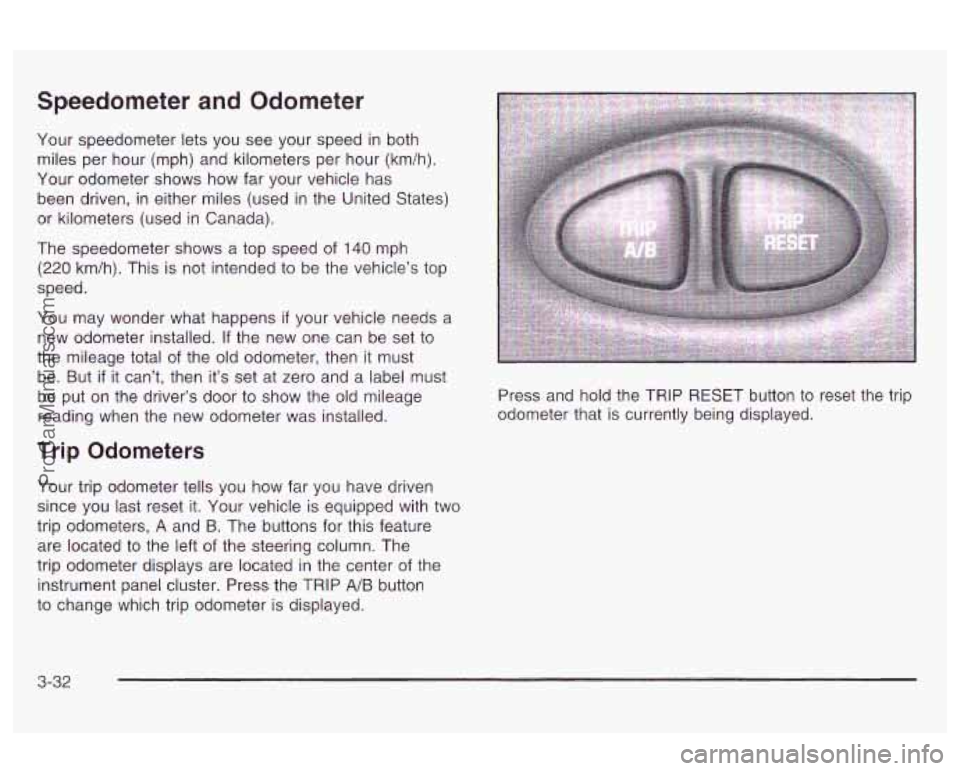
A and B. The buttons for this feature
are located to the left
of the steering column. The
trip odometer displays are located in the center of the
instrument panel cluster. Press the TRIP
A/B button
to change which trip odometer is displayed. Press and
hold the TRIP RESET button to reset the trip
odometer that is currently being displayed.
3-32
ProCarManuals.com
Page 147 of 387
Air Bag Readiness Light
There is an air bag readiness light on the instrument
panel, which shows the air bag symbol. The system
checks the air bag’s electrical system for malfunctions.
The light tells you
if there is an electrical problem.
The system check includes the air bag sensors, the air
bag modules, the wiring and the crash sensing and
diagnostic module. For more information on the air bag
system, see
Air Bag Systems on page 1-47.
This light will come on
when you start your
vehicle, and it will flash for
several seconds. Then
the light should go out. This means the
system is ready.
If the air bag readiness light stays on after you start the
vehicle or comes on when you are driving, your air
bag system may not work properly. Have your vehicle
serviced right away.
If the air bag readiness light stays on after you
start your vehicle,
it means the air bag system
may not be working properly. The air bags in
your vehicle may not inflate in a crash,
or they
could even inflate without a crash.
To help
avoid injury to yourself or others, have your
vehicle serviced right away if the air bag
readiness light stays on after you start your
vehicle.
The air bag readiness light should flash for a few
seconds when you turn the ignition key to
ON. If the
light doesn’t come on then, have it fixed
so it will
be ready to warn you
if there is a problem.
On the
DIC an AIR BAG PROBLEM message will be
displayed when there is a problem with the air bag
system. See
DIC Warnings and Messages on page 3-50
for more information.
3-34
ProCarManuals.com
Page 230 of 387

Passing
You’ll need more passing distance up ahead when
you’re towing a trailer. And, because you’re a good deal
longer, you’ll need to go much farther beyond the
passed vehicle before you can return to your lane.
Backing Up
Hold the bottom of the steering wheel with one hand.
Then, to move the trailer to the left, just move that hand
to the left. To move the trailer to the right, move your
hand to the right. Always back up slowly and,
if possible,
have someone guide you.
Making Turns
Notice: Making very sharp turns while trailering
could cause the trailer to come in contact with the
vehicle. Your vehicle could be damaged. Avoid
making very sharp turns while trailering.
When you’re turning with a trailer, make wider turns
than normal.
Do this so your trailer won’t strike
soft shoulders, curbs, road signs, trees or Other ObJeCtS.
Avoid jerky or sudden maneuvers. Signal well in
advance.
Turn Signals When Towing a Trailer
When you tow a trailer, your vehicle may need a
different turn signal flasher and/or extra wiring. Check
with your dealer. The arrows on your instrument
panel will flash whenever you signal a turn or lane
change. Properly hooked up, the trailer lamps will also
flash, telling other drivers you’re about to turn,
change lanes or stop.
When towing a trailer, the arrows on your instrument
panel will flash for turns even
if the bulbs on the trailer
are burned out. Thus, you may think drivers behind
you are seeing your signal when they are not. It’s
important to check occasionally to be sure the trailer
bulbs are still working.
4-41
ProCarManuals.com
Page 246 of 387

Hood Release
To open the hood, do the following:
1. Pull the hood release
handle, located to the
left of the steering
wheel under the
instrument panel.
A!!
2. Then go to the front of the vehicle and pull up on
3. Lift the hood.
the secondary
hood release.
Before closing the hood, be sure all the filler caps
are on properly. Then pull the hood down and
close it firmly.
5-1 3
ProCarManuals.com
Page 261 of 387
Coolant Surge Tank Pressure Cap
The cooling system pressure cap is located on the
surge tank.
Notice: Your cooling system pressure cap is a
pressure-type cap and must be tightly installed to
prevent coolant
loss and possible engine damage
from overheating.
Engine Overheating
You will find a coolant temperature gage on your
vehicle’s instrument panel. Your Driver Information
Center (DIC) will also display messages about engine
overheating. See
Engine Coolant Temperature Gage on
page 3-38.
Overheated Engine Protection
Operating Mode
If an overheated engine condition exists and the
message HOT STOP
ENGINE is displayed, an overheat
protection mode which alternates firing groups of
cylinders helps prevent engine damage. In this mode,
you will notice a
loss in power and engine performance.
This operating mode allows your vehicle to be driven
to a safe place in an emergency. Driving extended miles
(km) and/or towing a trailer in the overheat protection
mode should be avoided.
Notice: After driving in the overheated engine
protection operating mode, to avoid engine damage,
allow the engine to cool before attempting any
repair. The engine oil will be severely degraded. Repair the cause of coolant
loss, change the oil and
reset the oil life system. See “Engine
Oil” in the
Index.
5-28
ProCarManuals.com
Page 316 of 387

Here are some cleaning tips: Leather
Always read the instructions on the cleaner label.
Clean up stains as soon as you can - before
0 Carefully scrape off any excess stain.
0 Use a clean cloth or sponge, and change to a clean
area often.
A soft brush may be used if stains are
stubborn.
If a ring forms on fabric after spot cleaning, clean
the entire area immediately or it will set.
they set.
Vinyl
Use warm water and a
clean cloth.
Rub with a clean, damp cloth to remove dirt. You
may have to do this more than once.
Things like tar, asphalt and shoe polish will stain if
you don’t get them off quickly. Use a clean cloth
and vinyl/leather cleaner. See your dealer for
+I.%;.- nrrrrl, In) LI 1l.J PI WUU
L.
Use a soft cloth with lukewarm water and a mild soap or
saddle soap and wipe dry with a soft cloth. Then, let
the leather dry naturally.
Do not use heat to dry.
0 For stubborn stains, use a leather cleaner. See your
dealer for this product.
0 Never use oils, varnishes, solvent-based or abrasive
cleaners, furniture polish or shoe polish on leather.
Soiled or stained leather should be cleaned
immediately.
If dirt is allowed to work into the finish,
it can harm the leather.
Top of the Instrument Panel
Use only mild soap and water to clean the top surfaces
of the instrument panel. Sprays containing silicones
or waxes may cause annoying reflections in the
windshield and even make it difficult to see through the
windshield under certain conditions.
Interior Plastic Components
Use only a mild soap and water solution on a soft cloth
or sponge. Commercial cleaners may affect the
surface finish.
5-83
ProCarManuals.com