window OLDSMOBILE AURORA 2003 Owner's Manual
[x] Cancel search | Manufacturer: OLDSMOBILE, Model Year: 2003, Model line: AURORA, Model: OLDSMOBILE AURORA 2003Pages: 387, PDF Size: 18.05 MB
Page 139 of 387

Defogging and Defrosting
There are two modes to clear fog or frost from your
windshield. Use the defog mode to clear the windows of
fog or moisture and warm the passengers. Use the
defrost mode to remove fog or frost from the windshield
more quickly.
+> (Defog): This mode directs the air equally between
the windshield and the floor outlets. When you select
this mode, the system turns
off recirculation and runs the
air conditioning compressor unless the outside
temperature is at or below freezing.
9 (Defrost): This mode directs most of the air to the
windshield and the outboard outlets (for the side
windows), with some air directed to the floor outlets. In
this mode, the system will automatically run the air
conditioning compressor, unless the outside temperature is at or below freezing. Recirculation cannot be
selected while in the defrost mode.
Rear Window Defogger
The rear window defogger uses a warming grid to
remove fog or frost from the rear window.
: Press this button to turn the rear window defogger
on or
off. Be sure to clear as much snow from the
rear window as possible. At
speeds above
30 mph (48 km/h), the defogger will
operate continuously until you press the
REAR
button again. After 10 minutes of driving below 30 mph
(48 km/h), the defogger will turn off automatically. If
you need additional warming time, push the button
again. The system will then operate for five minutes
before going
off by itself.
If your vehicle has heated outside rearview mirrors, the
mirrors will heat to help clear fog
or frost from the
surface of the mirror when the rear window defogger
button is pressed.
Notice: Don’t use a razor blade or something else
sharp on the inside of the rear window.
If you
do, you could cut or damage the defogger and the
repairs would not be covered by your warranty.
Do not attach a temporary vehicle license, tape, a
decal or anything similar to the defogger grid.
3-26
ProCarManuals.com
Page 165 of 387
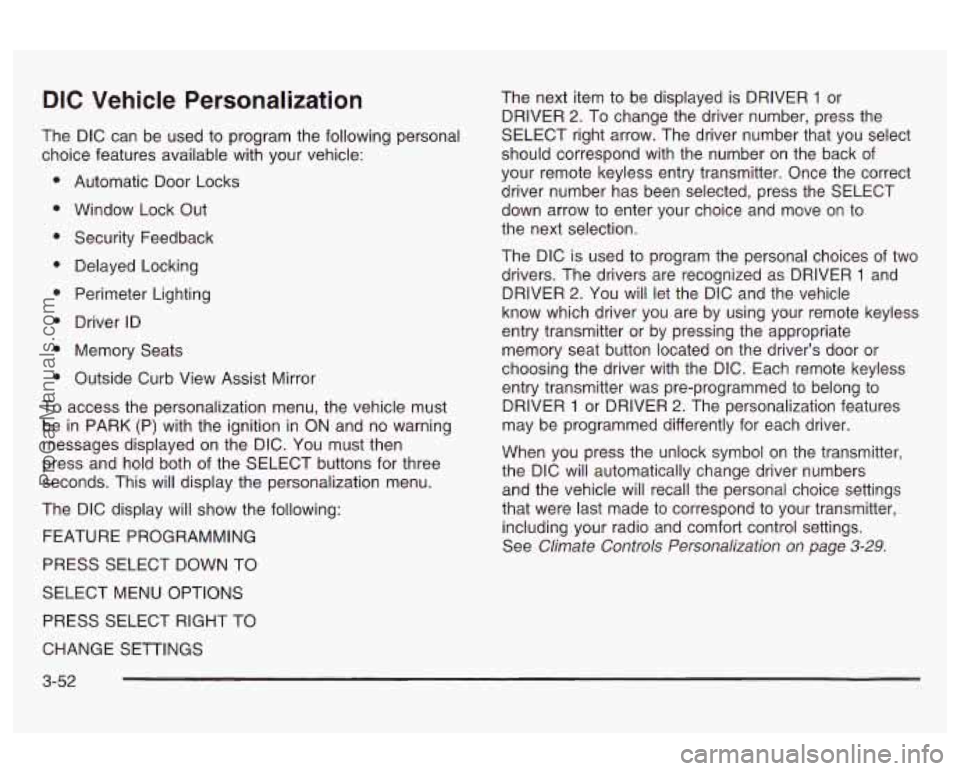
DIC Vehicle Personalization
The DIC can be used to program the following personal
choice features available with your vehicle:
Automatic Door Locks
Window Lock Out Security Feedback
Delayed Locking
Perimeter Lighting
Driver ID
Memory Seats
Outside Curb View Assist Mirror
To access the personalization menu, the vehicle must
be in PARK (P) with the ignition in ON and no warning
messages displayed on the DIC. You must then
press and hold both of the SELECT buttons for three
seconds. This will display the personalization menu.
The DIC display will show the following:
FEATURE PROGRAMMING
PRESS SELECT DOWN TO
SELECT MENU OPTIONS
PRESS SELECT RIGHT TO The next item
to be displayed is DRIVER
1 or
DRIVER
2. To change the driver number, press the
SELECT right arrow. The driver number that you select
should correspond with the number on the back of
your remote keyless entry transmitter. Once the correct
driver number has been selected, press the SELECT
down arrow to enter your choice and move on to
the next selection.
The DIC is used to program the personal choices
of two
drivers. The drivers are recognized as DRIVER
1 and
DRIVER
2. You will let the DIC and the vehicle
know which driver you are by using your remote keyless
entry transmitter or by pressing the appropriate
memory seat button located on the driver’s door or
choosing the driver with the DIC. Each remote keyless
entry transmitter was pre-programmed to belong to
DRIVER
1 or DRIVER 2. The personalization features
may be programmed differently for each driver.
When you press the unlock symbol on the transmitter,
the DIC will automatically change driver numbers
and the vehicle will recall the personal choice settings
that were last made to correspond to your transmitter,
including your radio and comfort control settings.
See
Climate Controls Personalization on page 3-29.
CHANGE SETTINGS
3-52
ProCarManuals.com
Page 166 of 387
If you unlock the vehicle using the door key instead of
the transmitter, the personal choice settings will
correspond to the previous driver of the vehicle as
identified by the transmitter, the memory seat control or
the DIC.
If this happens and you were not the last
driver of the vehicle, press the correct driver number on
the door panel
for the memory seats, press the
unlock symbol
on the transmitter or select the
personalization programming mode and choose the
correct driver number.
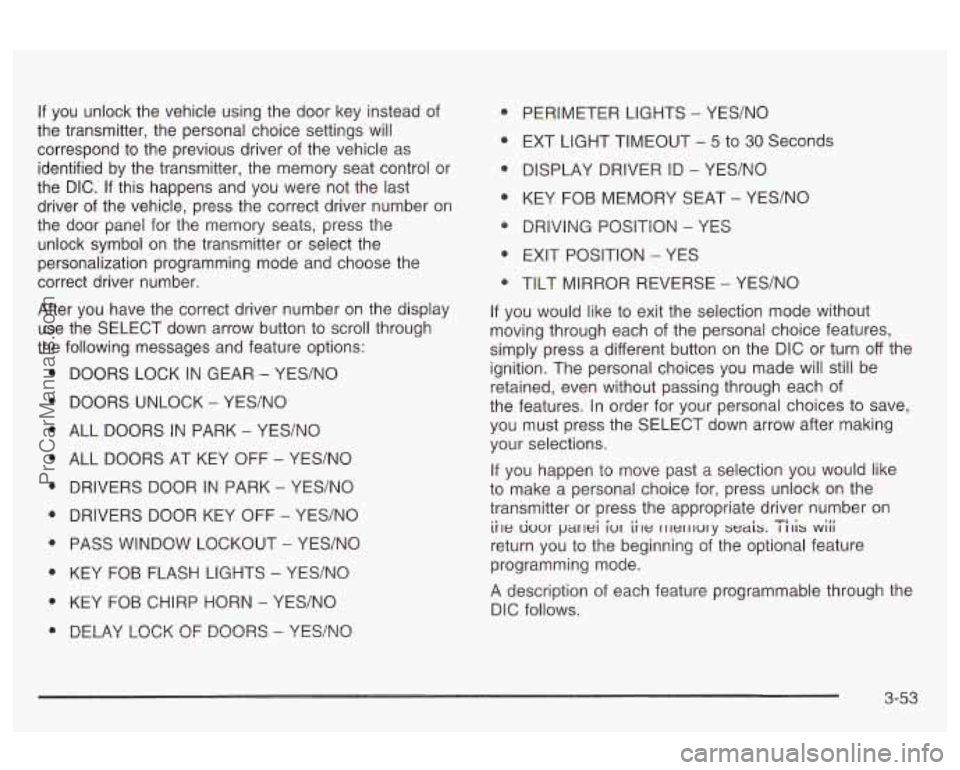
After you have the correct driver number on the display
use the SELECT down arrow button to scroll through
the following messages and feature options:
e
e
DOORS LOCK IN GEAR - YES/NO
DOORS UNLOCK
- YES/NO
ALL DOORS IN PARK
- YES/NO
ALL DOORS AT KEY OFF
- YEWNO
DRIVERS DOOR IN PARK
- YES/NO
DRIVERS DOOR KEY
OFF - YES/NO
PASS WINDOW LOCKOUT
- YES/NO
KEY FOB FLASH
LIGHTS - YES/NO
KEY FOB CHIRP HORN
- YES/NO
DELAY LOCK OF DOORS - YES/NO
PERIMETER LIGHTS - YES/NO
EXT LIGHT TIMEOUT
- 5 to 30 Seconds
DISPLAY DRIVER ID
- YES/NO
KEY FOB MEMORY SEAT
- YES/NO
DRIVING POSITION
- YES
EXIT POSITION
- YES
TILT MIRROR REVERSE
- YES/NO
If you would like to exit the selection mode without
moving through each of the personal choice features,
simply press a different button
on the DIC or turn off the
ignition. The personal choices you made will still be
retained, even without passing through each of
the features. In order for your personal choices to save,
you must press the SELECT down arrow after making
your selections.
If you happen to move past a selection you would like
to make a personal choice for, press unlock on the
transmitter or press the appropriate driver number
on
return you to the beginning of the optional feature
programming mode.
A description of each feature programmable through the
DIC follows.
ii~e uuur parlei iur iile rllerllury seais. I 111s wiii TI. .
3-53
ProCarManuals.com
Page 168 of 387
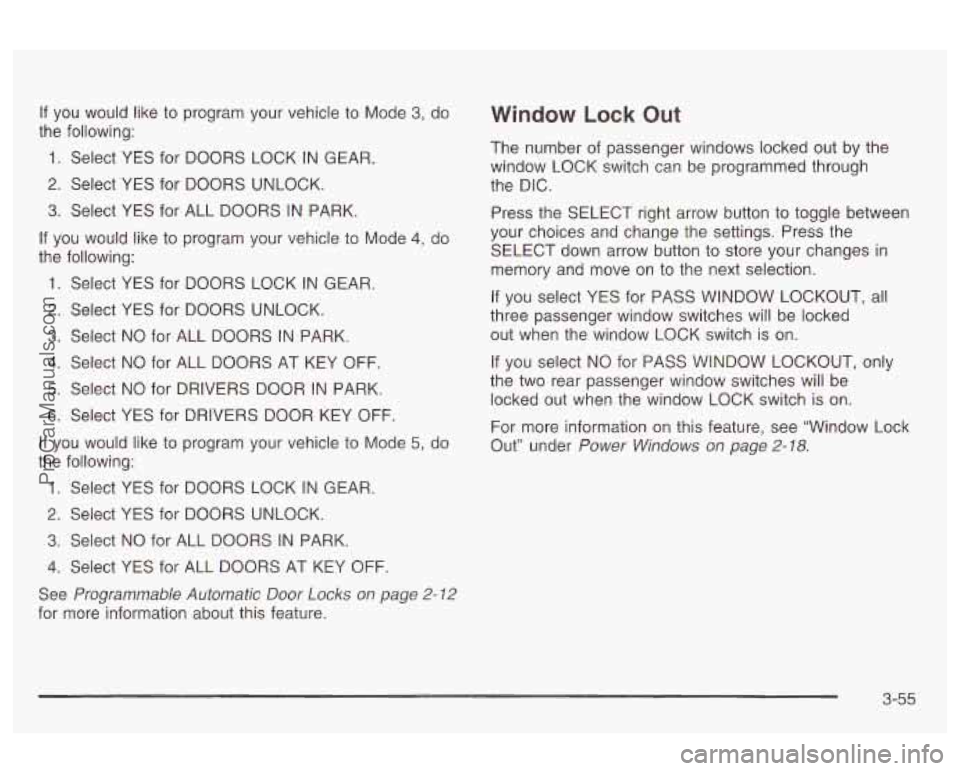
If you would like to program your vehicle to Mode 3, do
the following:
1. Select YES for DOORS LOCK IN GEAR.
2. Select YES for DOORS UNLOCK.
3. Select YES for ALL DOORS IN PARK.
If you would like to program your vehicle to Mode
4, do
the following:
1. Select YES for DOORS LOCK IN GEAR.
2. Select YES for DOORS UNLOCK.
3. Select NO for ALL DOORS IN PARK.
4. Select NO for ALL DOORS AT KEY OFF.
5. Select NO for DRIVERS DOOR IN PARK.
6. Select YES for DRIVERS DOOR KEY OFF.
If you would like to program your vehicle to Mode 5, do
the following:
1. Select YES for DOORS LOCK IN GEAR.
2. Select YES for DOORS UNLOCK.
3. Select NO for ALL DOORS IN PARK.
4. Select YES for ALL DOORS AT KEY OFF.
See Programmable Automatic Door Locks on page 2-12
for more information about this feature.
Window Lock Out
The number of passenger windows locked out by the
window LOCK switch can be programmed through
the DIC.
Press the SELECT right arrow button to toggle between
your choices and change the settings. Press the
SELECT down arrow button to store your changes in
memory and move on to the next selection.
If you select YES for PASS WINDOW LOCKOUT, all
three passenger window switches will be locked
out when the window LOCK switch
is on.
If you select NO for
PASS WINDOW LOCKOUT, only
the two rear passenger window switches will be
locked out when the window LOCK switch is on.
For more information on this feature, see “Window Lock
Out” under
Power Windows on page 2-18.
3-55
ProCarManuals.com
Page 189 of 387

Care of Your CD Player
The use of CD lens cleaner discs is not advised, due to
the risk of contaminating the lens of the CD optics
with lubricants internal to the
CD mechanism.
Diversity Antenna System
Your AM-FM antennas are located in the windshield and
rear window. Be sure that the inside surfaces of the
windshield and rear window are not scratched and that
the lines on the glass are not damaged.
If the inside
surfaces are damaged, they could interfere with
radio reception. Also, for proper radio reception, the
antenna connectors at the top-center of the front
windshield and the rear window need to be properly
attached to the posts on the glass.
Do not apply aftermarket glass tinting. The metallic film
in some tinting materials will interfere with or distort
the incoming radio reception.
Notice: Do not try to clear frost or other material
from the inside of the front windshield or rear
window with a razor blade or anything else that is
sharp. This may damage the rear defogger grid and
affect your radio’s ability to pick up stations
clearly. This repairs wouldn’t be covered by your
warranty.
If, when you turn on your rear window defogger, you
hear static on your radio station, it could mean that
a defogger grid line has been damaged.
If this is true,
the grid line must be repaired.
If you choose to add an aftermarket cellular telephone
to your vehicle, and the antenna needs to be attached to
the glass, be sure that you do not damage the grid
lines for the AM-FM antennas or place the cellular
telephone antenna over the grid lines.
Chime Level Adjustment
The volume level of the vehicle’s chimes can be
controlled by the radio. To change the volume level,
press and hold pushbutton
6 with the ignition on and the
radio power
off. The chime volume level will change
from the normal level to loud, and LOUD
will be
displayed on the radio. To change back to the default or
normal setting, press and hold pushbutton
6 again.
The chime level will change from the loud level
to normal, and NORMAL
will be displayed.
3-76
ProCarManuals.com
Page 212 of 387

Once you are moving on the freeway, make certain you
allow a reasonable following distance.
Expect to move slightly slower at night.
When you want to leave the freeway, move to the
proper lane well in advance.
If you miss your exit, do
not, under any circumstances, stop and back up. Drive
on to the next exit.
The exit ramp can be curved, sometimes quite sharply.
The exit speed is usually posted. Reduce your speed
according to your speedometer, not to your sense
of motion. After driving for any distance at higher
speeds, you may tend to think you are going slower
than you actually are.
Before Leaving on a Long Trip
Make sure you’re ready. Try to be well rested. If you
must start when you’re not fresh
- such as after a day’s
work
- don’t plan to make too many miles that first
part of the journey. Wear comfortable clothing and shoes
vou can easilv drive in.
Is your vehicle ready for a long trip? If you keep it
serviced and maintained, it’s ready to go. If
it needs
service, have it done before starting out. Of course,
you’ll find experienced and able service experts
in dealerships all across North America. They’ll be
ready and wiiiing
to heip if you need it.
Here are some things you can check before a trip:
Windshield Washer Fluid: Is the resewior full? Are
all windows clean inside and outside?
Wiper Blades: Are they in good shape?
Fuel, Engine Oil, Other Fluids: Have you checked
all levels?
Lamps: Are they all working? Are the lenses clean?
Tires: They are vitally important to a safe,
trouble-free trip.
Is the tread good enough for
long-distance driving? Are the tires all inflated to the
recommended pressure?
Weather Forecasts: What’s the weather outlook
along your route? Should you delay your trip a
short time to avoid
a major storm system?
Maps: Do you have up-to-date maps?
4-23
ProCarManuals.com
Page 220 of 387
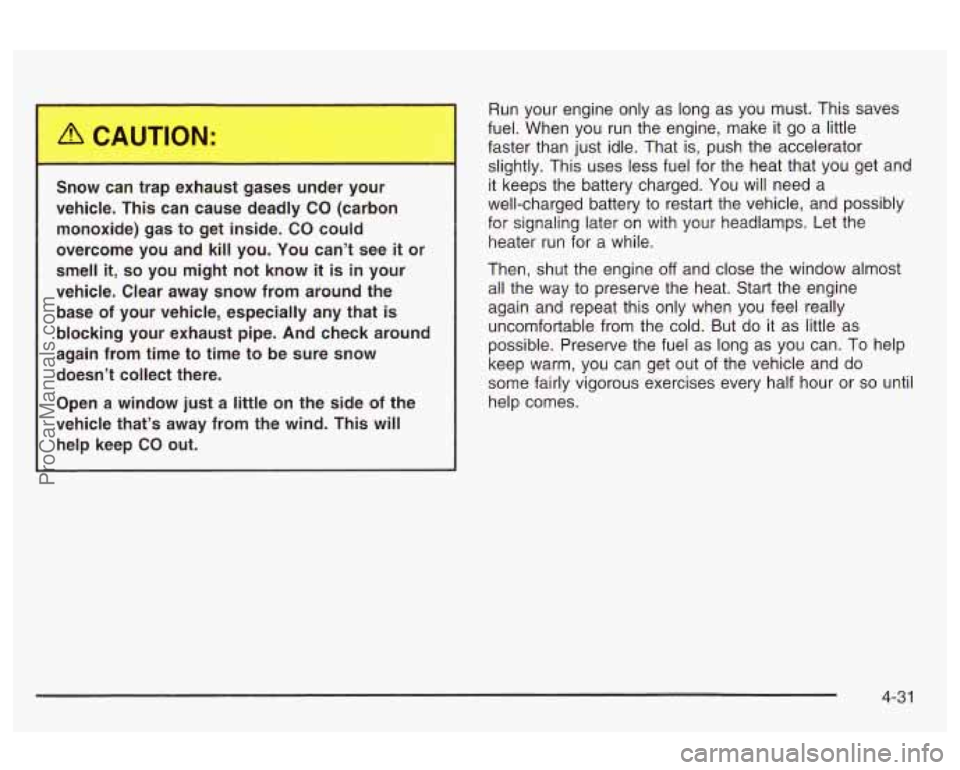
C -..- .. car. .. -~,. ex-._.ust gases under your
vehicle. This can cause deadly CO (carbon
monoxide) gas to get inside.
CO could
overcome you and kill you. You can’t see
it or
smell
it, so you might not know it is in your
vehicle. Clear away snow from around the
base of your vehicle, especially any that
is
blocking your exhaust pipe. And check around
again from time to time to be sure snow
doesn’t collect there.
Open a window just
a little on the side of the
vehicle that’s away from the wind. This will
help keep CO out.
nun your engme only as lorig as yuu must. I tlls saves
fuel. When you run the engine, make it go a little
faster than just idle. That is, push the accelerator
slightly. This uses less fuel for the heat that you get and
it keeps the battery charged.
You will need a
well-charged battery to restart the vehicle, and possibly
for signaling later on with your headlamps. Let the
heater run for a while.
Then, shut the engine
off and close the window almost
all the way to preserve the heat. Start the engine
again and repeat this only when you feel really
uncomfortable from the cold. But do it as little as
possible. Preserve the fuel as long
as you can. To help
keep warm, you can get out of the vehicle and do
some fairly vigorous exercises every half hour or
so until
help comes.
4-3 1
ProCarManuals.com
Page 235 of 387

Section 5 Service and Appearance Care
Appearance Care ......................................
Cleaning the Inside of Your Vehicle ...............
Weatherstrips .............................................
Cleaning the Outside of Your Vehicle ............
Sheet Metal Damage ...................................
Finish Damage ...........................................
Underbody Maintenance ..............................
Chemical Paint Spotting ...............................
GM Vehicle Care/Appearance Materials .........
Care of Safety Belts ....................................
-5-82
. 5.82
. 5.84
. 5.84
. 5.85
. 5.87
. 5.87
. 5.87
-5-87
. 5.88
Vehicle Identification ...................................... 5.90
Vehicle Identification Number (VIN)
................. 5-90
Service Parts Identification Label
.................... 5-90
Electrical System
........................................... 5-91
Add-on Electrical Equipment
......................... 5-91
Windshield Wiper Fuses
................................ 5-91
Fuses and Circuit Breakers
........................... 5-92
Removing the Rear Seat Cushion ................... 5-95
Capacities and Specifications
........................ 5-100
Normal Maintenance Replacement Parts ......... 5-101
Headlamp
Wiring
.......................................... 5-91
Power Windows and Other Power Options
....... 5-91
5-2
ProCarManuals.com
Page 263 of 387
If No Steam Is Coming From Your
Engine
An overheat warning, along with a low coolant message,
can indicate a serious problem. See “Low Coolant
Message” under
DIC Warnings and Messages
on page 3-50.
If you get an engine overheat warning with no low
coolant message, but see or hear no steam, the problem
may not be too serious. Sometimes the engine can
get a little too hot when you:
Climb a long hill on a hot day.
Stop after high-speed driving.
Idle for long periods in traffic.
Tow a trailer.
If you get the overheat warning with no sign of steam,
try this for a minute or
so:
1. In heavy traffic, let the engine idle in NEUTRAL (N)
while stopped. If it is safe to do
so, pull off the road,
shift to PARK (P) or NEUTRAL (N) and let the
engine idle.
If you no longer have the overheat warning, you can
drive. Just to be safe, drive slower for about
10 minutes.
If the warning doesn’t come back on, you can drive
normally.
If the warning continues and you have not stopped, pull
over, stop, and park your vehicle right away.
If there’s still no sign of steam, you can idle the engine
for three minutes while you’re parked. If you still
have the warning,
turn off the engine and get everyone
out
of the vehicle until it cools down. Also, see
“Overheated Engine Protection Operating Mode” listed
previously in this section.
You may decide not to lift the hood but to get service
help right away.
2. Turn on your heater to full hot at the highest fan
speed and open the window as necessary.
5-30
ProCarManuals.com
Page 315 of 387

Appearance Care
Remember, cleaning products can be hazardous. Some
are toxic. Others can burst into flames
if you strike a
match or get them on a hot part of the vehicle. Some are
dangerous
if you breathe their fumes in a closed
space. When you use anything from a container to clean
your vehicle, be sure to follow the manufacturer’s
warnings and instructions. And always open your doors
or windows when you’re cleaning the inside.
Never use these to clean your vehicle:
Gasoline
Benzene
0 Naphtha
0 Carbon Tetrachloride
Acetone
Paint Thinner
Turpentine
Lacquer Thinner
Nail Polish Remover Don’t use any
of these unless this manual says you
can. In many uses, these will damage your vehicle:
Alcohol
Laundry Soap
Bleach
Reducing Agents
Cleaning the Inside of Your Vehicle
Use a vacuum cleaner often to get rid of dust and
loose dirt. Wipe vinyl, leather, plastic and painted
surfaces with a clean, damp cloth.
FabridCarpet
Your dealer has cleaners for the cleaning of fabric and
carpet. They will clean normal spots and stains
very well.
You can get GM
- approved cleaning products from
your dealer. See
GM Vehicle Care/Appearance
Materials
on page 5-88.
They can all be hazardous - some more than
others -and they can all damage your vehicle, too
5-82
ProCarManuals.com