maintenance OLDSMOBILE BRAVADA 1998 User Guide
[x] Cancel search | Manufacturer: OLDSMOBILE, Model Year: 1998, Model line: BRAVADA, Model: OLDSMOBILE BRAVADA 1998Pages: 380, PDF Size: 19.2 MB
Page 261 of 380

How to Add Fluid
3. Check both sides of the dipstick, and read the lower
level. The fluid level must be in the COLD area for a
cold check or in the HOT area or cross-hatched area
for a hot check.
4. If the fluid level is in the acceptable range, push the
dipstick back in all the way; then flip the handle
down to lock the dipstick in place. Refer to the Maintenance Schedule to determine
what
kind
of transmission fluid to use. See “Recommended
Fluids and Lubricants’’ in the Index.
Add fluid only after checking the transmission fluid
while it is hot. (A cold check is used only as a
reference.) If the fluid level is low, add only enough
of
the proper fluid to bring the level up to the HOT area for
a hot check. It doesn’t take much fluid, generally less
than one pint
(0.5 L). Don’t overJiZ1.
NOTICE:
We recommend you use only fluid labeled
DEXR0N’-III, because fluid with that label is
made especially for your automatic transmission.
Damage caused by fluid other than
DEXRON-ZLI
is not covered by your new vehicle warranty.
0 After adding fluid, recheck the fluid level as
described under “How to Check.”
When the correct fluid level is obtained, push the
dipstick back in all the
way; then flip the handle
down to lock the dipstick in place.
6-19
ProCarManuals.com
Page 262 of 380

All-Wheel Drive
Transfer Case
How to Check Lubricant
When to Check Lubricant
Refer to the Maintenance Schedule to determine how
often to check the lubricant. See “Periodic Maintenance
Inspections”
in the Index.
If the level is below the bottom of the filler plug hole,
you’ll need to
add some lubricant. Add enough lubricant
to raise the level to the bottom
of the filler plug hole.
6-20
ProCarManuals.com
Page 263 of 380

What to Use
Refer to the Maintenance Schedule to determine what
kind of lubricant to use. See “Recommended Fluids and
Lubricants” in the Index.
Front Axle
When to Check and Change Lubricant
How to Check Lubricant
Refer to the Maintenance Schedule to determine how
often to check the lubricant and when to change it. See
“Scheduled Maintenance Services” in the Index.
If the level is below the bottom of the filler plug hole,
you’ll need to add some lubricant. Add enough lubricant
to raise the level to the bottom
of the filler plug hole.
What to Use
Refer to the Maintenance Schedule to determine what
kind
of lubricant to use. See “Recommended Fluids and
Lubricants” in the Index.
6-21
ProCarManuals.com
Page 264 of 380

Rear Axle What to Use
When to Check and Change Lubricant
Refer to the Maintenance Schedule to determine how
often to check the lubricant and when to change it. See
“Scheduled Maintenance Services”
in the Index.
How to Check Lubricant
If the level is below the bottom of the filler plug hole,
you’ll need to add some lubricant. Add enough lubricant
to raise the level to the bottom of the filler pl~~g hole. Refer
to the Maintenance Schedule to determine what
kind of lubricant to use. See “Recommended
Fluids and
Lubricants”
in the Index.
Engine Coolant
The cooling s stem in your vehicle is filled with
DEX-COOL engine coolant. This coolant is designed
to remain
in your vehicle for 5 years or 150,000 miles
(240 000 km), whichever occurs first, if you add only
DEX-COOL@ extended life coolant.
J
The following explains your cooling system and how to
add coolant when
it is low. If you have a problem with
engine overheating, see “Engine Overheating”
in
the Index.
A 50/50 mixture of water and DEX-COOL@
coolant will:
Give freezing protection down to -34°F (-37°C).
Give boiling protection up to 265°F (129°C).
Protect against rust and corrosion.
Help keep the proper engine temperature.
Let the warning lights and gages work as
they should.
ProCarManuals.com
Page 271 of 380

Brakes
Brake Fluid
of the brake system. If it is, you should have yo~~r brake
system tlxed, since
a leak nleans that sooner or later your
brakes won't work well, or won't work at
all.
So. it isn't a good idea to "top oft'' your brake fluid.
Adding brake fluid won't correct
a leak. If you add fluid
when your linings are worn, then you'll have too much
fluid when you get new brake linings. You should add
(or remove) brake fluid, as necessary, only when work is
done on the brake hydraulic system.
Your brake master cylinder reservoir is here.
It is filled
with DOT-3 brake fluid.
There are only two reasons
why the brake fluid level in the
reservoir might go down. The first is that the brake fluid
goes down to an acceptable level during norlnal brake
lining weal-. When new linings are
put in, the fluid level
goes back up. The other reason is that fluid is leaking out
If you have too much brake fluid, it can spill on
the engine. The fluid
will burn if the engine is
hot enough. You or others could be burned,
and your vehicle could be damaged. Add brake
fluid only when work
is done on the brake
hydraulic system.
Refer to the Maintenance Schedule to determine when to
check your brake fluid. See "Periodic Maintenance
Inspections"
in the Index.
6-29
ProCarManuals.com
Page 274 of 380

Some driving conditions or climates may cause a brake
squeal when the brakes are first applied or lightly
applied. This does not mean something is wrong with
your bra
cz k es.
Properly torqued wheel nuts are necessary to help
prevent brake pulsation. When tires are rotated, inspect
brake pads for wear and evenly torque wheel nuts
in the
proper sequence to
GM specifications.
Brake linings should always be replaced as complete
axle sets.
See “Brake System Inspection” in Section
7 of this
manual under Part
C “Periodic Maintenance
Inspections.’’
.e Pedal Travel
See your retailer if the brake pedal does not return to
normal height, or
if there is a rapid increase in pedal
travel. This could be a sign
of brake trouble.
Brake Adjustment
Every time you make a brake stop, your disc brakes
adjust for wear.
Replacing Brake System Parts
The braking system on a modern vehicle is complex.
Its many parts have to be
of top quality and work well
together
if the vehicle is to have really good braking.
Your vehicle was designed and tested
with top-quality
GM brake parts. When you replace parts of your braking
system
-- for example, when your brake linings wear
down and you have to have new ones put in
-- be sure
you get new approved
GM replacement parts. If you
don’t, your brakes may no longer work properly. For
example, if someone puts in brake linings that are wrong
for your vehicle, the balance between your front and
rear brakes can change
-- for the worse. The braking
performance you’ve come
to expect can change in many
other ways
if someone puts in the wrong replacement
brake parts.
Battery
Every new vehicle has a Delco Freedom@ battery. You
never have to add water to one of these. When it’s time
for
a new battery, we recommend a Delco Freedom
battery. Get one that has the replacement number shown
on the original battery’s label.
6-32
ProCarManuals.com
Page 277 of 380

Windshield Wiper Blade Replacement
See “Normal Maintenance Replacement Parts” in the
Index
for the proper type of replacement blades.
I NOTICE:
Use care when removing or installing a blade
assembly. Accidental bumping can cause the arm
to fall back and strike the windshield.
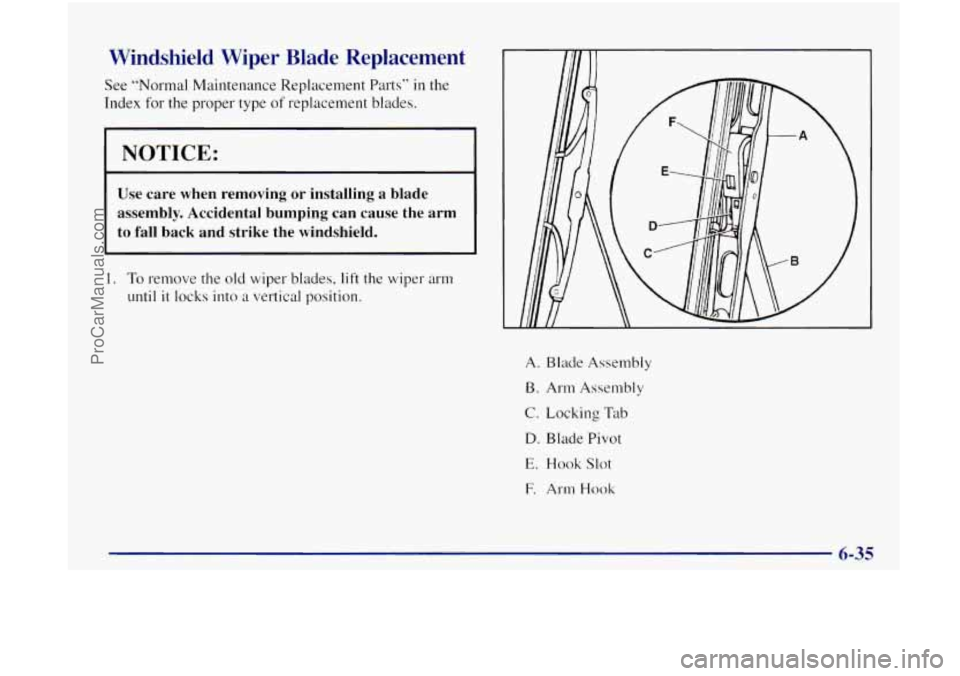
1. To remove the old wiper blades, lift the wiper arm
until it locks into a vertical position.
A. Blade Assembly
B. Arm Assembly
C. Locking Tab
D. Blade Pivot
E. Hook Slot
F. Arm Hook
ProCarManuals.com
Page 281 of 380

Tire Inspection and Rotation
Tires should be rotated every 6,000 to 8,000 miles
(10 000 to I3 000 km). Any time you notice unusual
wear, rotate your tires as
soon as possible and check
wheel alignment. Also check for damaged tires or
wheels. See “When
It’s Time for New Tires” and
“Wheel Replacement” later
in this section for
more information.
The purpose of regular rotation is to achieve more
lrniform wear for all tires on the vehicle. The first
rotation is the most important. See ”Scheduled
Maintenance Services”
in the Index for scheduled
rotation intervals. When rotating your
tires, always use the correct rotation
pattern shown here.
If your vehicle has a compact spare tire, don’t include it
in your tire rotation.
After the tires have been rotated, adjust the front and
rear inflation pressures as shown
on the
CertificatiodTire label. Make certain that all wheel nuts
are properly tightened. See “Wheel
Nut Torque’‘ in
the Index.
Rust or dirt on a wheel, or on the parts to which
it is fastened, can make wheel nuts become loose
after a time. The wheel could come off and cause
an accident. When you change
a wheel, remove
any rust or dirt from places where the wheel
attaches to the vehicle. In an emergency, you can
use a cloth or a paper towel
to do this; but be
sure to use a scraper or wire brush later, if you
need to, to get all the rust or dirt off. (See
“Changing a Flat Tire” in the Index.)
ProCarManuals.com
Page 293 of 380

Fi nish Damage
Any stone chips, fractures or deep scratches in the finish
should be repaired right away. Bare metal
will corrode
quickly and may develop into a major repair expense.
Minor chips and scratches can be repaired
with touch-up
materials available from your retailer or other service
outlets. Larger areas of
finish damage can be col-rect.ed
in your retailer’s body and paint shop.
Underbody Maintenance
Chemicals used for ice and snow removal and
dust control can collect on the underbody.
If these
are not removed, accelerated corrosion (rust) can occur
on the underbody parts such as fuel lines, frame,
floor pan and exhaust system even though they have
corrosion protection.
At least every spring, flush these materials
from the
underbody with plain water. Clean any areas where mud
and other debris can collect. Dirt packed
in closed areas
of the frame should be loosened before being flushed.
Your retailer or an underbody car washing system can
do this for you.
Chemical Paint Spotting
Some weather and atmospheric conditions can create a
chemical fallout. Airborne pollutants can
fill upon and
attack painted surfaces on your vehicle.
This damage
can take two forms: blotchy, ringlet-shaped
discolorations, and small irregular dark spots etched into
the paint surface.
Although no defect
in the paint job causes this, GM will
repair, at no charge to the owner, the surfaces of new
vehicles damaged by this fallout condition within
12 months or 12,000 miles (20 000 km) of purchase.
whichever occurs first.
ProCarManuals.com
Page 302 of 380

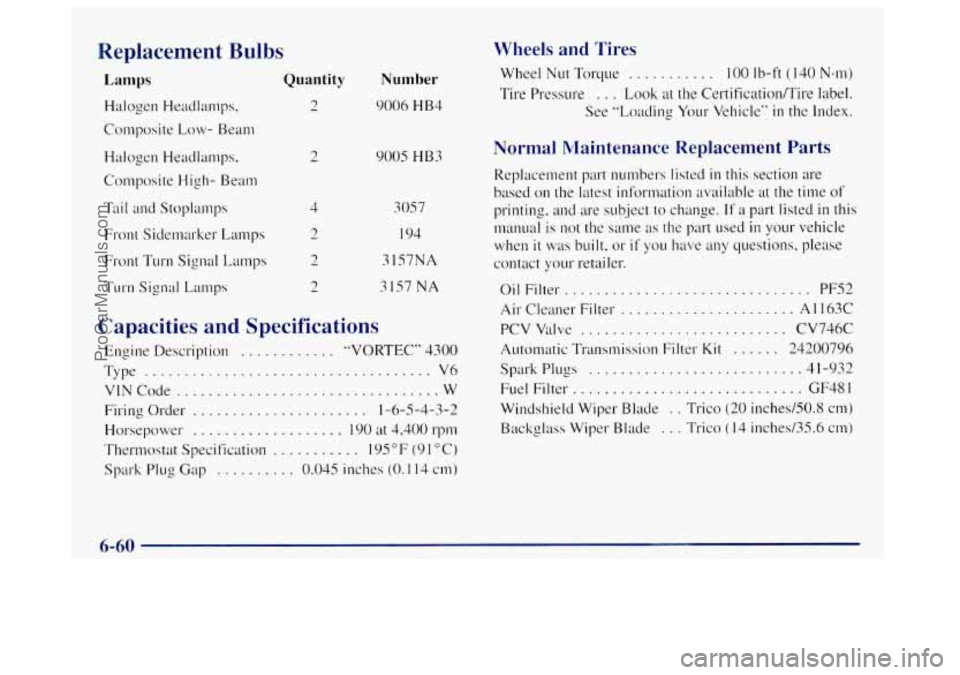
Replacement Bulbs
Lamps
Halogen Headlamps,
Composite Low- Beam
Halogen Headlamps.
Composite High- Beam
Tail and Stoplamps
Front Sidemarker Lamps
Front Turn Signal Lamps
Turn Signal Lamps
Quantity
2
2
4
Number
9006 HB4
9005 HB3
305 7
I94
31S7NA
3157
NA
Capacities and Specifications
Engine Description ............ "VORTEC" 4300
Type
.................................... V6
VINCode ................................. W
Firing Order
...................... 1-6-5-4-3-2
Horsepower
................... I90 at 4,400 rpm
Thermostat Specification
........... 1% "F (9 1 "C)
Spark Plug Gap
.......... 0.045 inches (0. I 14 cm)
Wheels and Tires
Wheel Nut Torque ........... 100 Ib-ft ( I40 Nem)
Tire Pressure . , . Look at the Certification/Tire label.
See "Loading Your Vehicle"
in the Index.
Normal Maintenance Replacement Parts
Replacement part numbers listed in this section are
based on the latest information available at the time
of
printing, and are subject to change. If a part listed in this
manual is not the same
as the part used in your vehicle
when
it was built, or if you have any questions, please
contact your retailer.
Oil Filter.
.............................. PFS2
Air Cleaner Filter ...................... A 1 163C
PCV Valve .......................... CV746C
Automatic Transmission Filter
Kit ...... 24200796
Spark P~LI~S
........................... 4 1-932
Fuel Filter ............................. GF48 1
Windshield Wiper Blade . . Trico (20 inchedS0.S crn)
Backglass Wiper Blade
... Trico (14 inched35.6 cm)
6-60
ProCarManuals.com