engine Oldsmobile Bravada 2003 s Owners Manual
[x] Cancel search | Manufacturer: OLDSMOBILE, Model Year: 2003, Model line: Bravada, Model: Oldsmobile Bravada 2003Pages: 410, PDF Size: 20.1 MB
Page 302 of 410
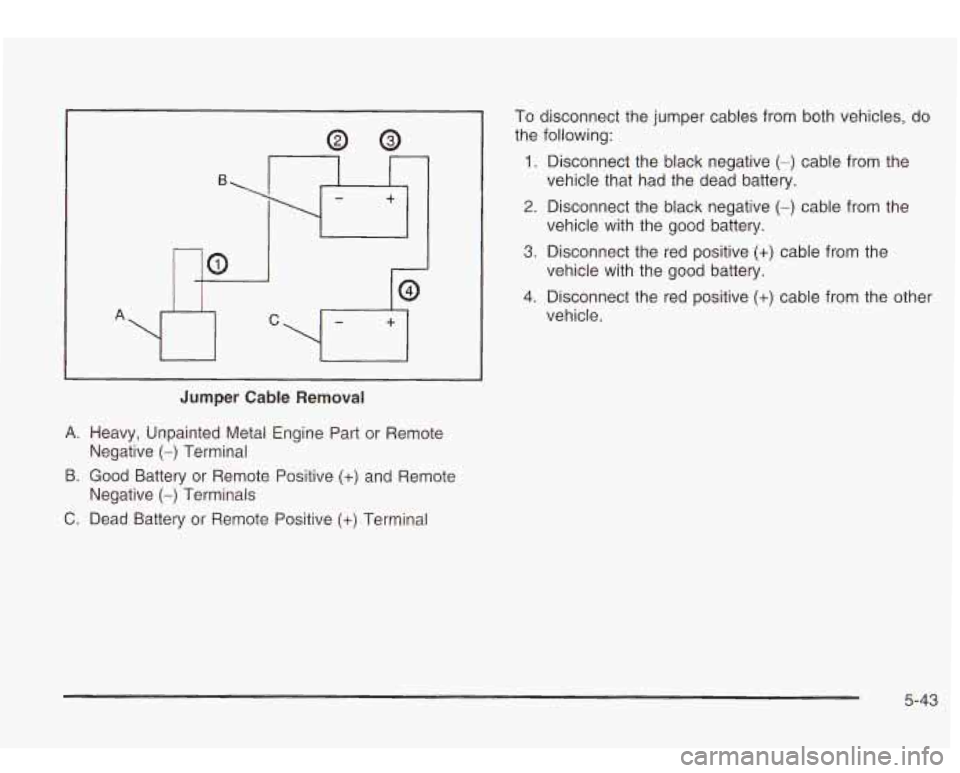
Jumper Cable Removal
A. Heavy, Unpainted Metal Engine Part or Remote
9. Good Battery or Remote Positive (+) and Remote
C. Dead Battery or Remote Positive (+) Terminal
Negative
(-) Terminal
Negative
(-) Terminals
To disconnect the jumper cables from both vehicles, do
the following:
1. Disconnect the black negative (-) cable from the
vehicle that had the dead battery.
2. Disconnect the black negative (-) cable from the
vehicle with the good battery.
3. Disconnect the red positive
(+) cable from the
4. Disconnect the red positive
(+) cable from the other
vehicle with the
good battery.
vehicle.
5-43
Page 321 of 410
A rear blowout, particularly on a curve, acts much like a
skid and may require the same correction you’d use
in a skid. In any rear blowout, remove your foot from the
accelerator pedal. Get the vehicle under control by
steering the way you want the vehicle
to go. It may be
very bumpy and noisy, but you can still steer. Gently
brake
to a stop - well off the road if possible.
If
a tire goes flat, the next part shows how to use your
jacking equipment
to change a flat tire safely.
Changing a Flat Tire
If a tire goes flat, avoid further tire and wheel damage
by driving slowly
to a level place. Turn on your
hazard warning flashers. Cha..,ing
a tire can ca-.-e an injc.
,. The
vehicle can slip
off the jack and roll over you
or other people. You and they could be badly
injured. Find a level place to change your tire.
To help prevent the vehicle from moving:
1. Set the parking brake firmly.
2. Put the shift lever in PARK (P).
3. Turn off the engine.
4. Put the wheel blocks at the front and rear
of the tire farthest away from the one
being changed. That would be the tire on
the other side of the vehicle,
at the
opposite end.
5-62
Page 344 of 410

Vehicle Identification
Vehicle Identification Number (VIN)
This is the legal identifier for your vehicle. It appears on
a plate in the front corner of the instrument panel, on
the driver’s side. You can see it
if you look through the
windshield from outside your vehicle. The VIN also
appears on the Vehicle Certification and Service Parts
labels and the certificates of title and registration.
Engine Identification
The 8th character in your VIN is the engine code. This
code will help you identify your engine, specifications
and replacement parts.
Service Parts Identification Label
You’ll find this label on the inside of the glove box. It’s
very helpful if you ever need to order parts. On this
label is:
your VIN,
the model designation,
paint information and
a list of all production options and special
equipment.
Be sure that this label is not removed from the vehicle.
5-85
Page 346 of 410
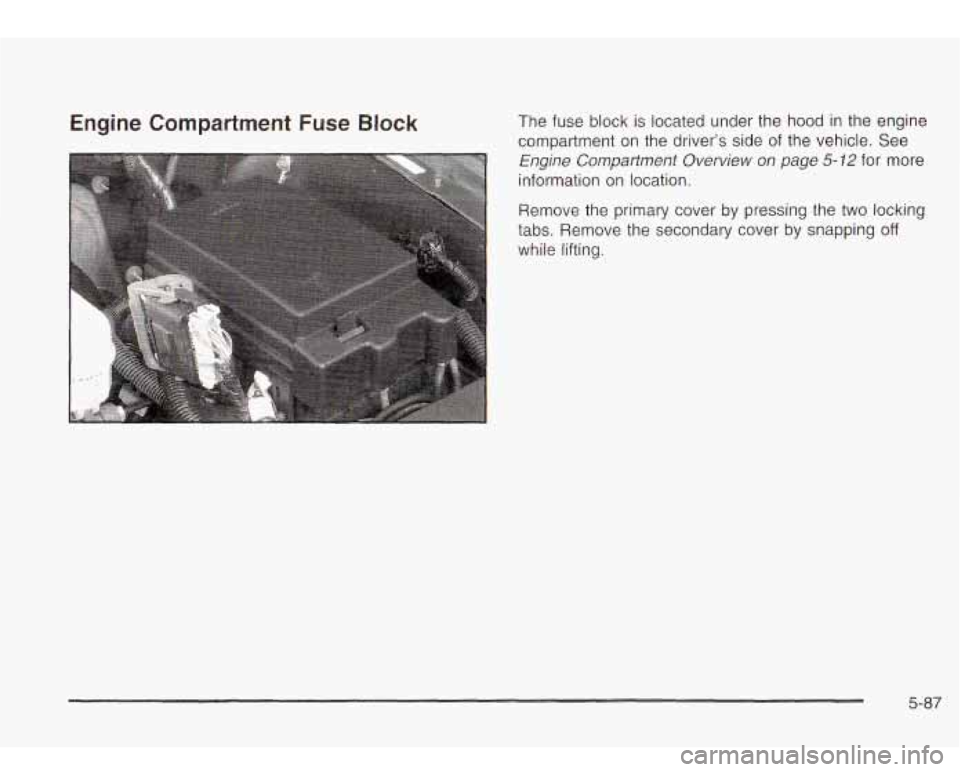
Engine Compartment Fuse Block The fuse block is located under the hood in the engine
compartment on the driver’s side of the vehicle. See
Engine Compartment Overview on page 5-72 for more
information on location.
Remove the primary cover by pressing the
two locking
tabs. Remove the secondary cover by snapping
off
while lifting.
5-87
Page 348 of 410
Fuses
10
11 12
13 14
15 16
17
18
19
20
21 22
23
24
25
26
27
28
29
30
31
Usage
Powertrain Control Module B
Fog Lamps
Stop Lamp
Cigarette Lighter
Ignition Coils
Air Suspension Ride
TBD-Ignition
1
Crank
Air Bag
Electric Brake
Cooling Fan
Horn Ignition
E
Electronic Throttle Control
Instrument Panel Cluster, Driver
Information Center
Automatic Shift Lock Control System
Engine 1
Back-up Powertrain Control Module 1
Oxygen Sensor
Air Conditioning
Truck Body Controller
Fuses
32
33
34
35
36
50
51
52
Relays
37
38
39
40
41
42
43
44
45
46 47
Usage
Trailer
Anti-Lock Brakes (ABS) Ignition A
Blower Motor Ignition B Passenger’s Side Trailer Turn
Driver’s Side Trailer Turn
Hazard Flashers
Usage
Blank Rear Window Washer
Fog Lamps
Horn Fuel Pump
Windshield WipersNasher
High-Beam Headlamp
Air Conditioning
Cooling Fan
Headlamp Driver Module
Starter
Miscellaneous Usage
48 Instrument Panel Battery
49 Fuse Puller
5-89
Page 353 of 410
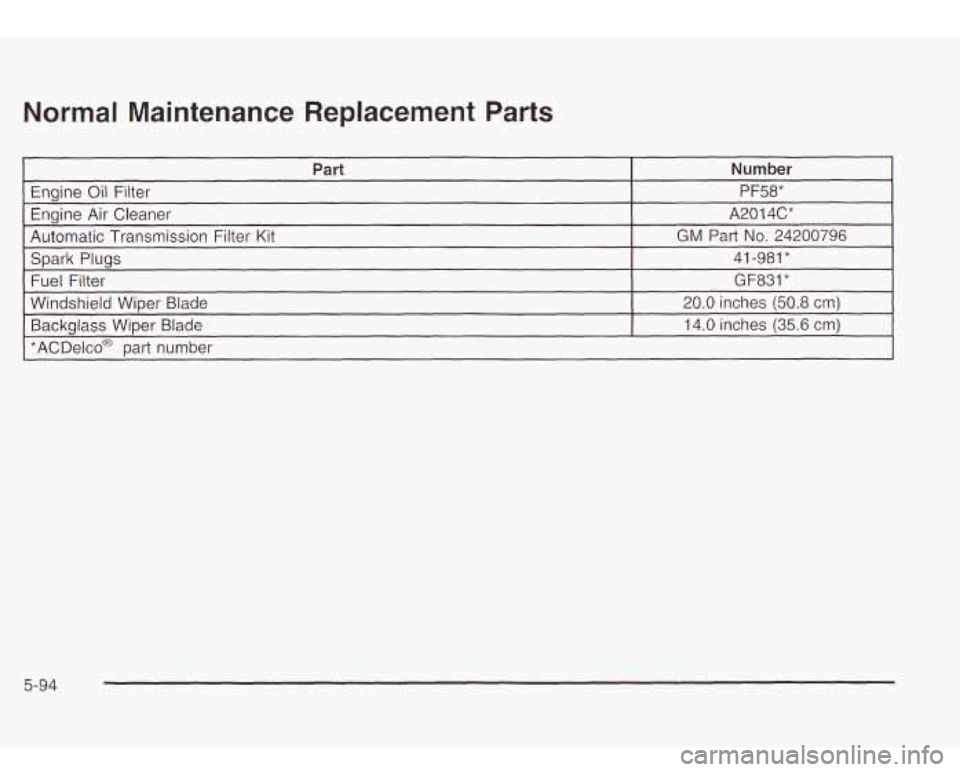
Normal Maintenance Replacement Parts
Part
GM Part No. 24200796
Automatic Transmission Filter Kit A201 4C*
Engine Air Cleaner P F58*
Engine
Oil Filter Number
~~ ~
Spark Plugs
*ACDelco@ part
number 14.0
inches
(35.6 em) Backglass Wiper Blade
20.0 inches (50.8 cm)
Windshield Wiper Blade
GF831* Fuel Filter 41
-981
*
5-94
Page 354 of 410

6 Maintenance Schedule
Maintenance Schedule ...................................... 6-2
Introduction
................................................... 6-2
Maintenance Requirements
.............................. 6-2
How This Section is Organized ......................... 6-3
Part A: Scheduled Maintenance Services
........... 6-4
Using Your Maintenance Schedule
.................... 6-4
Scheduled Maintenance
................................... 6-5
Part
B: Owner Checks and Services ................ 6-10
At Each Fuel Fill
.......................................... 6-10
At Least Once a Month
................................. 6-10
At Least Twice a Year
................................... 6-11
Your
Vehicle and the Environment
.................... 6-2 At
Least Once a Year
................................... 6-12
Part
C: Periodic Maintenance Inspections ......... 6.15
Boot and Seal Inspection
............................ 6.15
Exhaust System Inspection
............................ 6.15
Fuel System Inspection
.................................. 6.15
Engine Cooling System Inspection
................... 6.15
Brake System Inspection
................................ 6-16
Part E: Maintenance Record
........................... 6.19
Steering, Suspension and Front Drive
Axle
Transfer Case and Front Axle
(All-Wheel Drive) Inspection
........................ 6.16
Part D: Recommended Fluids and Lubricants
.... 6-17
6- 1
Page 357 of 410
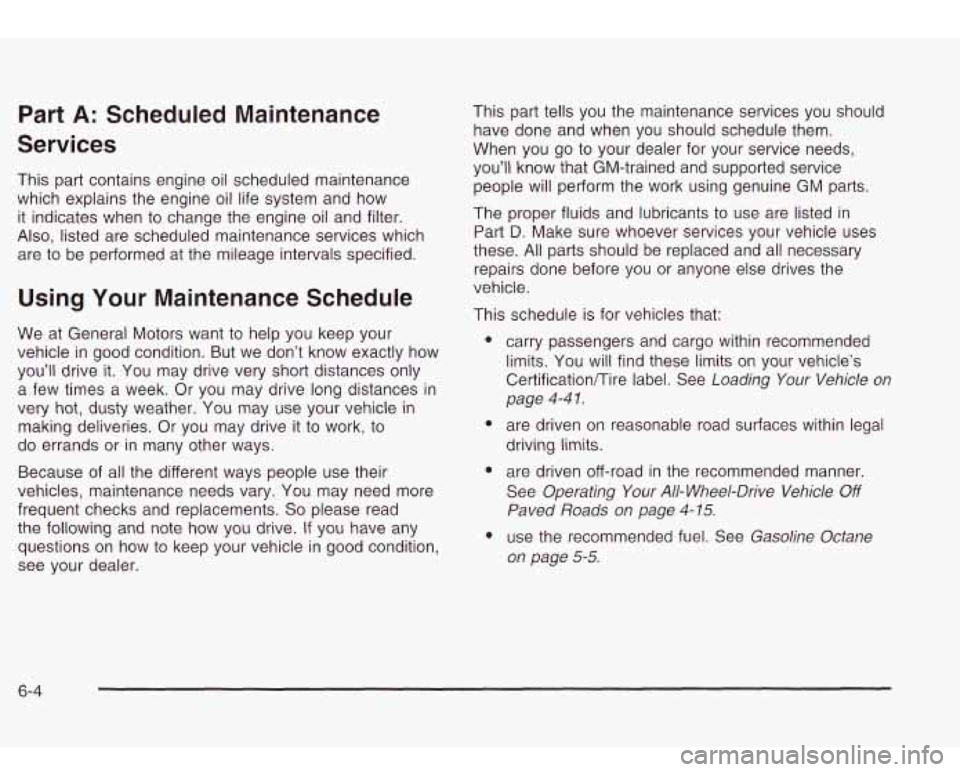
Part A: Scheduled Maintenance
Services
This part contains engine oil scheduled maintenance
which explains the engine oil life system and how
it indicates when to change the engine oil and filter.
Also, listed are scheduled maintenance services which
are
to be performed at the mileage intervals specified.
Using Your Maintenance Schedule
We at General Motors want to help you keep your
vehicle in good condition. But we don’t know exactly how
you’ll drive it. You may drive very short distances only
a few times a week. Or you may drive long distances in
very hot, dusty weather. You may use your vehicle in
making deliveries. Or you may drive it to work,
to
do errands or in many other ways.
Because
of all the different ways people use their
vehicles, maintenance needs vary. You may need more
frequent checks and replacements.
So please read
the following and note how you drive.
If you have any
questions on how
to keep your vehicle in good condition,
see your dealer. This part tells you the
maintenance services you should
have done and when you should schedule them.
When you
go to your dealer for your service needs,
you’ll know that GM-trained and supported service
people will perform the work using genuine GM parts.
The proper fluids and lubricants
to use are listed in
Part
D. Make sure whoever services your vehicle uses
these.
All parts should be replaced and all necessary
repairs done before you or anyone else drives the
vehicle.
This schedule is for vehicles that:
carry passengers and cargo within recommended
limits. You will find these limits on your vehicle’s
Certificationflire label. See
Loading Your Vehicle on
page
4-4 1.
are driven on reasonable road surfaces within legal
driving limits.
are driven off-road in the recommended manner.
See
Operating Your All- Wheel-Drive Vehicle Off
Paved Roads on page 4- 15.
use the recommended fuel. See Gasoline Octane
on page 5-5.
6-4
Page 358 of 410
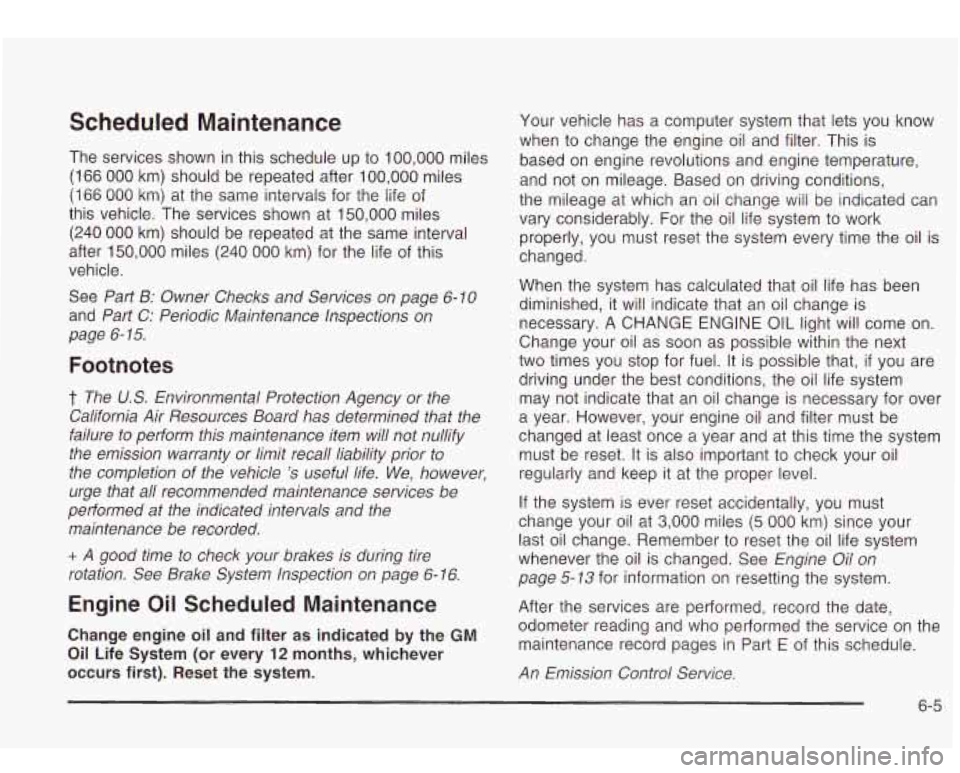
Scheduled Maintenance
The services shown in this schedule up to 100,000 miles
(166 000 km) should be repeated after 100,000 miles
(166 000 km) at the same intervals for the life of
this vehicle. The services shown at
150,000 miles
(240 000 km) should be repeated at the same interval
after
150,000 miles (240 000 km) for the life of this
vehicle.
See
Part B: Owner Checks and Services on page 6- 10
and Part C: Periodic Maintenance Inspections on
page 6- 15.
Footnotes
t The US. Environmental Protection Agency or the
California Air Resources Board has determined that the
failure to perform this maintenance item will not nullify
the emission warranty or limit recall liability prior
to
the completion of the vehicle 's useful life. We, however,
urge that all recommended maintenance services be
performed at the indicated intervals and the
maintenance be recorded.
+ A good time to check your brakes is during tire
rotation. See Brake System Inspection
on page 6- 16.
Engine Oil Scheduled Maintenance
Change engine oil and filter as indicated by the GM
Oil Life System (or every 12 months, whichever
occurs first). Reset the system.
Your vehicle has a computer system that lets you know
when
to change the engine oil and filter. This is
based on engine revolutions and engine temperature,
and not on mileage. Based on driving conditions,
the mileage
at which an oil change will be indicated can
vary considerably. For the
oil life system to work
properly, you must reset the system every time the oil is
changed.
When the system has calculated that oil life has been
diminished, it will indicate that an oil change is
necessary. A CHANGE ENGINE
OIL light will come on.
Change your oil as soon as possible within the next
two times you stop for fuel. It is possible that,
if you are
driving under the best conditions, the oil life system
may not indicate that an oil change is necessary for over
a year. However, your engine oil and filter must be
changed at least once a year and at this time the system
must be reset.
It is also important to check your oil
regularly and keep
it at the proper level.
If the system is ever reset accidentally, you must
change your oil at
3,000 miles (5 000 km) since your
last oil change. Remember
to reset the oil life system
whenever the oil is changed. See
Engine Oil on
page 5-13 for information on resetting the system.
After the services are performed, record the date, odometer reading and who performed the service on the
maintenance record pages in Part
E of this schedule.
An Emission Control Service.
6-5
Page 359 of 410

7,500 Miles (12 500 km)
0 Check readfront axle fluid level and add fluid as needed. Check constant velocity joints and axle seals
for leaking.
page 5-53 for proper rotation pattern and additional
information.
(See footnote +.)
U Rotate tires. See Tire Inspection and Rotation on
15,000 Miles (25 000 km)
0 Inspect engid'e air cleaner filter if you are driving in
dusty conditions. Replace filter
if necessary. An
Emission Control Service. (See footnote
f.)
0 Check readfront axle fluid level and add fluid as
needed. Check constant velocity joints and axle seals
for leaking.
page 5-53 for proper rotation pattern and additional
information.
(See footnote +.)
Ll Rotate tires. See Tire Inspection and Rotation on
22,500 Miles (37 500 km)
0 Check readfront axle fluid level and add fluid as
needed. Check constant velocity joints and axle seals
for leaking.
0 Rotate tires. See Tire Inspection and Rotation on
page
5-53 for proper rotation pattern and additional
information.
(See footnote +.)
30,000 Miles (50 000 km)
0 Check rear/front axle fluid level and add fluid as
needed. Check constant velocity joints and axle seals
for leaking.
page 5-53 for proper rotation pattern and additional
information.
(See footnote +.)
0 Replace fuel filter. An Emission Control Service. (See
footnote
t.)
0 Replace engine air cleaner filter. An Emission
Control Service.
Q Rotate tires. See Tire Inspection and Rotation on
37,500 Miles (62 500 km)
0 Check readfront axle fluid level and add fluid as
needed. Check constant velocity joints and axle seals
for leaking.
0 Rotate tires. See Tire Inspection and Rotation on
page
5-53 for proper rotation pattern and additional
information.
(See footnote +.)
6-6