run flat Oldsmobile Bravada 2003 Owner's Manuals
[x] Cancel search | Manufacturer: OLDSMOBILE, Model Year: 2003, Model line: Bravada, Model: Oldsmobile Bravada 2003Pages: 410, PDF Size: 20.1 MB
Page 50 of 410

Your vehicle has a right front passenger air bag. Never
put a rear facing child restraint in this seat. Here's whl-
A child in a rear-facing child restraint can be
seriously injured or killed
if the right front
passenger's air bag inflates. This is because
the back of the rear-facing child restraint
would be very close to the inflating air bag.
Always secure a rear-facing child restraint in a
rear seat.
Although a rear seat is a safer place, you can secure a
forward-facing child restraint in the right front seat.
You'll be using the lap-shoulder belt. See
Top Strap on
page 7-36 if the child restraint has one. Be sure to
follow the instructions that came with the child restraint.
Secure the child in the child restraint when and as
the instructions say.
1. Because your vehicle has a right front passenger's
air bag, always move the seat as far back as it will
go before securing a forward-facing child restraint.
See
Power Seats on page 7-2.
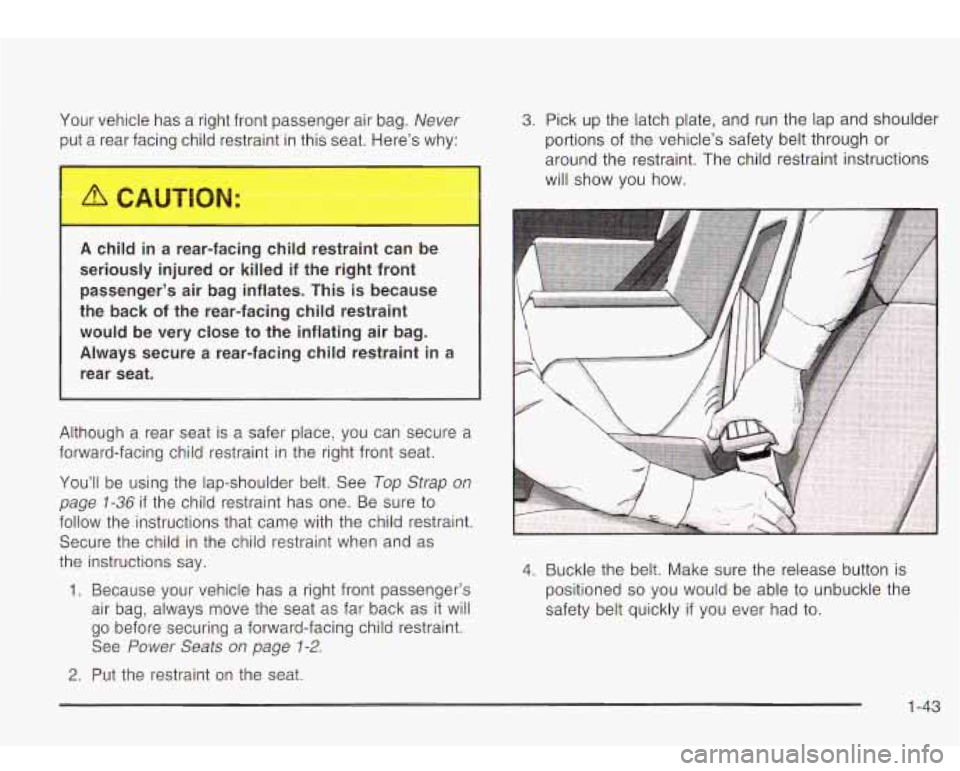
3. Pick up the latch plate, and run the lap and shoulder
portions of the vehicle's safety belt through
or
around the restraint. The child restraint instructions
will show you how.
4. Buckle the belt. Make sure the release button is
positioned
so you would be able to unbuckle the
safety belt quickly
if you ever had to.
2. Put the restraint on the seat.
1-43
Page 144 of 410

The safety belt light will also come
on and stay on
for several seconds, then it
will flash for several more.
If the driver’s belt is already buckled, neither the chime
nor the light will come on.
Air Bag Readiness Light
There is an air bag readiness light on the instrument
panel, which shows the air bag symbol. The system
checks the air bag’s electrical system for malfunctions.
The light tells you
if there is an electrical problem.
The system check includes the air bag sensors, the air
bag modules, the wiring and the crash sensing and
diagnostic module. For more information on the air baa
system, see
Air Bag Systems on page 1-46.
This light will come on
when you start your
vehicle, and it will flash for
a few seconds. Then
the light should
go out.
This means the system is
ready. If
the air bag readiness light stays on after you start the
vehicle or comes on when you are driving, your air
bag system may not work properly. Have your vehicle
serviced right away.
If the air bag readiness light stays on after you
start your vehicle, it means the air bag system
may not be working properly. The air bags in
your vehicle may not inflate in a crash, or they
could even inflate without a crash.
To help
avoid injury to yourself or others, have your
vehicle serviced right away
if the air bag
readiness light stays on after you start your
vehicle.
The air bag readiness light should flash for a few
seconds when you turn the ignition key to
RUN. If the
light doesn’t come on then, have it fixed
so it will
be ready to warn you
if there is a problem.
3-3 1
Page 320 of 410

To use the air inflator attach the appropriate nozzle
adapter to the end of the hose
if required. Then attach
that end of the hose to the object you wish to inflate.
Attach the other end of the hose to the outlet.
Press and release the switch to turn the air inflator on.
The indicator light will remain on when the inflator is
running.
The system has an internal clock to prevent overheating.
The system will allow about five minutes of running
time, then the compressor will stop. The indicator light
will then begin to flash. When the indicator is off,
the inflator can be started again by pressing the switch.
If the compressor is still hot,
it may only run for a
short time before shutting off again.
Press and release the switch to turn the inflator off.
Place the inflator kit
tools in the pouch and store
it properly. Remove the inflator hose from the outlet
during loading and unloading. Load leveling will
not function with the inflator hose attached
to the inflator
outlet. See ”Electronically Controlled Air Suspension
System” in the Index.
To reinstall the cover, line up the tabs at the back of the
cover, put it in place and latch the tabs.
A continuous flashing indicator light may also indicate a
malfunction in the air suspension system. See
“Electronically Controlled Air Suspension System” in the
Index.
Inllarlllg something too m,.-h can make it
explode, and you or others could be injured.
Be sure to read the inflator instructions, and
inflate any object only to its recommended
If a Tire Goes Flat
It’s unusual for a tire to “blowout” while you’re driving,
especially
if you maintain your tires properly. If air goes
out of a tire, it’s much more likely to leak out slowly.
But
if you should ever have a “blowout”, here are a few
tips about what to expect and what to do:
If a front tire fails, the flat tire will create a drag that
pulls the vehicle toward that side. Take your foot off the
accelerator pedal and grip the steering wheel firmly.
Steer to maintain lane position, and then gently brake to
a stop well out of the traffic lane.
5-61
Page 399 of 410

Removing the Flat Tire and Installing the
Spare Tire
.................................................. 5-69
Replacement Bulbs
......................................... 5-48
Replacing Restraint System Parts
Reporting Safety Defects
Removing
the Spare Tire and
Tools ................... 5-63
Replacing Brake System Parts
.......................... 5-37
After a Crash
.............................................. 1-56
Canadian Government
................................... 7-9
General Motors
............................................. 7-9
United States Government
.............................. 7-9
Reprogramming a Single HomeLink@ Button
...... 2-40
Resetting Defaults
........................................... 2-40
Restraint System Check
................................... 6-1 1
Checking Your Restraint Systems ................... 1-56
Replacing Restraint System Parts
After a Crash
.................................... , .. 1-56
Checking
.................................................... 1-56
Replacing Parts
........................................... 1-56
Restraints, Head
............................................... 1-5
Retained Accessory Power (RAP)
...................... 2-19
Restraint Systems
RFA
## BATTERY LOW .................................... 3-55
Right Front Passenger Position, Safety Belts
...... 1-21
RIGHT REAR DOOR AJAR
.............................. 3-55
Roadside
Assistance Program
....................................... 7-5
Rocking Your Vehicle To Get It Out
................... 4-40
Running Your Engine While You Are Parked
....... 2-29
S
................... 3-30 ............
Safety Belt
Safety Belts Reminder Light
.....
Care
of ...................................................... 5-80
Driver Position
............................................ 1-13
How to Wear Safety Belts Properly ................ 1-13
Questions and Answers About Safety Belts
..... 1-12
Rear Safety Belt Comfort Guides for Children
and Small Adults
...................................... 1-24
Rear Seat Passengers
................................. 1-21
Right Front Passenger Position
...................... 1-21
Safety Belt Extender
.................................... 1-26
Safety Belt Use During Pregnancy
................. 1-20
Safety Belts Are for Everyone
......................... 1-8
Safety Chains
................................................. 4-49
Safety Warnings and Symbols III ...
Scanning the Terrain ....................................... 4-18
..............................
Scheduled Maintenance ..................................... 6-5
Seats
Head Restraints
............................................ 1-5
Heated Seats
............................................... 1-3
Memory
..................................................... 2-47
Power Lumbar
.............................................. 1-2
Power Reclining Seatbacks
............................. 1-4
Power Seats
................................................. 1-2
Rear Seat Operation
...................................... 1-6
Designed for the LATCH System
................... 1-40
Securing a Child
Restraint
12