service indicator Oldsmobile Bravada 2004 Owner's Manuals
[x] Cancel search | Manufacturer: OLDSMOBILE, Model Year: 2004, Model line: Bravada, Model: Oldsmobile Bravada 2004Pages: 420, PDF Size: 4.37 MB
Page 1 of 420
Seats and Restraint Systems........................... 1-1
Front Seats
............................................... 1-2
Rear Seats
............................................... 1-6
Safety Belts
.............................................. 1-8
Child Restraints
.......................................1-27
Air Bag Systems
......................................1-46
Restraint System Check
............................1-55
Features and Controls..................................... 2-1
Keys
........................................................ 2-3
Doors and Locks
....................................... 2-7
Windows
.................................................2-14
Theft-Deterrent Systems
............................2-16
Starting and Operating Your Vehicle
...........2-18
Mirrors
....................................................2-29
OnStar
®System
......................................2-32
HomeLink®Transmitter
.............................2-34
Storage Areas
.........................................2-38
Sunroof
..................................................2-42
Vehicle Personalization
.............................2-42
Instrument Panel............................................. 3-1
Instrument Panel Overview
.......................... 3-4
Climate Controls
......................................3-21
Warning Lights, Gages and Indicators
.........3-28
Driver Information Center (DIC)
..................3-45
Audio System(s)
.......................................3-58Driving Your Vehicle....................................... 4-1
Your Driving, the Road, and Your Vehicle
..... 4-2
Towing
...................................................4-43
Service and Appearance Care.......................... 5-1
Service
..................................................... 5-3
Fuel
......................................................... 5-4
Checking Things Under the Hood
...............5-10
All-Wheel Drive
........................................5-47
Rear Axle
...............................................5-48
Front Axle
...............................................5-48
Bulb Replacement
....................................5-50
Windshield Wiper Blade Replacement
.........5-52
Tires
......................................................5-55
Appearance Care
.....................................5-88
Vehicle Identi�cation
.................................5-97
Electrical System
......................................5-98
Capacities and Speci�cations
...................5-105
Maintenance Schedule..................................... 6-1
Maintenance Schedule
................................ 6-2
Customer Assistance and Information.............. 7-1
Customer Assistance and Information
........... 7-2
Reporting Safety Defects
...........................7-11
Index................................................................ 1
2004 Oldsmobile Bravada Owner ManualM
Page 107 of 420
Instrument Panel Overview...............................3-4
Hazard Warning Flashers................................3-6
Other Warning Devices...................................3-7
Horn.............................................................3-7
Tilt Wheel.....................................................3-7
Turn Signal/Multifunction Lever.........................3-8
Exterior Lamps.............................................3-15
Interior Lamps..............................................3-17
Accessory Power Outlets...............................3-20
Ashtrays and Cigarette Lighter........................3-20
Climate Controls............................................3-21
Dual Automatic Climate Control System...........3-21
Rear Climate Control System.........................3-26
Climate Controls Personalization.....................3-27
Warning Lights, Gages and Indicators.............3-28
Instrument Panel Cluster................................3-29
Speedometer and Odometer...........................3-30
Tachometer.................................................3-31
Safety Belt Reminder Light.............................3-31
Air Bag Readiness Light................................3-32Charging System Light..................................3-33
Voltmeter Gage............................................3-33
Brake System Warning Light..........................3-34
Anti-Lock Brake System Warning Light.............3-35
Engine Coolant Temperature Gage..................3-36
Malfunction Indicator Lamp.............................3-36
Oil Pressure Gage........................................3-39
Change Engine Oil Light................................3-40
Security Light...............................................3-41
Cruise Control Light......................................3-41
Reduced Engine Power Light.........................3-42
Service All-Wheel Drive Light.........................3-42
Check Gages Warning Light...........................3-43
Gate Ajar Light.............................................3-43
Fuel Gage...................................................3-44
Low Fuel Warning Light.................................3-44
Driver Information Center (DIC).......................3-45
DIC Operation and Displays...........................3-45
DIC Warnings and Messages.........................3-54
Section 3 Instrument Panel
3-1
Page 142 of 420
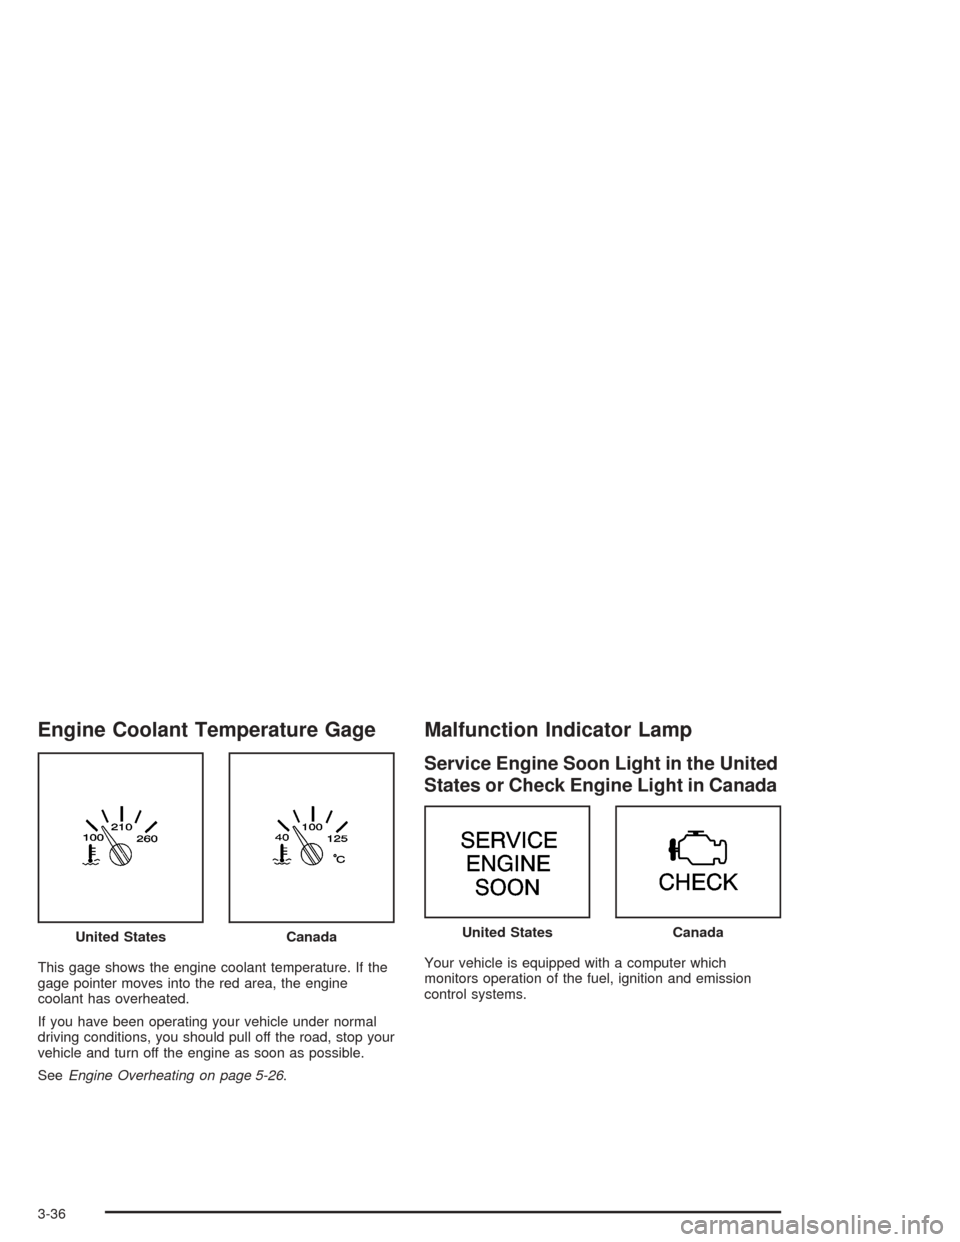
Engine Coolant Temperature Gage
This gage shows the engine coolant temperature. If the
gage pointer moves into the red area, the engine
coolant has overheated.
If you have been operating your vehicle under normal
driving conditions, you should pull off the road, stop your
vehicle and turn off the engine as soon as possible.
SeeEngine Overheating on page 5-26.
Malfunction Indicator Lamp
Service Engine Soon Light in the United
States or Check Engine Light in Canada
Your vehicle is equipped with a computer which
monitors operation of the fuel, ignition and emission
control systems. United States
CanadaUnited StatesCanada
3-36
Page 163 of 420
LEFT REAR DOOR AJAR
If the driver’s side rear door is not fully closed this
message will appear on the display and you will hear a
chime. Stop and turn off the vehicle, check the door
for obstacles, and close the door again. Check to see if
the message still appears on the DIC. Press the
select button tol acknowledge this message and clear it
from the DIC display.
RIGHT REAR DOOR AJAR
If the passenger’s side rear door is not fully closed this
message will appear on the display and you will
hear a chime. Stop and turn off the vehicle, check the
door for obstacles, and close the door again. Check
to see if the message still appears on the DIC. Press the
select button to acknowledge this message and clear
it from the DIC display.
RFA # BATTERY LOW
If a remote keyless entry transmitter battery is low, this
message will appear on the DIC. The battery needs
to be replaced in the transmitter. Press the select button
to acknowledge this message and clear it from the
DIC display.
CURB VIEW ACTIVATED
The CURB VIEW ACTIVATED message is displayed
when one of the outside rear view mirrors move into the
curb view position. Refer to “Outside Automatic
Dimming Mirror with Curb View Assist” for more
information.
TIGHTEN FUEL CAP
If the vehicle’s fuel cap is not tightened properly, this
message may appear on the DIC and a chime will
sound. Fully reinstall the fuel cap. The diagnostic system
can determine if the fuel cap has been left off or
improperly installed. A loose or missing fuel cap will
allow fuel to evaporate into the atmosphere. The
DIC message will remain on until the message is
cancelled with the return button on the steering wheel.
The DIC message will also be cancelled if the ignition
is turned off.
The DIC message and the Service Engine Soon light
may come on again during a second trip if the fuel cap is
still not tightened properly. SeeMalfunction Indicator
Lamp on page 3-36for more information.
3-57
Page 194 of 420
Slow Play:When the DVD is playing, press the pause
button then press the fast forward button. The DVD
will continue playing in a slow play mode. To cancel slow
play mode, press the play/pause button.
u(Next Track/Chapter):Press this button to advance
to the beginning of the next track or chapter. This
button may not work when the DVD is playing the
copyright information or the previews.
Battery Replacement
To change the batteries, do the following:
1. Remove the battery compartment door located on
the bottom of the remote control.
2. Replace the two AA batteries in the compartment.
Make sure that they are installed correctly, using
the diagram on the inside of the battery
compartment.
3. Close the battery door securely.
Notice:Do not store the remote control in heat or
direct sunlight. This could damage the remote
control and it would not be covered by your vehicles
warranty. Keep the remote control stored in a
cool, dry place.
If the remote control is to be stored for a long period of
time, remove the batteries and keep them in a cool,
dry place.
Headphones
The RSE system includes two sets of wireless
headphones.
Each set of headphones has an ON/OFF control. An
indicator light will illuminate on the headphones
when they are on. If the light does not illuminate, the
batteries may need to be replaced. See “Battery
Replacement” following for more information.
Each set of headphones has a volume knob. To adjust
the volume, adjust this knob.
The headphones will automatically turn off if they lose the
infrared signal from the system after approximately four
minutes in order to preserve their battery power. The
signal may be lost if the system is turned off or if the
headphones are out of range of the infrared signal
transmitters that are located below the video display
screen.
When using the wired headphones, if the front seat
passengers play a CD in the Radio with Six-Disc CD
(if equipped) or use XM™ Satellite Radio Service
(48 contiguous US states, if equipped), you will hear the
audio for these sources, instead of the DVD or CD
that is currently playing through the RSE.
3-88
Page 203 of 420
The cut tape detection feature of your cassette tape
player may identify the cleaning cassette as a damaged
tape, in error. To prevent the cleaning cassette from
being ejected, use the following steps.
1. Turn the ignition on.
2. Turn the radio off.
3. Press and hold the TP CD button for �ve seconds.
4. Insert the scrubbing action cleaning cassette.
5. Eject the cleaning cassette after the manufacturer’s
recommended cleaning time.
You may also choose a non-scrubbing action, wet-type
cleaner which uses a cassette with a fabric belt to
clean the tape head. This type of cleaning cassette will
not eject on its own. A non-scrubbing action cleaner
may not clean as thoroughly as the scrubbing type
cleaner. The use of a non-scrubbing action, dry-type
cleaning cassette is not recommended.
After you clean the player, press and hold the eject
button for �ve seconds to reset the CLEAN PLAYR
indicator. The radio will display CLEANED to show the
indicator was reset.Cassettes are subject to wear and the sound quality
may degrade over time. Always make sure the cassette
tape is in good condition before you have your tape
player serviced.
Care of Your CDs and DVDs
Handle discs carefully. Store them in their original cases
or other protective cases and away from direct sunlight
and dust. If the surface of a disc is soiled, dampen
a clean, soft cloth in a mild, neutral detergent solution
and clean it, wiping from the center to the edge.
Be sure never to touch the side without writing when
handling discs. Pick up discs by grasping the outer
edges or the edge of the hole and the outer edge.
Care of Your CD and DVD Player
The use of CD lens cleaner discs is not advised, due to
the risk of contaminating the lens of the CD optics
with lubricants internal to the CD mechanism.
3-97
Page 253 of 420
If the vehicle is parked for an extended period of time,
some bleed down of the suspension is normal. Upon
starting the vehicle, proper height will be achieved.
Overload Protection
The air suspension system is equipped with overload
protection. Overload protection is designed to protect the
air suspension system, and it is an indicator to the
driver that the vehicle is overloaded. When the overload
protection mode is on, it will not allow damage to the
air compressor. However, do not overload the vehicle.
SeeLoading Your Vehicle on page 4-43.
If the suspension remains at a low height, the rear axle
load has exceeded GAWR (Gross Axle Weight
Rating). When the overload protection mode is activated,
the compressor operates for about 30 seconds to one
minute without raising the vehicle depending on the
amount of overload. This will continue each time
the ignition is turned on until the rear axle load is
reduced below GAWR.
Indicator Light
The indicator light on the in�ator switch in the rear
passenger compartment also serves as an indicator for
internal system error. If the indicator light is �ashing
without the load leveling function or the in�ator being
active, turn off the ignition. The next day turn on
the ignition and check the indicator light. The vehicle
can be driven with the light �ashing, but if it is you
should have the vehicle serviced as soon as possible.
Adding a Snow Plow or Similar
Equipment
Your vehicle was neither designed nor intended for a
snow plow.
Notice:Adding a snow plow or similar equipment
to your vehicle can damage it, and the repairs would
not be covered by warranty. Do not install a snow
plow or similar equipment on your vehicle.
4-49
Page 270 of 420
Additives
To provide cleaner air, all gasolines in the United States
are now required to contain additives that will help
prevent engine and fuel system deposits from forming,
allowing your emission control system to work properly.
You should not have to add anything to your fuel.
However, some gasolines contain only the minimum
amount of additive required to meet U.S. Environmental
Protection Agency regulations. General Motors
recommends that you buy gasolines that are advertised
to help keep fuel injectors and intake valves clean. If your
vehicle experiences problems due to dirty injectors or
valves, try a different brand of gasoline.
Gasolines containing oxygenates, such as ethers and
ethanol, and reformulated gasolines may be available in
your area to contribute to clean air. General Motors
recommends that you use these gasolines, particularly if
they comply with the speci�cations described earlier.
Notice:Your vehicle was not designed for fuel that
contains methanol. Do not use fuel containing
methanol. It can corrode metal parts in your fuel
system and also damage the plastic and rubber
parts. That damage would not be covered under
your warranty.Some gasolines that are not reformulated for low
emissions may contain an octane-enhancing additive
called methylcyclopentadienyl manganese tricarbonyl
(MMT); ask the attendant where you buy gasoline
whether the fuel contains MMT. General Motors does
not recommend the use of such gasolines. Fuels
containing MMT can reduce the life of spark plugs and
the performance of the emission control system may
be affected. The malfunction indicator lamp may turn on.
If this occurs, return to your authorized GM dealer for
service.
Fuels in Foreign Countries
If you plan on driving in another country outside the
United States or Canada, the proper fuel may be hard
to �nd. Never use leaded gasoline or any other fuel
not recommended in the previous text on fuel. Costly
repairs caused by use of improper fuel would not
be covered by your warranty.
To check the fuel availability, ask an auto club, or
contact a major oil company that does business in the
country where you will be driving.
5-6
Page 303 of 420
Brake Wear
Your vehicle has four-wheel disc brakes.
Disc brake pads have built-in wear indicators that make
a high-pitched warning sound when the brake pads
are worn and new pads are needed. The sound
may come and go or be heard all the time your vehicle
is moving (except when you are pushing on the
brake pedal �rmly).
{CAUTION:
The brake wear warning sound means that
soon your brakes will not work well. That
could lead to an accident. When you hear the
brake wear warning sound, have your vehicle
serviced.
Notice:Continuing to drive with worn-out brake
pads could result in costly brake repair.Some driving conditions or climates may cause a brake
squeal when the brakes are �rst applied or lightly
applied. This does not mean something is wrong with
your brakes.
Properly torqued wheel nuts are necessary to help
prevent brake pulsation. When tires are rotated, inspect
brake pads for wear and evenly tighten wheel nuts in
the proper sequence to GM torque speci�cations.
Brake linings should always be replaced as complete
axle sets.
Brake Pedal Travel
See your dealer if the brake pedal does not return to
normal height, or if there is a rapid increase in
pedal travel. This could be a sign of brake trouble.
Brake Adjustment
Every time you make a brake stop, your disc brakes
adjust for wear.
5-39
Page 411 of 420
L
Lamps
Exterior......................................................3-15
Interior.......................................................3-17
Lamps On Reminder.......................................3-16
Lap-Shoulder Belt...................................1-14, 1-22
LATCH System
Child Restraints...........................................1-38
Securing a Child Restraint Designed for the
LATCH System........................................1-40
Leaving Your Vehicle.......................................2-12
Leaving Your Vehicle With the Engine Running . . . 2-26
LEFT REAR DOOR AJAR................................3-57
Liftgate Release..............................................2-13
Liftgate/Liftglass..............................................2-13
Liftglass/Liftgate..............................................2-13
Light
Air Bag Readiness.......................................3-32
Anti-Lock Brake System Warning...................3-35
Brake System Warning.................................3-34
Change Engine Oil......................................3-40
Charging System.........................................3-33
Check Gages Warning.................................3-43
Cruise Control.............................................3-41
Gate Ajar...................................................3-43Light (cont.)
Low Fuel Warning.......................................3-44
Malfunction Indicator....................................3-36
Reduced Engine Power................................3-42
Safety Belt Reminder...................................3-31
Security.....................................................3-41
Service All-Wheel-Drive................................3-42
Lighted Visor Vanity Mirror...............................2-16
Loading Your Vehicle.......................................4-43
Loading Your Vehicle for Off-Road Driving..........4-17
Locking Rear Axle...........................................4-11
Lockout Protection..........................................2-12
Locks
Delayed Locking........................................... 2-9
Door........................................................... 2-7
Leaving Your Vehicle....................................2-12
Lockout Protection.......................................2-12
Power Door.................................................. 2-8
Programmable Automatic Door Locks............... 2-9
Rear Door Security Locks.............................2-12
Loss of Control...............................................4-15
Low Fuel Warning Light...................................3-44
Luggage Carrier..............................................2-39
Lumbar
Power Controls............................................. 1-2
9