check engine Oldsmobile Cutlass Supreme 1993 s User Guide
[x] Cancel search | Manufacturer: OLDSMOBILE, Model Year: 1993, Model line: Cutlass Supreme, Model: Oldsmobile Cutlass Supreme 1993Pages: 340, PDF Size: 16.21 MB
Page 228 of 340
226
Sewice & Appearance Care
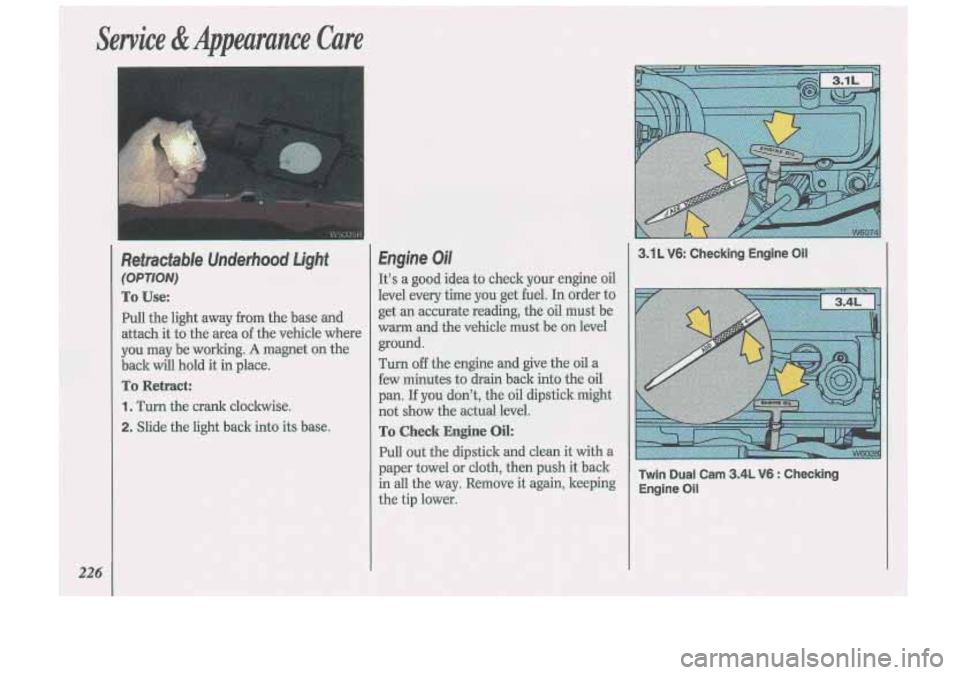
Retractable Underhood Light
(OPTION)
To Use:
Pull the light away from the base and
attach it to the area
of the vehicle where
you
may be working. A magnet on the
back will hold it in place.
To Retract:
1. Turn the crank clockwise.
2. Slide the light back into its base.
Engine Oil
It’s a good idea to check your engine oil
level every time you get fuel. In order to
get
an accurate reading, the oil must be
warm and the vehicle must be
on level
ground.
Turn off the engine and give the oil a
few minutes to drain back into the oil
pan. If you don’t, the oil dipstick might
not show the actual level.
To Check Engine Oil:
Pull out the dipstick and clean it with a
paper towel or cloth, then push it back
in all the way. Remove it again, keeping
the tip lower.
3.1 L V6: Checking Engine Oil
Twin
Dual Cam 3.4L V6 : Checking
Engine
Oil
Page 232 of 340
Service & Appearance Care
Air Cleaner
Refer to the Maintenance Schedule to
determine when to replace the air filter
and the
PCV filter.
See the
Index under Scheduled
Maintenance Services.
Operating the engine with
the air cleaner off can cause
you or others to be burned. The air
cleaner not only cleans the air, it
stops flame if the engine backfires.
If it isn’t there, and the engine
backfires, you could be burned.
Don’t drive with it
off, and be
careful working
on the engine with
the air cleaner off.
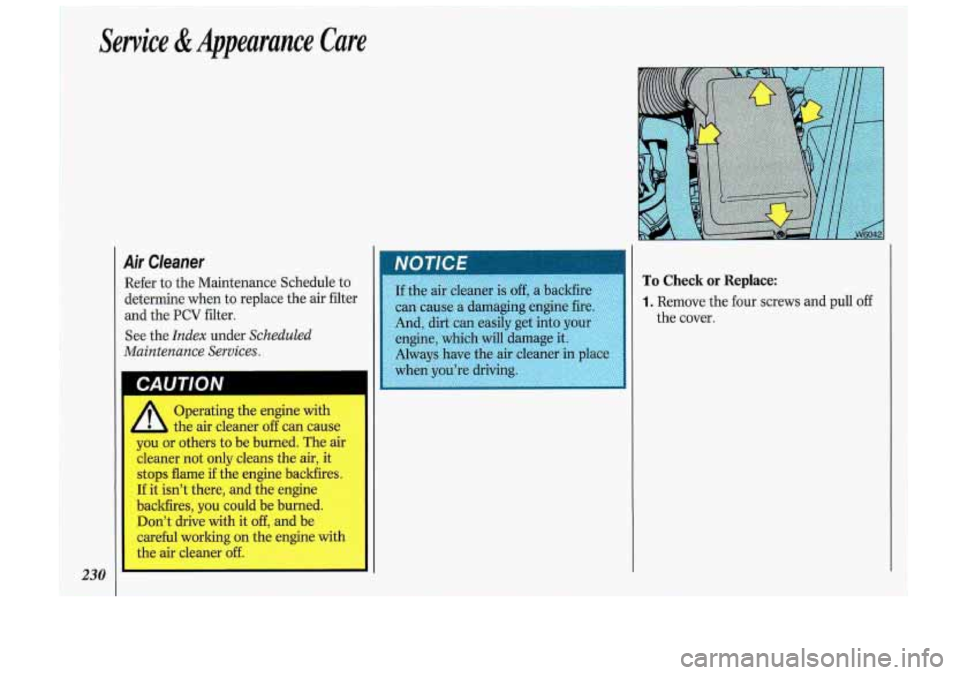
To Check or Replace:
1. Remove the four screws
the cover. and
pull off
I
Page 234 of 340
Automatic Transaxle Fluid (CONT.)
Wait at least 30 minutes before
checking the transaxle fluid level
if you
have been driving:
When outside temperatures are above
At high speed for quite awhile.
In heavy traffic-especially in hot
While pulling a trailer.
To get the right reading, the fluid
should be at normal operating
temperature, which is
180°F to 200°F
(82°C to 93°C).
Get the vehicle warmed up by driving
about
15 miles (24 lm) when outside
temperatures are above 50°F
(10°C). If
it's colder than 50°F
(lO"C), you may
have to drive longer.
90°F (32°C).
weather.
To Check the Fluid Level:
Park your vehicle on a level place.
Place the shift lever in P (Park) with
With your foot on the brake pedal,
the
parking brake applied.
move the shift lever through each gear
range, pausing for about three
seconds in each range. Then, position
the shift lever in
P (Park).
Let the engine run at idle for three to
five minutes.
Then, Without Shutting off the
Engine, Follow These Steps:
1. Pull out the dipstick and wipe it with
a clean rag or paper towel.
2. Push it back in all the way, wait three
seconds and then pull it back out
must be in the crosshatched area.
4. If the fluid level is where it should be,
push the dipstick back in all the way.
-
Page 237 of 340
Adding Coolant
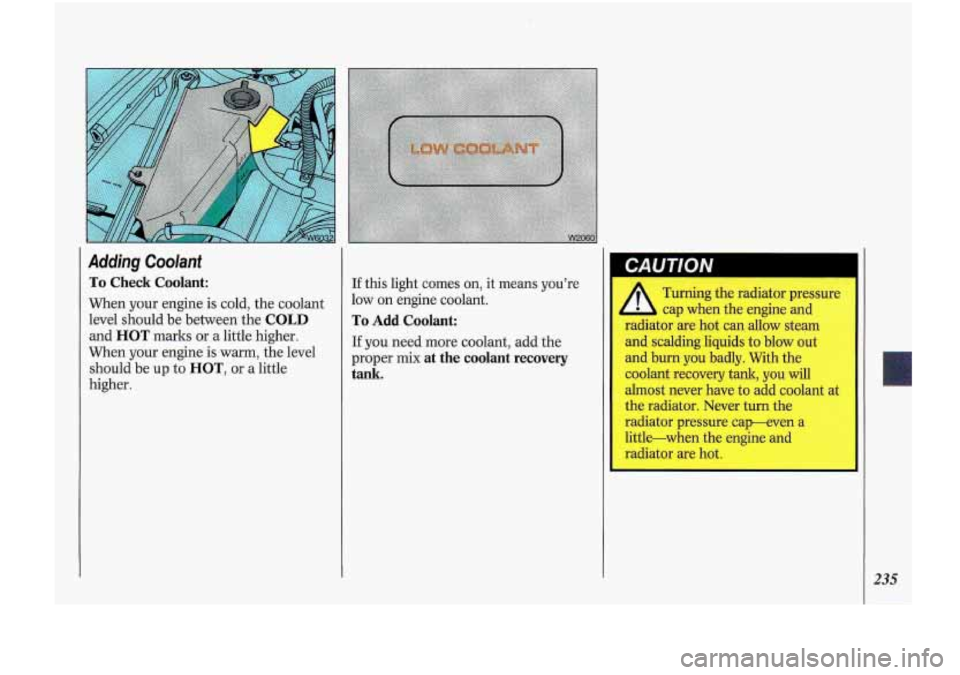
To Check Coolant:
When your engine is cold, the coolant
level should be between
the COLD
and HOT marks or a little higher.
When your
engine is warm, the level
should be u.p to HOT, or a little
higher.
If this light comes on, it means you’re
low
on engine coolant.
To Add Coolant:
If you need more coolant, add the
proper
mix at the coolant recovery
tank.
Turning the radiator pressure I
cap when the engine and
radiator are hot can allow steam
and scalding liquids to blow out
and burn you badly. With the
coolant recovery tank, you will
almost never have to add coolant at
the radiator. Never turn the
radiator pressure cap-even a
little-when the engine and
radia
I are hot.
I I
n
Page 239 of 340
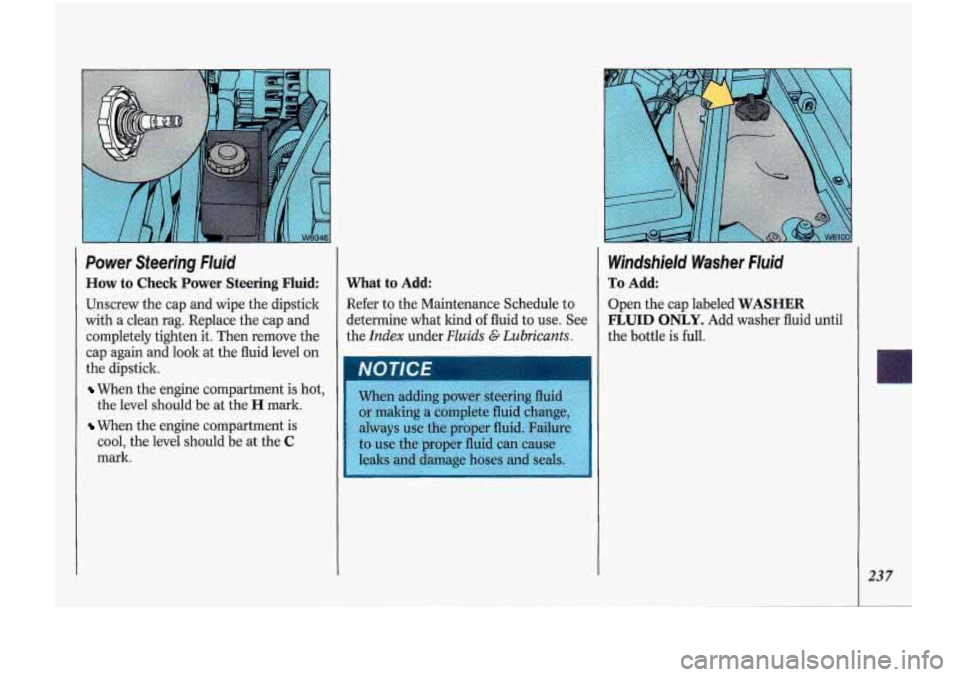
Power Steering Fluid
How to Check Power Steering Fluid:
Unscrew the cap and wipe the dipstick
with a clean rag. Replace the cap and
completely tighten it. Then remove the
cap again and look at the fluid level on
the dipstick.
When the engine compartment is hot,
the
level should be at the H mark.
When the engine compartment is
cool, the level should be at the
C
mark.
What to Add
Refer to the Maintenance Schedule to
determine what kind
of fluid to use. See
the
Lndex under Fluids G Lubricants.
Windshield Washer Fluid
To Add
Open the cap labeled WASHER
FLUID
ONLY. Add washer fluid until
the bottle
is full.
237
Page 272 of 340
Service & Appearance Care
270
Fuses & Circuit Breakers
The wiring circuits in your vehicle are
protected from short circuits by
a
combination of fuses, circuit breakers,
and fusible thermal links in the wiring
itself. This greatly reduces the chance of
fires caused by electrical problems.
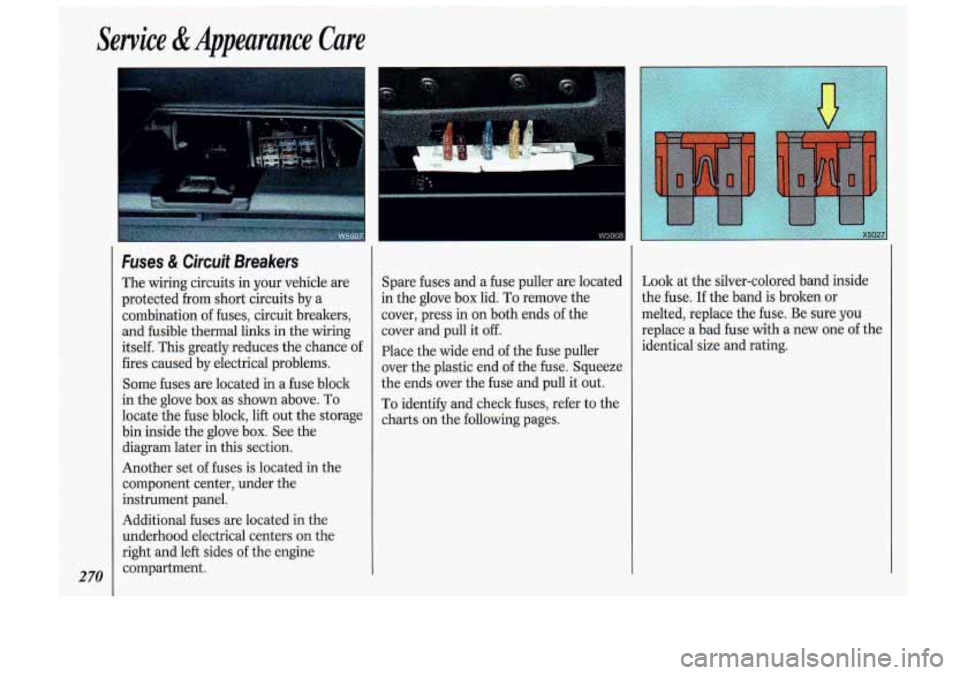
Some fuses are located in a fuse block
in the glove box as shown above.
To
locate the fuse block, lift out the storage
bin inside the glove box. See the
diagram later in this section.
Another set of fuses is located in the
component center, under the
instrument panel.
Additional fuses are located in the
underhood electrical centers on the
right and left sides of the engine
compartment. Spare fuses
and a fuse puller are located
in the glove box lid. To remove the
cover, press in on both ends
of the
cover and pull it
off.
Place the wide end of the fuse puller
over the plastic end of the fuse. Squeeze
the ends over the fuse and pull it out.
To identify and check fuses, refer to the
charts on the following pages. Look
at the silver-colored band inside
the fuse. If the band is broken or
melted, replace the fuse. Be sure you
replace a bad fuse with a new one of the
identical size and rating.
Page 298 of 340
Maintenance Schedule
Section A: Scheduled Maintenance Services (Cant.)
Explanation of Scheduled Maintenance Services
Below are explanations of the services listed in Schedule I
and Schedule 11.
The proper fluids and lubricants to use are listed in Section
D. Make sure whoever services your vehicle uses these. All
parts should be replaced and all necessary repairs done
before you or anyone else drives the vehicle.
ITEM
NO. SERVICE
1 Engine Oil and Filter Change”-Always use SG
296
2
Energy Conserving I1 oils for proper viscosity. The
“SG” designation may be shown alone or in
combination with others, such as “SG/CC,”
“SG/CD” or “SF, SG, CC,” etc.
To determine the
preferred viscosity for your vehicle’s engine (e.g.,
SAE 5W-30 or SAE 1OW-30) see the Index under
Engine Oil.
Chassis Lubrication-Lubricate the transaxle shift
linkage, parking brake cable guides, underbody
contact points and linkage. Lubricate the front and
rear suspension and steering linkage.
ITEM
NO. SERVICE
3 Throttle Body Mounting Bolt Torque (3.1L
Code T or M engines only)*-Check the torque of
the mounting bolts and/or nuts.
4 Tire and Wheel Rotation and Inspection-For
proper wear and maximum tire life, rotate your
tires following the instructions in this manual. See
the
Index under Tires, Inspection G Rotation.
Check the tires for uneven wear or damage. If you
see irregular or premature wear, check the wheel
alignment. Check for damaged wheels also.
NOTE: To determine your engine’s displacement and code, see the Index under Engine Identification
* An Emission Control Service.
0 The U.S. Environmental Protection Agency has determined that the failure to perform this maintenance item will not nullify the emission warranty QY
limit recall liability prior to the completion of vehicle useful life. General Motors, however, urges that all re\
commended maintenance services be
performed
at the indicated intervals and the maintenance be recorded in Section E: Maintenance Record.
Page 299 of 340
ITEM
NO. SERVICE
5
6
7
Engine Accessory Drive Belt (s) Inspection
(California
3.1L Code T engine”)-Inspect the
belt for cracks, fraying, wear and proper tension.
Replace as needed.
Camshaft Timing Belt Inspection
(3.4L Code X
engine only)*-Inspect for cracks, wear or oiliness.
Check tensioner for proper operation. See the
service manual. (To purchase a service manual,
see the
Index under Publications.) Replace parts
as needed.
Cooling System Service*-Drain, flush, and refill
the system with new or approved recycled coolant
conforming to
GM Specification 1825M. Keep
coolant at the proper mixture as specified. See the
Index under Coolant. This provides proper freeze
protection, corrosion inhibitor level, and engine
operating temperature.
Inspect hoses and replace if they are cracked,
swollen or deteriorated. Tighten screw-type hose
clamps. Clean the outside of the radiator and air
conditioning condenser. Wash the pressure cap
and neck.
To help ensure proper operation, we recommend a
pressure test of both the cooling system and the
pressure cap.
ITEM
NO. SERVICE
8 Transaxle Service-Change both the fluid and
filter every 15,000 miles (25 000 ltm) if the vehicle
is mainly driven under one or more of these
conditions:
In heavy city traffic where the outside
temperature regularly reaches
90°F (32°C) or
higher.
In hilly or mountainous terrain.
When doing frequent trailer towing. (With some
models, you shouldn’t ever tow a trailer. See the
Index under Towing a Trailer.)
Uses such as found in taxi, police car, or delivery
service.
If you do not use your vehicle under any
of these
conditions, change both the fluid and filter every
100,000 miles (160 000 lun) .
Spark Plug Replacement*-Replace spark plugs
with the proper type. See the
Index under
Replacement Parts.
burns, cracks or other damage. Check the boot fit
at the coils and at the spark plugs. Replace wires
as needed.
10 Spark Plug Wire Inspection**-Inspect for
9
297
Page 301 of 340
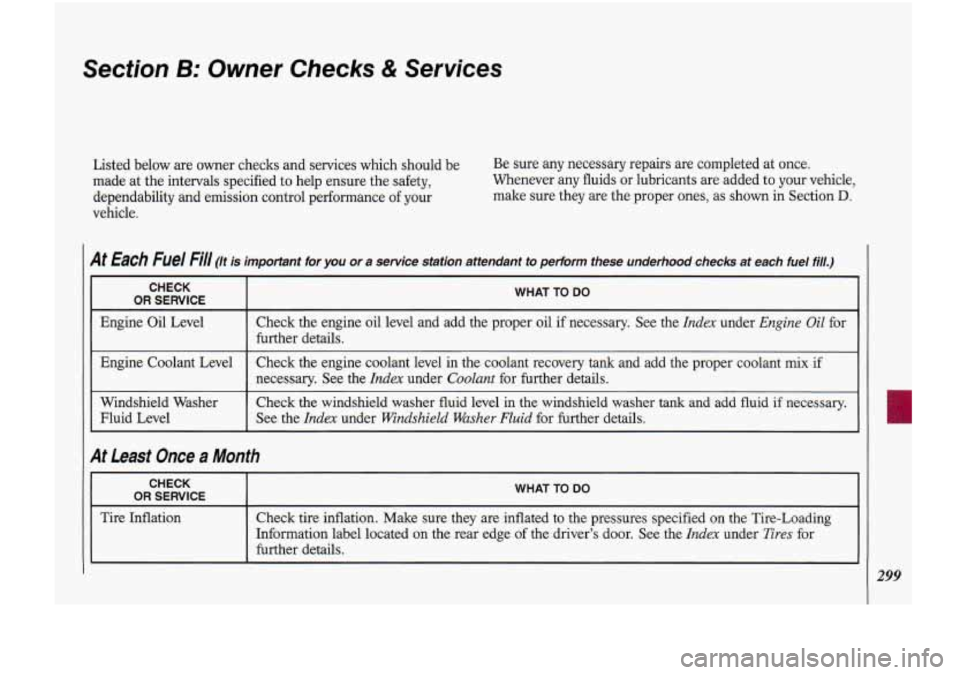
Section B: Owner Checks & Services
Listed below are owner checks and services which should be Be sure any necessary repairs are completed at once.
made at the intervals specified to help ensure the safety, Whenever any fluids or lubricants are added to your vehicle,
dependability and emission control performance of your make sure they are the proper ones, as
shown in Section D.
vehicle.
At Each Fuel Fill (/t is important for you or a service station attendant to perform these underhood check\
s at each fuel fill.)
CHECK
OR SERVICE I WHAT TO DO
Engine Oil Level Check the engine oil level and add the proper oil if necessary. See the Index under Engine Oil for
further details.
Engine Coolant Level
See the
Index under Windshield Washer Fluid for further details.
Fluid Level Check the
windshield washer fluid level in the windshield washer
tank and add fluid if necessary. Windshield Washer
Check the engine coolant
level in the coolant recovery tank and add the proper coolant mix if
~~ ~ ~~
necessary. See the Index under Coolant for further details.
At Least Once a Month
CHECK
I OR SERVICE I WHAT TO DO
Tire Inflation
Check tire inflation. Make sure they are inflated to the pressures specified on the Tire-Loading
~~ ~
Information label located on the rear edge of the driver’s door. See the Index under Tires for
further details.
r
L
299
Page 302 of 340
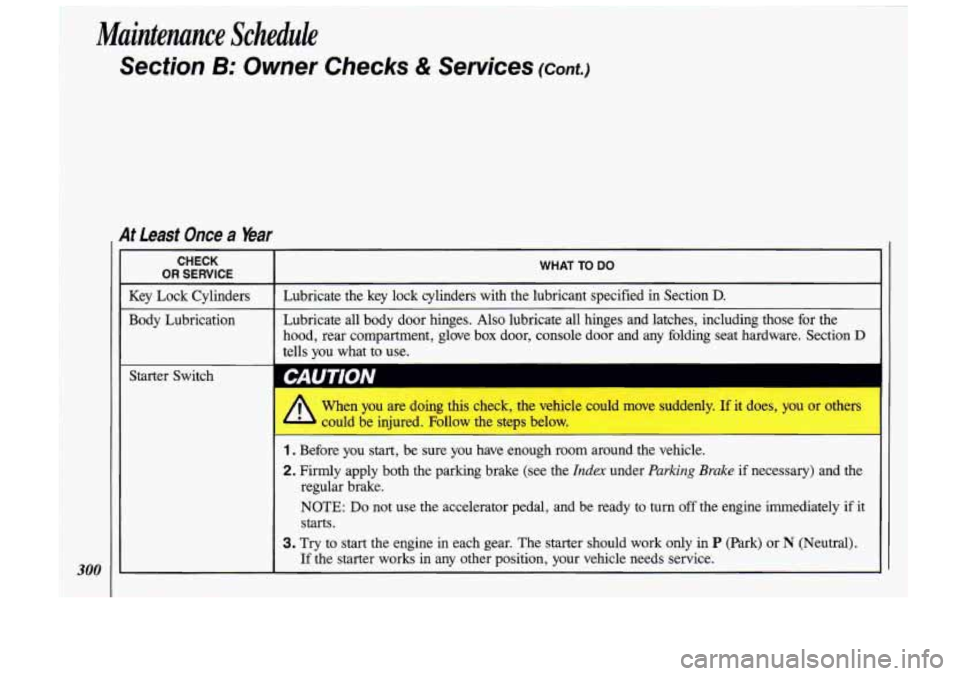
Maintenance Schedule
Section 8: Owner Checks & Services (cant.)
300
At Least Once a Year
CHECK
OR SERVICE WHAT TO DO
~ ~_~__
Key Lock Cylinders Lubricate the key lock cylinders with the lubricant specified in Section D.
Body Lubrication Lubricate all body door hinges. Also lubricate all hinges and latches, including those for the
hood, rear compartment, glove box door, console door and any folding seat hardware. Section
D
tells you what to use.
CAUTION
n
I When you are doing this chock, the vehicle could move suddenly. If it does, you or others
1. Before you start, be sure you have enough room around the vehicle.
2. Firmly apply both the parking brake (see the Index under Parking Brake if necessary) and the
regular brake.
NOTE:
Do not use the accelerator pedal, and be ready to turn off the engine immediately if it
starts.
3. Try to start the engine in each gear. The starter should work only in P (Park) or N (Neutral).
If the starter works in any other position, your vehicle needs service.