engine OLDSMOBILE INTRIGUE 1998 Repair Manual
[x] Cancel search | Manufacturer: OLDSMOBILE, Model Year: 1998, Model line: INTRIGUE, Model: OLDSMOBILE INTRIGUE 1998Pages: 340, PDF Size: 17.93 MB
Page 215 of 340

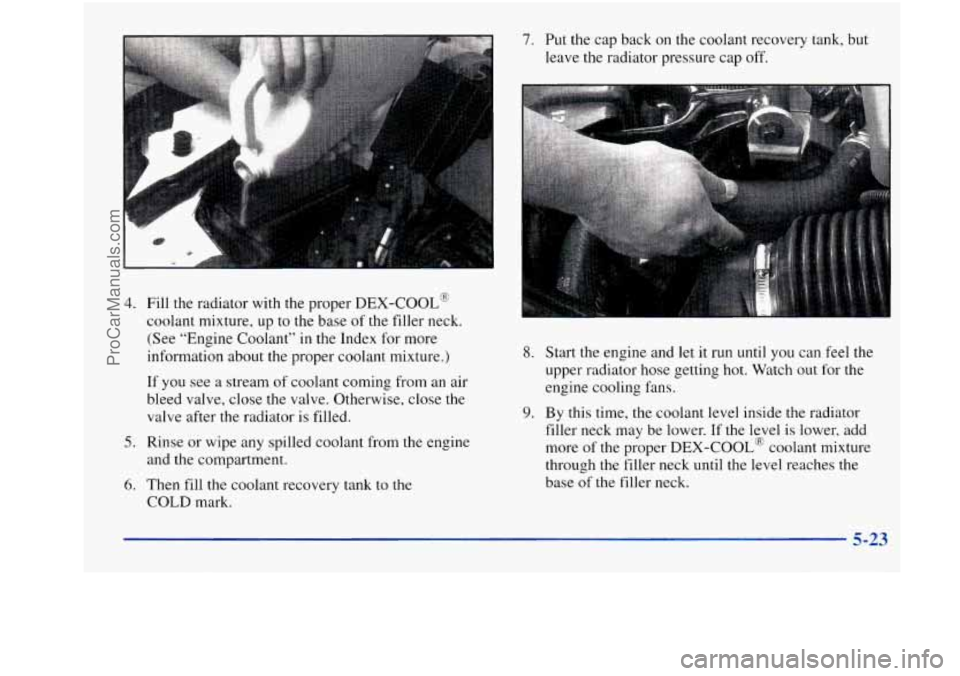
4. Fill the radiator with the proper DEX-COOL@
coolant mixture, up to the base
of the filler neck.
(See “Engine Coolant”
in the Index for more
information about the proper coolant mixture.)
If you see a stream of coolant coming from an air
bleed valve, close the valve. Otherwise, close the
valve after the radiator is filled.
5. Rinse or wipe any spilled coolant from the engine
and the compartment.
6. Then fill the coolant recovery tank to the
COLD mark.
7. Put the cap back on the coolant recovery tank, but
leave the radiator pressure cap off.
8. Start the engine and let it run until you can feel the
upper radiator hose getting hot. Watch out for the
engine cooling fans.
9. By this time, the coolant level inside the radiator
filler neck may be lower. If
the level is lower, add
more of the proper
DEX-COOL@ coolant mixture
through the filler neck until the level reaches the
base of the filler neck.
5-23
ProCarManuals.com
Page 216 of 340

If a Tire Goes Flat
I --
10. Then replace the pressure cap. At any time during
this procedure if coolant begins to flow out
of the
filler neck, reinstall the pressure cap. Be sure the
arrows on the pressure cap line up like this.
1 1. Check the coolant in the recovery tank. The level
in the coolant recovery tank should be at the
HOT
mark when the engine is hot or at the COLD mark
when the engine
is cold. It’s
unusual for a tire to “blow out” while you’re driving,
especially if
you maintain your tires properly. If air goes
out of a tire, it’s much more likely to leak out slowly.
But if
you should ever have a “blowout,” here are a few
tips about what to expect and what to do:
If a front tire fails, the flat tire will create
a drag that
pulls the vehicle toward that side. Take your foot
off
the accelerator pedal and grip the steering wheel firmly.
Steer to maintain lane position, and then gently brake
to a stop well out of the traffic lane.
A rear blowout, particularly on a curve, acts much like
a skid and may require the same correction you’d use
in a skid. In any rear blowout, remove your foot from
the accelerator pedal. Get the vehicle under control by
steering the way you want the vehicle to go. It may be
very bumpy and noisy, but you can still steer. Gently
brake to a stop
-- well off the road if possible.
If a tire goes flat, the next part shows how to use your
jacking equipment to change a flat tire safely.
5-24
ProCarManuals.com
Page 217 of 340

Changing a Flat Tire
If a tire goes flat, avoid further tire and wheel damage
by driving slowly
to a level place. Turn on your hazard
warning flashers.
Changing a tire can cause an injury. The vehicle
can slip off the jack and roll over you or other
people. You and they could be badly injured.
Find a level place to change your tire.
To help
prevent the vehicle from moving:
1. Set the parking brake firmly.
2. Put the shift lever in PARK (P).
3. Turn off the engine.
To be even more certain the vehicle won’t move,
you can put blocks at the front and rear of the
tire farthest away from the one being changed.
That would be the tire on the other side of the
vehicle, at the opposite end.
i
The following steps will tell you how to use the jack and
change a
tire.
5-25
ProCarManuals.com
Page 228 of 340

If You’re Stuck: In Sand, Mud,
Ice or Snow
What you don’t want to do when your vehicle is stuck is
to spin your wheels too fast. The method known as
“rocking” can help you get out when you’re stuck, but
you must use caution.
TT7:
If you let your tires spin at high speed, they can
explode, and you
or others could be injured. And,
the transaxle or other parts of the vehicle can
overheat. That could cause an engine
compartment fire or other damage. When you’re
stuck, spin the wheels
as little as possible. Don’t
spin the wheels above
35 mph (55 kmh) as shown
on the speedometer.
I NOTICE:
Spinning your wheels can destroy parts of your
vehicle as well as the tires.
If you spin the wheels
too fast while shifting your transaxle back and
forth, you can destroy your transaxle.
For information about using tire chains on your vehicle,
see “Tire Chains” in the Index.
Rocking Your Vehicle To Get It Out
First, turn your steering wheel left and right. That will
clear the area around your front wheels. If your vehicle
has the Enhanced Traction System, you should turn
the system off. (See “Enhanced Traction System”
in the Index.) Then shift back and forth between
REVERSE
(R) and a forward gear, spinning the wheels
as little as possible. Release the accelerator pedal while
you shift, and press lightly on the accelerator pedal
when
the transaxle is in gear. If that doesn’t get you out
after a few tries, you may need to be towed out.
If you
do need
to be towed out, see “Towing Your Vehicle” in
the Index.
5-36
ProCarManuals.com
Page 229 of 340

Section 6 Service and Appearance Care
Here you will find information about the care of your vehicle. This section begins with service and fuel information,
and then it shows how
to check important fluid and lubricant levels. There is also technical information about your
vehicle, and a part devoted to its appearance care.
6-2 Service
6-3 Fuel
6-5 Fuels in Foreign Countries
6-5 Filling Your Tank
6-
8 Filling a Portable Fuel Container
6-
8 Checking Things Under the Hood
6-1 1 Engine Oil
6-
16 Air Cleaner
6-18 Automatic Transaxle Fluid
6-2
1 Engine Coolant
6-25 Power Steering Fluid
6-26 Windshield Washer Fluid
6- 27 Brakes
6-30 Battery
6-38 Windshield Wiper Blade Replacement
6-3
1 Bulb Replacement
6-39 Tires 6-47
6-47
6-49
6-50
6-50
6-52
6-52
6-53
6-53
6-53
6-54
6-55
6-55
6-56
6-62
6-63
6-64 Appearance
Care
Cleaning the Inside of Your Vehicle
Care of Safety Belts
Cleaning Glass Surfaces
Cleaning the Outside of Your Vehicle
Cleaning Aluminum Wheels
Sheet Metal Damage
Finish Damage
Underbody Maintenance Chemical Paint Spotting
Appearance Care Materials Chart
Vehicle Identification Number (VIN)
Service Parts Identification Label
Electrical System
Replacement Bulbs Capacities and Specifications
Normal Maintenance Replacement
Parts
6-1
ProCarManuals.com
Page 231 of 340

You can be injured and your vehicle could be
damaged
if you try to do service work on a
vehicle without knowing enough about it.
Be sure you have sufficient knowledge,
experience, the proper replacement parts
and tools before you attempt any vehicle
maintenance task.
Be sure to use the proper nuts, bolts and
other fasteners. “English” and “metric”
fasteners can be easily confused.
If you use
the wrong fasteners, parts can later break
or fall
off. You could be hurt.
Adding Equipment to the Outside of
Your Vehicle
Things YOU might add to the outside of your vehicle can
affect
the airflow around it. This may cause wind noise
and affect windshield washer performance. Check with
your retailer before adding equipment to the outside of
your vehicle.
Fuel
Use regular unleaded gasoline rated at 87 octane or
higher. At a minimum, it should meet specifications
ASTM
D4814 in the United States and CGSB 3.5-M93
in Canada. Improved gasoline specifications have been
developed by the American Automobile Manufacturers
Association (MA) for better vehicle performance
and engine protection. Gasolines meeting the AAMA
specification could provide improved driveability and
emission control system protection compared to
other gasolines.
Be sure the posted octane is at least
87. If the octane is
less than
87, you may get a heavy knocking noise when
you drive.
If it’s bad enough, it can damage your engine.
If you’re using fuel rated at
87 octane or higher and you
hear heavy knocking, your engine needs service. But
don’t worry if you hear a little pinging noise when
you’re accelerating
or driving up a hill. That’s normal,
and you don’t have to buy a higher octane fuel to get rid
of pinging. It’s the heavy, constant knock that means
you have a problem.
6-3
ProCarManuals.com
Page 232 of 340

If your vehicle is certified to meet California Emission
Standards (indicated on the underhood emission control
label),
it is designed to operate on fuels that meet
California specifications. If such fuels are not available
in states adopting California emissions standards, your
vehicle will operate satisfactorily on fuels meeting
federal specifications, but emission control system
performance may be affected.
The malfunction indicator
lamp on your instrument panel may turn on and/or your
vehicle may fail a smog-check test. If this occurs, return
to your authorized Oldsmobile retailer for diagnosis to
determine the cause of failure. In the event it
is
determined that the cause of the condition is the type of
fuels used, repairs may not be covered by your warranty.
Some gasolines that are not reformulated for low
emissions contain an octane-enhancing additive called
methylcyclopentadienyl manganese tricarbonyl (MMT);
ask your service station operator whether or not his fuel
contains MMT. General Motors does not recommend the
use of such gasolines. If fuels containing MMT are used,
spark plug life may be reduced and your emission
control system performance may be affected. The
malfunction indicator lamp on your instrument panel
may turn on. If this occurs, return to your authorized
Oldsmobile retailer for service.
To provide cleaner air, all gasolines in the United States
are now required to contain additives that will help
prevent deposits from forming in your engine and fuel
system, allowing your emission control system to
function properly. Therefore, you should not have to add
anything to the fuel. In addition, gasolines containing
oxygenates, such as ethers and ethanol, and
reformulated gasolines may be available in your area to help clean the air. General Motors recommends that you
use these gasolines if they comply with the
specifications described earlier.
NOTICE:
Your vehicle was not designed for fuel that
contains methanol. Don’t use it. It can corrode
metal parts in your fuel system and
also damage
plastic and rubber parts. That damage wouldn’t
be covered under your warranty.
6-4
ProCarManuals.com
Page 236 of 340

~ Filling a Portable
Fuel Container
I
I
1 1 Never fill a portable fuel container while it is in
your vehicle. Static electricity discharge from the
container can ignite the gasoline vapor. You can
I be badly burned and your vehicle damaged if this
i occurs. To help avoid injury to you and others:
Dispense gasoline only into approved
containers.
0 Do not fill a container while it is inside a
vehicle, in a vehicle’s trunk, pickup bed or
on any surface other than the ground.
inside of the fill opening before operating
the nozzle. Contact should be maintained
until the filling
is complete.
I Bring the fill nozzle in contact with the
~ I 0 Don’t smoke while pumping gasoline.
Checking Things Under the Hood
An electric fan under the hood can start up and
injure you even when the engine
is not running.
Keep hands, clothing and tools
away from any
underhood electric fan.
Things that burn can get on hot engine parts and
start a fire. These include liquids like gasoline,
oil, coolant, brake fluid, windshield washer and
other fluids, and plastic or rubber. You or others
could be burned. Be careful not to drop or spill
things that
will burn onto a hot engine.
6-8
ProCarManuals.com
Page 238 of 340

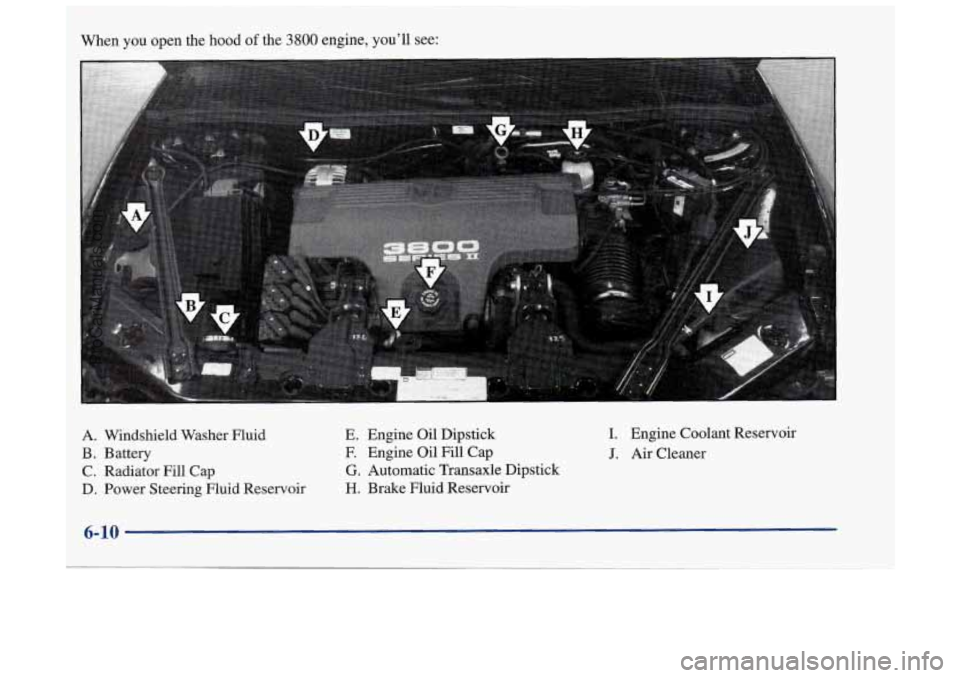
I. Engine Coolant Reservoir
J. Air Cleaner
Windshield
Washer Fluid
Battery
Radiator Fill Cap
Power Steering Fluid Reservoir E.
Engine Oil Dipstick F. Engine Oil Fill Cap
G. Automatic Transaxle Dipstick
H. Brake Fluid Reservoir
A.
B.
C.
D.
6-10
ProCarManuals.com
Page 239 of 340

Before closing the hood, be sure that all the filler caps
are on properly. Then pull the hood down and close
it firmly.
Engine Oil
LOW
OIL
If the LOW OIL light on
the instrument panel comes
on,
it means you need to
check your engine
oil level
right away.
For more information, see “LOW OIL Light” in the
Index.
You should check your engine oil level regularly;
this
is an added reminder.
It’s
a good idea to check your engine oil every time you
get fuel. In order to get an accurate reading, the oil must
be warm and the vehicle must be on level ground. The engine oil
dipstick
is the yellow loop near the front
of the engine.
Turn off the engine and give the oil a few minutes to
drain back into the oil pan. If you don’t, the oil dipstick
might not show the actual level.
6-11
ProCarManuals.com