clock OLDSMOBILE SILHOUETTE 1994 User Guide
[x] Cancel search | Manufacturer: OLDSMOBILE, Model Year: 1994, Model line: SILHOUETTE, Model: OLDSMOBILE SILHOUETTE 1994Pages: 276, PDF Size: 15.82 MB
Page 124 of 276
Comfort Controls &Audio Systems
122
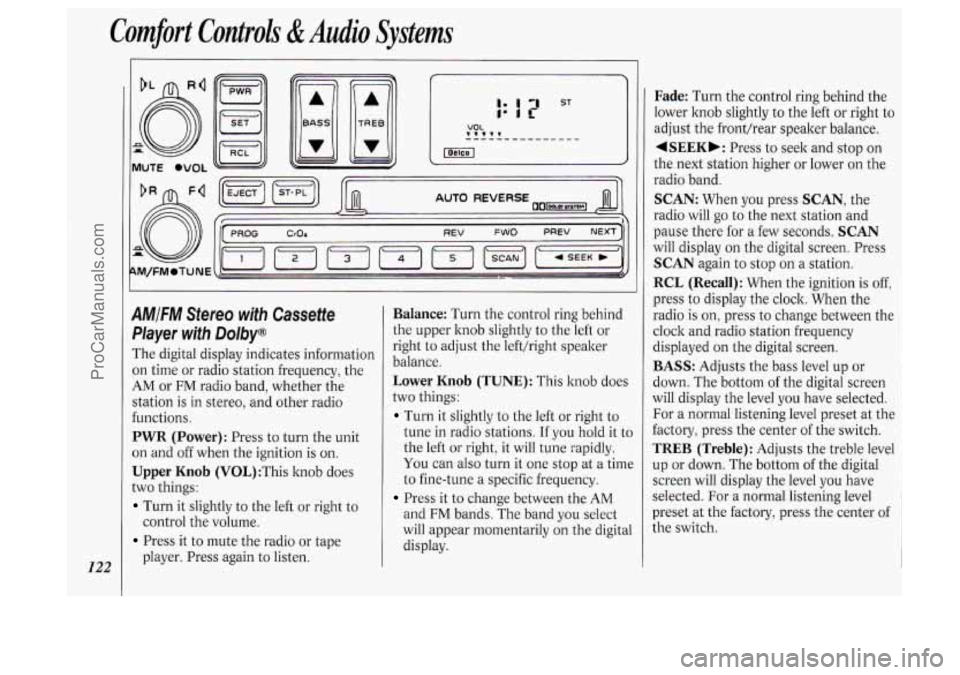
AMIFM Stereo with Cassette
Pkyer with Dolby@
The digital display indicates information
on time or radio station frequency, the
AM or FM radio band, whether the
station
is in stereo, and other radio
functions.
PWR (Power): Press to turn the unit
on and off when the ignition
is on.
Upper Knob (V0L):This knob does
two things:
Turn it slightly to the left or right to
Press it to mute the radio or tape
control the
volume.
player. Press again to listen.
Balance: Turn the control ring behind
the upper knob slightly to the left or
right to adjust the lefthight speaker
balance.
Lower Knob (TUNE): This knob does
two things:
Turn it slightly to the left or right to
tune in radio stations. If you hold it to
the left or right, it will tune rapidly.
You can also turn it one stop at a time
to fine-tune a specific frequency.
Press it to change between the AM
and FM bands. The band you select
will appear momentarily on the digital
display.
Fade: Turn the control ring behind the
lower knob slightly to the left or right to
adjust the fronthear speaker balance.
4SEEKb: Press to seek and stop on
the next station higher or lower on the
radio band.
SCAN: When you press SCAN, the
radio will
go to the next station and
pause there for a few seconds.
SCAN
will display on the digital screen. Press
SCAN again to stop on a station.
RCL (Recall): When the ignition is off,
press to display the clock. When the
radio
is on, press to change between the
clock and radio station frequency
displayed on the digital screen.
BASS: Adjusts the bass level up or
down. The bottom
of the digital screen
will display the level you have selected.
For a normal listening level preset at the
factory, press the center of the switch.
TREB (Treble): Adjusts the treble level
up or down. The bottom of the digital
screen will display the level you have
selected. For a normal listening level
preset at the factory, press the center of
the switch.
ProCarManuals.com
Page 127 of 276

SEEK: Press SEEK to tune in and stop
on the next station on the
AM or FM
radio band.
SCAN: When you press SCAN, the
radio will go to the next station and
pause there for a few seconds.
SCAN
will display on the digital screen. Press
SCAN again to stop on a station.
RCL (Recall) : When the ignition is off,
press to display the clock. When the
radio is on, press to change between the
clock and the radio station frequency
displayed on the digital screen.
The five pushbuttons in the lower right
corner can be used to preset up to ten
radio stations (five AM and five FM
stations). These buttons have other
uses when you are playing a compact
disc (see
Compact Disc Controls later
in this section).
To Preset Radio Stations:
1. Tune the digital display to the station
you want.
2. Press SET. The SET indicator will
appear on the digital screen for five
seconds.
3. While the SET indicator is displayed,
press one of the five pushbuttons.
4. Repeat steps 1-3 for each of five AM
and five FM stations.
Compact Disc Controls
Many of the controls for the radio also
have functions for the compact disc
player, as explained here.
To Play a Compact Disc:
Don’t use mini-discs that are called
singles. They won’t eject. Use only full-
size compact discs.
1. Press POWER to turn the radio on.
2. Insert a disc part-way into the slot,
with the label side up. The player will
pull it in. In a few seconds, the disc
should play.
If the disc comes back out:
The disc may be upside down.
The disc may be dirty, scratched or
wet.
There may be too much moisture in
the air (wait about one hour and
try
again).
The player may be too hot, or the road
may be too rough for the disc to play.
If the word
HOT appears on the
display, the player is too hot. Press
RCL to remove HOT from the
display. As soon as things get back to
normal, the disc should play.
While a disc is playing, the
CD
indicator is displayed on the digital
screen, as is the clock.
RCL (Recall): Press once to see which
track is playing. Press again within five
seconds to see how long your selection
has been playing. The track number
also will be displayed when the volume
is changed or a new track starts to play.
PREV (Previous): Press to play a track
again. If you hold or keep pressing the
PREV button, the disc will keep
backing up to previous tracks.
NEXT: Press when you want to hear
the next track before the track you are
listening to has finished. If you hold or
keep pressing the
NEXT button, the
disc will keep advancing to other tracks.
REV (Reverse): Press and hold to
rapidly back up to a favorite passage.
Release to resume playing.
FF (Fast Forward): Press and hold to
rapidly advance the disc. Release to
resume playing.
r
125
ProCarManuals.com
Page 141 of 276
What should you do if this ever
happens? Ease up on the accelerator
pedal, steer the vehicle the way you
want it to go, and slow down.
Speed limit signs near curves warn that
you should adjust your speed. Of
course, the posted speeds are based on
good weather and road conditions.
Under less favorable conditions you’ll
want to go slower.
If you need to reduce your speed as you
approach a curve, do it before you enter
the curve, while your front wheels are
straight ahead.
Try to adjust your speed
so you can
“drive” through the curve. Maintain a
reasonable, steady speed. Wait to
accelerate until you are out of the curve,
and then accelerate gently into the
straightaway.
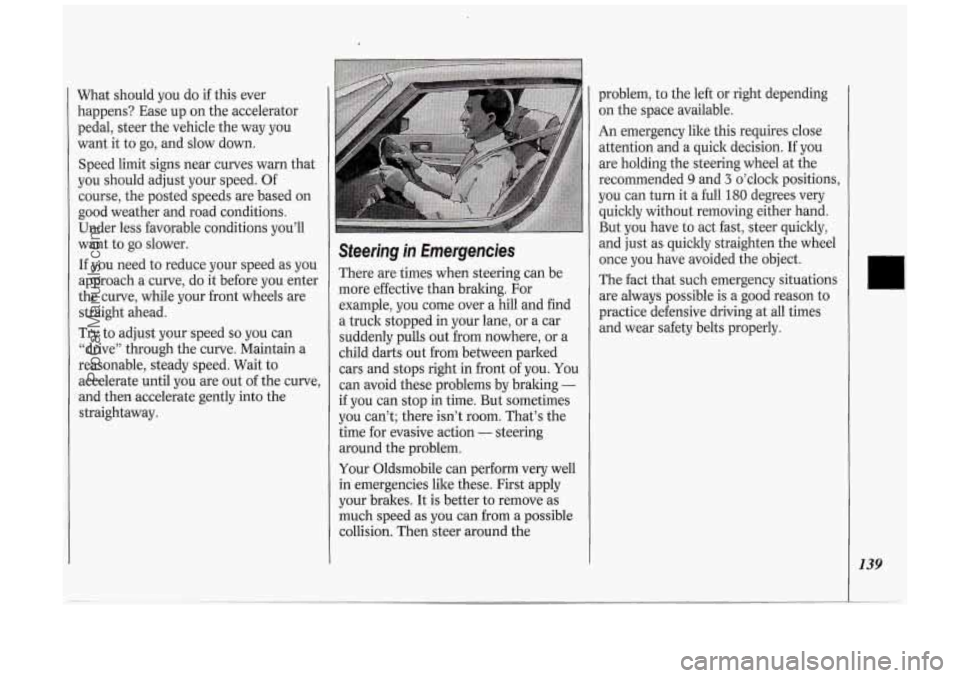
Steering in Emergencies
There are times when steering can be
more effective than braking. For
example, you come over a hill and find
a truck stopped in your lane, or a car
suddenly pulls out from nowhere, or a
child darts out from between parked
cars and stops
right in front of you. You
can avoid these problems by braking
-
if you can stop in time. But sometimes
you can’t; there isn’t room. That’s the
time for evasive action
- steering
around the problem,
Your Oldsmobile can perform very well
in emergencies like these. First apply
your brakes.
It is better to remove as
much speed
as you can from a possible
collision. Then steer around the problem,
to the left
or right depending
on the space available.
An emergency like this requires close
attention and a quick decision. If you
are holding the steering wheel at the
recommended
9 and 3 o’clock positions,
you can turn it a full
180 degrees very
quickly without removing either hand.
But you have to act fast, steer quickly,
and just as quickly straighten the wheel
once you have avoided the object.
The fact that such emergency situations
are always possible is a good reason to
practice defensive driving at all times
and wear safety belts properly.
139
ProCarManuals.com
Page 176 of 276
Problems on the Road
I 74
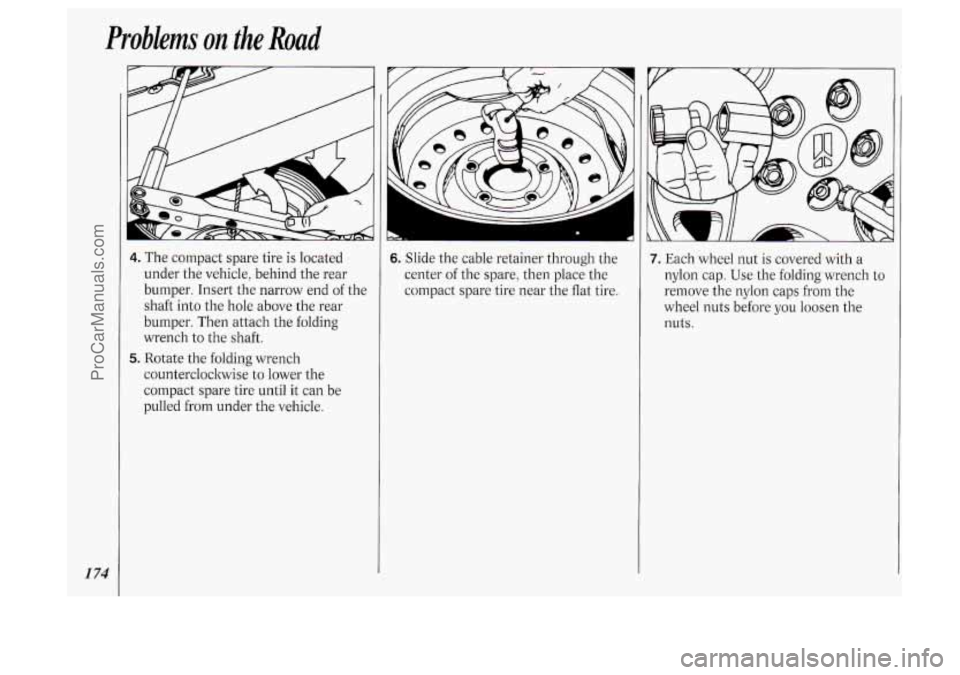
4. The compact spare tire is located
under the vehicle, behind the rear
bumper. Insert the narrow end of the
shaft into the hole above the rear
bumper. Then attach the folding
wrench to the shaft.
counterclockwise to lower the
compact spare tire until
it can be
pulled from under the vehicle.
5. Rotate the folding wrench
I
6. Slide the cable retainer through the
center of the spare, then place the
compact spare tire near the flat tire.
I
7. Each wheel nut is covered with a
nylon cap. Use the folding wrench to
remove the nylon caps from the
wheel nuts before
you loosen the
nuts.
ProCarManuals.com
Page 178 of 276
Problems on the Road
1 76
NOTICE:
Raising your vehicle with the jack
improperly positioned will damage
the vehicle or may allow the vehicle
to fall off the jack. Be sure to fit the
jack lift head into the proper
location before raising your vehicle.
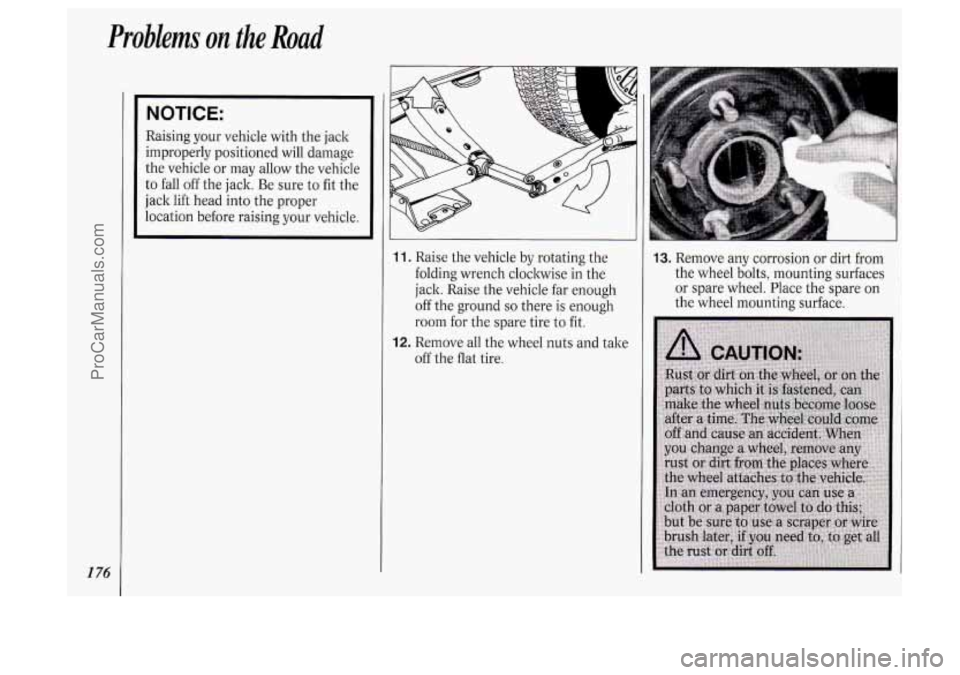
11. Raise the vehicle by rotating the
folding wrench clockwise in the
jack. Raise the vehicle far enough
off the ground
so there is enough
room for the spare tire to fit.
12. Remove all the wheel nuts and take
off the
flat tire.
3. Remove any corrosion or dirt from
the wheel bolts, mounting surfaces
or spare wheel. Place the spare on
the wheel mounting surface.
ProCarManuals.com
Page 179 of 276
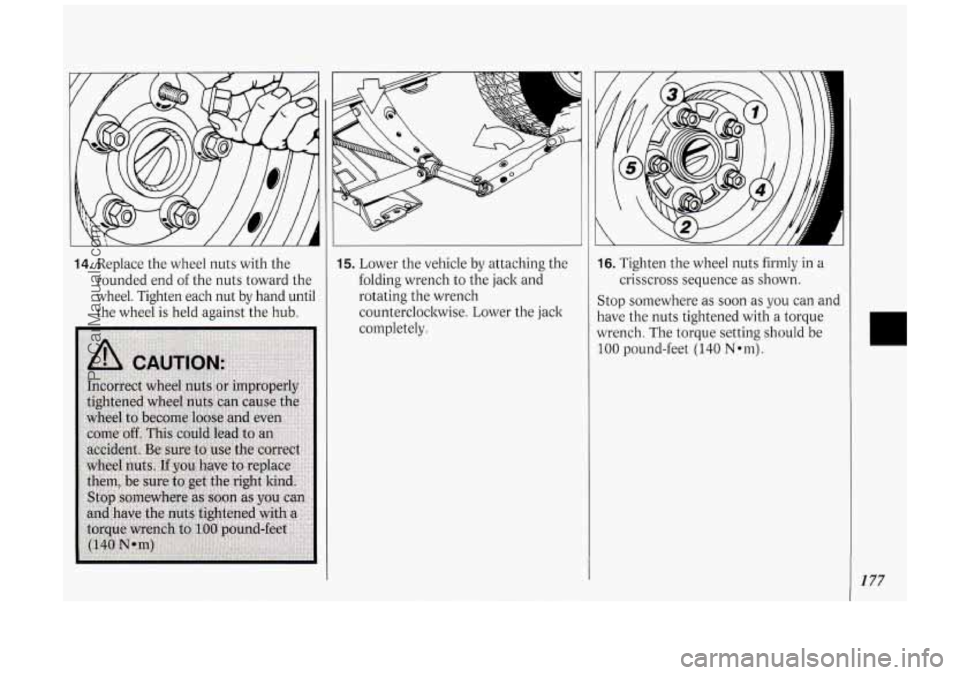
14. Replace the wheel nuts with the
rounded end of the nuts toward the
wheel. Tighten each nut by hand until
the wheel is held against the hub.
I
15. Lower the vehicle by attaching the
folding wrench to the jack and
rotating the wrench
counterclockwise. Lower the jack
completely.
I
16. Tighten the wheel nuts firmly in a
crisscross sequence as shown.
Stop somewhere as soon as you can and
have the nuts tightened with a torque
wrench. The torque setting should be
100 pound-feet (140 Nmm).
177
ProCarManuals.com
Page 206 of 276
Service &Appearance Care
204
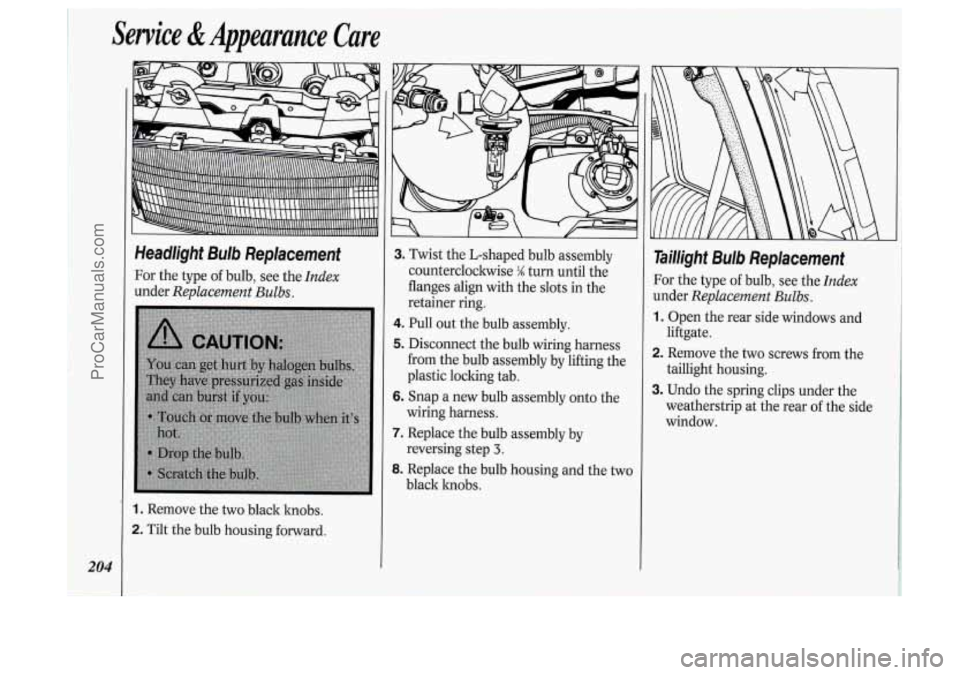
Headlight Bulb Replacement
For the type of bulb, see the Index
under Replacement Bulbs.
1. Remove the two black knobs.
2. Tilt the bulb housing forward.
3. Twist the L-shaped bulb assembly
counterclockwise
M turn until the
flanges align with the slots in the
retainer ring.
4. Pull out the bulb assembly.
5. Disconnect the bulb wiring harness
from the bulb assembly by lifting the
plastic locking tab.
6. Snap a new bulb assembly onto the
7. Replace the bulb assembly by
8. Replace the bulb housing and the two
wiring harness.
reversing step
3.
black knobs.
Taillight Bulb Replacement
For the type of bulb, see the Index
under Replacement Bulbs.
1. Open the rear side windows and
2. Remove the two screws from the
3. Undo the spring clips under the
liftgate.
taillight housing.
weatherstrip at the rear of the side
window.
ProCarManuals.com
Page 207 of 276
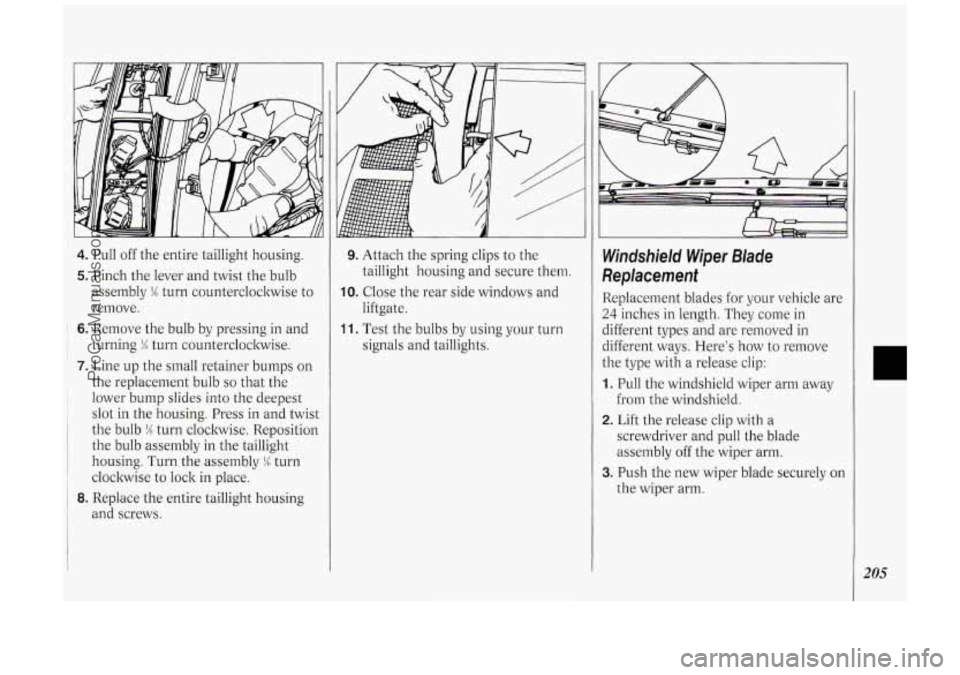
4. Pull off the entire taillight housing.
5. Pinch the lever and twist the bulb
assembly
M turn countercloclwise to
remove.
~ 6. Remove the bulb by pressing in and
1 turning % turn counterclockwise.
7. Line up the small retainer bumps on
the replacement bulb
so that the
1 lower bump slides into the deepest
' slot in the housing. Press in and twist
the bulb
!4 turn clockwise. Reposition
the bulb assembly in the taillight
housing. Turn the assembly
M turn
clockwise to lock in place.
' 8. Replace the entire taillight housing
and screws.
9. Attach the spring clips to the
taillight housing and secure them.
liftgate.
signals and taillights.
IO. Close the rear side windows and
11. Test the bulbs by using your turn
Windshield Wiper Blade
Replacement
Replacement blades for your vehicle are
24 inches in length. They come in
different types and are removed in
different ways. Here's how to remove
the type with a release clip:
1. Pull the windshield wiper arm away
from the windshield.
2. Lift the release clip with a
screwdriver and pull the blade
assembly off the wiper arm.
the wiper arm.
3. Push the new wiper blade securely on
205
ProCarManuals.com
Page 265 of 276

lndex
Accessory Power Outlet ................... 84
Adding Brake Fluid
............................. 201. 227
Electrical Equipment
........ .60. 117 . 2 19
Engine Coolant
.......... 167.197.224. 227
Engine Oil
.............................. 190. 224
Power Steering Fluid
..... 199.225. 227
Sound Equipment
.......................... 11 7
Transaxle Fluid
.............. 195. 224. 227
Windshield Washer Fluid
...... 200. 227
Air Bag Readiness Light
..................... 27
Air Bags
............................................... 26
Air Cleaner
............................... 194. 226
Air Conditioner
................................ 11 1
Air Inflator System ............................. 85
Alcohol. Driving Under the
Influence
of ..................................... 132
Alcohol in Gasoline
.......................... 183
Aluminum Wheels .................... 21 1. 216
Antenna
............................................ 129
Anti-Lock
.......................................... 135
Anti-Lock Brake System
................... 135
Brake Master Cylinder ................... 201
Junction Block Fuse
...................... 222
Warning Light
................................ 104
Appearance Care
.............................. 212
Adjusting
Rear Seats
.......................... 17
Antifreeze
......................... 197. 224. 227
Ashtrays and Lighter
.................... 89. 90 Audio
Systems
.................................. 117
AM/FM Stereo Radio
.................... 1 19
AM/FM Stereo Radio with Compact
Disc Player
..................................... 124
Care
of Audio Systems .................. 128
Setting the Clock
........................... 117
Steering Wheel Touch Controls
.... 127
Adding Fluid
.................. 197. 225. 227
Checking Fluid
............................... 195
Shifting
............................................. 62
Battery
............................................ 203
Jump Starting
................................. 158
Battery Warning Gage ...................... 103
Blizzard
............................................. 149
Brake Cassette
Player
...................... 120. 122
Radio Reception. For the Best
...... 128
Automatic Transaxle
(( Blowout. .. Tire ................................ 172
Adjustment
.................................... 202
Anti-Lock Brakes
.......................... 135
Anti-Lock Brake System Warning
Light
............................................ 104
Fluid
....................................... 201. 227
Parking
............................................. 65
Pedal Travel
................................... 202
Rear
Drums .................................... 202
Junction
Block Fuse
...................... 222
Master Cylinder
............................. 201 Warning Light
................................ 103
Wear Indicators
............................. 202
Brake System Warning Light
........... 103
Braking
............................................. 134
Braking in Emergencies
................... 138
Braking Technique
........................... 134
“Break.1n.
.. New Vehicle ............. 57. 152
Bucket Seats. Removable Rear
.......... 15
Buckling Up (see
Safety Belts)
Bulb Replacement
Headlight
....................................... 203
Taillight
.......................................... 204
Bulbs, Replacement
.......................... 228
Capacities
81 Specifications ............ 224
Carbon Monoxide in
Exhaust
...................... 57, 68. 150. 154
Cassette Tape Player
(see
Audio Systems )
Center Passenger Position
(see
Safety Belts)
Chains. Safety ................................... 154
Chains. Tire
.............................. 179, 212
Changing a Flat Tire
......................... 172
Checking
Brake Fluid
.................................... 201
Engine Coolant
.............................. 197
Engine Oil ...................................... 190
Power Steering Fluid
..................... 199
Safety Belt Systems
......................... 41
.
263
ProCarManuals.com
Page 266 of 276
264
Things Under the Hood ................ 186
Transaxle Fluid
.............................. 195
Chemical Paint Spotting
.................. 217
Child Restraints
.................................. 35
How to Install
.................................. 35
Where to Put
.................................... 36
Children and Safety Belts
............ 34. 39
Child Security Lock
............................ 55
Circuit BrealtedRelay Panel ............ 222
Circuit Breakers
& Fuses ................. 219
City Driving
...................................... 145
Cleaner, Air
.............................. 194, 226
Cleaning Aluminum Wheels
......................... 216
Compact Discs
............................... 129
Fabric
..................................... 213, 214
Finish Care
..................................... 216
Foreign Material
............................ 2 16
Glass
.............................................. 215
Inside of Your Oldsmobile
............ 212
Leather and Vinyl
.......................... 214
Outside
of the Windshield and Wiper
Blades
............................................. 215
Outside
of Your Oldsmobile ......... 215
Safety Belts
.................................... 214
Special Problems
........................... 213
Stains. Removing
........................... 213
Cigarette Lighter
................................ 89
Cassette Tape Player
...................... 128
Top of the Instrument Panel
......... 214 Underbody
Maintenance
............... 217
Vinyl or Leather
............................. 214
Warnings
........................................ 2 12
Weatherstrips
................................. 216
Windshield
..................................... 215
Climate Control System
............ 11 1. 113
Clock. Setting the
............................. 117
Cluster. Instrument Panel .................. 98
Comfort Controls
............................. 11 1
Air Conditioner .............................. 11 1
Heater ............................................ 111
Rear ................................................ 113
Ventilation ..................................... 1 16
(see
Audio Systems )
Compact Disc Player
Compact Overhead Console
.............. 95
Compact Spare Tire
......................... 178
Compass Display
................................ 81
Console, Overhead ............................. 79
Control
of a Vehicle ......................... 134
Convenience Net
................................ 91
Convex Outside Mirror
...................... 87
Coolant ............................................. 197
Checking
& Adding ....................... 198
Proper Mixture to Use
............ 168, 197
Safety Warnings About
.................. 167, 168, 169, 198
Temperature Gage
......................... 103
Cruise Control
.................................... 72
Cup Holder/Ashtray, Front
............... 89 Curves. Driving
on
........................... 138
Customer Assistance Information
... 249
Dead Battery: What to
Do ............. 158
Defensive Driving
............................ 132
Defogger. Rear Window
................... 115
Defogging and Defrosting
................ 115
Delco LOC II@
................................. 126
Dome Lights
....................................... 84
Door Locks
............................. 45. 46. 52
Door. Power Sliding ................... 52. 107
Door. Sliding
...................................... 51
Driver Position
................................... 22
Driving At Night
......................................... 142
City
................................................. 145
Controlling a Skid
......................... 141
Defensively
.................................... 132
Drunlten
......................................... 132
Freeway
.......................................... 145
Hill and Mountain
......................... 147
In a Foreign Country ..................... 184
In Rain
........................................... 143
Long Distance
................................ 146
Loss
of Control .............................. 141
On Curves
...................................... 138
Passing ........................................... 140
Through Deep Standing Water
....... 60
Winter Driving
............................... 148
With a Trailer
................................. 151
ProCarManuals.com