change time OLDSMOBILE SILHOUETTE 1994 Owners Manual
[x] Cancel search | Manufacturer: OLDSMOBILE, Model Year: 1994, Model line: SILHOUETTE, Model: OLDSMOBILE SILHOUETTE 1994Pages: 276, PDF Size: 15.82 MB
Page 4 of 276
Important Notes
About this Manual
Please keep this
manual in your Oldsmobile,
so it will be
there
if you ever need it
when you’re on the
road.
If you sell the
vehicle, please leave
this
manual in it so the new
owner can use
it.
This manual includes the
latest information
at the
time
it was printed. We
reserve the right to
make changes in the product after that time
without further notice. Published
by
Oldsmobile Division
General Motors Corporation
920 Townsend
Street
Lansing, Michigan
48921
The word Olds?mbiZe and
the Oldsmobile rocket
emblem are registered
trademarks
of General
Motors Corporation.
The word
DeLco is a
registered trademark of
General Motors
Corporation.
0 Copyright 1993 General Motors Corporation, Oldsmobile Division. All rights reserved. Printed in USA.
ProCarManuals.com
Page 50 of 276

Features & Controls
48
again, indicating that this mode has
been successfully programmed.
You can reprogram the automatic door
loclts system at any time.
If you do not
program the automatic door loclts
system, all doors will remain locked
when the shift lever is returned to
P
(Park).
If you have more than one remote
transmitter for your vehicle, your
automatic door loclts system will
operate as programmed with any of
them. There
is no need to program each
one individually.
Leaving Your Vehicle
If you are leaving the vehicle, open your
door and set the loclts from inside. Then
get out and close the door.
4 Remote Lock Controi (OPTION)
[f your Oldsmobile has this option, you
:an lock and unlock your doors and
iftgate from up to
30 feet (9 m) away
lsing the key chain transmitter supplied
with your vehicle.
four remote lock control operates on a
-adio frequency subject to Federal
Sornmunications Commission (FCC)
3ules.
rhis device complies with Part
15 of the
’CC Rules. Operation is subject to the
ollowing two conditions:
(1) This
device may not cause harmful
interference, and
(2) This device must
3ccept any interference received,
including interference that may cause
undesired operation. Should interference
to this system
occur, try this:
Check to determine if battery
replacement is necessary. See the
instructions on battery replacement.
Check the distance. You may be too
far from your vehicle. This product
has a maximum range.
Check the location. Other vehicles or
objects may be blocking the signal.
See your Oldsmobile dealer or a
qualified technician for service.
Changes or modifications to this system
by other than an authorized service
facility could void authorization to use
this equipment.
Operation
The driver’s door will unlock and the
interior lights will go on when
a is
pressed (see
Illuminated Entry System
later in this section). If pressed again
within five seconds, all doors and the
liftgate will unlock. All doors and the
liftgate will lock when
fi is pressed.
If the driver’s door is open and your key
is in the ignition in the
Off position,
ProCarManuals.com
Page 52 of 276

Features & Controls
50
Battery Replacement
Under normal use, the batteries in your
key chain transmitter should last about
two years.
You can tell the batteries are weak if the
transmitter won‘t work at the normal
range in any location.
If you have to get
close to your vehicle before the
transmitter works, it’s probably time
to
change the batteries.
To Replace Batteries in the Remote
Lock Control:
1. Insert a coin into the slot in the back
of the transmitter, and turn
counterclockwise to open the cover.
2. Remove the cover.
3. Remove and replace the two 3-volt
batteries
(DL 20 16).
4. Reassemble the transmitter.
5. Check the transmitter operation.
I Illuminated Entry System
(OPTION)
This option comes with the optional
remote lock control system.
When you open the driver’s door, by
itself or in combination with any
passenger door or the liftgate, the
interior lights will come on and then
gradually dim to off
10 seconds after the
kt door is closed.
(If the driver’s door
has not been opened, the interior lights
will immediately dim to off.)
When you press
a on your remote
transmitter, the lights inside your
vehicle will go on, then gradually dim to
off after about
40 seconds, unless a
door or the liftgate is opened.
When you turn on the ignition, the
interior lights will immediately dim to
off. Vehicle
theft is big business, especially
in some cities. Although your
Oldsmobile has a number of theft
deterrent features, we know that
nothing we put
on it can make it
impossible to steal. However, there are
ways you can help.
Key in the Ignition
If you walk away from your vehicle with
the keys inside, it’s an easy target for
joy riders or professional thieves
- so
don’t do it.
When you park your Oldsmobile and
open the driver’s door, you’ll hear a
chime reminding you to remove your
key from the ignition and take it with
you. Always do this. Your steering
wheel will be locked, and
so will your
ignition and transaxle. And remember
to lock the doors.
ProCarManuals.com
Page 61 of 276
NOTICE:
Don‘t try to shift to P (Park) if your
Oldsmobile is moving. If you do,
you could damage the transaxle.
Shift to
P (Park) only when your
vehicle is stopped.
To start your 3100 V6 engine
(Code D) :
1. Without pushing the accelerator
pedal, turn your ignition key to
Start.
When the engine starts, let go of the
ltey. The idle speed will go down as
your engine gets warm.
NOTICE:
Holding your key in Start for longer
than
15 seconds at a time will cause
your battery to be drained much
sooner. And the excessive heat can
damage your starter motor.
2. If it doesn’t start right away, hold
your key in
Start. If it doesn’t start in
three seconds (or starts but then stops), push the accelerator pedal
about one-quarter of the way down
for
12 more seconds, or until it starts.
3. If your engine still won’t start (or
starts but then stops), it could
be
flooded with too much gasoline. Try
this: Wait
15 seconds to let the
starter motor cool down. Then push
your accelerator pedal all the way to
the floor. Hold it there. Then hold the
key in
Start. This clears the extra
gasoline from the engine. When the
engine starts, let go
of the key and
the accelerator pedal. If the engine
still doesn‘t start, wait another
15
seconds and do Step 2 again.
NOTICE:
Your engine is designed to work
with the electronics in your vehicle.
If you add electrical parts or
accessories, you could change the
way the fuel injection system
operates. Before adding electrical
equipment, check with your dealer.
If you don’t, your engine might not
perform properly. If you ever have
to have your vehicle towed, see the
part
of this manual that tells how to
do it without damaging your
vehicle. See
Towing Your Vehicle
in the Index.
To start your 3800 V6 engine
(Code L):
1. Without pushing the accelerator
pedal, turn your ignition key to
Start.
When the engine starts, let go of the
ltey. The idle speed will go down as
your engine gets warm.
59
ProCarManuals.com
Page 62 of 276
Features & Controls
60
NOTICE:
Holding your key in Start for longer
than
15 seconds at a time will cause
your battery to be drained much
sooner. And the excessive heat can
damage your starter motor.
2. If it doesn’t start right away, hold
your key in
Start for about three to
five seconds at a time until your
engine starts. Wait about
15 seconds
between each try to help avoid
draining your battery.
3. If your engine still won’t start (or
starts but then stops), it could be
flooded with too much gasoline. Try
pushing your accelerator pedal all the
way to the floor and holding it there
as you hold the key in
Start for about
three seconds.
If the vehicle starts
briefly but then stops again, do the
same thing, but this time keep the
pedal down for five
or six seconds.
This clears the extra gasoline from
the engine. After waiting about
15
seconds, repeat the normal starting
procedure.
NOTICE:
Your engine is designed to work
with the electronics in your vehicle.
If you add electrical parts or
accessories, you could change the
way the fuel injection system
operates. Before adding electrical
equipment, check with your dealer.
If you don’t, your engine might not
perform properly.
If you ever have
to have your vehicle towed, see the
part of this manual that tells how to
do it without damaging your
vehicle. See
Towing Your Vehicle
in the Index.
I Driving Through Deep
Standing Water
NOTICE:
If you drive too quickly through
deep puddles or standing water,
water can come in through your
engine’s air intake and badly
damage your engine.
If you can’t
avoid deep puddles or standing
water, drive through them very
slowly.
ProCarManuals.com
Page 96 of 276
Features & Controls
94
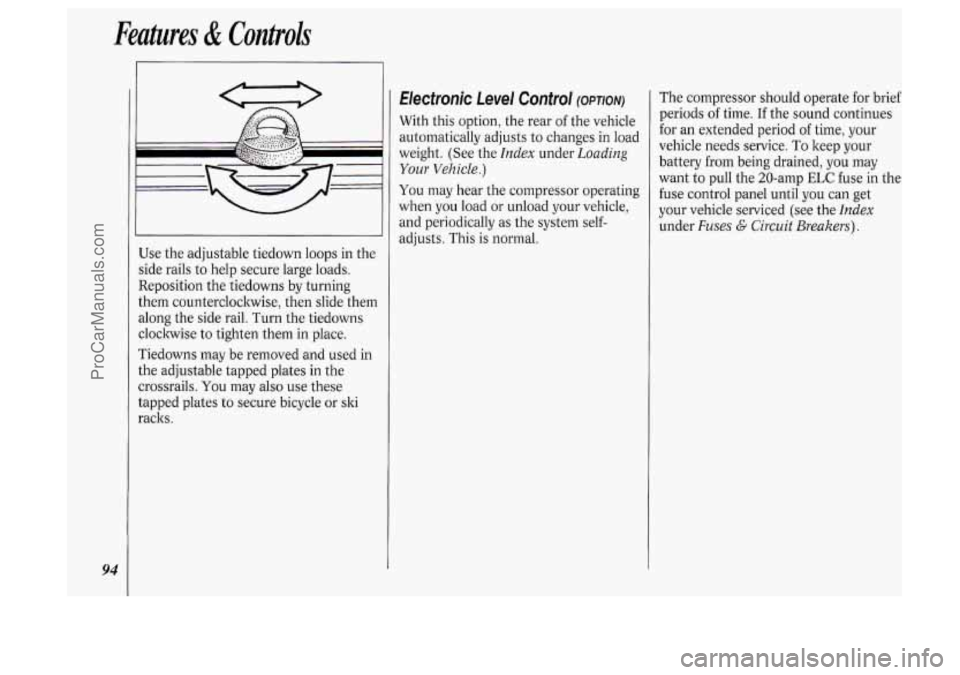
Use the adjustable tiedown loops in the
side rails
to help secure large loads.
Reposition the tiedowns by turning
them counterclockwise, then slide them
along the side rail. Turn the tiedowns
cloclnvise
to tighten them in place.
Tiedowns may be removed and used in
the adjustable tapped plates in the
crossrails.
You may also use these
tapped plates to secure bicycle or ski
racks.
Electronic Level Control (OPTION)
With this option, the rear of the vehicle
automatically adjusts to changes in load
weight. (See the
Index under Loading
Your Vehicle.)
You may hear the compressor operating
when you load or unload your vehicle,
and periodically
as the system self-
adjusts. This is normal. The compressor
should operate for brief
periods of time. If the sound continues
for an extended period
of time, your
vehicle needs service. To keep your
battery from being drained, you may
want to pull the 20-amp
ELC fuse in the
fuse control panel until you can get
your vehicle serviced (see the
Index
under Fuses G Circuit Breakers).
ProCarManuals.com
Page 113 of 276
![OLDSMOBILE SILHOUETTE 1994 Owners Manual I Climate Control System
Your vehicle’s heater and air
conditioner work best if you keep your
windows closed. Your vehicle also has
flow-through ventilation, described late]
in this s OLDSMOBILE SILHOUETTE 1994 Owners Manual I Climate Control System
Your vehicle’s heater and air
conditioner work best if you keep your
windows closed. Your vehicle also has
flow-through ventilation, described late]
in this s](/img/31/58207/w960_58207-112.png)
I Climate Control System
Your vehicle’s heater and air
conditioner work best if you keep your
windows closed. Your vehicle also has
flow-through ventilation, described late]
in this section, to bring outside air into
your vehicle.
If you have the optional engine coolant
heater and use it during cold weather,
0°F (-18°C) or lower, your heating
system will more quicldy provide heat
because the engine coolant is already
warmed. See the
Index under Engine
Coolant Heater.
OFF: Press to turn the system off. Press
any climate control setting to turn the
system on.
8: Slide the lever to the right to increase
fan speed,
decrease fan speed. to the left
to
Temperature Control Lever: Slide
the
lever to the right for warmer, heated air;
slide it to the left for cooled air.
Air Conditioner
When the temperature outside is above
freezing, the air conditioner compressor
will automatically condition the air
when
you press RECIRC (the A/C
indicator light will glow), DEFOG or
DEF (the A/C indicator light will not
Press
A/C (the A/C indicator light will
glow) to condition the air when you
press
UPPER, BI-LEV or LOWER. To
turn off the air conditioner compressor
in these settings, press
A/C again (the
indicator light will go off).
glow).
Each time you turn on the ignition, the
air conditioner will default to the setting
you had selected before last turning off
the ignition.
When the air conditioner compressor is
on, you may sometimes notice slight
changes in your vehicle’s engine
performance and power. This is normal, because
the system is designed to help
fuel economy while it maintains the
desired cooling level.
The air conditioner removes moisture
from the air,
so you may sometimes
notice water dripping from under your
vehicle when it
is idling or after it has
been turned off. This is normal.
On very hot days, your vehicle will cool
down more quickly and economically if
you open the windows long enough to
let hot inside air escape. For all settings,
adjust the temperature control lever and
fan speed as desired.
Directional Controls
RECIRC (Recirculate): Press to get
maximum cooling or quick cool-down
on very hot days. This setting
recirculates much of the air inside your
vehicle. It should not be used for long
periods of time because the air may
become too cold and dry.
Slide the temperature control lever
down to the coolest setting and adjust
the fan speed as desired.
UPPER: For normal cooling on hot
days, press
A/C along with UPPER.
1
111
ProCarManuals.com
Page 121 of 276
2 RECALL
TUNE --@ FAOE --
5 AM-FM
~
BASS V SEEK A 1 234 SET
II I I II
II I I II
II I I II
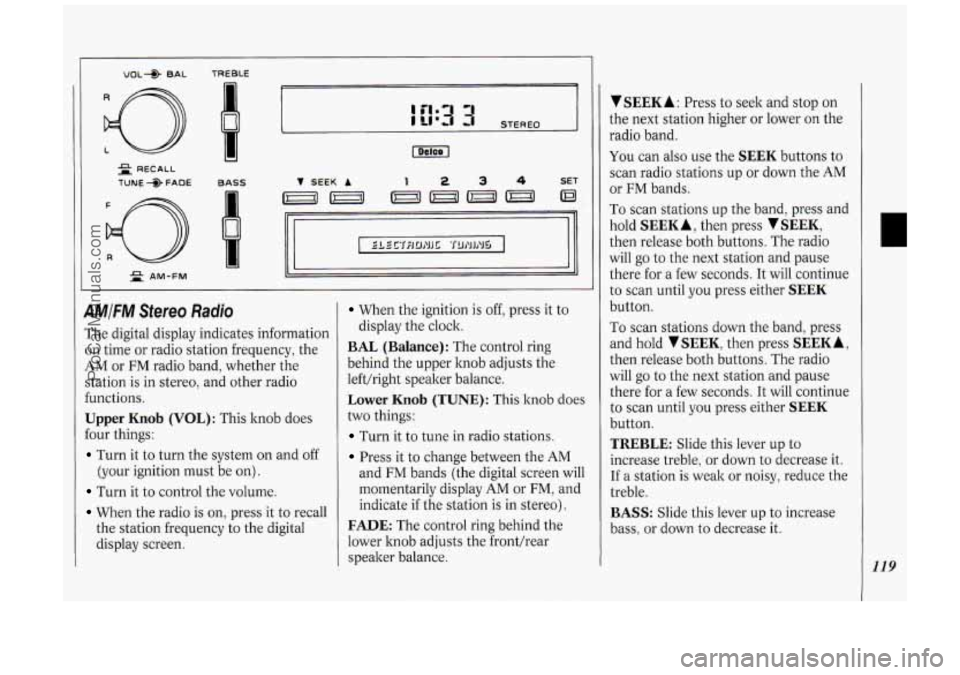
4MIFM Sfereo Radio
The digital display indicates information
on time or radio station frequency, the
AM or FM radio band, whether the
station is in stereo, and other radio
€unctions.
Upper Knob (VOL): This knob does
Four things:
Turn it to turn the system on and off
(your ignition must be on).
Turn it to control the volume.
When the radio is on, press it to recall
the station frequency to the digital
display screen.
When the ignition is off, press it to
BAL (Balance): The control ring
behind the upper knob adjusts the
lefthight speaker balance.
Lower Knob (TUNE): This knob does
two things:
Turn it to tune in radio stations.
Press it to change between the AM
display the clock.
and
FM bands (the digital screen will
momentarily display
AM or FM, and
indicate
if the station is in stereo).
FADE: The control ring behind the
lower hob adjusts the fronthear
speaker balance.
V SEEK A : Press to seek and stop on
the next station higher or lower on the
radio band.
You can also use the SEEK buttons to
scan radio stations up or down the
AM
or FM bands.
To scan stations up the band, press and
hold
SEEK A, then press SEEK,
then release both buttons. The radio
will
go to the next station and pause
there for a few seconds.
It will continue
to scan until you press either
SEEK
button.
To scan stations down the band, press
and hold
TSEEK, then press SEEKA,
then release both buttons. The radio
will
go to the next station and pause
there for a few seconds.
It will continue
to scan until you press either
SEEK
button.
TREBLE: Slide this lever up to
increase treble, or down to decrease it.
If a station is weak or noisy, reduce the
treble.
BASS: Slide this lever up to increase
bass, or down to decrease it.
119
ProCarManuals.com
Page 122 of 276
120
Comfort Controls &Audio Systems
To Preset Radio Stations:
1. Tune in the desired station.
2. Press SET. The word SET will
appear on the digital screen for five
seconds.
3. While SET is displayed, press one of
the four pushbuttons.
4. Repeat steps 1-3 for each of four AM
and four
FM stations.
Up to three additional stations
on each
band may be preset by “pairing”
pushbuttons:
1. Tune in the desired station.
2. Press SET, and within five seconds
press any two adjacent pushbuttons
at the same time.
3. The station can be tuned in when the
same two pushbuttons are pressed at
the same time.
VOL* BAL TREBLE I= - -
= PROG-RCL
TUNE +> FADE BASS
d
AUTO REVERSE
2 AM-FM
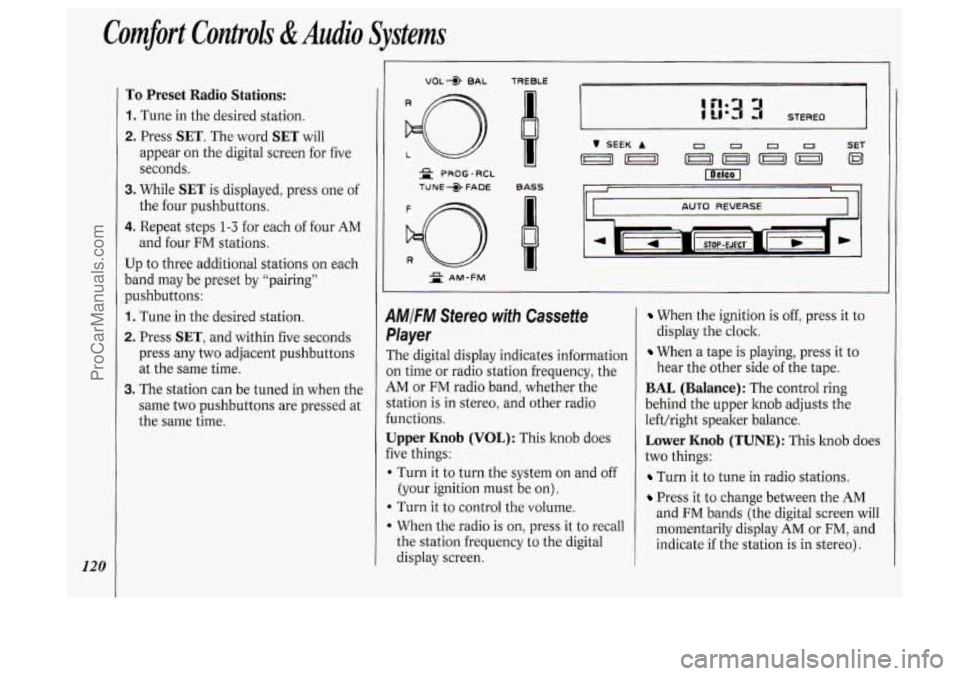
1MIFM Stereo with Cassette
,layer
The digital display indicates information
)n time or radio station frequency, the
iM or FM radio band, whether the
‘tation is in stereo, and other radio
unctions.
Jpper Knob (VOL): This knob does
ive things:
I Turn it to turn the system on and off
(your ignition must be on).
b Turn it to control the volume.
When the radio is on, press it to recall
the station frequency to the digital
display screen.
When the ignition is off, press it to
display the clock.
When a tape is playing, press it to
hear the other side
of the tape.
BAL (Balance): The control ring
behind the upper knob adjusts the
left/right speaker balance.
Lower Knob (TUNE): This knob does
two things:
Turn it to tune in radio stations.
Press it to change between the AM
and FM bands (the digital screen will
momentarily display
AM or FM, and
indicate if the station is in stereo).
ProCarManuals.com
Page 123 of 276
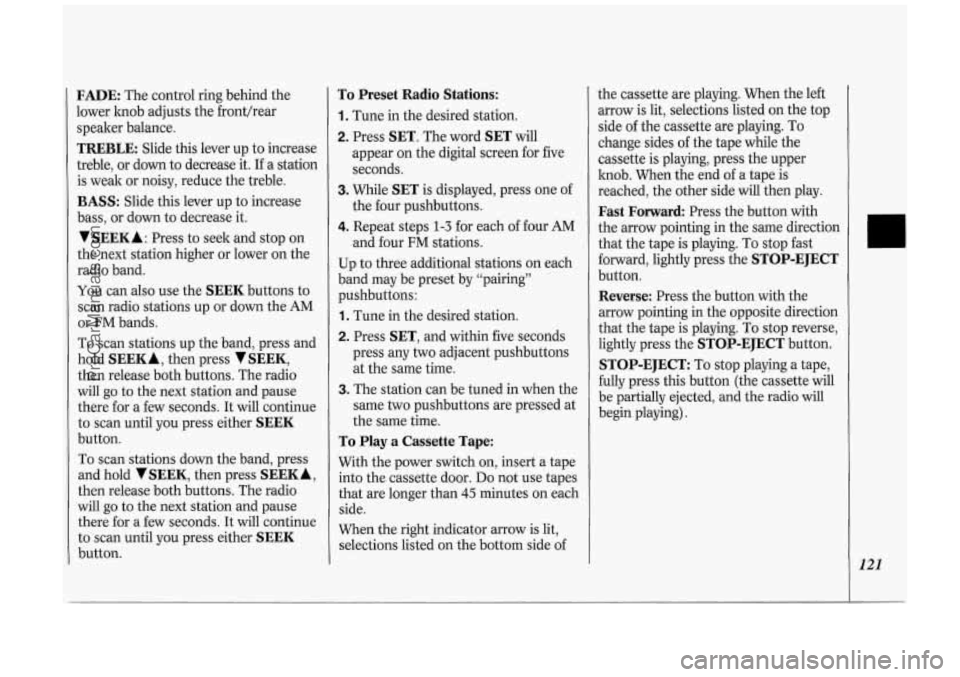
FADE: The control ring behind the
lower knob adjusts the fronthear
speaker balance.
TREBLE: Slide this lever up to increase
treble, or down to decrease it. If a station
is weak or noisy, reduce the treble.
BASS: Slide this lever up to increase
bass, or down to decrease it.
VSEEKA : Press to seek and stop on
the next station higher or lower on the
radio band.
You can also use the
SEEK buttons to
scan radio stations up or down the AM
or FM bands.
To scan stations up the band, press and
hold
SEEKA, then press VSEEK,
then release both buttons. The radio
will
go to the next station and pause
there for
a few seconds. It will continue
to scan until you press either
SEEK
button.
To scan stations down the band, press
and hold
V SEEK, then press SEEK A,
then release both buttons. The radio
will
go to the next station and pause
there for a few seconds. It will continue
to scan until you press either
SEEK
button.
To Preset Radio Stations:
1. Tune in the desired station.
2. Press SET. The word SET will
appear
on the digital screen for five
seconds.
3. While SET is displayed, press one of
the four pushbuttons.
4. Repeat steps 1-3 for each of four AM
and four FM stations.
Up to three additional stations
on each
band may be preset by “pairing”
pushbuttons:
1. Tune in the desired station.
2. Press SET, and within five seconds
press any two adjacent pushbuttons
at the same time.
3. The station can be tuned in when the
same two pushbuttons are pressed at
the same time.
To Play a Cassette Tape:
With the power switch on, insert a tape
into the cassette door.
Do not use tapes
that are longer than
45 minutes on each
side.
When the right indicator arrow is lit,
selections listed
on the bottom side of the cassette are
playing. When the left
arrow is lit, selections listed
on the top
side of the cassette are playing. To
change sides of the tape while the
cassette is playing, press the upper
knob. When the end of a tape is
reached, the other side will then play.
Fast Forward Press the button with
the arrow pointing in the same direction
that the tape is playing. To stop fast
forward, lightly press the
STOP-EJECT
button.
Reverse: Press the button with the
arrow pointing in the opposite direction
that the tape is playing. To stop reverse,
lightly press the
STOP-EJECT button.
STOP-EJECT: To stop playing a tape,
fully press this button (the cassette will
be partially ejected, and the radio will
begin playing).
121
ProCarManuals.com