fuel cap OLDSMOBILE SILHOUETTE 1994 Owners Manual
[x] Cancel search | Manufacturer: OLDSMOBILE, Model Year: 1994, Model line: SILHOUETTE, Model: OLDSMOBILE SILHOUETTE 1994Pages: 276, PDF Size: 15.82 MB
Page 102 of 276
Features & Controls
100
Warning Lights, Gages and
Indicators
This section describes the warning
lights and gages that may be on your
vehicle. The pictures will help you
locate them.
Warning lights and gages can signal that
something
is wrong before it becomes
serious enough to cause an expensive
repair or replacement. Paying attention
to your warning lights and gages could
also save you or others from injury.
Warning lights go on when there may
be or is a problem with one of your
vehicle's functions. As you will see in
the details on the next few pages, some
warning lights come on briefly when
you turn the ignition key just to let you
know they're working. If you are
familiar with this section, you should
not be alarmed when this happens.
Gages can indicate when there may be
or
is a problem with one of your
vehicle's functions. Often gages and
warning lights work together to let you
know when there's a problem with your
vehicle. When
one of the warning lights comes
on and stays on when you are driving,
or when one
of the gages shows there
may be a problem, check the section
that tells you what to do about it. Please
follow the manual's advice. Waiting to
do repairs can be costly
- and even
dangerous.
So please get to know your
warning lights and gages. They're a big
help.
- UNLtADtU FUtL
-
I
loo= ,
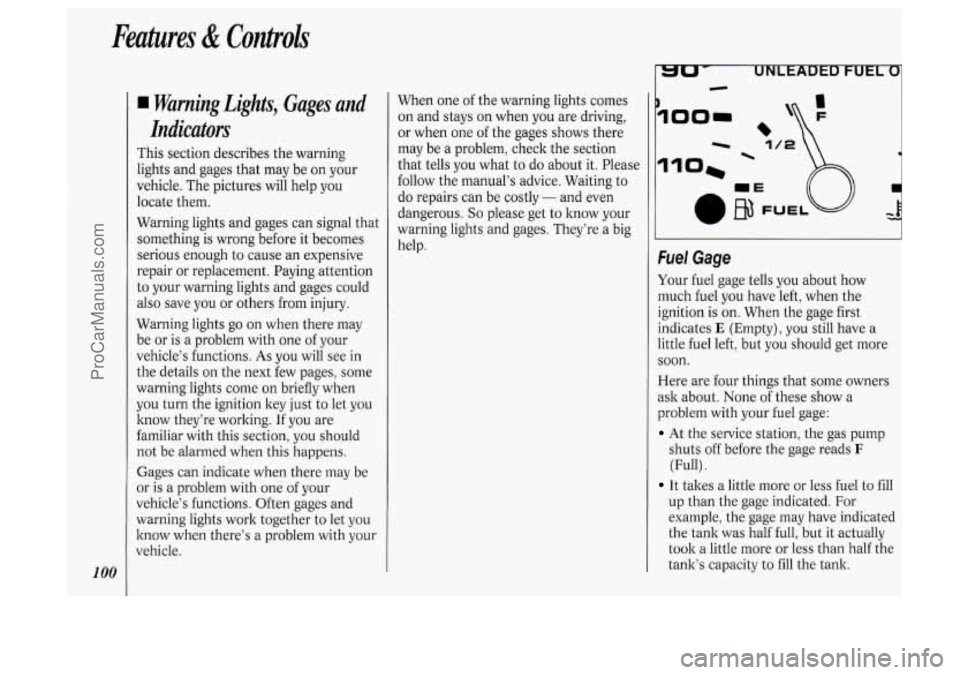
fuel Gage
Your fuel gage tells you about how
much fuel you have left, when the
ignition is
on. When the gage first
indicates
E (Empty), you still have a
little fuel left, but you should get more
soon.
Here are four things that some owners
ssk about. None of these show a
problem with your fuel gage:
At the service station, the gas pump
shuts off before the gage reads
F
(Full) .
It takes a little more or less fuel to fill
up than the gage indicated. For
example, the gage may have indicated
the tank was half full, but it actually
took a little more or less than half the
tank's capacity to
fill the tank.
ProCarManuals.com
Page 103 of 276
The gage moves a little when you turn
The gage doesn’t go back to E when
For your fuel tank capacity, see
Service
Station Information
on the last page of
this manual. a corner, brake or
speed
up.
you turn off the ignition.
_____ 0
‘F
I
00-
- 1/2
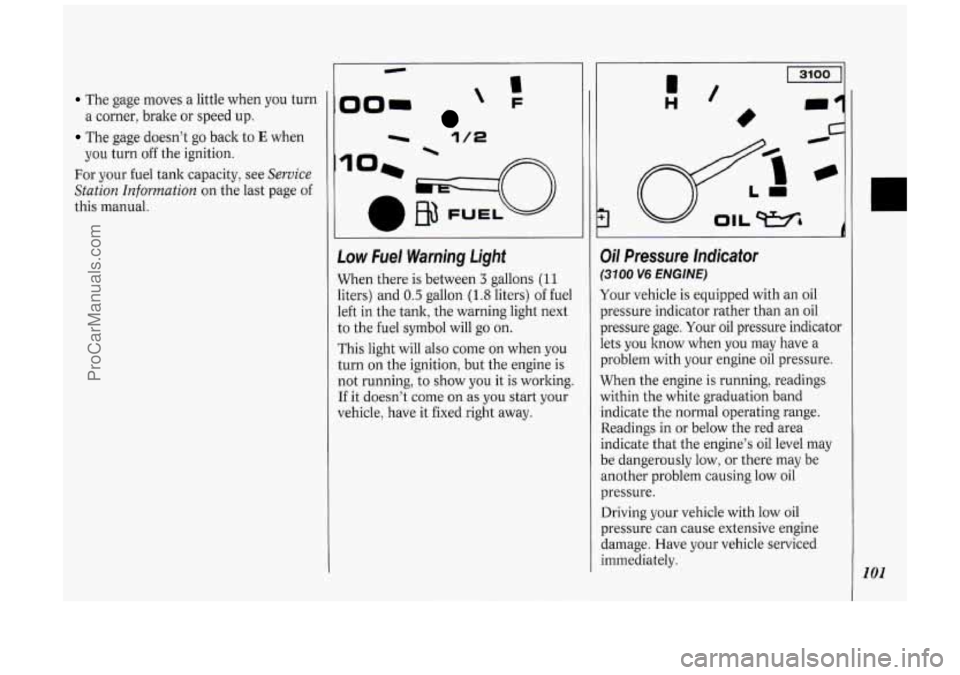
Low Fuel Warning Light
When there is between 3 gallons (1 1
liters) and 0.5 gallon (1.8 liters) of fuel
left in the tank, the warning light next
to the fuel symbol will go on.
This light will also come on when you
turn on the ignition, but the engine is
not running, to show you it is working.
If it doesn’t come on as you start your
vehicle, have it fixed right away.
d
Oil Pressure lndicator
(31 00 V6 ENGINE)
Your vehicle is equipped with an oil
pressure indicator rather than an oil
pressure gage. Your oil pressure indicator
lets
you know when you may have a
problem with your engine oil pressure.
When the engine is running, readings
within the white graduation band
indicate the normal operating range.
Readings in or below the red area
indicate that the engine’s oil level may
be dangerously low, or there may be
another problem causing low oil
pressure.
Driving your vehicle with low oil
pressure can cause extensive engine
damage. Have your vehicle serviced
immediately.
101
ProCarManuals.com
Page 113 of 276
![OLDSMOBILE SILHOUETTE 1994 Owners Manual I Climate Control System
Your vehicle’s heater and air
conditioner work best if you keep your
windows closed. Your vehicle also has
flow-through ventilation, described late]
in this s OLDSMOBILE SILHOUETTE 1994 Owners Manual I Climate Control System
Your vehicle’s heater and air
conditioner work best if you keep your
windows closed. Your vehicle also has
flow-through ventilation, described late]
in this s](/img/31/58207/w960_58207-112.png)
I Climate Control System
Your vehicle’s heater and air
conditioner work best if you keep your
windows closed. Your vehicle also has
flow-through ventilation, described late]
in this section, to bring outside air into
your vehicle.
If you have the optional engine coolant
heater and use it during cold weather,
0°F (-18°C) or lower, your heating
system will more quicldy provide heat
because the engine coolant is already
warmed. See the
Index under Engine
Coolant Heater.
OFF: Press to turn the system off. Press
any climate control setting to turn the
system on.
8: Slide the lever to the right to increase
fan speed,
decrease fan speed. to the left
to
Temperature Control Lever: Slide
the
lever to the right for warmer, heated air;
slide it to the left for cooled air.
Air Conditioner
When the temperature outside is above
freezing, the air conditioner compressor
will automatically condition the air
when
you press RECIRC (the A/C
indicator light will glow), DEFOG or
DEF (the A/C indicator light will not
Press
A/C (the A/C indicator light will
glow) to condition the air when you
press
UPPER, BI-LEV or LOWER. To
turn off the air conditioner compressor
in these settings, press
A/C again (the
indicator light will go off).
glow).
Each time you turn on the ignition, the
air conditioner will default to the setting
you had selected before last turning off
the ignition.
When the air conditioner compressor is
on, you may sometimes notice slight
changes in your vehicle’s engine
performance and power. This is normal, because
the system is designed to help
fuel economy while it maintains the
desired cooling level.
The air conditioner removes moisture
from the air,
so you may sometimes
notice water dripping from under your
vehicle when it
is idling or after it has
been turned off. This is normal.
On very hot days, your vehicle will cool
down more quickly and economically if
you open the windows long enough to
let hot inside air escape. For all settings,
adjust the temperature control lever and
fan speed as desired.
Directional Controls
RECIRC (Recirculate): Press to get
maximum cooling or quick cool-down
on very hot days. This setting
recirculates much of the air inside your
vehicle. It should not be used for long
periods of time because the air may
become too cold and dry.
Slide the temperature control lever
down to the coolest setting and adjust
the fan speed as desired.
UPPER: For normal cooling on hot
days, press
A/C along with UPPER.
1
111
ProCarManuals.com
Page 153 of 276
Towinga Trailer
L
NOTICE:
Pulling a trailer improperly can
damage your vehicle and result in
costly repairs not covered by your
warranty. To pull a trailer correctly,
follow the advice in this section,
and see your Oldsmobile dealer for
important information about
towing a trailer with your vehicle.
Your vehicle can tow a trailer. To
identify what the vehicle trailering
capacity is for your vehicle, you should
read the information in
Weight of the
Trailer that appears later in this section.
But trailering is different than just
driving your vehicle by itself. Trailering
means changes in handling, durability,
and fuel economy. Successful, safe
trailering takes correct equipment, and
it has to be used properly.
That’s the reason for this section. In it
are many time-tested, important
trailering tips and safety rules. Many of
these are important for your safety and
that of your passengers.
So please read
this section carefully before you pull a trailer.
Load-pulling components such as the
engine, transaxle, wheel assemblies, and
tires are forced to work harder against
the drag of the added weight. The
engine is required to operate at
relatively higher speeds and under
greater loads, generating extra heat.
What’s more, the trailer adds
considerably to wind resistance,
increasing the pulling requirements.
If You Do Decide To Pull A Trailer
If you do, here are some important
points.
There are many different laws having
to do with trailering. Make sure your
rig will be legal, not only where you
live but
also where you’ll be driving. A
good source for this information can
be state or provincial police.
Consider using a sway control if your
trailer will weigh
2,000 pounds (900
kg) or less. You should always use a
sway control if your trailer will weigh
more than
2,000 pounds (900 kg).
You can ask a hitch dealer about sway
controls.
151
ProCarManuals.com
Page 183 of 276
Here you will find information about
the care of
your Oldsmobile . This
part begins with service and fuel
information. and then it shows how
to check important fluid and
lubricant levels
. There is also
technical information about
your
vehicle. and a section devoted to its
appearance care
.
Part 6
Service & Appearance Care
Service ........................................................................\
............................................. 182
Fuel
........................................................................\
.................................................. 183
Hood Release ........................................................................\
................................... 186
Engine Oil ........................................................................\
........................................ 190
Air Cleaner
........................................................................\
...................................... 194
Transaxle Fluid
........................................................................\
................................ 195
Engine Coolant
........................................................................\
................................ 197
Power Steering Fluid
........................................................................\
....................... 199
Windshield Washer Fluid
........................................................................\
................ 200
Brakes
........................................................................\
.............................................. 201
Battery
........................................................................\
............................................. 203
Bulb Replacement
........................................................................\
........................... 203
Windshield Wiper Blade Replacement
................................................................... 205
Loading Your Vehicle
........................................................................\
..................... 206
Tires
........................................................................\
................................................. 207
Appearance Care ........................................................................\
............................. 212
Vehicle Identification Number (VIN)
.................................................................... 218
Add-on Electrical Equipment
........................................................................\
........ 219
Fuses & Circuit Breakers ........................................................................\
................ 219
Capacities and Specifications
........................................................................\
......... 224
Normal Maintenance Replacement Parts
............................................................... 226
Fluids
& Lubricants ........................................................................\
........................ 227
Replacement
Bulbs ........................................................................\
.......................... 228
181
ProCarManuals.com
Page 187 of 276
Filling Your Tank
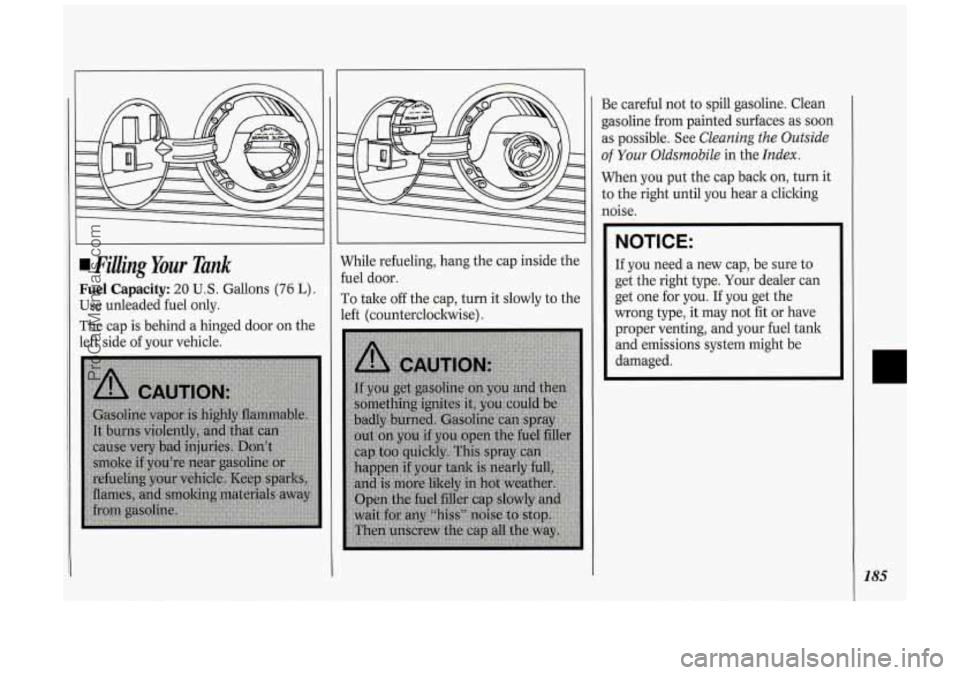
Fuel Capacity: 20 U.S. Gallons (76 L).
Use unleaded fuel only.
The cap is behind a hinged door on the
left side of your vehicle. While
refueling, hang the cap inside the
fuel door.
To take off the cap, turn it slowly to the
left (countercloclnvise)
.
Be careful not to spill gasoline. Clean
gasoline from painted surfaces as soon
as possible. See
Cleaning the Outside
of Your Oldsmobile in the Index.
When you put the cap back on, turn it
to the right until you hear a clicking
noise.
NOTICE:
If you need a new cap, be sure to
get the right type. Your dealer can
get one for you. If you get the
wrong type, it may not fit or have
proper venting, and your fuel tank
and emissions system might be
damaged.
185
ProCarManuals.com
Page 208 of 276
Service &Appearance Care
206
GVWR CAWR FRT CAWR RR
THIS VEHICLE CONFORMS TO ALL APPLICABLE US. FEDERAL
MOTOR VEHICLE SAFETY STANDARDS IN EFFECT ON THE DATE
OF MANUFALTURESHOWN ABOVE.
.MODEL.
M.P.V.
MPHY FRT TlRESlZE
RTG RIM WliKP, (COLD1
RR SPA MFD
fly GENERAL MOTORS CORP XWXX
LWKG
SERIAI. NUMBER SPEED
SEE
OWNERS MANUAL FOR ADDI'TIONAL INFORMATlOh
Loading Your Vehicle
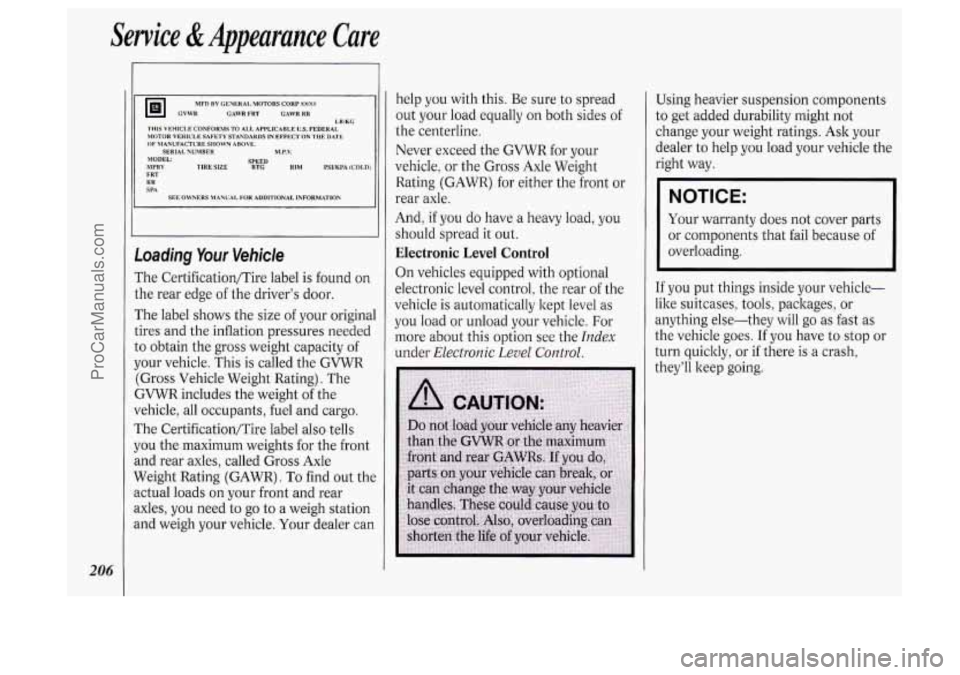
The Certification/Tire label is found on
the rear edge of the driver's door.
The label shows the size
of your original
tires and the inflation pressures needed
to obtain the gross weight capacity
of
your vehicle. This is called the GVWR
(Gross Vehicle Weight Rating). The
GVWR includes the weight of the
vehicle, all occupants, fuel and cargo.
The Certification/Tire label also tells
you the maximum weights for the front
and rear axles, called Gross Axle
Weight Rating (GAWR).
To find out the
actual loads
on your front and rear
axles, you need to go to a weigh station
and weigh your vehicle, Your dealer can help
you with
this. Be sure to spread
out your load equally on both sides
of
the centerline.
Never exceed the
GVWR for your
vehicle, or the Gross Axle Weight
Rating (GAWR) for either the front or
rear axle.
And,
if you do have a heavy load, you
should spread it out.
Electronic Level Control
On vehicles equipped with optional
electronic level control, the rear
of the
vehicle is automatically kept level as
you load or unload your vehicle. For
more about this option see the
Index
under Electronic Level Control.
Using heavier suspension components
to get added durability might not
change your weight ratings. Ask your
dealer to help you load your vehicle the
right way.
NOTICE:
Your warranty does not cover parts
or components that fail because
of
overloading.
If you put things inside your vehicle-
like suitcases, tools, packages, or
anything else-they will go
as fast as
the vehicle goes.
If you have to stop or
turn quickly! or if there is a crash,
they'll keep going.
ProCarManuals.com
Page 210 of 276
Sewice & Appearunce Care
208
Inflation-Tire Pressure
The CertificatiodTire label which is on
the rear edge of the driver’s door shows
the correct inflation pressures for your
tires, when they’re cold. “Cold” means
your vehicle has been sitting for at least
three hours or driven no more than a mile.
NOTICE:
Don’t let anyone tell you that
underinflation
or overinflation is all
right. It’s not. If your tires don’t
have enough air (underinflation)
you can get:
Too much flexing
Too much heat
Tire overloading
Bad wear
Bad handling
Bad fuel economy.
If your tires have too much air
(overinflation) you can get:
Unusual wear
Bad handling
Rough ride
Needless damage from road
hazards.
When to Check
Check your tires once a month or more.
Don’t forget your compact spare tire. It
should be at
60 psi (420 1tPa).
How to Check
Use a good quality pocket-type gage to
check tire pressure. Simply loolting at
the tires will not tell you the pressure,
especially
if you have radial tires -
which may look properly inflated even if
they’re underinflated.
If your tires have valve caps, be sure to
put them back on. They help prevent
leaks by keeping out dirt and moisture.
-
f
x
Tire Inspection and Rotation
To make your tires last longer, have
them inspected and rotated at the
mileages recommended in the
Maintenance Schedule. See
Scheduled
Maintenance Services
in the Index.
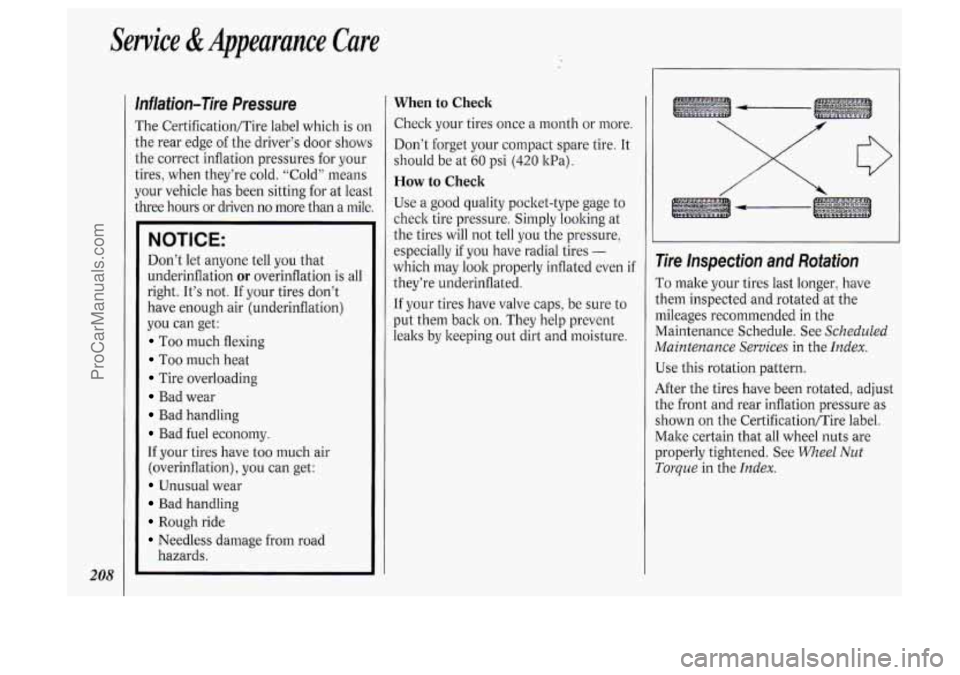
Use this rotation pattern.
After the tires have been rotated, adjust
the front and rear inflation pressure as
shown on the CertificationlTire label.
Make certain that all wheel nuts are
properly tightened. See
Wheel Nut
Toque in the Index.
ProCarManuals.com
Page 227 of 276
1.02 kg
1.36 kg
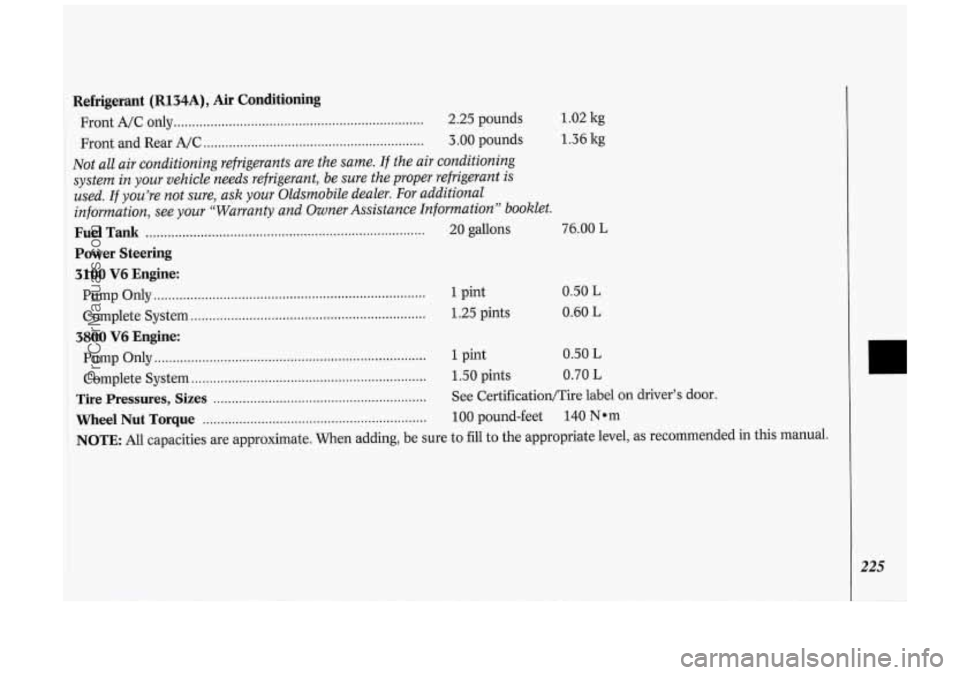
Refrigerant (R134A), Air Conditioning
Front A/C only .................................................................... 2.25 pounds
Front and Rear A/C
............................................................ 3.00 pounds
Not all air conditioning refrigerants are the same. If the air conditioning
system in your vehicle needs refrigerant, be sure the proper refrigerant
is
used. If you’re not sure, ask your Oldsmobile dealer. For additional
infomation, see your “Warranty and Owner Assistance Information
” booklet.
Fuel Tank ........................................................................\
..... 20 gallons 76.00 L
Power Steering
3100
V6 Engine:
Pump Only ........................................................................\
..
Complete System ................................................................
1 pint
1.25 pints 0.50 L
0.60 L
3800 V6 Engine:
Pump Only ........................................................................\
.. 1 pint 0.50 L
Complete System ................................................................ 1.50 pints 0.70 L
Tire Pressures, Sizes .......................................................... See CertificatiorVTire label on driver’s door.
Wheel Nut Torque ............................................................. 100 pound-feet 140 Nom
NOTE: All capacities are approximate. When adding, be sure to fill to the appropriate level, as recommended in this manual.
r
ProCarManuals.com
Page 241 of 276

6. Transaxle Service - Change both
the fluid and filter every
15,000 miles
(25 000 ltm) if the vehicle is mainly
driven under one or more of these
conditions:
In heavy city traffic where the
outside temperature regularly
reaches
90°F (32°C) or higher.
In hilly or mountainous terrain.
When doing frequent trailer towing.
Uses such as found in taxi, police
car or delivery service.
If you do not use your vehicle under
any of these conditions, change both
the
fluid and filter every 100,000 miles
(166 000 ltm) .
7. Spark Plug Replacement::' -
Replace spark plugs with the proper
type. See
Replacement Parts in the
Index.
8. Spark Plug Wire Inspection''-
Inspect for burns, cracks or other
damage. Check the boot fit at the
distributor or coils and at the spark
plugs. Replace wires
as needed.
9. Exhaust Gas Recirculation (EGR)
System 1nspection':t
- Conduct
the
EGR system service as described
in the service manual.
To purchase a
service manual, see
Service
Publications
in the Index.
IO. Air Cleaner Filter Replacement+-
Replace every 30,000 miles
(50 000 ltm) or more often under
dusty conditions.
Ask your dealer
for the proper replacement intervals
for your driving conditions.
11. Air Cleaner Inspection''? - Inspect
all hoses and ducts for proper
hookup. Make sure the valve works
properly.
1nspection';:t - Inspect fuel tank,
cap and lines for damage
or leaks.
Inspect fuel cap gasket for an even
filler neck imprint or any damage.
Replace parts as needed. Periodic
replacement of the fuel filter
is not
required.
12. Fuel Tank, Cap and Lines
13. Engine Timing and Distributor
Check
(3100 Code D engine
only)'xt
- Adjust the timing to the
underhood label specifications.
Inspect the inside and outside
of the
distributor cap and rotor for cracks,
carbon tracking and corrosion.
Clean or replace as needed.
NOTE: To determine your engine's
displacement and code, see
Engine
Identification
in the Index.
': = An Enzission Control Service.
t = The U.S. Environmental Protection Agency
or the California Air Resources Boa1.d has
determined that the failure
to pelform this
maintenance item will
not nullify the
emission warranty
or limit recall liability
prior
to fhe completion of ~~ehicle useful life.
General
Motors: however, urges that all
recornmended maintenance services be
performed at the indicated intervals and the
maintenance be recorded
in "Section E:
Maintenance Record."
239
ProCarManuals.com