oil pressure OLDSMOBILE SILHOUETTE 1994 Owners Manual
[x] Cancel search | Manufacturer: OLDSMOBILE, Model Year: 1994, Model line: SILHOUETTE, Model: OLDSMOBILE SILHOUETTE 1994Pages: 276, PDF Size: 15.82 MB
Page 12 of 276
How to Use this Manual
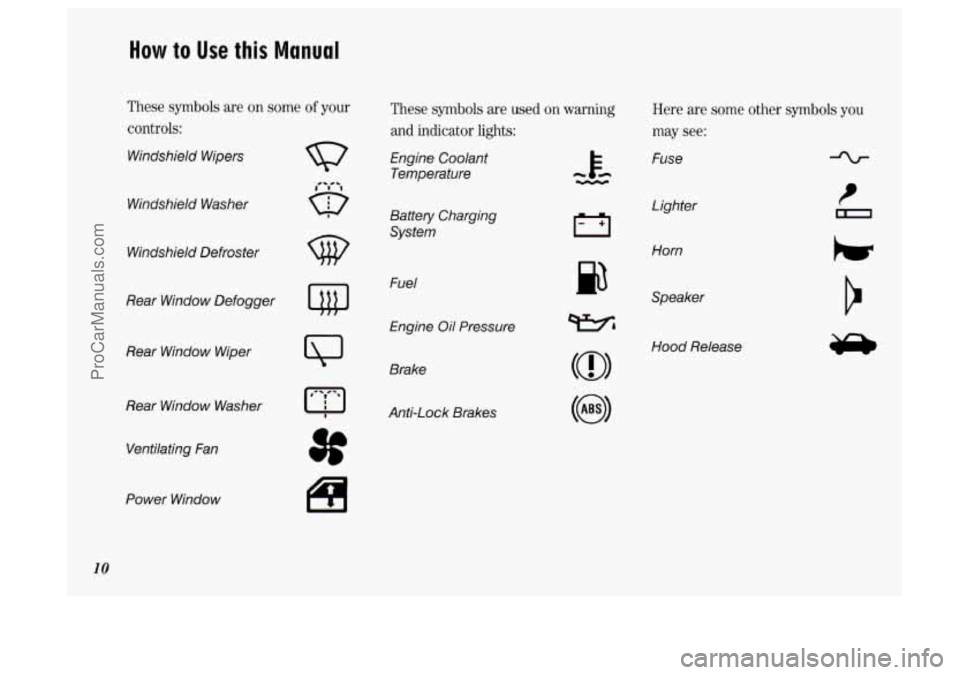
These symbols are on some of your
controls:
Windshield Wipers
Windshield Washer
w
Windshield Defroster
Rear Window Defogger
Rear Window Wiper
Rear Window Washer Ventilating Fan
Power Window
10
3f
These symbols are used on warning
and indicator lights:
Engine Coolant Temperature
Battery Charging
System
Fuel
Engine
Oil Pressure
Brake
AntXock Brakes
p3
Here are some other symbols you
may see:
Fuse
Lighter
Horn
Speaker
Hood Release
ProCarManuals.com
Page 103 of 276
The gage moves a little when you turn
The gage doesn’t go back to E when
For your fuel tank capacity, see
Service
Station Information
on the last page of
this manual. a corner, brake or
speed
up.
you turn off the ignition.
_____ 0
‘F
I
00-
- 1/2
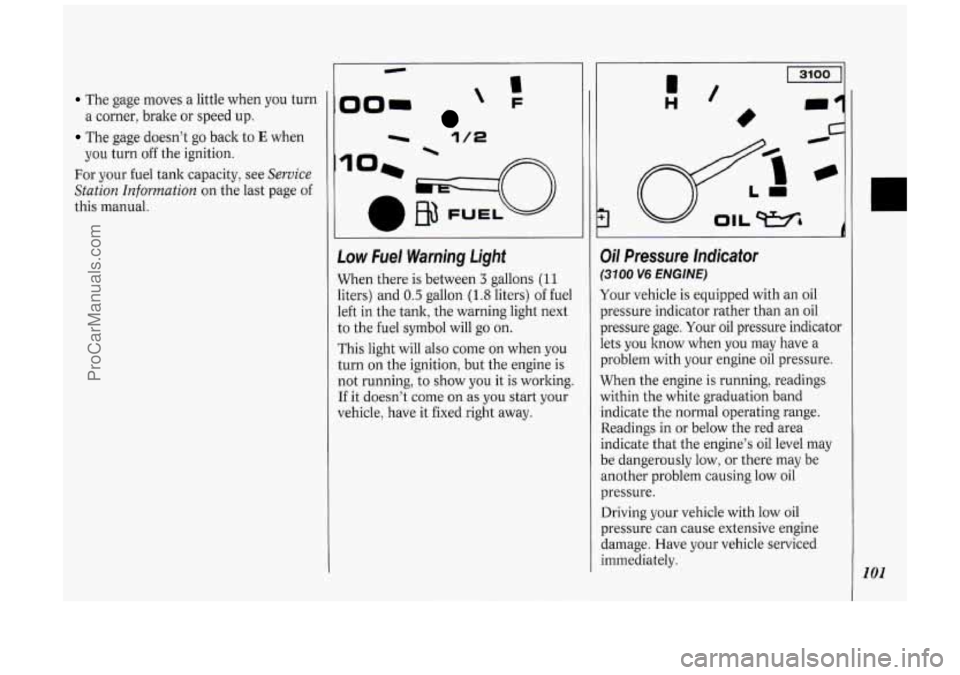
Low Fuel Warning Light
When there is between 3 gallons (1 1
liters) and 0.5 gallon (1.8 liters) of fuel
left in the tank, the warning light next
to the fuel symbol will go on.
This light will also come on when you
turn on the ignition, but the engine is
not running, to show you it is working.
If it doesn’t come on as you start your
vehicle, have it fixed right away.
d
Oil Pressure lndicator
(31 00 V6 ENGINE)
Your vehicle is equipped with an oil
pressure indicator rather than an oil
pressure gage. Your oil pressure indicator
lets
you know when you may have a
problem with your engine oil pressure.
When the engine is running, readings
within the white graduation band
indicate the normal operating range.
Readings in or below the red area
indicate that the engine’s oil level may
be dangerously low, or there may be
another problem causing low oil
pressure.
Driving your vehicle with low oil
pressure can cause extensive engine
damage. Have your vehicle serviced
immediately.
101
ProCarManuals.com
Page 104 of 276
Features & Controls
102
NOTICE:
Damage to your engine from
neglected oil problems can be costly
and
is not covered by your
warranty.
I I
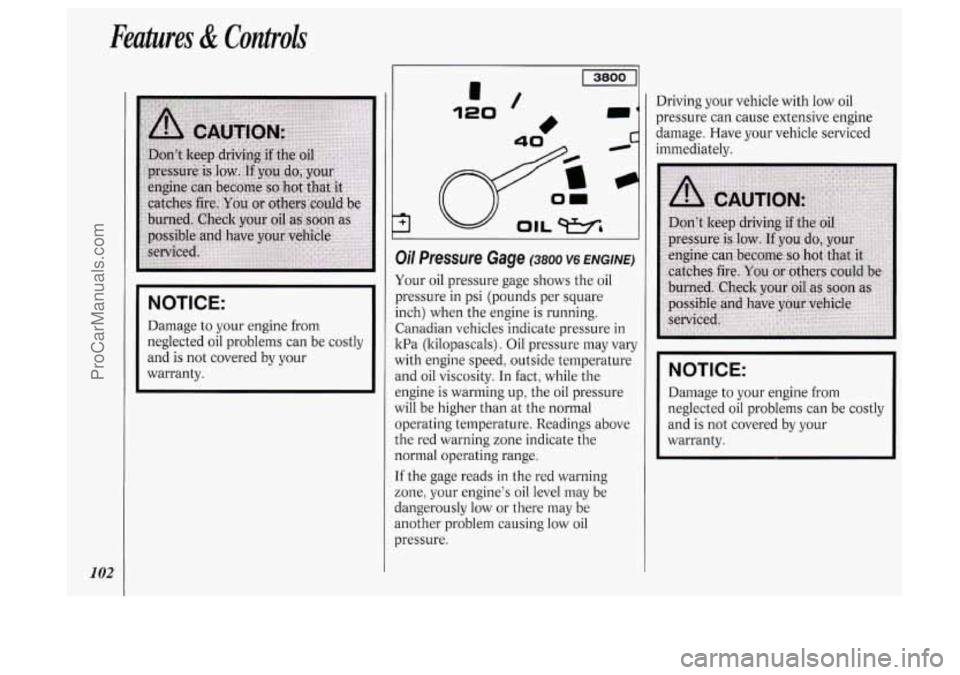
3il Pressure Gage (3800 v6 ENGINE)
four oil pressure gage shows the oil
x-essure
in psi (pounds per square
nch) when the engine is running.
Zanadian vehicles indicate pressure in
vith engine speed, outside temperature
md oil viscosity. In fact, while the
mgine is warming up, the oil pressure
vi11 be higher than at the normal
Iperating temperature. Readings above
.he red warning zone indicate the
lormal operating range.
.f the gage reads in the red warning
:one, your engine's oil level may be
langerously low or there may be
mother problem causing low oil
xessure. Driving
your vehicle with low oil
pressure can cause extensive engine
damage. Have your vehicle serviced
immediately.
NOTICE:
Damage to your engine from
neglected oil problems can be costly
and is not covered by your
warranty.
ProCarManuals.com
Page 148 of 276
Your Driving and the Road
146
flow. Try to merge into the gap at close
to the prevailing speed. Switch on your
turn signal, check your mirrors and
glance over your shoulder as often as
necessary. Try to blend smoothly with
the traffic flow.
Once
you are on the freeway, adjust
your speed to the posted limit or to the
prevailing rate
if it’s slower. Stay in the
right lane unless you want to pass.
Before changing lanes, check your
mirrors. Then use your turn signal.
Just before you leave the lane, glance
quickly over your shoulder to make sure
there isn’t another vehicle in your
“blind” spot.
Once you are moving
on the freeway,
make certain you allow a reasonable
following distance. Expect to move
slightly slower at night.
When you want to leave the freeway,
move to the proper lane well in
advance. If you
miss your exit do not,
under any circumstances, stop and back
up. Drive on to the next exit.
The exit ramp can be curved, sometimes quite sharply. The exit
speed
is usually posted.
Reduce your speed according to your
speedometer, not to your sense of
motion. After driving for any distance at
higher speeds, you may tend to think
you are going slower than you actually
are.
I Before Leaving on a Long
Trip
Make sure you’re ready. Try to be well
rested. If you must start when you‘re
not fresh
- such as after a day’s work
- don’t plan to make too many miles
that first part of the journey. Wear
comfortable clothing and shoes you can
easily drive in.
Is your vehicle ready for a long trip? If
you keep it serviced and maintained, it’s
ready to go. If
it needs service, have it
done before starting out. Of course,
you’ll find experienced and able service
experts in Oldsmobile dealerships all
across North America. They‘ll be ready
and willing to help
if you need it.
Here are some things you can check
before a trip:
Windshield Washer Fluid: Is the
reservoir full? Are
all windows clean
inside and outside?
shape?
you checked all levels?
lenses clean?
safe, trouble-free trip.
Is the tread
good enough for long-distance
driving? Are the tires all inflated to
the recommended pressure?
weather outlook along your route?
Should you delay your trip a short
time to avoid a major storm system?
Maps: Do you have up-to-date maps?
Wiper Blades: Are they in good
Fuel, Engine Oil, Other Fluids: Have
Lights: Are they all working? Are the
Tires: They are vitally important to a
Weather Forecasts: What’s the
Highway Hypnosis
Is tbere actually such a condition as
“highway hypnosis”? Or is it just plain
falling asleep at the wheel? Call it
highway hypnosis, lack of awareness, or
whatever.
ProCarManuals.com
Page 169 of 276
Cooling System
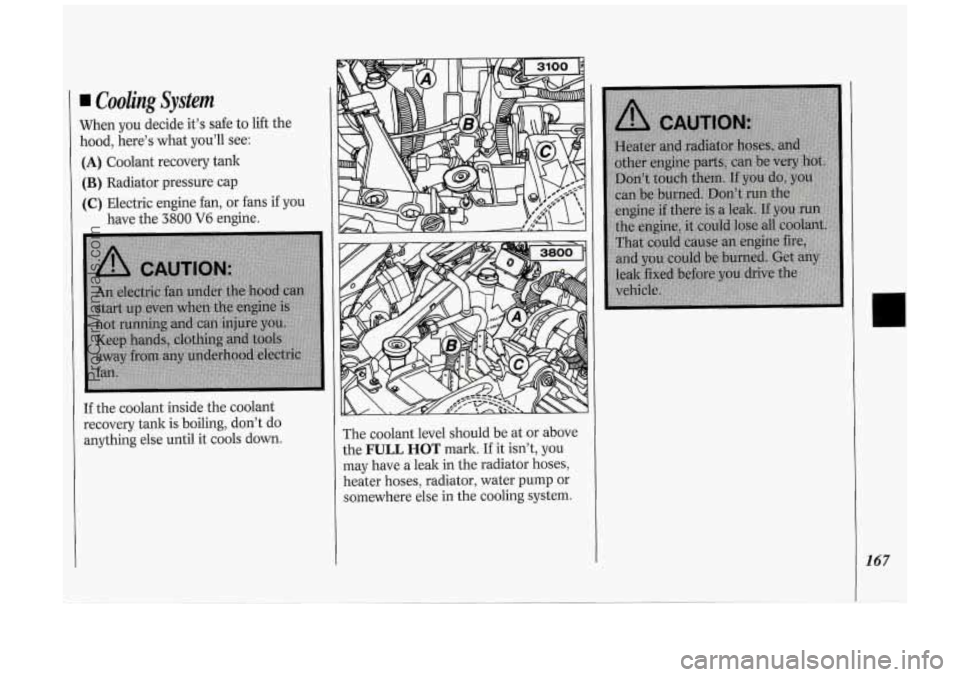
When you decide it’s safe to lift the
hood, here’s what you’ll see:
(A) Coolant recovery tank
(B) Radiator pressure cap
(C) Electric engine fan, or fans if you
have the
3800 V6 engine.
If the coolant inside the coolant
recovery tank is boiling, don’t do
anything else until it cools down. The coolant
level should be at or above
the
FULL HOT mark. If it isn’t, you
may have a leak in the radiator hoses,
heater hoses, radiator, water pump or
somewhere else in the cooling system.
ProCarManuals.com
Page 215 of 276
Using Foam-Type Cleaner on
Fabric
Vacuum and brush the area to remove
Always clean a whole trim panel or
any
loose dirt.
section. Mask surrounding trim along
stitch or welt lines.
Mix Multi-Purpose Powdered Cleaner
following the directions on the
container label.
Use suds only and apply with a clean
Don’t saturate the material.
Don’t rub it roughly.
As soon as you’ve cleaned the section,
use a sponge to remove the suds.
Rinse the section with a clean, wet
sponge.
Wipe off what’s left with a slightly
damp paper towel or cloth.
Then dry it immediately with a blow
sponge.
dryer or a heat lamp.
NOTICE:
Be careful with a hair dryer or heat
lamp. You could scorch the fabric.
Wipe with a clean cloth.
Using Solvent-Type Cleaner on
Fabric
First, see if you have to use solvent-type
cleaner at all. Some spots and stains
will clean off better with just water and
mild soap.
If you need to use a solvent:
Gently scrape excess soil from the
trim material with a clean, dull knife
or scraper. Use very little cleaner,
light pressure and clean cloths
(preferably cheesecloth). Cleaning
should start
at the outside of the
stain, “feathering” toward the center.
Keep changing to a clean section of
the cloth.
When you clean a stain from fabric,
immediately dry the area with an air
hose, hair dryer, or heat lamp to help prevent
a cleaning ring. (See the
previous NOTICE.)
Special Cleaning Problems
Greasy or Oily Stains
Such as grease, oil, butter, margarine,
shoe polish, coffee with cream, chewing
gum, cosmetic creams, vegetable oils,
wax crayon, tar and asphalt.
Carefully scrape off excess stain.
Follow the solvent-type instructions
Shoe polish, wax crayon, tar and
described earlier.
asphalt will stain
if left on a vehicle
seat fabric. They should be removed
as soon as possible. Be careful,
because the cleaner will dissolve them
and may cause them to spread.
Non-Greasy Stains
Such as catsup, coffee (black), egg,
fruit, fruit juice, milk, soft drinks, wine,
vomit, urine and blood.
Carefully scrape off excess stain, then
sponge the soiled area with cool
water.
213
ProCarManuals.com
Page 222 of 276
![OLDSMOBILE SILHOUETTE 1994 Owners Manual Service &Appeurunce Cure
220
+I
r=J
HORN
prpl
m
STOP-HA2 F-PUMP
m3 AUX
r?]
.pg
TURN BIU
GAGE
prpl LPS
(31 ABS
RDO 2
pTo4
ca
rn
ca
R-WIPER F-WIPER
rfpl IGN
HTR-A/C R-BLWR
Posi OLDSMOBILE SILHOUETTE 1994 Owners Manual Service &Appeurunce Cure
220
+I
r=J
HORN
prpl
m
STOP-HA2 F-PUMP
m3 AUX
r?]
.pg
TURN BIU
GAGE
prpl LPS
(31 ABS
RDO 2
pTo4
ca
rn
ca
R-WIPER F-WIPER
rfpl IGN
HTR-A/C R-BLWR
Posi](/img/31/58207/w960_58207-221.png)
Service &Appeurunce Cure
220
+I
r=J
HORN
prpl
m
STOP-HA2 F-PUMP
m3 AUX
r?]
.pg
TURN BIU
GAGE
prpl LPS
(31 ABS
RDO 2
pTo4
ca
rn
ca
R-WIPER F-WIPER
rfpl IGN
HTR-A/C R-BLWR
Position Rating (AMP.)
CTSY
ELC
HORN STOP HAZ
F PUMP
AUX
TAIL
ECM
TURN B/U
GAGE
LPS
ABS RD02
WIPER
FflIPER
IGN
HTR A/C
R BLWR 15
20
15
15
10
20
15
10
15
7.5
7.5
3
15
20
25 15
25
25
Circuitry
Dome Lamps, Courtesy Lamps, Power Door Lock Switches, Glove
Box Lamp, Power Mirrors, Power Sliding Delay Lock Module
Auto Level Control, Underhood Lamp
Horns, Horn Relay, Safety Belt Buzzer
Front/Rear Turn Lamps, Front Side Marker Lamps, Rear Stop Lamps,
Instrument Cluster Turn Indicator Lamps, Cruise Brake Switch
Fuel Pump, Oil Pressure Sender/Fuel Pump Switch
Radio, Front Cigar Lighter, Accessory Power Outlet
Front Park Lamps, Rear Tail Lamps, Front Side Marker Lamps,
License Plate Lamp, Radio, Heat/Vent/AC Control Head, Power
Sliding Door
Throttle Body Fuel Injection, Fuel Pump Relay, Elec. Vac. Reg. Valve,
Elec. Control Module, Elec. Spark Control Module
Front/Rear Turn Lamps, Front Side Marker Lamps, Cluster Turn
Telltale, Back-up Lamps, Fog Lamps
Cluster, Anti-Lock Brake System Lamp Module, Elec. Level Control Sensor
Cluster, Radio, Wiper Switch, Headlamp Switch? Rear Blower Switch,
Heat/Vent/AC Control Head, Door Switch Illumination, Front/Rear
Ashtray Illumination Bulbs
Anti-Lock Brake System Radio
Rear WiperNasher Motors; Overhead Console Compass
Front Wiperflasher Motor
A/C Compressor, A/C Solenoid Box, Compressor Relay, Temp.
Door
Motor, Low Blower Relay; Heat/Vent/AC Control Head; Cruise
Module; Cooling Fan Relay; Rear Defogger Relay; Key Chime; Vehicle
Speed Sensor Buffer and Generator Charge Discrete, Transaxle
Converter Clutch Switch
Front/Rear Blower Motors, High Blower Relay
Rear Blower, Rear Heat/Vent/AC
ProCarManuals.com
Page 225 of 276
Injector 3365 Fuse
(3800 V6 ENGINE ONLY)
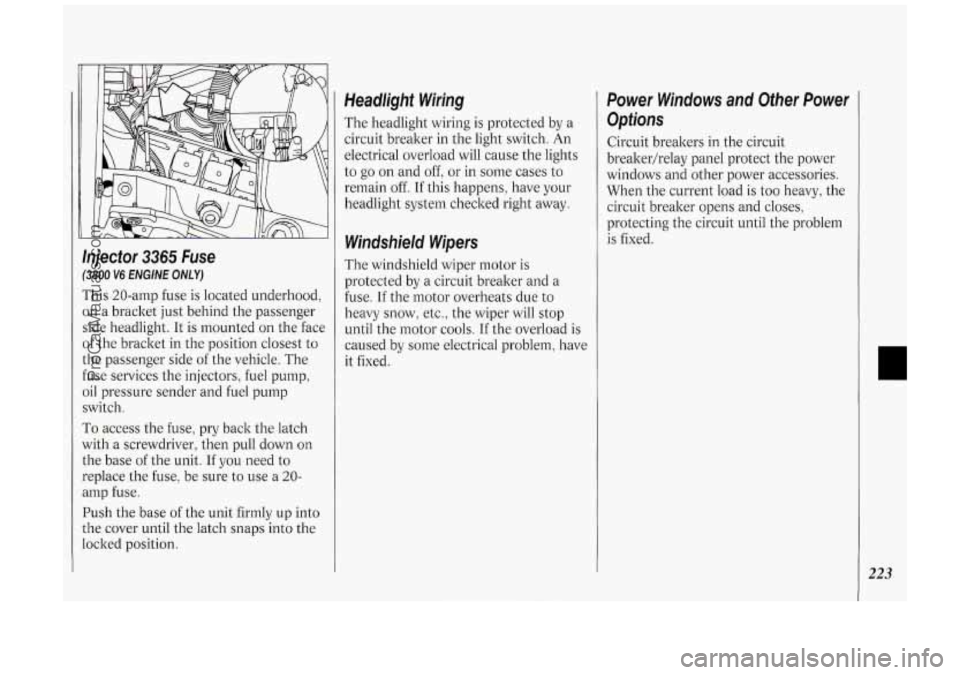
This 20-amp fuse is located underhood,
on a bracket just behind the passenger
side headlight. It is mounted on the face
of the bracket in the position closest to
the passenger side of the vehicle. The
fuse services the injectors, fuel pump,
oil pressure sender and fuel pump
switch.
To access the fuse, pry back the latch
with a screwdriver, then pull down on
the base
of the unit. If you need to
replace the fuse, be sure to use a 20-
amp fuse.
Push the base of the unit firmly up into
the cover until the latch snaps into the
locked position.
Headlight Wiring
The headlight wiring is protected by a
circuit breaker in the light switch. An
electrical overload will cause the lights
to go on and off: or
in some cases to
remain off. If this happens, have your
headlight system checked right away.
Windshield Wipers
The windshield wiper motor is
protected by a circuit breaker and a
fuse.
If the motor overheats due to
heavy snow, etc., the wiper will stop
until the motor cools.
If the overload is
caused by some electrical problem, have
it fixed.
Power Windows and Other Power
Options
Circuit breakers in the circuit
breakerhelay panel protect the power
windows and other power accessories.
When the current load is too heavy, the
circuit breaker opens and closes,
protecting the circuit until the problem
is fixed.
223
ProCarManuals.com
Page 240 of 276
Maintenance Schedule
238
Explanation of Scheduled
Maintenance Services
Following are explanations of the
services listed in Schedule I and
Schedule 11.
The proper fluids and lubricants to use
are listed in Section D. Make sure
whoever services your vehicle uses
these. All parts should be replaced and
all necessary repairs done before you or
anyone else drives the vehicle.
ITEM
NO. SERVICE
1. Engine Oil and Filter Change* -
Always use SH or SG Energy
Conserving
I1 oils of proper viscosity.
The
“SH” or “SG” designation may
be shown alone
or in combination
with others, such as “SH/CD,”
“SH,
SG, CD,” “SG/CD,” etc. To
determine the preferred viscosity for
your vehicle’s engine (e.g.,
SAE 5W-
30 or SAE 10W-30), see
Engine Oil
in the Index.
2. Chassis Lubrication - Lubricate
suspension and steering linkage.
Lubricate the transaxle shift linkage,
and parking brake cable guides,
underbody contact points and
linkage.
3. Tire and Wheel Rotation and
Inspection
- For proper wear and
maximum tire life, rotate your tires
following the instructions in this
manual. See
Tires, Inspection E.
Rotation in the Index. Check the
tires for uneven wear
or damage. If
you see irregular or premature wear,
check the wheel alignment. Check for
damaged wheels also.
Engine Accessory Drive Inspection
- Inspect the drive belt for cracks,
fraying, wear and proper tension.
Replace as needed.
I
Cooling System Servicee - Drain,
flush and refill the system with new
or approved recycled coolant
conforming to GM Specification
I
1825M. Keep coolant at the proper 1
mixture as specified. See Coolant in
the
Index. This provides proper
freeze and boil protection, corrosion
I
inhibitor level and maintains proper ’
engine operating temperature.
Inspect hoses
and replace if they are
cracked, swollen or deteriorated.
Tighten screw-type hose clamps.
Clean the outside of the radiator and
air conditioning condenser. Wash tht
pressure cap and neck.
To help ensure proper operation, we
recommend
a pressure test of both the
cooling system and the pressure cap.
ProCarManuals.com
Page 242 of 276
240
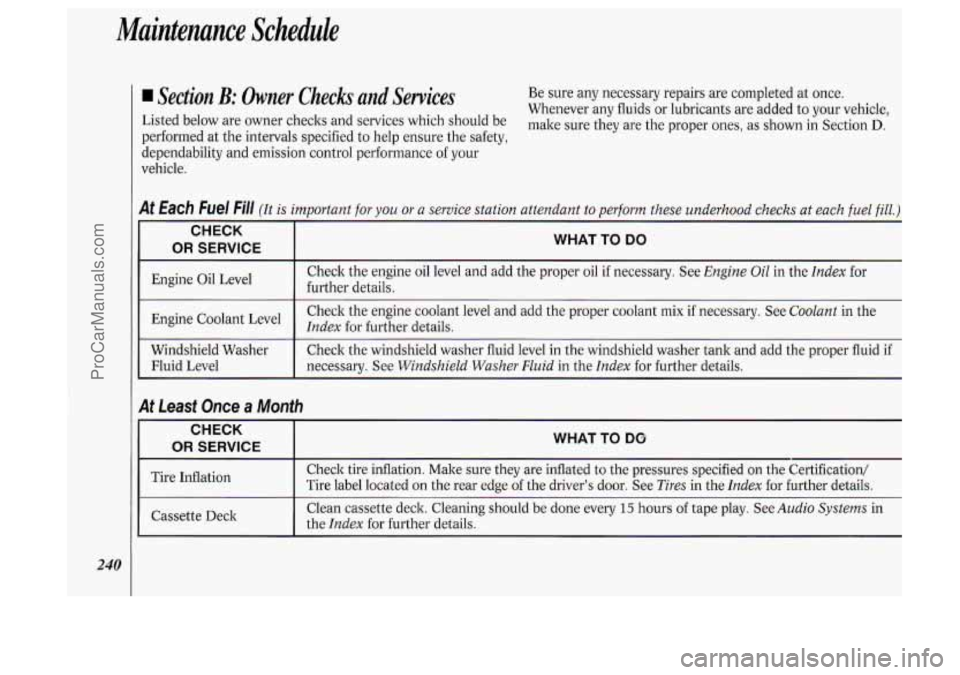
Section B: Owner Checks and Services Be sure any necessary repairs are completed at once.
Whenever any fluids or lubricants are added to your vehicle,
Listed below are owner checks and services which should be malte Sure they are the proper ones, as shown in Section
D.
performed at the intervals specified to help ensure the safety,
dependability and emission control performance of your
vehicle.
Each Fuel Fill (It is important
for you or a service station attendant to perform
these underhood
checks at each fuel fill.)
I
Check the engine coolant level and add the proper coolant mix if necessary. See Coolant in the
Engine Index for further details.
CHECK
OR SERVICE
I
WHAT TO DO
Check the engine oil level and add the proper oil if necessary. See Engine Oil in the Index for
further details.
Engine
Oil Level
Windshield Washer Check the windshield washer fluid level in the windshield washer tank and add the proper fluid if
Fluid Level necessary. See
Windshield Washer Fluid in the Index for further details. I
It Leasf Once a Month
CHECK
OR SERVICE
I
WHAT TO DO I
Tire Inflation I
Check tire inflation. Make sure they are inflated to the pressures specified on the Certification/
Tire label located
on the rear edge of the driver’s door. See Tires in the Index for further details.
Cassette Deck
I
Clean cassette deck. Cleaning should be done every 15 hours of tape play. See Audio Systems in
the
Index for further details.
ProCarManuals.com