wiring OLDSMOBILE SILHOUETTE 1994 Owners Manual
[x] Cancel search | Manufacturer: OLDSMOBILE, Model Year: 1994, Model line: SILHOUETTE, Model: OLDSMOBILE SILHOUETTE 1994Pages: 276, PDF Size: 15.82 MB
Page 73 of 276

0
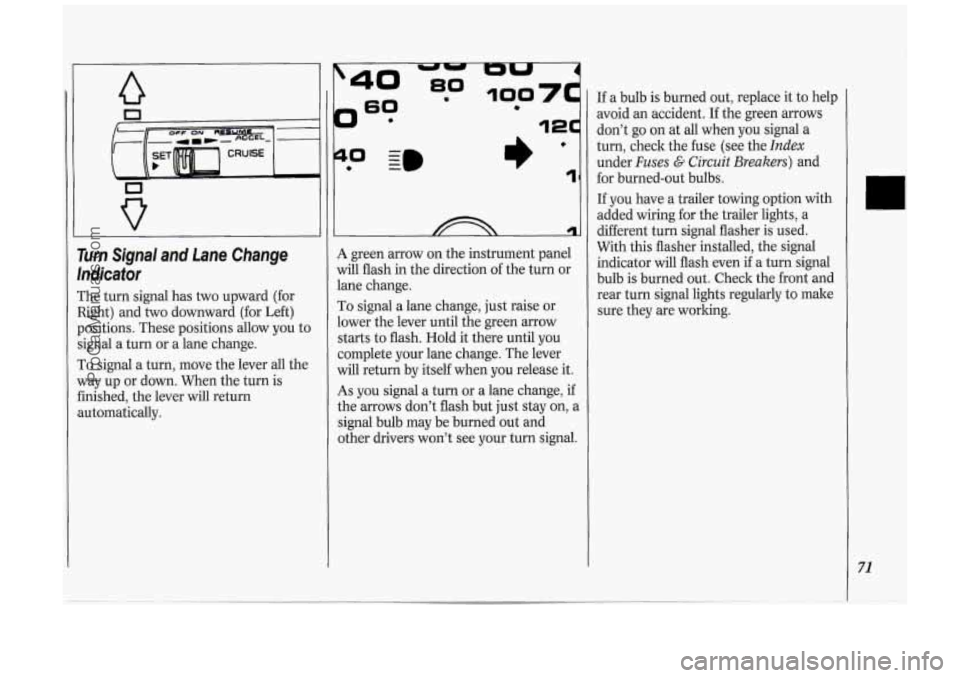
Turn Signal and Lane Change
lndicafor
The turn signal has two upward (for
Right) and two downward (for Left)
positions. These positions allow you to
signal a turn or a lane change.
To signal a turn, move the lever all the
way up or down. When the turn is
finished, the lever will return
automatically.
?
0 - I)’ 1
A green arrow on the instrument panel
will flash in the direction of the turn or
lane change.
To signal a lane change, just raise or
lower the lever until the green arrow
starts to flash. Hold it there until you
complete your lane change. The lever
will return by itself when you release it.
As you signal a turn or a lane change, if
the arrows don’t flash but just stay on, a
signal bulb may be burned out and
other drivers won’t see your turn signal. If
a bulb is burned out, replace it to help
avoid an accident. If the green arrows
don’t go on at all when you signal a
turn, check the fuse (see the
Index
under Fuses G Circuit Breakers) and
for burned-out bulbs.
If you have a trailer towing option with
added wiring for the trailer lights, a
different turn signal flasher is used.
With this flasher installed, the signal
indicator will flash even
if a turn signal
bulb is burned out. Check the front and
rear turn signal lights regularly to make
sure they are working.
71
ProCarManuals.com
Page 157 of 276

During your trip, check occasionally to
be sure that the load is secure, and that
the lights and
any trailer brakes are still
working.
Following Distance
Stay at least twice as far behind the
vehicle ahead as you would when
driving your vehicle without a trailer.
This can help you avoid situations that
require heavy braking and sudden
turns.
Passing
You’ll need more passing distance up
ahead when you’re towing a trailer.
And, because you’re a good deal longer,
you’ll need to go much farther beyond
the passed vehicle before you can return
to your lane.
Backing Up
Hold the bottom of the steering wheel
with one hand. Then, to move the
trailer to the left, just move that hand to
the left.
To move the trailer to the right,
move your hand to the right. Always back up
slowly and, if possible, have
someone guide you.
Making Turns
When you’re turning with a trailer,
make wider turns than normal. Do this
so your trailer won’t strike soft
shoulders, curbs, road signs, trees, or
other objects. Avoid jerky or sudden
maneuvers. Signal well in advance.
Turn Signals When Towing a
Trailer
When you tow a trailer, your vehicle has
to have a different turn signal flasher
and extra wiring. The green arrows on
your instrument panel will flash
whenever you signal a turn or lane
change. Properly hooked up, the trailer
lights will
also flash, telling other
drivers you’re about to turn, change
lanes or stop.
When towing a trailer, the green arrows
on your instrument panel will flash for
turns even
if the bulbs on the trailer are
burned out. Thus, you may think
drivers behind you are seeing your signal
when they are not.
It’s important
to check occasionally to be sure the
trailer bulbs are still working.
Driving On Grades
Reduce speed and shift to a lower gear
before you start down a long or steep
downgrade. If you don’t
shift down, you
might have to use your brakes
so much
that they would get hot and
no longer
work well.
On a long uphill grade, shift down and
reduce your speed to around
45 mph
(70 lwh) to reduce the possibility of
engine and transaxle overheating.
If you are towing a trailer that weighs
more than
1,000 pounds (454 kg), and
you have an automatic transaxle with
Overdrive, you may prefer to drive in
D
instead of Overdrive (or, as you need to,
a lower gear). This will minimize heat
build-up and extend the life of your
transaxle.
n
ProCarManuals.com
Page 206 of 276

Service &Appearance Care
204
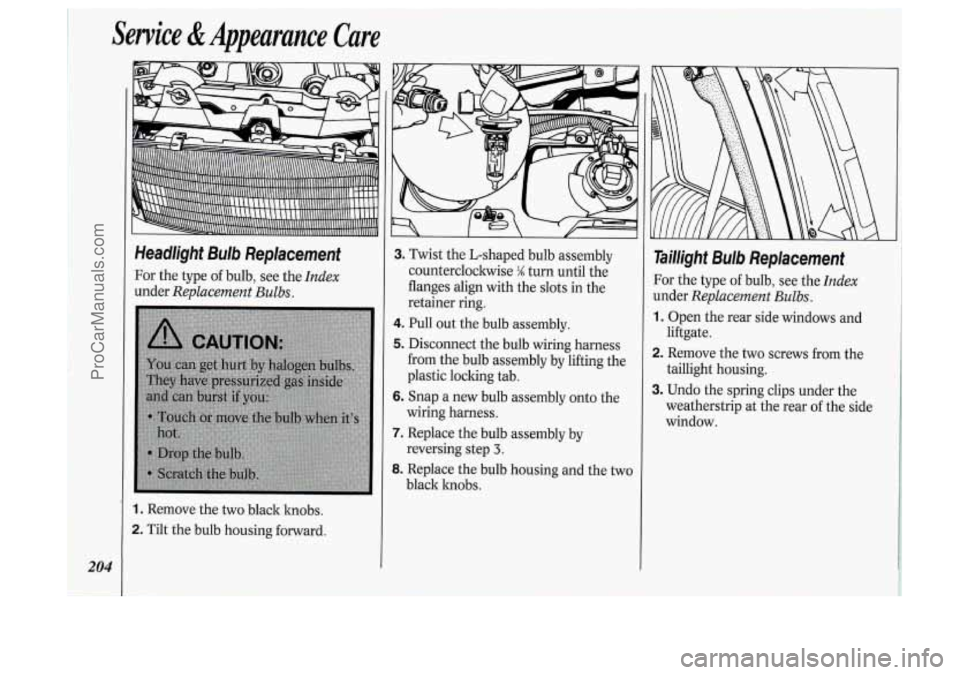
Headlight Bulb Replacement
For the type of bulb, see the Index
under Replacement Bulbs.
1. Remove the two black knobs.
2. Tilt the bulb housing forward.
3. Twist the L-shaped bulb assembly
counterclockwise
M turn until the
flanges align with the slots in the
retainer ring.
4. Pull out the bulb assembly.
5. Disconnect the bulb wiring harness
from the bulb assembly by lifting the
plastic locking tab.
6. Snap a new bulb assembly onto the
7. Replace the bulb assembly by
8. Replace the bulb housing and the two
wiring harness.
reversing step
3.
black knobs.
Taillight Bulb Replacement
For the type of bulb, see the Index
under Replacement Bulbs.
1. Open the rear side windows and
2. Remove the two screws from the
3. Undo the spring clips under the
liftgate.
taillight housing.
weatherstrip at the rear of the side
window.
ProCarManuals.com
Page 221 of 276

Ad-On Electrical Equiprnent
NOTICE:
Don’t add anything electrical to
your Oldsmobile unless you check
with your dealer first. Some electrical
equipment can damage your vehicle
and the damage wouldn’t be
covered by your warranty. Some
add-on electrical equipment can
keep other components from
working as they should.
Your vehicle has an air bag system.
Before attempting to add anything
electrical to your Oldsmobile, see
Servicing Your Air Bag-Equipped
Oldsmobile
in the Index.
Fuses & Circuit Breakers
The wiring circuits in your vehicle are
protected from short circuits
by a
:ombination of fuses and circuit
breakers in the wiring itself. This greatly
reduces the chance of damage caused
by electrical problems.
To identify and check fuses, refer to the
Fuse panel, which is behind the
glove
box door, and the fuse usage chart later
in this section.
To remove a fuse, grasp it firmly and
pull.
U
Look at the silver-colored band inside
the fuse.
If the band is broken or
melted, replace the fuse. Be sure you
replace a bad fuse with a new one of the
correct size.
219
ProCarManuals.com
Page 225 of 276

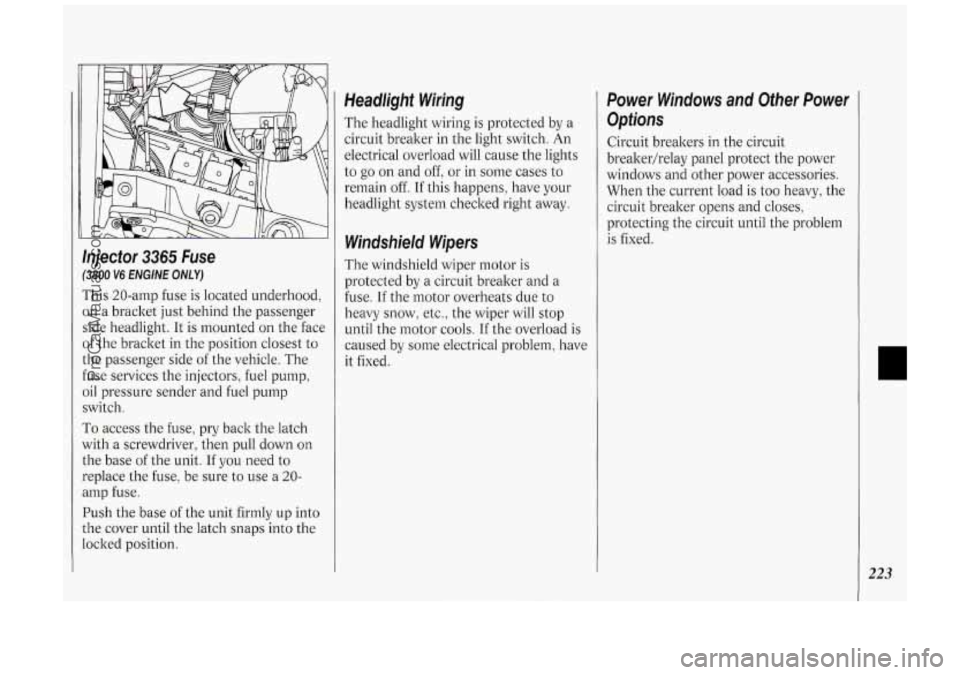
Injector 3365 Fuse
(3800 V6 ENGINE ONLY)
This 20-amp fuse is located underhood,
on a bracket just behind the passenger
side headlight. It is mounted on the face
of the bracket in the position closest to
the passenger side of the vehicle. The
fuse services the injectors, fuel pump,
oil pressure sender and fuel pump
switch.
To access the fuse, pry back the latch
with a screwdriver, then pull down on
the base
of the unit. If you need to
replace the fuse, be sure to use a 20-
amp fuse.
Push the base of the unit firmly up into
the cover until the latch snaps into the
locked position.
Headlight Wiring
The headlight wiring is protected by a
circuit breaker in the light switch. An
electrical overload will cause the lights
to go on and off: or
in some cases to
remain off. If this happens, have your
headlight system checked right away.
Windshield Wipers
The windshield wiper motor is
protected by a circuit breaker and a
fuse.
If the motor overheats due to
heavy snow, etc., the wiper will stop
until the motor cools.
If the overload is
caused by some electrical problem, have
it fixed.
Power Windows and Other Power
Options
Circuit breakers in the circuit
breakerhelay panel protect the power
windows and other power accessories.
When the current load is too heavy, the
circuit breaker opens and closes,
protecting the circuit until the problem
is fixed.
223
ProCarManuals.com
Page 268 of 276

266
Gate Ajar Light ................................ 107
Gear Positions
Gearshift Lever
Glove Boxes/Storage (see
Shifting the Transaxle )
(see Shifting the Transaxle)
Compartment 88
alogen Bulbs ............................... 203
...................................
H
Hazard
Warning Flashers ................ 158
Replacing
....................................... 203
Headlights
.......................................... 74
Headlight
& Taillight. Removing
and
High-Low Beam Changer
.................. 75
Instrument Panel Intensity Control
.. 76
On” Reminder
................................ 75
Replacement Bulb
.......................... 228
Wiring
............................................ 223
Head Restraint
................................... 14
Heater (see
Comfort Controls)
High Beams ........................................ 75
Hill and Mountain Roads
................ 147
Hood Release
................................... 186
LL
Operation ......................................... 75
“Highway Hypnosis”
....................... 146
Hills. Parking on
.............................. 156
Safety Warning
.............................. 187
Warning. Overheated
Engine
.......................... 187. 198. 199
Horn .................................................... 69 Hot
Engine. Safety
Warnings
............. 166. 187. 198. 199
Hydroplaning
.................................... 144
Identification Number. Vehicle
...... 21 8
Idling Your Engine ....................... 67. 68
If You’re Stuck: In Sand. Mud.
Ice or Snow
.................................... 179
Ignition Key
................................................... 44
Positions
.......................................... 58
Illuminated Entry System
.................. 50
Indicator Lights (see Warning Lights)
Infant Restraint (see Child Restraints)
Inflation. Tire ........................... 178. 208
Inflator.
Air ......................................... 85
Inside Rearview Mirror
...................... 86
Instrument Panel
................................ 97
Instrument Panel Cluster
................... 98
Instrument Panel Intensity Control
.. 76
Instrument Panel Warning Lights
... 100
Interior Lights
........................ 76, 79. 80
Override Switch
83 ...............................
J- ack, Tire ......................................... 172
Jump Starting
................................... 158
Keyless Entry, Remote
..................... 48
Keys
.................................................... 44
L ane Change Indicator .................... 71
Front
................................................ 23
Rear
.................................................. 32
Use by Children ......................... 34, 39
Level Control, Electronic
............ 94, 206
Liftgate
....................................... 56, 107
Lighter
................................................ 89
Lights Dome
................................................. 84
Fog
................................................... 76
Headlights
........................................ 74
Interior Lights Control
.................... 76
Interior Lights Override Switch
...... 83
On” Reminder
................................ 75
Reading
...................................... 80, 83
Removing &
Lap-Shoulder Belt .............................. 23
(6
Rear Interior Lights ......................... 84
Replacement Bulbs
........................ 228
Replacing Bulbs
................... 204, 228
Taillights
........................................ 204
Turn Signal
...................................... 71
Underhood
..................................... 190
Warning Lights
.............................. 100
Lights On Reminder
........................... 75
Loading Your Vehicle
................ 92, 206
Locks Manual
....................................... 45, 52
Power ............................................... 46
ProCarManuals.com