belt OLDSMOBILE SILHOUETTE 1997 Owners Manual
[x] Cancel search | Manufacturer: OLDSMOBILE, Model Year: 1997, Model line: SILHOUETTE, Model: OLDSMOBILE SILHOUETTE 1997Pages: 436, PDF Size: 21.87 MB
Page 3 of 436

The 1997 Oldsrnobile Silhouette Owner’s Manual
1-1
2- 1
3-1
4- 1
5-1
6- 1
7- 1
8-1
9- 1
Seats and Restraint Systems
This section tells you how to use your seats and safety belts properly. It also explains the “SRS” system.
Features and Controls
This section explains how to start and operate your Oldsmobile.
Comfort Controls and Audio Systems
This section tells you how to adjust the ventilation and comfort controls and how to operate your audio system.
Your Driving and the Road
Here you’ll find helpful information and tips about the road and how to drive under different conditions.
Problems on the Road
This section tells what to do if you have a probletn while driving, such as a flat tire or overheated engine, etc.
Service and Appearance Care
Here the manual tells you how to keep your Oldsmobile running properly and looking good.
Maintenance Schedule
This section tells you when to perform vehicle manitenance and what fluids and lubricants to use.
Customer Assistance Information
This section tells you how to contact Oldsmobile for assistance and how to get service and owner publications.
It also gives you information on “Reporting Safety Defects” on page 8-8.
Index
Here’s an alphabetical listing of almost every subject in this manual. You can use it to quickly find
something you want to read.
i
ProCarManuals.com
Page 7 of 436

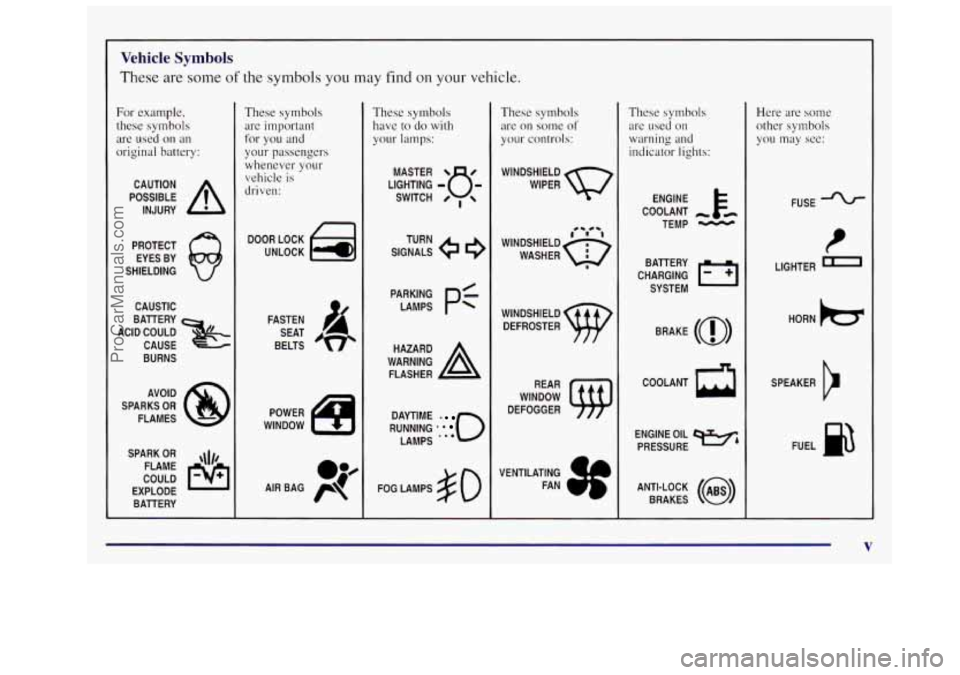
Vehicle Symbols
These are some of the symbols you may find on your vehicle.
For example,
these symbols
are used
on an
original battery:
POSSIBLE A
CAUTION
INJURY
PROTECT EYES BY
SHIELDING
CAUSTIC
ACID COULD
&
BATTERY
CAUSE
BURNS
AVOID
SPARKS
OR
FLAMES
SPARK
OR ,\I/,
COULD FLAME
EXPLODE BATTERY
These symbols are important
for you and
your passengers whenever your
vehicle is
driven:
DOOR LOCK
UNLOCK
FASTEN SEAT
BELTS
These symbols have
to do with
your lamps:
SIGNALS e
TURN
RUNNING
* ' 0
DAYTIME .
LAMPS .**
FOG LAMPS $0
These symbols
are
on some of
your controls:
WINDSHIELD
WIPER
WINDSHIELD DEFROSTER
WINDOW
DEFOGGER
VENTILATING FAN
These symbols are used
on
warning and
indicator lights:
COOLANT -
TEMP -
CHARGING 1'1
BATTERY
SYSTEM
BRAKE
(a)
COOLANT a
ENGINE OIL
PRESSURE
Wb
ANTI-LOCK (@)
BRAKES
Here are some
other symbols
you may see:
FUSE
P
LIGHTER -
HORN )tr
SPEAKER
b
FUEL B
ProCarManuals.com
Page 9 of 436

Section 1 Seats and Restraint Systems
Here you’ll find information about the seats in your Oldsmobile and how to use your safety belts properly. You can
also learn about some things you should
not do with air bags and safety belts.
1-2
1-2
1-3
1-3
1 -4
1-6
1-6
1-6
1-7 1-7
1-8
1-18
1-26
1-30 Seats
and Controls
Manual Seats
Power Seats
Folding Driver’s Seatback
Reclining Front Seatbacks
Manual Lumbar Control
Head Restraints
Rear Seats Second Row Safety Belt Stowage
Dump and Stow Feature
Solid Bench Seats
Split Bench Seats
Captain Chairs
Why Safety Belts Work 1-33
1-34
1-42 1-43
1-49
1-52
1-56
1-58
1-68
1-69
1-80 1-80
1-80 Questions
Many People Ask About
Safety Belts
How to Wear Safety Belts Properly
Safety Belt Use During Pregnancy
Questions and Answers About Air Bags
Reat Seat Passengers
Rear Safety Belt Comfort Guides
Important for Buckling Children
in
Child Restraints
Using the Built-In Child Restraint
How to Use Child Restraints
Child Restraint Top Straps
How to Obtain a Safety Belt Extender
Checking Your Restraint Systems
Replacing Parts After
a Crash
ProCarManuals.com
Page 13 of 436

But don’t have a seatback reclined if your vehicle is moving.
Sitting in a reclined position when your vehicle is
in motion can be dangerous. Even
if you buckle
up, your safety belts can’t do their job when
you’re reclined like this.
The shoulder belt can’t do its job because it
won’t be against your body. Instead,
it will be in
front of you. In a crash you could
go into it,
receiving neck or other injuries.
The lap belt can’t do its job either. In a crash the
belt could
go up over your abdomen. The belt
forces would be there, not at your pelvic bones.
This could cause serious internal injuries.
For proper protection when the vehicle
is m
motion, have the seatback upright. Then sit well
back
in the seat and wear your safety belt properly.
ProCarManuals.com
Page 15 of 436

Second Row Safety Belt Stowage
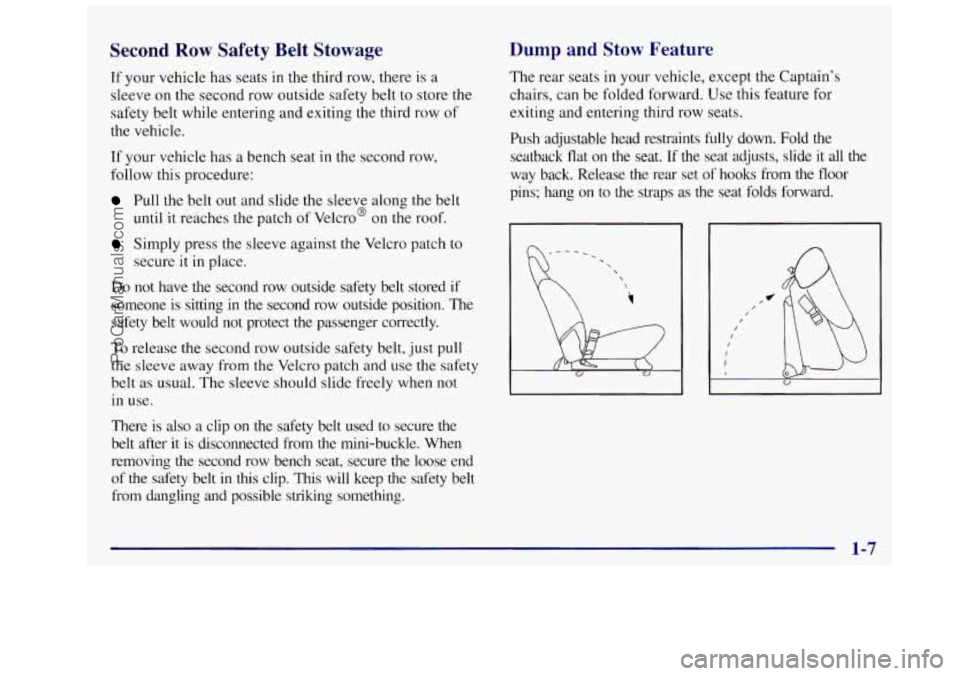
If your vehicle has seats in the third row, there is a
sleeve on the second row outside safety belt to store the
safety belt while entering and exiting the third row of
the vehicle.
If your vehicle has a bench seat
in the second row,
follow this procedure:
Pull the belt out and slide the sleeve along the belt
until it reaches the patch of Velcro@ on the roof.
Simply press the sleeve against the Velcro patch to
secure it in place.
Do not have the second row outside safety belt stored if
someone
is sitting in the second row outside position. The
safety belt would not protect
the passenger correctly.
To release the second row outside safety belt, just pull
the sleeve away from the Velcro patch and use the safety
belt as usual. The sleeve should slide freely when not
in use.
~nere is
also a clip on the safety belt used to secure the
belt after it is disconnected from the mini-buckle. When
removing the second row bench seat, secure the loose end of the safety belt
in this clip. This will keep the safety belt
from dangling and possible striking something.
Dump and Stow Feature
The rear seats in your vehicle, except the Captain’s
chairs, can be folded forward. Use this feature for
exiting and entering third row seats.
Push adjustable head restraints
fully down. Fold the
seatback
flat on the seat. If the seat adjusts, slide it all the
way back. Release the rear set of hooks from the floor
pins; hang on to the straps as the seat folds forward.
1-7
ProCarManuals.com
Page 16 of 436

Solid Bench Seat
If you have a solid bench seat, the seatback can be
folded down. The seat can also be folded forward or
removed to provide extra storage space.
Second Row Solid Bench Seats
Folding the Seatback
To fold down the seatback,
' pull the nylon strap on the
back of the seat.
To raise the seatback, pull the nylon strap on the back of
the seat while raising the seatback
until it locks upright.
Push and pull on the seatback to check that
it is locked.
Removing the Second Row Solid Bench Seat
With the seatback in the upright position, unhook the
side attachment for the safety belt. This mini-buckle
is
located on the right side of the seat.
Push up
the red center on
the buckle with a small
pointed object like a key
or pen.
1. Pull the nylon strap on the back of the seat to fold
the seatback forward.
1-8
ProCarManuals.com
Page 20 of 436

A seat that isn't locked into place properly can
move around in a collisio~l
or sudden stop. People
in the vehicle could be injured. Be sure to lock
the seat into place properly when installing it.
6. Pull the nylon strap on the back of the seat and raise
the seatback until it locks upright.
7. Push and pull on the seatback to check that it is
locked into place.
A CAUTION:
If the seatback isn't locked, it could move
forward in a sudden stop or crash. That could
cause injury to the person sitting there.
Always
press rearward on the seatback to be sure it
is locked.
8. Attach the mini-buckle so that the safety belt is
ready for use when a passenger uses the seat.
The buckle reattaches by pushing the latch into the
buckle
until the red center pops out again.
1-12
ProCarManuals.com
Page 28 of 436

/
~
Release the lever. Push and
is locked into place. Lift
up either lever and slide
the seat forward to allow
for
extra storage behind the
seat, or slide the seat back
to allow extra room
for passengers.
pull on the seat to be sure it
Removing the Split Bench Seat
Make sure the seatback is in the upright position and
that the safety belts are on the correct section of the seat.
The head restraints should be fully down.
For the second row bench: With the seatback in the
upright position, unhook the side attachment for the
safety belt. This mini-buckle is located
on the right side
of the seat.
Push up the red center on
the buckle with
a small
pointed object like a key
or pen.
I. Lift the seatback recliner lever or pull the nylon strap
on the
back of the seat to fold the seatback forward.
2. Slide the seat all the way back by lifting either one of
the adjustment bars and sliding the seat fully rearward.
1-20
ProCarManuals.com
Page 33 of 436

A seat that isn’t locked into place properly can
move around in
a collision or sudden stop. People
in the vehicle could be injured. Be sure to lock
the seat into place properly when installing it.
A CAUTION:
If the seatback isn’t locked, it could move
forward in
a sudden stop or crash. That could
cause injury to the person sitting there. Always
press rearward on the seatback to be sure it
is locked.
7. Lift the seatback recliner lever or pull the nylon strap
on the back of the seat and raise the seatback until it
locks upright.
9. Attach the mini-buckle so that the safety belt is
ready for use when a passenger uses the seat.
8. Push and pull on the seatback to check that it
is locked. The
buckle reattaches by pushing the latch into the
buckle until the red center pops out again.
Repeat Steps
1 through 5 for the other section of the
split bench seat.
ProCarManuals.com
Page 36 of 436

2. Push the rear of the seat down to lock the rear latches
onto
the rear set of floor pins.
I
3. Push and pull on the seat to be sure it is properly attached.
Safety Belts: They’re for Everyone
This part of the manual tells you how to use safety belts
properly.
It also tells you some things you should not do
with safety belts.
And
it explains the Supplemental Restraint System
(SRS), or air bag system.
A seat that isn’t locked into place properly can
move around in a collision or sudden stop. People
in the vehicle could be injured. Be sure to lock
the seat into place properly when installing it. Don’t let
anyone ride where he or she can’t wear
a safety belt properly. If you are in a crash and
you’re not wearing
a safety belt, your injuries
can be much worse. You can hit things inside the
vehicle or be ejected from it. You can be seriously
injured or killed. In the same crash, you might
not be if you are buckled up. Always fasten your
safety belt, and check that your passengers’ belts
are fastened properly too.
1-28
ProCarManuals.com