OLDSMOBILE SILHOUETTE 1998 Owners Manual
Manufacturer: OLDSMOBILE, Model Year: 1998, Model line: SILHOUETTE, Model: OLDSMOBILE SILHOUETTE 1998Pages: 444, PDF Size: 23.2 MB
Page 271 of 444

Making Turns
NOTICE:
Making very sharp turns while trailering could
cause the trailer to come in contact with the vehicle. Your vehicle could
be damaged. Avoid
making very sharp turns while trailering.
When you’re turning with a trailer, make wider turns
than normal. Do this
so your trailer won’t strike soft
shoulders, curbs, road signs, trees or other objects.
Avoid jerky or sudden maneuvers. Signal well
in advance.
Turn Signals When Towing a Trailer
When you tow a trailer, your vehicle has to have
extra wiring.
The arrows on your instrument panel will flash
whenever
you signal a turn or lane change. Properly
hooked up, the trailer lamps will also flash, telling other
drivers you’re about to turn, change lanes or stop. When
towing a trailer, the arrows on your instrument
panel will flash for turns even if the bulbs on the trailer
are burned
out. Thus, you may think drivers behind you
are seeing your signal when they are not. It’s important
to check occasionally to be sure the trailer bulbs are
still working.
Driving On Grades
Reduce speed and shift to a lower gear before you start
down a long or steep downgrade.
If you don’t shift
down, you might have to use your brakes
so much that
they would get hot and no longer work well.
On a long uphill grade, shift down and reduce your
speed to around
45 mph (70 km/h) to reduce the
possibility of engine and transaxle overheating.
If
you are towing a trailer that weighs more than
1,000 lbs. (450 kg), you may prefer to drive in
THIRD
(3) instead of AUTOMATIC OVERDRIVE (D)
(or, as you need to, a lower gear). This will minimize
heat build-up and extend the life of your transaxle.
4-39
ProCarManuals.com
Page 272 of 444

Parking on Hills
You really should not park your vehicle, with a trailer
attached, on a hill.
If something goes wrong, your rig
could start to move. People can be injured, and both
your vehicle and the trailer can be damaged.
But
if you ever have to park your rig on a hill, here’s
how
to do it:
1. Apply your regular brakes, but don’t shift into
PARK
(P) yet.
2. Have someone place chocks under the trailer wheels.
3. When the wheel chocks are in place, release the
regular brakes until the chocks absorb the load.
4. Reapply the regular brakes. Then apply your parking
brake, and then shift to PARK (P).
5. Release the regular brakes.
When You Are Ready to Leave After
Parking on a Hill
1. Apply your regular brakes and hold the pedal down
while you:
Start your engine;
Shift into a gear; and
Release the parking brake.
2. Let up on the brake pedal.
3. Drive slowly until the trailer is clear of the chocl ss .
4. Stop and have someone pick up and store the chocks.
Maintenance When Trailer Towing
Your vehicle will need service more often when you’re
pulling a trailer. See the Maintenance Schedule for more
on this. Things that are especially important in trailer
operation are automatic transaxle fluid (don’t overfill),
engine oil, belts, cooling system and brake adjustment.
Each of these is covered in this manual, and the Index
will help you find them quickly. If you’re trailering, it’s
a good idea to review these sections before you start
your trip.
Check periodically to see that all hitch nuts and bolts
are tight.
4-40
ProCarManuals.com
Page 273 of 444

@lJ NOTES
4-41
ProCarManuals.com
Page 274 of 444

b6 NOTES
4-42
ProCarManuals.com
Page 275 of 444

Section 5 Problems on the Road
Here you’ll find what to do about some problems that can occur on the road.
5-2
5-2
5-3
5-7
5- 13
5-24 Hazard Warning
Flashers
Other Warning Devices
Jump Starting Towing Your Vehicle
Engine Overheating If a Tire Goes Flat
5-24 Air Inflator (Option)
5-24 Changing a Flat Tire
5-34 Compact Spare Tire
5-35 If You’re Stuck: In Sand,
Mud, Ice or Snow
ProCarManuals.com
Page 276 of 444

Hazard Warning Flashers
Your hazard warning flashers let you warn others. They
also let police know you have a problem. Your front and
rear turn signal lamps will flash on and off. Your
hazard warning
flashers button is on top of
the steering column. Press
the button in to turn on
your flashers.
Your ha,,,, warning flashers work no matter what
position your key
is in, and even if the key isn’t in.
To turn off the flashers, push the button down and it will
pop back up by itself.
When the hazard warning flashers are on, your turn
signals won’t work.
Other Warning Devices
If you carry reflective triangles, you can set one up at
the side
of the road about 300 feet (100 m) behind
your vehicle.
5-2
ProCarManuals.com
Page 277 of 444

Jump Starting
If your battery has run down, you may want to use
another vehicle and some jumper cables to start your
vehicle. But please use the following steps listed to
do it safely.
On vehicles equipped with the optional power sliding
door, a low voltage battery or replacing a battery may
cause the system to become inoperative. See “Power
Sliding Door” in the Index for more information. NOTICE:
Ignoring these steps could result in costly damage
to your vehicle that wouldn’t be covered by
your warranty.
Trying to start your vehicle by pushing or pulling
it won’t work, and
it could damage your vehicle.
1. Check the other vehicle. It must have a 12-volt
battery with a negative ground system.
Batteries can hurt you. They can be dangerous
because:
0 They contain acid that can burn you.
0 They contain gas that can explode or ignite.
0 They contain enough electricity to
If’ you don’t follow these steps exactly, some or all
of these things can hurt you.
burn
you.
I NOTICE:
If the other system isn’t a 12-volt system with a
negative ground, both vehicles can be damaged.
2. Get the vehicles close enough so the jumper cables
can reach, but be sure the vehicles aren’t touching
each other.
If they are, it could cause a ground
connection you don’t want. You wouldn’t be able to
start your vehicle, and the bad grounding could
damage the electrical systems.
5-3
ProCarManuals.com
Page 278 of 444

NOTICE:
To avoid the possibility of the vehicles rolling, set
the parking brake firmly on both vehicles
involved in the jump start procedure. Put an
automatic transaxle in
PARK (P).
3. Turn off the ignition on both vehicles. Unplug
unnecessary accessories plugged into the cigarette
lighter or accessory power outlet. Turn
off all lamps
that aren’t needed as well as radios. This will avoid
sparks and help save both batteries.
In addition, it
could save your radio!
I NOTICE:
If you leave your radio on, it could be badly
damaged. The repairs wouldn’t be covered by
your warranty.
JTION:
--
An electric fan can start up even when the engine
is not running and can injure you. Keep hands,
clothing and tools away from any underhood
electric fan.
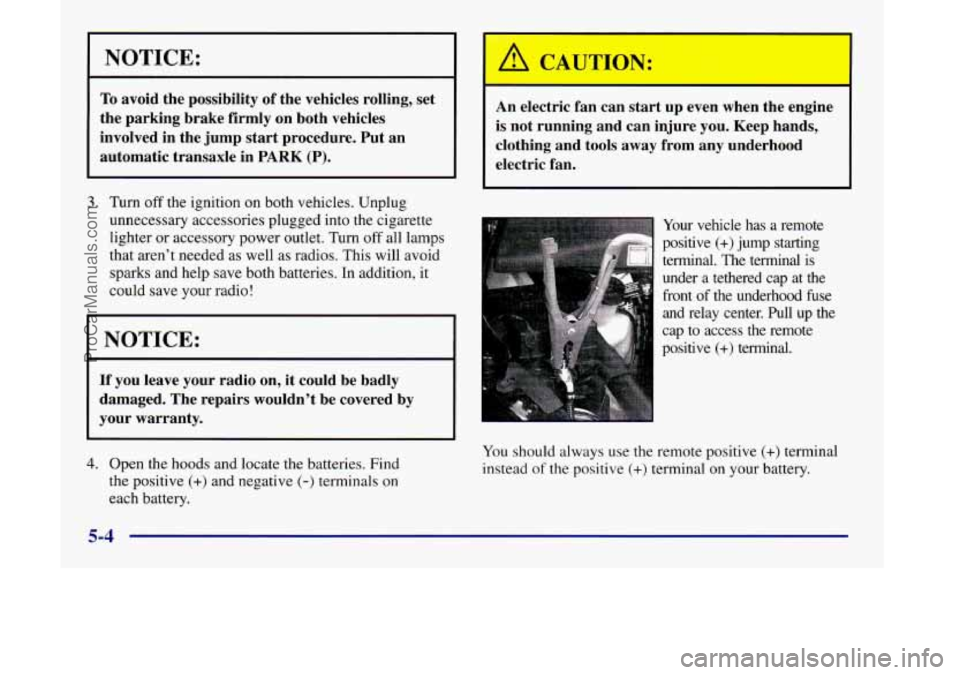
Your vehicle has a remote
positive
(+) jump starting
terminal. The terminal is
under a tethered cap at the
front of the underhood fuse
and relay center. Pull up the
cap to access the remote
positive
(+) terminal.
4. Open the hoods and locate the batteries. Find
the positive
(+) and negative (-) terminals on
each battery. You
should always use
the remote positive (+) terminal
instead
of the positive (+) terminal on your battery.
5-4
ProCarManuals.com
Page 279 of 444

- CAUTICA
Using a match near a battery can cause battery
gas to explode. People have been hurt doing this,
and some have been blinded. Use a flashlight if
you need more light.
Be sure the battery has enough water. You don’t
need to
add water to the ACDelco Freedom@
battery installed in every new
GM vehicle. But if
a battery has filler caps, be sure the right amount
of fluid is there.
If it is low, add water to take
care of that first.
If you don’t, explosive gas could
be present.
Battery fluid contains acid that can burn you.
Don’t get it on you. If you accidentally get it in
your eyes or on your skin, flush the place with
water and get medical help immediately. Fans or other moving engine parts can injure
you
badly. Keep your hands
away from moving parts
once the engine is running.
-1
5. Connect the red positive (+) cable to the positive (+)
terminal of the vehicle with the dead battery. Use a
remote positive
(+) terminal if the vehicle has one.
6. Don’t let the other end
touch metal. Connect it
to the positive
(+)
terminal of the good
battery. Use a remote
positive
(+) terminal if
the vehicle has one.
5-5
ProCarManuals.com
Page 280 of 444

7. Now connect the black
negative
(-) cable to
the good battery’s
negative
(-) terminal.
Don’t let the other end touch anything until the next
step.
The other end of the negative (-) cable doesn’t go
to the dead battery. It goes to a heavy unpainted metal
part on the engine of the vehicle with the dead battery. 8. Attach the
cable at least
18 inches
(45 cm) away
from the dead battery,
but not near engine parts
that move.
The electrical
connection is just as
good there, but the
chance of sparks getting
back to the battery
is
much less.
9. Now start the vehicle with the good battery and run
the engine for
a while.
10. Try to start the vehicle with the dead battery.
If it won’t start after a few tries, it probably
needs service.
5-6
ProCarManuals.com