torque OLDSMOBILE SILHOUETTE 1998 Owners Manual
[x] Cancel search | Manufacturer: OLDSMOBILE, Model Year: 1998, Model line: SILHOUETTE, Model: OLDSMOBILE SILHOUETTE 1998Pages: 444, PDF Size: 23.2 MB
Page 139 of 444

Torque Lock
If you are parking on a hill and you don’t shift your
transaxle into PARK
(P) properly, the weight of the
vehicle may put too much force on the parking pawl in
the transaxle. You may find it difficult to pull the shift
lever out of PARK (P). This is called “torque lock.” To
prevent torque lock, set the parking brake and then shift
into PARK (P) properly before you leave the driver’s
seat. To find out how, see “Shifting Into PARK (P)” in
the Index.
When you are ready to drive, move the shift lever out of
PARK (P)
before you release the parking brake.
If torque lock does occur, you may need to have another
vehicle push yours a little uphill to take some of the
pressure from the parking pawl in the transaxle,
so you
can pull the shift lever out of PARK (P).
Shifting Out of PARK (P)
Your vehicle has Brake-Transaxle Shift Interlock
(BTSI). You have to fully
apply your regular brakes
before you can shift from PARK (P), when the ignition
is
in RUN.
As you step on the brake pedal, while in PARK
(P), you
may hear a click from the solenoid
of the BTSI. This
ensures that the BTSI
is operating properly. See
“Automatic Transaxle Operation” in the Index.
If you cannot shift out of PARK (P), ease pressure on
the shift lever
-- push the shift lever all the way into
PARK
(P) as you maintain brake application. Then
move the shift lever into the gear you want. If you ever
hold the brake pedal down but still can’t shift out of
PARK (P), try this:
1.
2.
3.
4.
5.
Turn the ignition key to OFF.
Apply and hold the brake until the end of Step 4.
Shift to NEUTRAL (N).
Start the vehicle and then shift to the drive gear
you want.
Have the vehicle fixed as soon as you can.
2-37
ProCarManuals.com
Page 306 of 444

OLDS ONLY
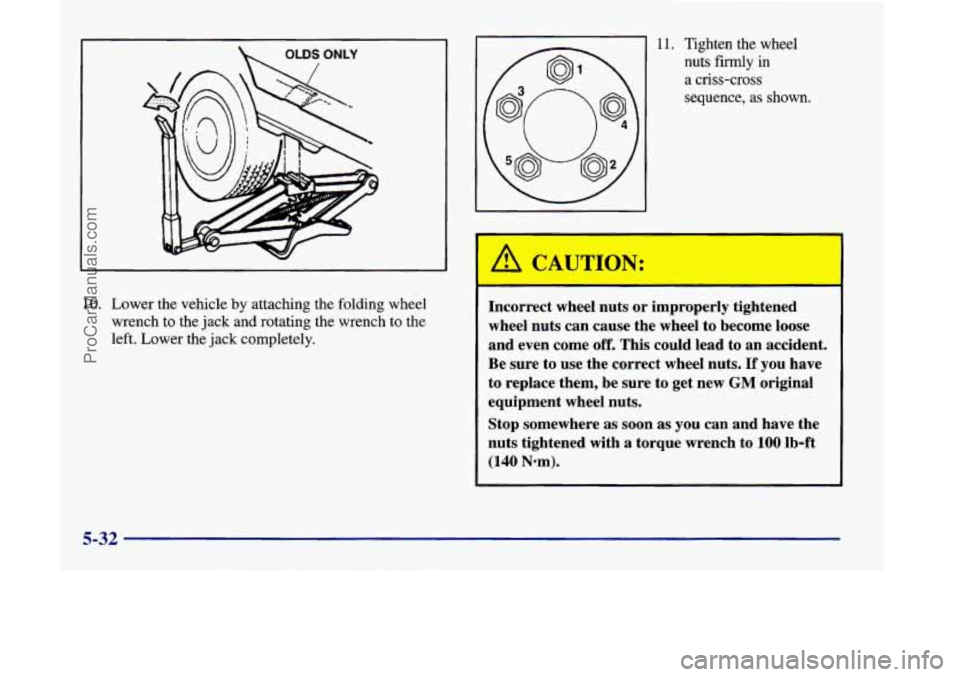
10. Lower the vehicle by attaching the folding wheel
wrench to the jack and rotating the wrench to the
left. Lower the jack completely.
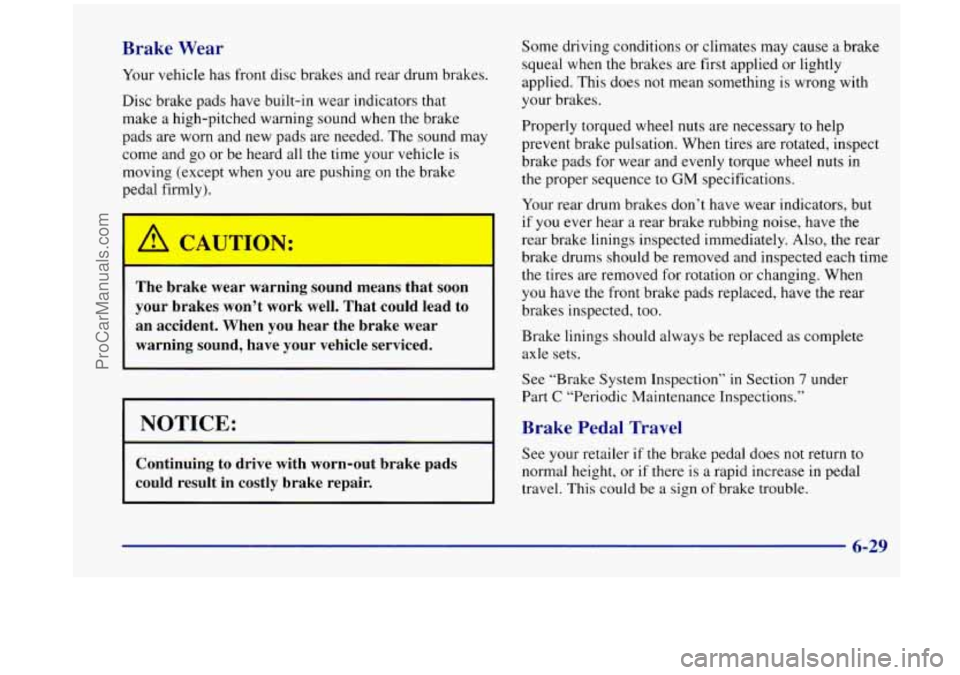
I 11. Tighten the wheel
A CAUTION:
nuts firmly in
a criss-cross
sequence, as shown.
Incorrect wheel nuts or improperly tightened
wheel nuts can cause the wheel to become loose
and even come
off. This could lead to an accident.
Be sure to use the correct wheel nuts.
If you have
to replace them, be sure to get new
GM original
equipment wheel nuts.
Stop somewhere as soon as you can and have the
nuts tightened with a torque wrench to
100 lb-ft
(140 Nom).
5-32
ProCarManuals.com
Page 307 of 444

I
NOTICE:
Improperly tightened wheel nuts can lead to
brake pulsation and rotor damage.
To avoid
expensive brake repairs, evenly tighten the wheel
nuts in the proper sequence and
to the proper
torque specification.
Don’t try to put a wheel cover on the compact spare tire. It
won’t fit. Store the wheel cover securely
in the rear of the
vehicle
until you have the flat tire repaired or replaced.
I NOTICE:
Wheel covers won’t fit on your compact spare. If
you try to put a wheel cover on your compact
spare, you could damage the cover or the spare.
Storing a Flat or Spare Tire and Tools
Storing a jack, a tire or other equipment in the
passenger compartment
of the vehicle could
cause injury.
In a sudden stop or collision, loose
equipment could strike someone. Store all these
in the proper place.
Lay the tire near the rear of the vehicle with the valve
stem down. Slide the cable retainer through the center
of
the wheel and start to raise the tire. When the tire is
almost in the stored position, turn the tire
so the valve is
towards the rear
of the vehicle. This will help when you
check and maintain tire pressure in the spare.
Keep raising the wheel until you hear the hoist
mechanism click twice. This means the wheel is firmly
stored against the underside
of the vehicle. Push
against the wheel to be sure it does not move and is
stored securely.
5-33
ProCarManuals.com
Page 339 of 444

Brake Wear
Your vehicle has front disc brakes and rear drum brakes.
Disc brake pads have built-in wear indicators that
make a high-pitched warning sound when the brake
pads are worn and new pads are needed. The sound may
come and go or be heard all the time your vehicle is
moving (except when you are pushing
on the brake
pedal firmly).
I A CAUTION:
The brake wear warning sound means that soon
your brakes won’t work well. That could lead to
an accident. When you hear the brake wear
warning sound, have your vehicle serviced.
NOTICE:
Continuing to drive with worn-out brake pads
could result in costly brake repair.
Some driving conditions or climates may cause a brake
squeal when the brakes are first applied
or lightly
applied. This does not mean something is wrong with
your brakes.
Properly torqued wheel nuts are necessary to help
prevent brake pulsation. When tires are rotated, inspect
brake pads for wear and evenly torque wheel nuts in
the proper sequence
to GM specifications.
Your rear drum brakes don’t have wear indicators, but
if you ever hear
a rear brake rubbing noise, have the
rear brake linings inspected immediately. Also, the rear
brake drums should be removed and inspected each time
the tires are removed for rotation or changing. When
you have the front brake pads replaced, have the rear
brakes inspected, too.
Brake linings should always be replaced as complete
axle sets.
See “Brake System Inspection’’ in Section
7 under
Part
C “Periodic Maintenance Inspections.”
Brake Pedal Travel
See your retailer if the brake pedal does not return to
normal height, or if there is a rapid increase in pedal
travel. This could be a sign of brake trouble.
6-29
ProCarManuals.com
Page 351 of 444

Tire Inspection and Rotation
Tires should be rotated every 6,000 to 8,000 miles
(10 000 to 13 000 km). Any time you notice unusual
wear, rotate your tires as soon
as possible and check
wheel alignment. Also crheck for damaged tires or
wheels.
See “When It’s ‘Time for New Tires”
and “Wheel Replacement” later in this section for
more information.
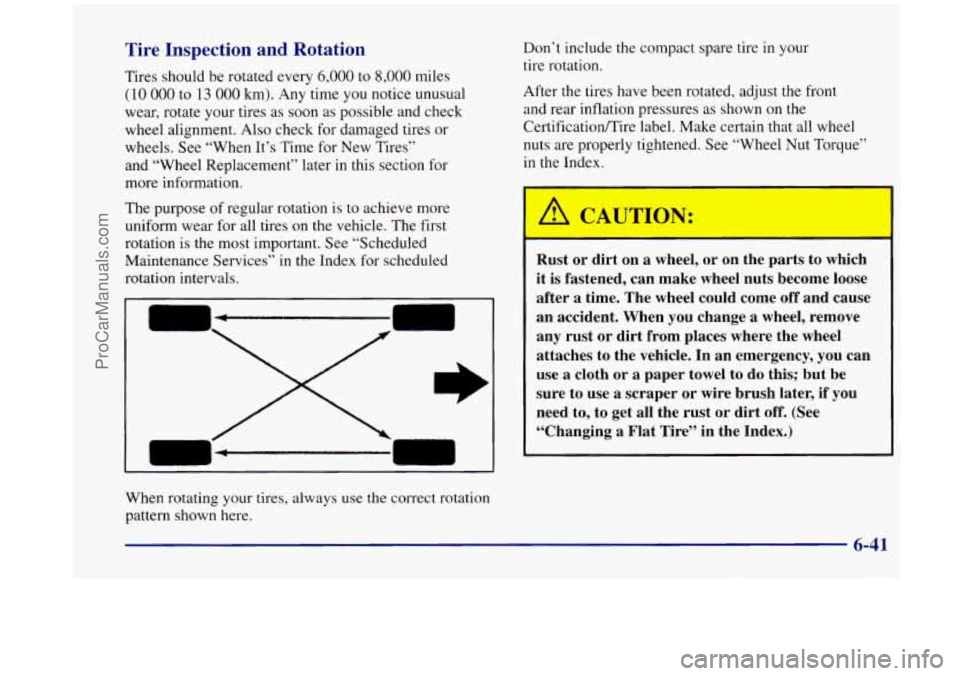
The purpose of regular rotation is to achieve more
uniform wear for all tires on the vehicle. The first
rotation
is the most important. See “Scheduled
Maintenance Services” in the Index for scheduled
rotation intervals.
1
When rotating your tires, always use the correct rotation
pattern shown here. Don’t
include the compact spare tire
in your
tire rotation.
After the tires have been rotated, adjust the front
and rear inflation pressures as shown on the
CertificatiodTire label. Make certain that all wheel
nuts are properly tightened. See “Wheel Nut Torque”
in the Index.
Rust or dirt on
a wheel, or on the parts to which
it is fastened, can make wheel nuts become loose
after
a time. The wheel could come off and cause
an accident. When you change
a wheel, remove
any rust or dirt from places where the wheel
attaches to the vehicle. In an emergency, you can
use
a cloth or a paper towel to do this; but be
sure
to use a scraper or wire brush later, if you
need to,
to get all the rust or dirt off. (See
“Changing
a Flat Tire” in the Index.)
6-41
ProCarManuals.com
Page 369 of 444

Fuses Fuses
RR HVAC SWC ACCY
HAZARD
RR PWR SCKT
DRL
LH T/LP
RR DEFOG
FRT PWR SCKT
SIR
FRT HVAC LOW/MED BLWR Rear
Blower Motor, Rear
Heater-A/C Control, and
Temperature Door
Actuator (Rear)
Steering Wheel Radio Control
Switches
Turn Signal Switch
Rear Electric Accessory
Plug Housing
DRL Control Module
Not Used
Rear Window Defogger Relay
Front Electric Accessory
Plug Housing
Inflatable Restraint
Control Module
Heater-A/C Control MALL/RADIO/DIC
BCM, Driver Information
Display, Radio and Radio Rear Speaker Amplifier
STOP LAMP
ABS MOD BATT
CAN VENT
SOL
ELC CTSY LAMP
IGN 1
Stoplamp Switch to Stoplamps
Electronic Brake Control
Module/Electronic Brake
Traction Control Module (EBCM/EBTCM)
Evaporative Emissions (EVAP)
Canister Vent Solonoid Valve
Electronic Level Control (ELC)
Air Compressor and ELC
Relay, Trailer Harness
BCM
ALC Sensor, BCM, Electronic
Brake Control Indicator Lamp
Driver Module, Instrument
Panel Cluster, Rear Window
Wipermasher and
Multifunction Switch (Fog
Lamp SwitcWTraction Control
Switch) and Stoplamp/Torque
Converter Clutch (TCC) Switch
6-59
ProCarManuals.com
Page 373 of 444

Mini Fuse
2 1 -1GN 1 -UH
22-SPARE
23-SPARE
24-SPARE
25-ELEK
IGN
26-SPARE
27-B/U LAMP
28-NC CLU
29-RADIO Evaporative Emissions
(EVAP)
Canister Purge Valve, Heated
Oxygen Sensors
1 and 2, Mass
Air Flow (MAF) Sensor
Not Used
Not Used
Not Used
Ignition Control Module (ICM)
Not Used
Transaxle Range Switch to
Back-up Lamps
A/C CLU Relay to A/C
Compressor Clutch Oil
Driver Information Display,
Heater A/C Control, Radio,
Rear Side Door Actuator
Control Motor, Remote Control
Door Lock Receiver (RCDLR),
Security Indicator Lamp and
Theft Deterrent Shock Sensor
Mini Fuse
30-ALT SENSE
3
1 -TCC Generator
Automatic Transaxle
(Torque
Converter Clutch Solenoids)
Stoplamp Switch to PCM
32-FUEL PUMP Fuel Pump Relay
33-ECM SENSE
34
35-FOG LP
36-HORN
37-PARK LP
38
39
40 Powertrain Control
Module (PCM)
Not Used
Fog Lamp Relay
Horn Relay
Daytime Running Lamps (DRL) Control Module,
Headlamps and
I/P Dimmer
Switch Theft-Deterrent Relay
to Headlamps
Not Used
Not Used
Mini Fuse Puller
6-63
ProCarManuals.com
Page 374 of 444

Replacement Bulbs
Exterior Lamps Bulb Number
Headlamps ......................... 9004-HBI
Signal Lamps
.......... .3 157 NA or 3 157 NAK
Front Sidemarker Lamps ................... 194
Stop/Tail (Top)
.......................... 3057
Signal (2nd from top)
..................... 3 156
Tail (Bottom) ........................... 3057
Front Parking/Turn
Back-up Lamps (3rd from top)
............. 3156
Capacities and Specifications
The following approximate
capacities are given in
English and metric conversions.
Please refer to “Recommended Fluids and Lubricants’’
in the Index for more information.
Automatic Transaxle
Pan Removal and Replacement ..... 8 quarts (7.5 L)
With A/C
................... 9.6 quarts (9.1 L)
Cooling System
With Rear Climate Control
or Rear Heater
............ 1 1.9 quarts (1 1.3 L)
Engine Crankcase - Oil and
Fuel Capacity Filter Change
............... 4.5 quarts (4.3 L)
Standard/Regular .............. 20 gallons (76 L)
OptionalExtended
............ 25 gallons (95 L)
Refrigerant,
Air Conditioning*
.......... See the Refrigerant
Label under the hood.
Tire Pressures, Sizes ........... See Tire-Loading
Information label
on driver’s door.
Wheel Nut Torque .......... 100 lb-ft (140 N-m)
Windshield Washer Fluid ....... 1 gallon (0.37 L)
*See Air Conditioning Refrigerants later in this section.
NOTE: All capacities are approximate. When adding,
be sure to fill to the appropriate level, as recommended
in this manual.
Engine Specifications
Engine VIN Code ........................... E
Firing Order
...................... 1-2-3-4-5-6
EngineType
.............................. V6
Horsepower
............................. 180
Thermostat Temperature Specification
................... 195°F (91°C)
6-64
ProCarManuals.com
Page 437 of 444

Theft ......................................... 2-22
Theft-Deterrent Feature, CD Player
................ 3-21
THEFI'LOCK
.................................. 3-21
Thermostat
.................................... 6-24
ThirdGear
.................................... 2-32
Tilt Steering Wheel
............................. 2-52
Time, Setting the
................................ 3-9
Tire Chains
.................................... 6-46
TireLoading
................................... 4-30
Tire-Loading Information Label
................... 4-30
Tires
......................................... 6-39
Alignment and Balance
........................ 6-45
BuyingNew
................................. 6-42
Chains
..................................... 6-46
Changing a Flat
.............................. 5-24
Compact Spare
............................... 5-34
Inflation
.................................... 6-40
Inflation Check
............................... 7-29
Inspection and Rotation
........................ 6-41
Cleaning
.................................... 6-52
Loading
.................................... 4-30
Pressure
.................................... 6-40
Storing a Flat or Spare
......................... 5-33
Temperature
................................. 6-44
Traction
.................................... 6-44
Treadwe
ar ................................... 6-44
Uniform Quality Grading
....................... 6-43
Used Wheel Replacement
...................... 6-46
Wear Indicators
.............................. 6-42
Wheel Replacement
........................... 6-45
When It's Time for New
....................... 6-42
TopStrap
..................................... 1-76
TorqueLock
................................... 2-37 Torque.
Wheel Nut
......................... 5.32. 6.64
Towing a Trailer
................................ 4-33
Towing
Your Vehicle ............................. 5-7
Traction Control System
.......................... 4-9
Traction Control System Warning Light
........ 2.90. 4.10
Trailer
Brakes
..................................... 4-37
Hitches
..................................... 4-36
Driving on Grades
............................ 4-39
Drivingwith
................................. 4-37
Maintenance When Towing
..................... 4-40
ParkingonHills
.............................. 4-40
Safety Chains
................................ 4-37
Tongueweight
............................... 4-35
Total Weight on Tires
.......................... 4-36
Towing
..................................... 4-33
Turnsignals
................................. 4-39
Weight
..................................... 4-34
Transaxle Fluid, Automatic
....................... 6-18
Transmitters, Remote Lock Control
.................. 2-8
Transportation, Courtesy
.......................... 8-6
Trip Computer
................................ 2-101
Trip Odometer
................................. 2-85
TTY Users
...................................... 8-4
Turn Signal and Lane Change Signals ............... 2-53
Turn Signal Reminder Chime
..................... 2-53
Turn Signal/Multifunction Lever
................... 2-52
Turn Signals When Towing a Trailer
................ 4-39
Underbody Flushing Service
..................... 7-32
Underhood Fuse and Relay Center
................. 6-61
UnderhoodLamp
............................... 6-11
Underbody Maintenance
......................... 6-53
ProCarManuals.com
Page 438 of 444

Vehicle Control
...................................... 4-6
Damage Warnings
.............................. iv
Dimensions ................................. 6-65
Identification Number
......................... 6-55
Loading
.................................... 4-30
Storage
..................................... 6-30
Ventilation System
............................... 3-8
Ventilation Tips
................................. 3-9
Visor Vanity Mirrors
............................ 2-78
Visors. Sun
.................................... 2-78
warning Devices
............................... 5-2
Warning Lights. Gages and Indicators
............... 2-86
Washer Fluid. Windshield
........................ 6-26
Washing Your Vehicle
........................... 6-5 1
Weatherstrips .................................. 6-50
Wheel
Alignment .................................. 6-45
NutTorque
............................. 5-32. 6-64
Replacement
................................. 6-45
Used Replacement
............................ 6-46
Wrench
..................................... 5-27 Windows
..................................... 2-50
Power
...................................... 2-50
Power Rear Quarter
........................... 2-51
Side Latches ................................. 2-51
Windshield Washer
............................. 2-54
Fluid
.................................. 2-54. 6-26
Fluid Level Check
............................ 7-29
Rear
....................................... 2-55
Windshield Wiper
.............................. 2-54
Rear
....................................... 2-55
Blade Replacement
........................... 6-38
Fuses
...................................... 6-56
Winter Driving
................................. 4-26
Wiring. Headlamp
.............................. 6-56
Wrench. Wheel
................................. 5-27
9-12
ProCarManuals.com