fuse OLDSMOBILE SILHOUETTE 1998 Owners Manual
[x] Cancel search | Manufacturer: OLDSMOBILE, Model Year: 1998, Model line: SILHOUETTE, Model: OLDSMOBILE SILHOUETTE 1998Pages: 444, PDF Size: 23.2 MB
Page 11 of 444
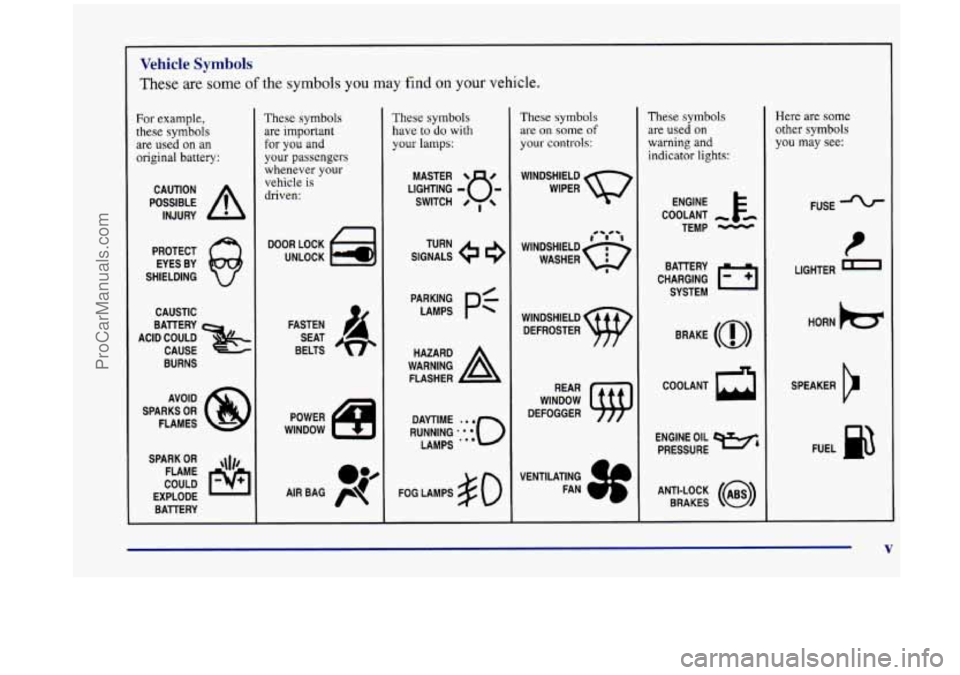
Vehicle Symbols
These are some of the symbols you may find on your vehicle.
For example,
these symbols are used on an
original battery:
POSSIBLE A
CAUTION
INJURY
PROTECT EYES BY
SHIELDING
CAUSTIC
ACID COULD BAllERY
CAUSE
BURNS
AVOID
SPARKS
OR
FLAMES
SPARK
OR ,\I/,
COULD FLAME
EXPLODE BAllERY
These symbols
are important
for you and
your passengers
whenever
your
vehicle is
driven:
DOOR LOCK
UNLOCK
FASTEN SEAT
BELTS
These symbols
have to do with
your lamps:
SIGNALS e
TURN
WARNING
A
HAZARD
FLASHER
FOG LAMPS
$0
These symbols
are on some of
your controls:
WINDSHIELD
WIPER
WINDSHIELD DEFROSTER
WINDOW
DEFOGGER
These symbols
are used on
warning and indicator lights:
ENGINE E*
COOLANT
TEMP
-
CHARGING I-1
BATTERY
SYSTEM
BRAKE
(a)
COOLANT a
ENGINE OIL e,
PRESSURE
ANTI-LOCK
(@)
BRAKES
Here are some other symbols you may see:
FUSE
LIGHTER
m
HORN )cr
SPEAKER
b
FUEL e3
ProCarManuals.com
Page 14 of 444

Seats and Seat Controls
This section tells you about the seats -- how to adjust
them, take them out, put them back in and fold and
unfold them.
Driver’s 4-Way Manual Seat
To raise the seat, pull up on the lever on the front right
side
of the seat. To lower the seat, push the lever down.
Use the lever on the front left side
of the seat to adjust the
seat forward or reatward.
Pull up the lever on the front of
the seat to unlock it. Slide the seat to where you want it. \
To make sure the seat is locked into place, release the
lever and
try to move the seat with your body.
- -- ii
You can lose control of the vehicle if you try to
adjust a manual driver’s seat while the vehicle is
moving. The sudden movement could startle and confuse you,
or make you push a pedal when you
don’t want to. Adjust the driver’s seat only when the vehicle
is not moving.
1-2
ProCarManuals.com
Page 121 of 444
Resetting the Power Sliding Door
The power sliding door may operate incorrectly or not at
all because of the following conditions:
A low voltage or dead battery,
Disconnecting the battery or
If the IGN 1, B/U LAMP, RADIO or PWR
SEATPSD fuse is removed or blown.
See “Fuse Panel” in the Index for more information
about your fuse panel.
If any of these conditions occur, the power sliding door
will need to be reset.
To do this, follow the directions
listed here. It will be easier if you read through them
once before beginning this procedure.
1. Check to be sure the power sliding door is unlocked
2. Turn the ignition switch to OFF.
and securely closed.
3. Enable the power sliding door override feature.
4. Remove the RADIO fuse from the underhood fuse
and relay center. Leave it out for
30 seconds.
5. Reinstall the fuse and wait 10 seconds.
6. Disable the power sliding door override feature.
7. Push either of the power door buttons to open the
power sliding door.
8. Wait five seconds and close the door by pushing
9. Wait five seconds and repeat Steps 7 and 8.
either power door button.
If the door does not rest in the fully open position after
repeating Step
7, repeat Steps 7 and 8 again. If the
door still does not operate correctly, see your retailer
for service.
Sliding Door Security Lock
Your vehicle is equipped with a sliding door security
lock that helps prevent young children or other
passengers from opening the sliding door by using the
inside door handle. This lock is on both doors if your
vehicle has the dual sliding doors.
If you have the optional power sliding door, you can
override the security lock by pressing either power door
switch when the power sliding door override feature is
disabled. See “Power Sliding Door” earlier in
the section.
2-19
ProCarManuals.com
Page 143 of 444

Entering Programming Mode
To program features, your vehicle must be in the
programming mode. Follow these steps:
1.
2.
3.
4.
5.
The Content Theft-Deterrent system (if equipped)
must be disarmed. See “Content Theft-Deterrent
System” in this section.
Remove the BCM PRGRM fuse from the instrument
panel fuse block, located to the right
of the glove
box. (See “Fuses and Circuit Breakers” in the Index.)
Close the driver’s door.
Turn the ignition switch towards you to
ACCESSORY.
Count the number of chimes you hear.
You will hear
two
to four chimes depending on the features your
vehicle is equipped with. Refer to the chart
shown previously.
You can now program your choices.
10 exit the programming mode, follow the steps
listed under “Exiting Programming Mode” later in
this section.
Delayed Illumination and Exit Lighting
With Delayed Illumination, the interior lamps will stay
on for about
25 seconds after all the doors and the
liftgate are closed.
With Exiting Lighting, the interior lamps will come on
and stay on for about
25 seconds whenever you remove
the key from the ignition.
To customize these features to your preference, see
“Programmable Modes” following.
Programmable Modes
Your vehicle can be programmed to one of the
following modes.
Mode 1: Both Features Off (The interior lamps will turn on
or
off at the same instant that a door is opened or closed.)
Mode 2: Delayed Illumination Only (The interior lamps
will stay
on for about 25 seconds after all the doors and
liftgate are closed, or until you lock the doors.)
2-41
ProCarManuals.com
Page 152 of 444

Exiting Programming Mode
To exit programming mode, just turn the key from
ACCESSORY to
OFF and put the BCM PRGRM fuse
back into the instrument panel fuse block.
NOTE: After programming a feature, you can exit the
programming mode at anytime.
Windows
Power Windows
The switches on the driver’s door armrest control
the front windows (when the ignition is in
RUN or
ACCESSORY). The left switch controls the
driver’s window. The right switch controls the
passenger’s window.
The driver’s power window switch has two down
positions. Push the switch to the first position to lower
the window normally.
To activate the auto-down feature, push the switch all
the way down, then release. The window will lower
completely. To stop the window from lowering all the
way, pull up the front of the switch.
To raise the window, pull up the front of the switch.
2-50
ProCarManuals.com
Page 155 of 444
Turn and Lane Change Signals
The turn signal has two upward (for right) and two
downward (for left) positions. These positions allow you
to signal a turn or a lane change.
To signal a
turn, move the lever all the way up or down.
When the
turn is finished, the lever will retwn automatically.
An arrow on the instrument
panel will flash in the
direction of the turn
or lane change.
To signal a lane change, just raise or lower the lever
until the arrow starts to flash. Hold it there until you
complete your lane change. The lever will return by
itself when you release it.
As you signal a turn or a lane change, if the arrow
flashes faster than normal, a signal bulb may be burned
out and other drivers won’t see your turn signal.
If a bulb is burned out, replace it to help avoid an
accident.
If the arrows don’t go on at all when you
signal a turn, check for burned-out bulbs and check the
fuse (see “Fuses and Circuit Breakers”
in the Index). If
you have a trailer towing option with added wiring for
the trailer lamps, the signal indicator will flash at a
normal rate even
if a turn signal bulb is burned out.
Check the front and rear turn signal lamps regularly to
make sure they are working.
Turn Signal On Chime
If either turn signal is left on for more than 3/4 mile
(1.2 km), a chime will sound to let the driver know to
turn it off.
If the you need to leave the signal on for more than
3/4 mile (1.2 km), turn off the signal and then turn it
back on.
Headlamp HigWLow Beam Changer
To change the headlamps from high to low beam, or low
to high, simply pull the turn signal lever all the way
toward you. Then release it.
When the high beams are
on, this light on the
instrument cluster will also
be on.
2-53
ProCarManuals.com
Page 182 of 444

To use your air inflator system, attach the appropriate
nozzle adapter, if required, to the end of the hose that
has the pressure gage. Then attach that end of the hose
to the object you wish to inflate. Remove the protective
cap covering the outlet. Attach the other end of the hose
to the outlet. Press the ON switch. The
ON switch will
work even with the ignition
off.
2-80
If the air inflator system does not turn on, the fuse may
be blown or installed incorrectly. See “Fuses and Circuit
Breakers” in the Index or see your retailer for service.
Your air inflator will automatically shut off after about
10 minutes. To reset, press the ON switch again.
Don’t run your air inflator for longer than
30 minutes at
one time.
If you do, you may damage the system. After
30 minutes, wait at least 10 minutes before restarting the
air inflator.
To turn off the inflator, press OFF and detach the hose,
first from the inflated object, then from the outlet.
Replace the protective cap. Place the inflator kit tools
in
the pouch, and store in the glove box.
To replace the cover, line up the tabs at the back of the
cover and put it in place. Push down the tab to secure
the cover.
ProCarManuals.com
Page 185 of 444
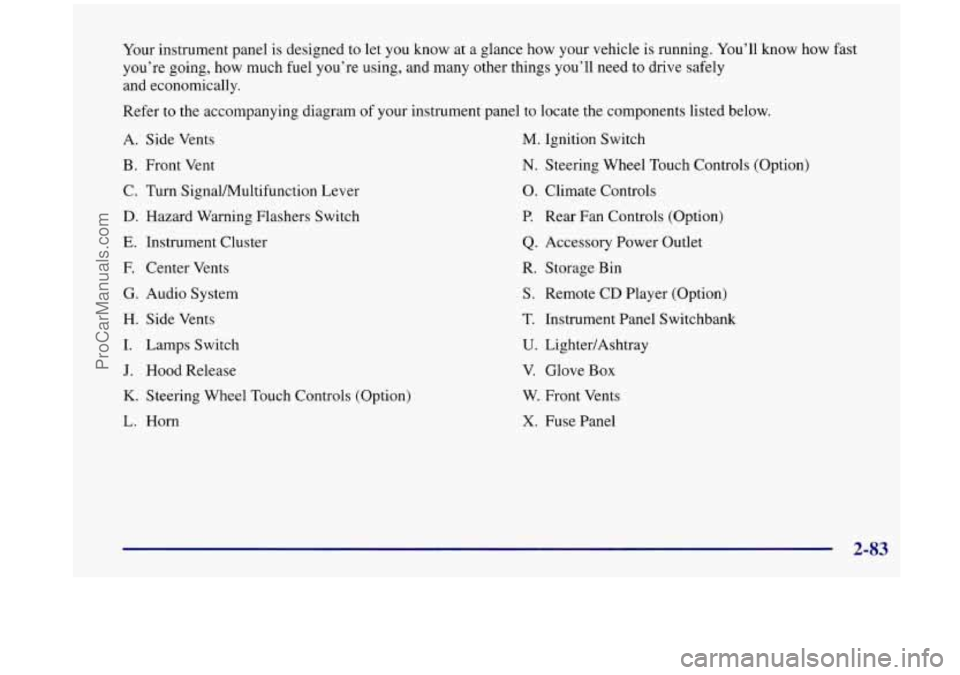
Your instrument panel is designed to let you know at a glance how your vehicle is running. You’ll know how fast
you’re going, how much fuel you’re using, and many other things you’ll need to drive safely
and economically.
Refer to the accompanying diagram of your instrument panel to locate the components listed below.
A. Side Vents
B. Front Vent
C. Turn SignalMultifunction Lever
D. Hazard Warning Flashers Switch
E. Instrument Cluster
F. Center Vents
G. Audio System
H. Side Vents
I. Lamps Switch
J. Hood Release
K. Steering Wheel Touch Controls (Option)
L. Horn
M. Ignition Switch
N. Steering Wheel Touch Controls (Option)
0. Climate Controls
P. Rear Fan Controls (Option)
Q. Accessory Power Outlet
R. Storage Bin
S. Remote CD Player (Option)
T. Instrument Panel Switchbank
U. LightedAshtray
V. Glove Box
W. Front Vents
X, Fuse Panel
2-83
ProCarManuals.com
Page 264 of 444

/I CAL TION:
Things you put inside your vehicle can strike
and injure people in a sudden stop or turn, or in
a crash.
0 Put things in the cargo area of your vehicle.
Try to spread the weight evenly.
0 Never stack heavier things, like suitcases,
inside the vehicle
so that some of them are
above the tops
of the seats.
0 Don’t leave an unsecured child restraint in
your vehicle.
0 When you carry something inside the
vehicle, secure it whenever you can.
0 Don’t leave a seat folded down unless you
need to.
Electronic Level Control (Option)
On vehicles equipped with the optional electronic level
control, the rear of the vehicle is automatically kept
level as you load or unload your vehicle. However, you
should still not exceed the
GVWR or the GAWR.
You may hear the compressor operating when you load
or unload your vehicle, and periodically as the system
self-adjusts. This is normal.
The compressor should operate for brief periods
of time.
If the sound continues for an extended period of time,
your vehicle needs service.
To keep your battery from
being drained, you may want to remove the
ELC fuse in
the fuse control panel until you can have your vehicle
serviced (see “Fuses and Circuit Breakers” in the Index.)
Using heavier suspension components to get added
durability might not change your weight ratings. Ask
your retailer to help you load your vehicle the right way.
4-32
ProCarManuals.com
Page 278 of 444
NOTICE:
To avoid the possibility of the vehicles rolling, set
the parking brake firmly on both vehicles
involved in the jump start procedure. Put an
automatic transaxle in
PARK (P).
3. Turn off the ignition on both vehicles. Unplug
unnecessary accessories plugged into the cigarette
lighter or accessory power outlet. Turn
off all lamps
that aren’t needed as well as radios. This will avoid
sparks and help save both batteries.
In addition, it
could save your radio!
I NOTICE:
If you leave your radio on, it could be badly
damaged. The repairs wouldn’t be covered by
your warranty.
JTION:
--
An electric fan can start up even when the engine
is not running and can injure you. Keep hands,
clothing and tools away from any underhood
electric fan.
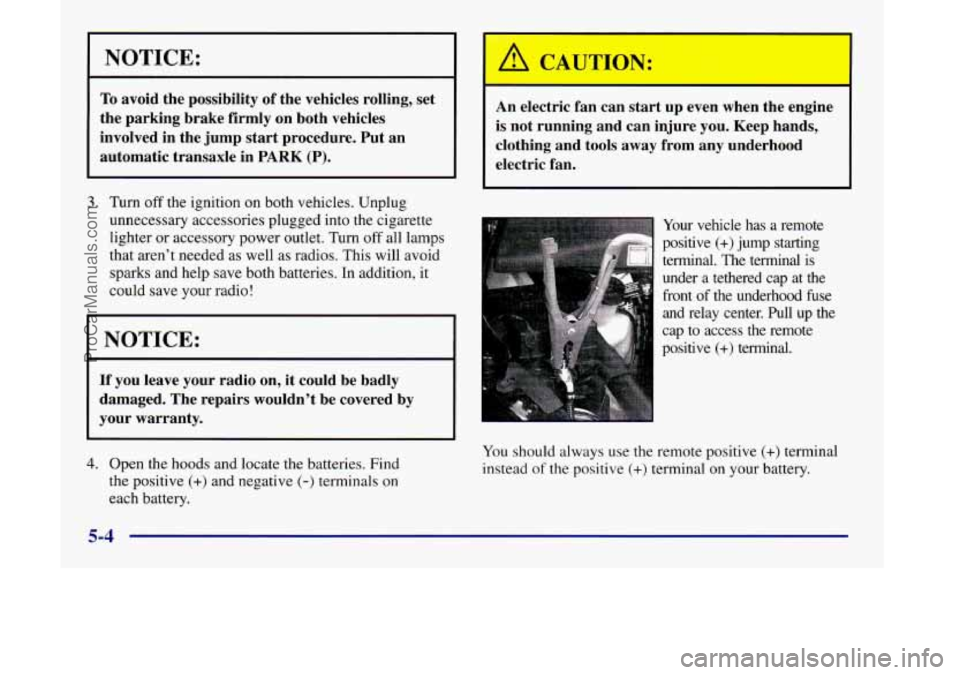
Your vehicle has a remote
positive
(+) jump starting
terminal. The terminal is
under a tethered cap at the
front of the underhood fuse
and relay center. Pull up the
cap to access the remote
positive
(+) terminal.
4. Open the hoods and locate the batteries. Find
the positive
(+) and negative (-) terminals on
each battery. You
should always use
the remote positive (+) terminal
instead
of the positive (+) terminal on your battery.
5-4
ProCarManuals.com