headlamp OLDSMOBILE SILHOUETTE 2003 User Guide
[x] Cancel search | Manufacturer: OLDSMOBILE, Model Year: 2003, Model line: SILHOUETTE, Model: OLDSMOBILE SILHOUETTE 2003Pages: 466, PDF Size: 21.55 MB
Page 309 of 466
Section 5 Service and Appearance Care
Appearance Care ............................................ 5.87
Care of Safety Belts ...................................... 5-90
Weatherstrips
............................................... 5-90
Sheet Metal Damage
..................................... 5.92
Finish Damage
............................................. 5.92
Underbody Maintenance
................................ 5.93
Chemical Paint Spotting
................................. 5.93
GM Vehicle Care/Appearance Materials
........... 5.93
Cleaning
the Inside
of Your Vehicle ................. 5-87
Cleaning the Outside of Your Vehicle ................. 5-90 Vehicle
Identification
........................ ...... 5.95
Vehicle Identification Number (VIN)
... ...... 5.95
Service Parts Identification Label
... ...... 5.95
Electrical System
.......................... .......... 5.96
Add-on Electrical Equipment
...................... 5.96
Headlamp Wiring
.......................................... 5.96
Windshield Wiper Fuses
................................ 5.96
Power Windows and Other Power Options
....... 5.96
Fuses and Circuit Breakers
............................ 5.96
Capacities and Specifications
........................ 5.103
Normal Maintenance Replacement Parts
......... 5.105
5-2
Page 359 of 466
Bulb Replacement
For the type of bulbs, see Replacement Bulbs on
page
5-57.
For any bulb changing procedure not listed in this
section, contact your dealer.
Halogen Bulbs
Ha.,Jen ,Jibs h, - e pressurized ga, .nside and
can burst
if you drop or scratch the bulb. You or
others could be injured. Be sure
to read and
follow the instructions on the bulb package.
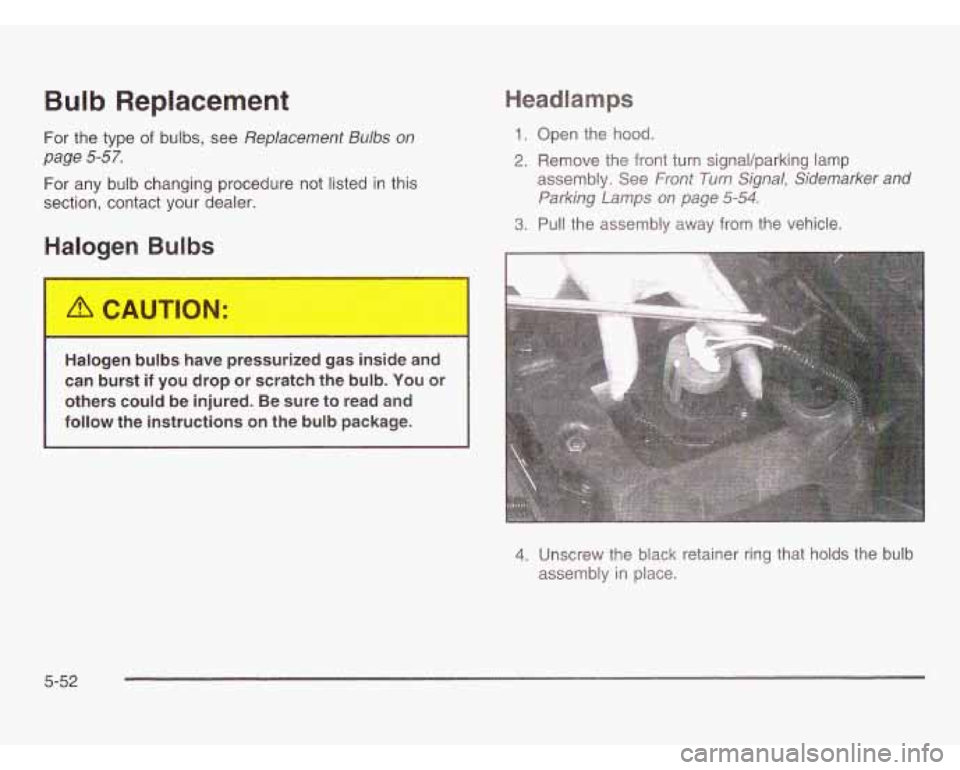
Headlamps
1. Open the hood.
2. Remove the front turn signaVparking lamp
assembly. See
Front Turn Signal, Sidemarker and
Parking Lamps
on page 5-54.
3. Pull the assembly away from the vehicle.
4. Unscrew the black retainer ring that holds the bulb
assembly in place.
5-52
Page 360 of 466

5.
6.
7. Install the new bulb through the black retainer ring
retainer ring in place. Push the bulb firmly enough
so that the blue tabs hook over the tab on the bulb.
:-+e. +Le -l--+";--l -n----rL-.r l-:-I-rL-.- .LL- i-l--l- a1 tu 11 i1u LI IC CitbLI ibal but 11 ~tbtu~. I 191 lief I 11 ~t: uidbk
8. Carefully put the bulb assembly back into the lamp
housing.
Be careful not to damage the bulb on the
headlamp aiming bar.
5-53
Page 361 of 466
Front Turn Signal, Sidemarker and
Parking Lamps
9. Align the pins on the bottom of the headlamp
assembly with the holes in the lamp support
bracket.
10. To reinstall the front turn signaVparking lamp
assembly. See
Front Turn Signal, Sidemarker
and Parking Lamps on page
5-54 next.
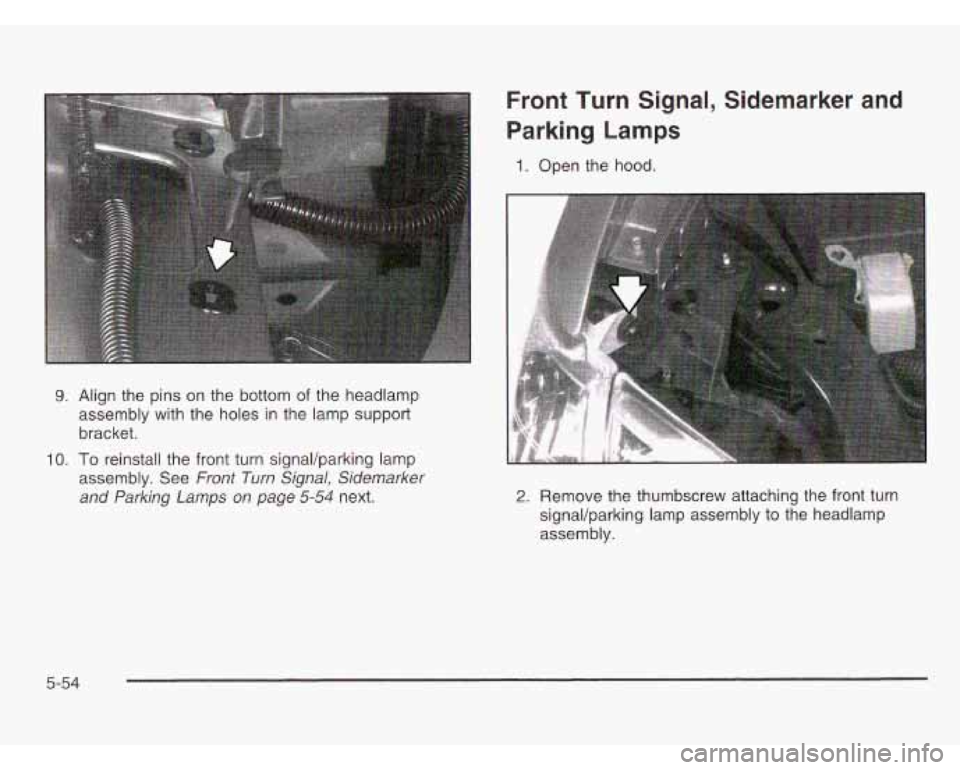
1. Open the hood.
2. Remove the thumbscrew attaching the front turn
signaVparking lamp assembly to the headlamp
assembly.
5-54
Page 363 of 466
7. To reinstall the lamp assembly, line up and insert
the tabs on the back of the assembly in the slots
in
the fender. Engage the lower clip on the back of
the lamp assembly into the fender, keeping
the upper tab on the front turn signaVparking lamp
assembly inboard
of the headlamp bracket tab.
8.
To align the front turn SignaVparking lamp assembly
with the headlamp assembly, lift up the front turn
signaVparking lamp assembly until the upper edge is
contacting the fender.
9. Fasten the front turn signaVparking lamp assembly
to the headlamp assembly with the thumbscrew
removed
in Step 2.
Taillamps, Turn Signal, Stoplamps
and Back-up Lamps
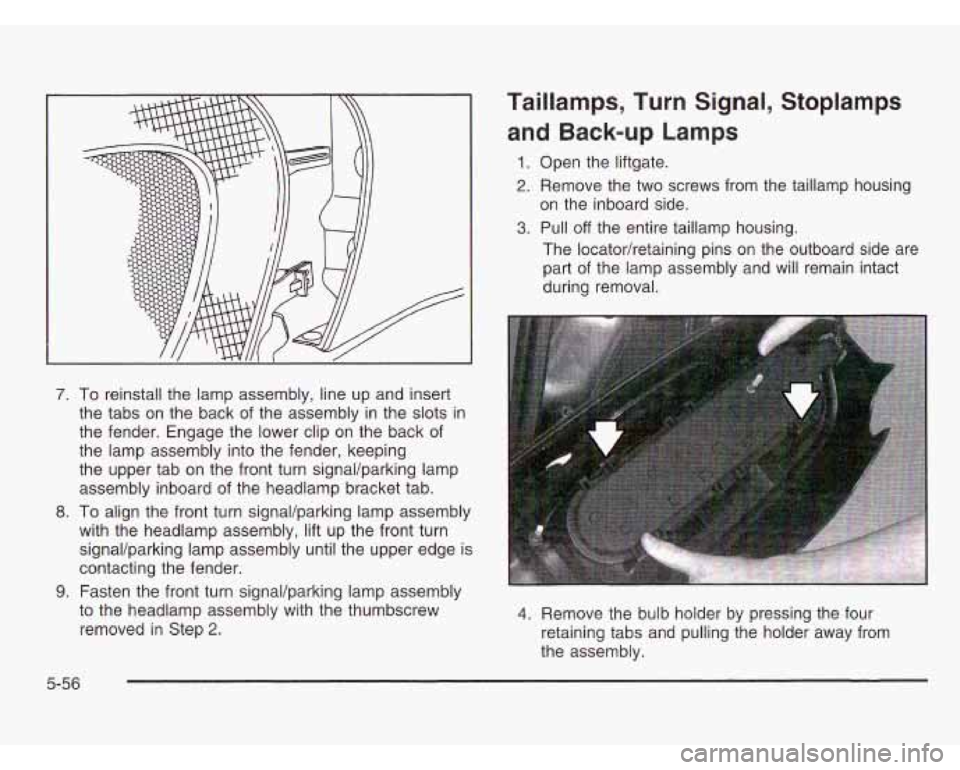
1. Open the liftgate.
2. Remove the two screws from the taillamp housing
3. Pull off the entire taillamp housing.
on
the inboard side.
The locator/retaining pins on the outboard side are
part of the lamp assembly and will remain intact
during removal.
4. Remove the bulb holder by pressing the four
retaining tabs and pulling the holder away from
the assembly.
5-56
Page 364 of 466
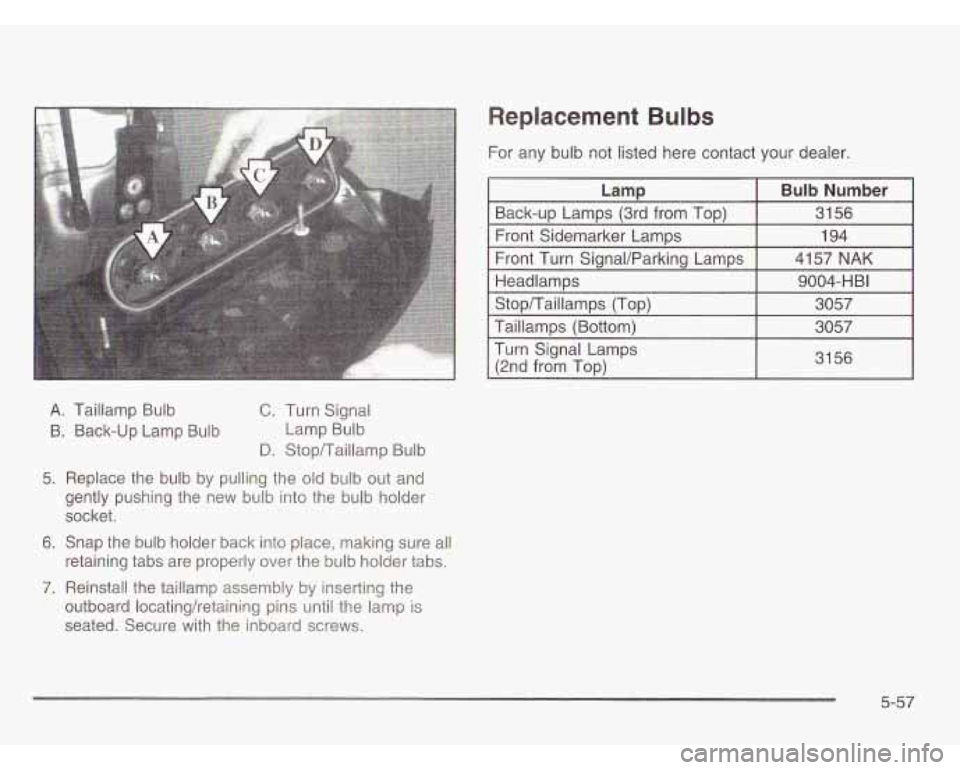
A. Taillamp Bulb
6. Back-up Lamp Bulb
C. Turn Signal
Lamp Bulb
D. StopTTailIamp Bulb
5. Replace the bulb by pulling the old bulb out and
gently pushing the new bulb into the bulb holder
socket.
6. Snap the bulb holder back into place, making sure all
retaining tabs are properly over the bulb holder tabs.
7. Reinstall the taillamp assembly by inserting the
outboard locatingh-etaining pins until the lamp is
seated. Secure with the inboard screws.
Replacement Bulbs
For any bulb not listed here contact your dealer.
I Lamp I Bulb Number I
I Back-ur, Lamps (3rd from Tor,) I 31 56 I
I
Front Sidemarker Lamps I 194 I
Front Turn SignaVParking Lamps
Headlamps 4157 NAK
9004-HBI
I
Turn
Signal Lamps
(2nd from
Top) I 3156
5-57
Page 374 of 466
If you need to replace any of your wheels, wheel bolts or
wheel nuts, replace them only with new GM original
equipment parts. This way, you will be sure to have the
Using the wrong replacement wheels, wheel
bolts or wheel nuts on your vehicle can be
dangerous.
It could affect the braking and
handling of your vehicle, make your tires lose
air and make you lose control. You could have
a collision in which you or others could be
injured. Always use the correct wheel, wheel
bolts and wheel nuts for replacement.
I
Notice: The wrong wheel can also cause problems
with bearing life, brake cooling, speedometer or odometer calibration, headlamp aim, bumper height,
vehicle ground clearance and tire or tire chain
clearance to the body and chassis.
See
Changing a Flat Tire on page 5-70 for more
information.
Used Replacement WI els
Putting a used wheel on your vehicle is
dangerous. You can’t know how it’s been used
or how far it’s been driven. It could fail suddenly
and cause a crash. If you have to replace a
wheel, use a new
GM original equipment wheel.
Tire Chains
Notice: Use tire chains only where legal and only
when you must. Use only SAE Class
“S” type chains
that are the proper size for your tires. Install them
on the front tires and tighten them as tightly
as possible with the ends securely fastened.
Drive slowly and follow the chain manufacturer’s
your vehicle, stop and retighten them. If the contact continues, slow down until
it stops. Driving too
fast or spinning the wheels with chains on will
damage your vehicle.
!-- -I-~---I’- ~- - If . L IL- -L-.-- --.-*-.-a:--. I~IS1ruC;LIVIIs. II yuu ual~ Ileal ~lle Glla~llb GUIILQ~LII~~
5-67
Page 403 of 466
Electrical System
Add-on Electrical Equipment
Notice: Don’t add anything electrical to your
vehicle unless you check with your dealer first.
Some electrical equipment can damage your vehicle
and the damage wouldn’t be covered by your
warranty. Some add-on electrical equipment can
keep other components from working as they should.
Your vehicle has an air bag system. Before attempting to
add anything electrical to your vehicle, see
Servicing
Your Air Bag-Equipped Vehicle
on page 1-76.
Headlamp Wiring
The headlamp wiring is protected by an internal circuit
breaker in the instrument panel fuse panel. An electrical
overload will cause the lamps to go on and
off, or in
some cases to remain
off. If this happens, have
your headlamp wiring checked right away.
Windshield Wiper Fuses
The windshield wiper motor is protected by an internal
circuit breaker and a fuse. If the motor overheats due to
heavy snow, etc., the wiper will stop until the motor
cools. If the overload is caused by some electrical
problem, be sure to get it fixed.
Power Windows and Other
Power Options
Circuit breakers in the instrument panel fuse panel
protect the power windows and other power accessories.
When the current load is too heavy, the circuit breaker
opens and closes, protecting the circuit until the
problem is fixed.
Fuses and Circuit Breakers
The wiring circuits in your vehicle are protected from
short circuits by a combination of fuses, circuit breakers
and fusible thermal links.
Look at the silver-colored band inside the fuse. If the
band is broken or melted, replace the fuse. Be sure you
replace a bad fuse with a new one
of the identical
size and rating.
If you ever have a problem on the road and don’t have
a spare fuse, you can borrow one that has the same
amperage or use one of the spare fuses in the
underhood fuse block. Just pick some feature of your
vehicle that you can get along without
- like the radio
or cigarette lighter
- and use its fuse, if it is the
right amperage. Replace it as soon as you can.
There are two fuse blocks in your vehicle, the instrument
panel fuse block and the underhood fuse block.
5-96
Page 406 of 466
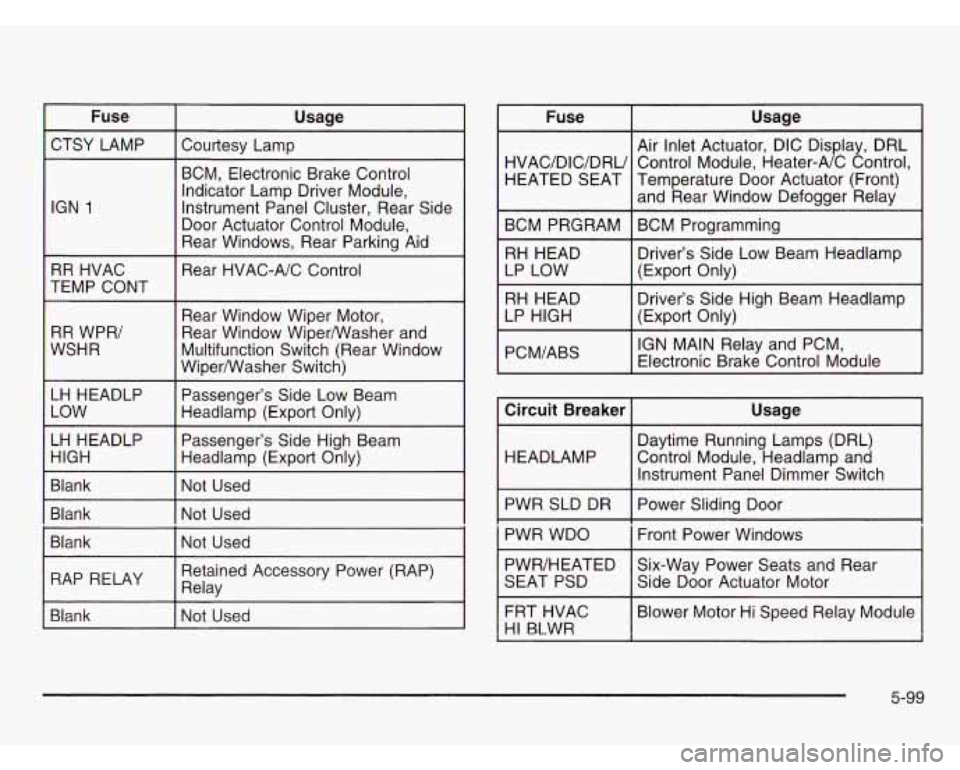
Fuse Usage
CTSY LAMP Courtesy Lamp
IGN
1
~~ ~ ~~____
BCM, Electronic Brake Control
Indicator Lamp Driver Module,
Instrument Panel Cluster, Rear Side
Door Actuator Control Module,
Rear Windows, Rear Parking Aid
~~
RR HVAC
TEMP CONT
RR WPR/
WSHR Rear
HVAC-A/C Control
Rear Window Wiper Motor,
Rear Window WiperNVasher and
Multifunction Switch (Rear Window
Wiper/Washer Switch)
LH HEADLP Passenger’s Side Low Beam
I Headlamp (Export Only)
Passenger’s Side High Beam
Headlamp (Export Only)
I Blank I Not Used
I Blank I Not Used
Blank Not Used
I
I RAP RELAY I Relay Retained Accessory Power (RAP) I
Blank l-Nat Used Fuse
Usage
Air Inlet Actuator, DIC Display, DRL
HVAC/DIC/DRU Temperature Door Actuator (Front) HEATED SEAT
Control
Module, Heater-A/C Control,
and Rear Window Defogger Relay
BCM PRGRAM BCM Programming
RH HEAD Driver’s Side Low Beam Headlamp
LP LOW (Export Only)
RH HEAD
(Export Only)
I LP HIGH Driver’s
Side High Beam Headlamp
PCM/ABS
I IGN MAIN Relay and PCM,
Electronic Brake Control Module
Circuit Breaker
I Usage
I 1
Daytime Running Lamps (DRL)
HEADLAMP Control Module, Headlamp and
Instrument Panel Dimmer Switch
PWR SLD DR
I Power Sliding Door
PWR WDO
i Front Power Windows i
PWR/HEATED Six-Way Power Seats and Rear
SEAT PSD
I Side Door Actuator Motor
FRT HVAC
I Blower Motor Hi Speed Relay Module
HI B4WR I
5-99
Page 407 of 466
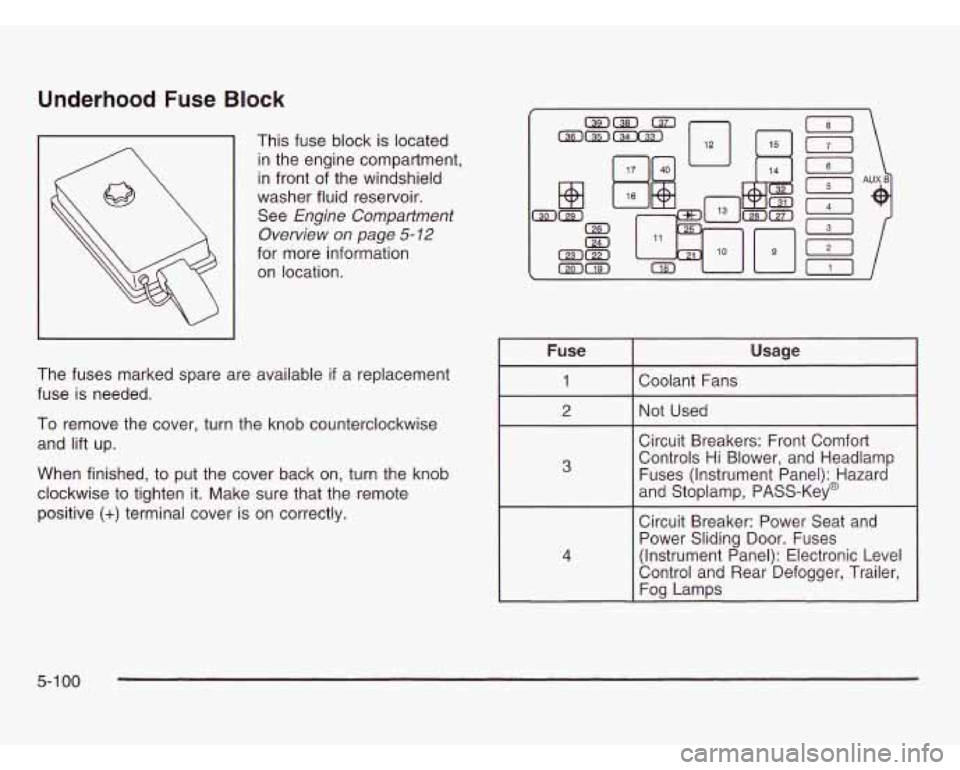
Underhood Fuse Block
This fuse block is located
in the engine compartment,
in front of the windshield
washer fluid reservoir.
See
Engine Compartment
Overview
on page 5-12
for more information
on location.
The fuses marked spare are available
if a replacement
fuse
is needed.
To remove the cover, turn the knob counterclockwise
and lift up.
When finished, to put the cover back on, turn the knob
clockwise to tighten it. Make sure that the remote
positive
(+) terminal cover is on correctly.
(71
[61
[2)
111 Aul
I Fuse
I 2
4
Usage
Coolant Fans
Not Used
Circuit Breakers: Front Comfort
Controls Hi Blower, and Headlamp
Fuses (Instrument Panel): Hazard
and Stoplamp, PASS-Key@
Circuit Breaker: Power Seat and
Power Sliding Door. Fuses
(Instrument Panel): Electronic Level
Control and Rear Defogger, Trailer,
Fog Lamps
5-1 00