CD player OLDSMOBILE SILHOUETTE 2003 Owner's Manual
[x] Cancel search | Manufacturer: OLDSMOBILE, Model Year: 2003, Model line: SILHOUETTE, Model: OLDSMOBILE SILHOUETTE 2003Pages: 466, PDF Size: 21.55 MB
Page 253 of 466
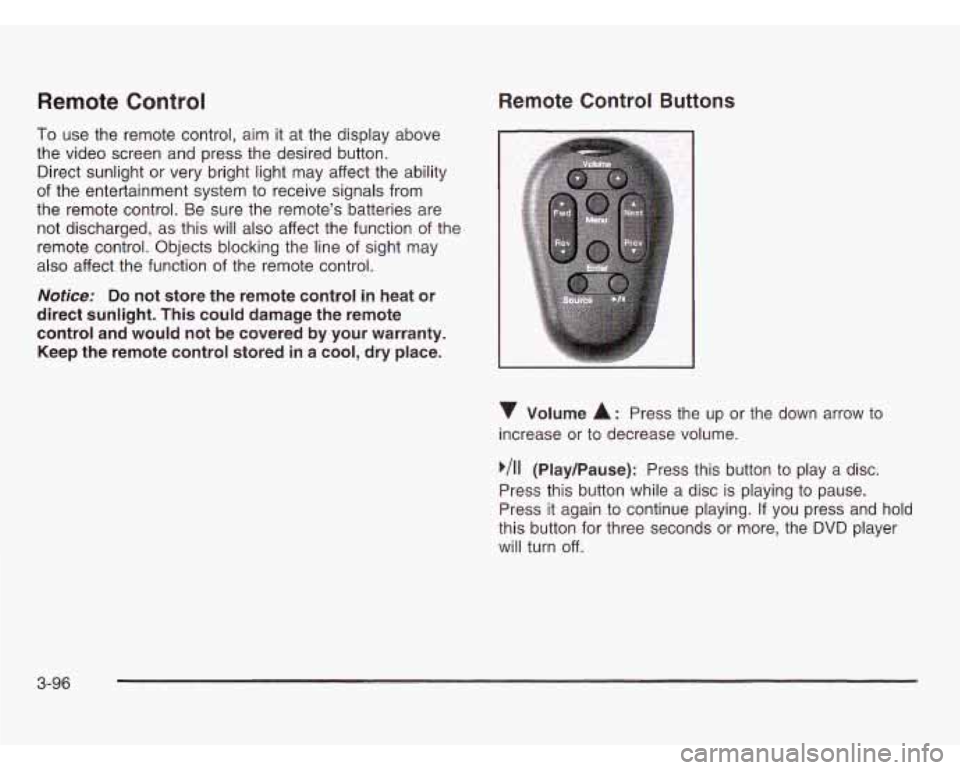
Remote Control
To use the remote control, aim it at the display above
the video screen and press the desired button.
Direct sunlight or very bright light may affect the ability
of the entertainment system to receive signals from
the remote control. Be sure the remote’s batteries are
not discharged, as this will also affect the function of the
remote control. Objects blocking the line of sight may
also affect the function of the remote control.
Notice: Do not store the remote control in heat or
direct sunlight. This could damage the remote
control and would not be covered by your warranty.
Keep the remote control stored in a cool, dry place.
Remote Control Buttons
Volume A: Press the up or the down arrow to
increase or to decrease volume.
,/I1 (Play/Pause): Press this button to play a disc.
Press this button while a disc is playing to pause.
Press it again to continue playing.
If you press and hold
this button for three seconds or more, the DVD player
will turn off.
3-96
Page 254 of 466
b Fwd/( Rev (Fast Forward/Reverse): Press the
right or left arrow once to fast forward or reverse
the DVD. To resume play, press the button again or
press the Play/Pause button. Pressing and holding an
arrow will fast forward or fast reverse the DVD and play
will resume when the arrow is released. These buttons
may not work when the DVD is playing the copyright
or the previews.
A NexVV Prev (NexVPrevious): Press the up or the
down arrow to select the next or the previous chapter.
These buttons may not work when the DVD is playing
the copyright or the previews.
Menu: Press this button to view the media menu.
The media menu is different on every disc. Use the up
and the down and the right and the left arrow buttons to
move the cursor around the media menu. After making
your selection, press Enter. Some discs may contain a
short skit leading up to the media menu.
Source: Press this button to switch the source for the
(connected to the RCA jacks) and the DVD player.
Pressing this button has no effect when there is
no auxiliary device connected.
GI IIG1 IUII I1 I IC51 I1 3yJLGl I1 UGLVWGGI I LI IG UUAIIIUI y UG V IUG nm+mrCo;nmnnt +.r++nm hn+lIrnnrr +hn -I av;li--qr nlnlr;nn
Battery Replacement
To change the batteries, do the following:
1. Remove the screw and open the battery door
located on the back of the remote control.
2. Replace the two AAA batteries in the compartment.
Make sure that they are installed correctly.
3. Replace the battery door and screw.
If the remote control is to be stored for a long period of
time, remove the batteries and keep them in a cool,
dry place.
3-97
Page 258 of 466
While listening to a cassette tape, press the right arrow to
hear the next selection on the tape. Press the left arrow to
go back to the previous selection. These arrows are
inactive
if the tape mode on the front radio is in use.
While listening to a CD, press the right arrow to hear the
next track on the CD. Press the left arrow to go back to
the start of the current track (if more than eight seconds
have played). These arrows are inactive
if the CD mode
on the front radio is in use.
P.SET SCAN (Preset
Scan): The front passengers
must be listening to something different for each of
these functions to work:
Press and hold this button to scan through the
preset radio stations set on the pushbuttons on the
main radio. The radio will go to a preset station
stored on your pushbuttons, play for a few seconds,
then go on to the next preset station. This feature
will only scan the presets that are in the selected
band. The selected radio station frequency will
appear on the display above the video screen.
Przss this !x::sn zgzi;; tz step scznzizcj pi-esek
If your vehicle is equipped with the AM-FM Radio
with Cassette Tape and Compact Disc Player
with Radio Data System (RDS) and Automatic Tone
Control, press this button to go to the other side
of the tape when a cassette tape is playing.
0 If your vehicle has the AM-FM Radio with Six-Disc
Compact Disc Player with Equalization and Radio
Data System (RDS), press this button to switch
to playing a different CD when multiple CDs
are loaded into the CD player.
CD TAPE: Press this button to switch between playing
a cassette tape, a compact disc, a DVD or an auxiliary
device when the headphones are on channel
B. If one
of the devices is not loaded, the system will skip
over the device when this button is pressed.
Theft-Deterrent Feature
THEFTLOCK@ is designed to discourage theft of your
radio. The feature works automatically by learning
a portion of the Vehicle Identification Number
(VIN).
If the radio is moved to a different vehicle, it will
not operate and LOCKED will be displayed.
When the radio and vehicle are turned
off, your radio
may have a blinking red light that indicates that
THEFTLQCK IC 2rme.l.
With THEFPLOCK activated, your radio will not operate
if stolen.
3-1 01
Page 260 of 466
DVD Distortion
You may experience video distortion when operating
cellular phones, scanners, CB radios, Global Position
Systems (GPS)*, two-way radios, mobile fax, or
wal kie talkies.
It may be necessary to turn
off the DVD player when
operating one of these devices in or near the vehicle.
*Excludes the Onstar@ System.
Understanding Radio Reception
AM
The range for most AM stations is greater than for FM,
especially at night. The longer range, however, can
cause stations to interfere with each other. AM can pick
up noise from things like storms and power lines. Try
reducing the treble to reduce this noise
if you ever get it.
FM
FM stereo will give you the best sound, but FM signals
will reach only about
10 to 40 miles (16 to 65 km).
Tall buildings or hills can interfere with
FM signals,
causing the sound to come and go.
Care of Your Cassette Tape Player
A tape player that is not cleaned regularly can cause
reduced sound quality, ruined cassettes or a damaged
mechanism. Cassette tapes should be stored
in their
cases away from contaminants, direct sunlight and
extreme heat. If they aren’t, they may not operate
properly or may cause failure
of the tape player.
Your tape player should be cleaned regularly after
every
50 hours of use. Your radio may display CLEAN
to indicate that you have used your tape player for
50 hours without resetting the tape clean timer.
If this message appears on the display, your cassette
tape player needs to be cleaned. It will still play
tapes, but you should clean it as soon as possible
to prevent damage to your tapes and player. If you
notice a reduction in sound quality, try a known good
cassette to see
if the tape or the tape player is at fault.
If this other cassette has no improvement in sound
quality, clean the tape player.
For best results, use a scrubbing action, non-abrasive
cieaning casseiie wirn pads wnicn scrub tne tape
head as the hubs of the cleaner cassette turn.
The recommended cleaning cassette is available
through your dealership.
3-1 03
Page 261 of 466
The broken tape detection feature of your cassette
tape player may identify the cleaning cassette as
a damaged tape, in error. To prevent the cleaning
cassette from being ejected, use the following steps:
1. Turn the ignition on.
2. Turn the radio off.
3. Press and hold the TAPE CD button for five
seconds. READY will appear on the display and
a cassette symbol will flash for five seconds.
4. Insert the scrubbing action cleaning cassette.
5. Eject the cleaning cassette after the manufacturer’s
recommended cleaning time.
After the cleaning cassette is ejected, the broken tape
detection feature will be active again.
You may also choose a non-scrubbing action, wet-type
cleaner which uses a cassette with a fabric belt to
clean the tape head. This type of cleaning cassette will
not eject on its own. A non-scrubbing action cleaner
may not clean as thoroughly as the scrubbing type
cleaner. The use of a non-scrubbing action, dry-type
cleaning cassette is not recommended. After you
clean the player, press and hold the EJT
button for five seconds to reset the CLEAN indicator.
The radio will display CLEANED to show the indicator
was reset.
Cassettes are subject to wear and the sound quality
may degrade over time. Always make sure the cassette
tape is in good condition before you have your tape
player serviced.
Care of Your CDs and DVDs
Handle discs carefully. Store them in their original cases
or other protective cases and away from direct sunlight
and dust. If the surface of a disc is soiled, dampen
a clean, soft cloth in a mild, neutral detergent solution
and clean it, wiping from the center to the edge.
Be sure never to touch the side without writing when
handling discs. Pick up discs by grasping the outer
edges or the edge of the hole and the outer edge.
Care of Your CD and DVD Player
The use of CD lens cleaner discs is not advised, due to
the risk of contaminating the lens of the CD optics
with lubricants internal to the CD mechanism.
3-1 04
Page 262 of 466
Cleaning Your DVD Player
When cleaning the outside DVD cabinet face and
buttons, use only a clean cloth dampened with
clean water.
Fixed Mast Antenna
The fixed mast antenna can withstand most car washes
without being damaged. If the mast should ever
become slightly bent, you can straighten
it out by hand.
If the mast is badly bent, as it might be by vandals, -
Cleaning the Video Screen you should replace it.
Check occasionally to be sure the mast is still tightened
When Cleaning the video Screen, Use Only a Clean cloth to the fender.
If tightening is required, tighten by
dampened with clean water. Use care when directly hand, then with a wrench one quarter turn.
touching or cleaning the screen, as damage may result.
3-1 05
Page 423 of 466
Part B: Owner Checks and Services
Listed in this part are owner checks and services
which should be performed at the intervals specified to
help ensure the safety, dependability and emission
control performance of your vehicle.
Be sure any necessary repairs are completed at once.
Whenever any fluids or lubricants are added to your
vehicle, make sure they are the proper ones, as shown
in Part D.
At Each Fuel Fill
It is important for you or a service station attendant to
perform these underhood checks at each fuel fill.
Engine Oil Level Check
Check the engine oil level and add the proper oil if
necessary. See Engine Oil on page 5-14 for further
details.
Engine Coolant Level Check
Check the engine coolant level and add DEX-COOL@
coolant mixture
if necessary. See Engine Coolant
on page 5-23
for further details.
Windshield Washer Fluid Level Check
Check the windshield washer fluid level in the windshield
washer tank and add the proper fluid
if necessary. See
Windshield Washer Fluid on page 5-38 for further details.
At Least Once a Month
Tire Inflation Check
Make sure tries are inflated to the correct pressures.
Don’t forget to check your spare tire. See
Tires on
page 5-60
for further details.
Cassette Tape Player Service
Clean cassette tape player. Cleaning should be done
every
50 hours of tape play. See Audio Systern(s)
on page 3-63 for further details.
At Least Twice a Year
Restraint System Check
:s , Make sure the safety belt reminder light and all your bell
buckles, latch plates, retractors and anchorages are
working properly. Look for any other loose or damaged
safety belt system parts.
If you see anything that might
keep a safety belt system from doing its
job, have it
repaired. Have any torn or frayed safety belts replaced.
6-1 0
Page 446 of 466
Accessory Inflator ........................................... 5-68
Accessory Power Outlets
................................. 3-24
Adding Washer Fluid
....................................... 5-38
Additional Program Information
........................... 7-8
Additives, Fuel
..................... ,... . ......... 5-6
Add-on Electrical Equipment
................. ... 5-96
Adjusting the Captain's Chairs
(Second Row)
............................................. 1-13
Adjusting the Speakers (Balance/Fade)
............................ 3-66, 3-73, 3-82
Air Bag Readiness Light
.......................................... 3-43
Air Bag Systems
............................................. 1-69
Servicing Your Air Bag-Equipped Vehicle
......... 1-76
What Will You See After an
How Does
ari Air Bag Restrain? .................... 1-74
What Makes an Air Bag Inflate?
.................... 1-74
Air Bag Inflates?
...................................... 1-74
When Should an Air Bag Inflate?
................... 1-73
Where Are the Air Bags?
.............................. 1-71
~II 'clttmIw/t-lller, Eflyirle ................................. 5- IS
All Overseas Locations ....... ........................ 7-4
A: . nr- ~ . . I~.ER
All-Wheel Drive ............................................... 5-86
All-Wheel Drive
............................................... 5-50
All-Wheel Drive Disable Warning Message .......... 3-59
All-Wheel-Drive (AWD) System
......................... 4-1 1
Aluminum Wheels ........................................... 5-92 AM
............................................................. 3-103
Antenna, Fixed Mast
...................................... 3-105
Anti-lock Brake System (ABS)
............................ 4-7
Anti-Lock Brake, System Warning Light
.............. 3-45
Appearance Care
............................................ 5-87
Care
of Safety Belts .................................... 5-90
Cleaning the Inside of Your Vehicle
................ 5-87
Cleaning the Outside of Your Vehicle
.............. 5-90
Finish Damage
............................................ 5-92
Chemical Paint Spotting
............................... 5-93
GM Vehicle Care/Appearance Materials
.......... 5-93
Sheet Metal Damage
................................... 5-92
Underbody Maintenance
............................... 5-93
Weatherstrips
.............................................. 5-90
Theft-Deterrent System
............. ......... 2-70
Arming and Disarming the Content
Arming Confirmation
.................... ............ 2-28
Arming with the Power Lock Switch
... ......... 2-27
Arming with the Remote Keyless Entry
Transmitter
................................................. 2-28
Arming with Your Key
...................................... 2-28
Audio Speakers
.............................................. 3-93
hdl0 System(s) ............................................. 3-63
Audio Systems
Audio Steering Wheel Controls
.................... 3-102
Care of Your Cassette Tape Player
............... 3-103
Care of Your CD and DVD Player
................ 3-104
Care
of Your CDs and DVDs ....................... 3-104
Fixed Mast Antenna
................. ... 3-105
Page 448 of 466

Capacities and Specifications .......................... 5-1 03
Captain Chairs. Rear
....................................... 1-13
Carbon Monoxide
................... 4-26, 4-36, 2-22, 2-43
Care of
Safety Belts
................................................ 5-90
Care of Your
Cassette Tape Player
................................. 3-103
CD and DVD Player
................................... 3-104
CDs and DVDs ......................................... 3-104
Cargo Lamp
................................................... 3-20
Carrier Assembly-Differential
(Rear Drive Module)
.................................... 5-51
Cassette Tape Messages
................................. 3-77
Cassette Tape Player Service
........................... 6-10
CD Adapter Kits
............................................. 3-78
Chains, Tires
.................................................. 5-67
Change Engine Oil Message
............................ 3-56
Charging System Indicator Message
.................. 3-54
Check
Checking Coolant
............................................ 5-24
Checking or Replacing the Engine Air CleanedFilter
......................................... 5-1 9
Checking Things Under the Hood
...................... 5-10
Center Passenger Position, Safety Belts ............. 1-37
Engine Light
............................................... 3-47
PhneLinm Enm;nn A:I VI l~ur\iIly Li lyll IG VI1 4- I y. 4A ........................................
Checking Your Restraint Systems ...................... 1-77
Chemical Paint Spotting
................................... 5-93 Child Restraints
Child Restraint Systems
............................... 1-51
Infants and Young Children
........................... 1-48
Lower Anchorages and Top Tethers for
Children (LATCH System)
.......................... 1-58
Older Children
.......................................... 1-45
Securing a Child Restraint Designed for
the LATCH System
................................ 1-60
Securing a Child Restraint in a Center
Seat Position
........................................... 1-64
Securing a Child Restraint in a Rear
Outside Seat Position
............................... 1-60
Securing a Child Restraint in the Right
Front Seat Position
................................... 1-66
Top Strap
................................................... 1-55
Where to Put the Restraint
........................... 1-54
Inside of Your Vehicle
.................................. 5-87
Outside of Your Vehicle
................................ 5-90
Underbody Maintenance
............................... 5-93
Video Screen
............................................ 3-105
VVedll IelsLI Ips 5-YU
Your DVD Player ....................................... 3-105
Cleaning Exterior LampsILenses
....................... 5-91
Air Filter, Passenger Compartment
................. 3-37
Dual
.......................................................... 3-28
-I--- iup S+m clap Anchor L~atio~~ 1-56 ............................
Cleaning
I A r- -11- - .._I .. I .. 1- ..............................................
Climate Control System ................................... 3-25
3
Page 450 of 466
Door Ajar Warning Message
................................. 3-57
Last Door Closed Locking
............................. 2-1 1
Power Door Locks ....................................... 2-10
Power Sliding Door
...................................... 2-1 6
Power Sliding Warning Message
.................... 3-56
Programmable Automatic Door Locks
............. 2-1 2
Position, Safety Belt
..................................... 1-28
Dual Sliding
Doors
....................................... 2-13
Locks
.......................................................... 2-9
Driver
Driver Information Center (DIC)
......................... 3-60
Driving
At Night
.................................................. 4-17
City
........................................................ 4-21
Defensive ..................................................... 4-2
Drunken ....................................................... 4-3
Freeway
..................................................... 4-22
Hill and Mountain Roads
.............................. 4-24
In Rain and on Wet Roads
........................... 4-1 8
Winter
........................................................ 4-26
Driving On Grades
.......................................... 4-42
Driving Through Deep Standing Water
............... 4-20
Driving with a Trailer
....................................... 4-40
Dual Trip Odometers
....................................... 3-41
ZrkiGCJ Gfi Sncjiiv Gi- kl3 4-a
Driving Through Flowing Water ......................... 4-20
Dual Climate Control System
............................ 3-28
n ,. ....................................
DVD
Care of Your
.......................................... 3-104
Care
of Your DVD Player ............................ 3-104
Cleaning the Video Screen
.......................... 3-105
Cleaning Your DVD Player .......................... 3-105
Distortion
.................................................. 3-1 03
Entertainment System
.................................. 3-91
DVD Player
.................................................... 3-94
E
Eight-Way Power Seats ..................................... 1-3
Electrical System
Add-on Equipment
...................................... 5-96
Fuses and Circuit Breakers
........................... 5-96
Headlamp Wiring
......................................... 5-96
Power Windows and Other Power Options
...... 5-96
Windshield Wiper Fuses
............................... 5-96
Maintenance Programs
............................. 3-50
Air CleanedFilter
...................... ........ 5-19
Battery ....................................................... 5-43
Change Oil Message
................................... 3-56
Coolant
...................................................... 5-23
Coolant Heater
............................................ 2-35
Emissions Inspection and
Engine
Check and Service Engine Soon Light
............ 3-47
Cnn!ant Temperature G2ge ........................... 3-47
5