steering wheel OLDSMOBILE SILHOUETTE 2003 Owners Manual
[x] Cancel search | Manufacturer: OLDSMOBILE, Model Year: 2003, Model line: SILHOUETTE, Model: OLDSMOBILE SILHOUETTE 2003Pages: 466, PDF Size: 21.55 MB
Page 79 of 466
If something is between an occupant and an
air bag, the bag might not inflate properly or
it
might force the object into that person causing
severe injury or even death. The path of an
inflating air bag must be kept clear. Don’t put
anything between an occupant and an air bag,
and don’t attach or put anything on the
steering wheel hub or on or near any other air
bag covering. Don’t let seat covers block the
inflation path
of a side impact air bag.
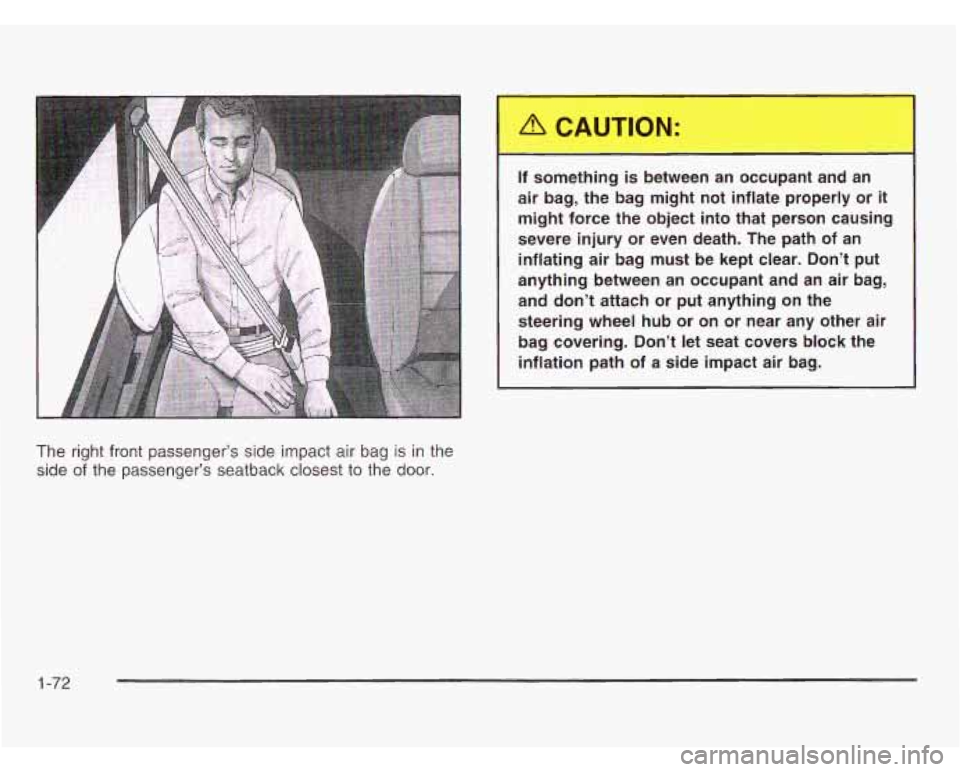
The right front passenger’s side impact air bag is in the
side
of the passenger’s seatback closest to the door.
1-72
Page 81 of 466
What Makes an Air Bag Inflate?
In an impact of sufficient severity, the air bag sensing
system detects that the vehicle is in a crash. For both
frontal and side impact air bags, the sensing system
triggers a release of gas from the inflator, which inflates
the air bag. The inflator, the air bag and related hardware
are all part of the air bag modules inside the steering
wheel, the instrument panel, and the side of the front
seatbacks closest to the door.
How Does an Air Bag Restrain?
In moderate to severe frontal or near frontal collisions,
even belted occupants can contact the steering wheel
or the instrument panel. In moderate to severe side
collisions, even belted occupants can contact the inside
of the vehicle. The air bag supplements the protection
provided by safety belts. Air bags distribute the force
of the impact more evenly over the occupant’s
upper body, stopping the occupant more gradually.
But the frontal air bags would not help you in many
types of collisions, including rollovers, rear impacts, and
many side impacts, primarily because an occupant’s
motion is not toward the air bag. Side impact air bags
would not help you
in many types of collisions,
including frontal or near frontal collisions, rollovers, and
rear impacts, primarily because an occupant’s motion is not toward those air
bags. Air bags should never be
regarded as anything more than a supplement to
safety belts, and then only in moderate to severe frontal
or near-frontal collisions for the driver’s and right front
passenger’s frontal air bags, and only in moderate
to severe side collisions for the driver’s and right front
passenger’s side impact air bag.
What Will You See After an Air Bag
Inflates?
After the air bag inflates, it quickly deflates, so quickly
that some people may not even realize the air bag
inflated. Some components of the air bag module will be
hot for a short time. These components include the
steering wheel hub for the driver’s frontal air bag and the
instrument panel for the right front passenger’s frontal
air bag. For vehicles with side impact air bags, the side
of the seatback closest to the driver’s and/or right
front passenger’s door will be hot. The parts of the bag
that come into contact with you may be warm, but
not too hot to touch. There will be some smoke and dust
coming from the vents in the deflated air bags. Air bag
inflation doesn’t prevent the driver from seeing or
being able to steer the vehicle, nor does it stop people
from leaving the vehicle.
1 -74
Page 82 of 466

When an air baa jnflates, there is dust in the
air. This dust could cause breathing problems
for people with a history of asthma or other breathing trouble.
To avoid this, everyone in
the vehicle should get out as soon as it is safe
to do
so. If you have breathing problems but
can’t get out of the vehicle after an air bag
inflates, then get fresh air by opening a
window or a door.
If you experience breathing
problems following an air bag deployment,
you should seek medical attention.
In many crashes severe enough to inflate an air bag,
windshields are broken by vehicle deformation.
Additional windshield breakage may also occur from
the right front passenger air bag.
Air bags are designed to inflate only once. After an
air bag inflates, you’ll need some new parts for
your air bag system. If you don’t get them, the air
bag system won’t be there to help protect you
in another crash.
A new system will include air bag
manual for your vehicle covers the need to replace
other parts.
modules and possibly other parts. The service
Your vehicle is equipped with an electronic frontal
sensor, which helps the sensing system distinguish
between a moderate frontal impact and a more
severe frontal impact. Your vehicle is also equipped
with a crash sensing and diagnostic module,
which records information about the frontal air bag
system. The module records information about
the readiness of the system, when the system
commands air bag inflation and driver’s safety belt
usage at deployment. The module
also records
speed, engine
RPM, brake and throttle data.
Let only qualified technicians work on your air bag
systems. Improper service can mean that an air
bag system won’t work properly. See your dealer
for service.
Notice: If you damage the covering for the driver’s
or the right front passenger’s air bag, or the air
bag covering on the driver’s and right front
passenger’s seatback, the bag may not work
properly. You may have to replace the air bag
module
in the steering wheel, both the air bag
module and the instrument panel for the right front
passenger’s air bag, or both the air bag module
and seatback for the driver’s and right front
passenger’s side impact air bag.
Do not open or
break the air bag coverings.
1 -75
Page 118 of 466

B (LOCK): This is the only position from which you
can remove the key. This position locks your ignition,
steering wheel and transaxle.
Notice: If your key seems stuck in LOCK and you
can’t turn
it, be sure you are using the correct key;
if
so, is it all the way in? If it is, then turn the
steering wheel left and right while you turn the key hard. Turn the key only with your hand. Using a
tool to force
it could break the key or the ignition
switch. If none
of these works, then your vehicle
needs service.
C (OFF): This position unlocks the ignition, steering
wheel and transaxle but, does not send power to
any accessories. Use this position
if your vehicle
must be pushed or towed, but never try
to push-start
your vehicle.
D (RUN): This is the position to which the switch returns
after you start your engine and release the ignition key.
This is the position for driving. Even when the engine is
not running, you can use RUN to operate your electrical
accessories and
to display some instrument panel
warning lights.
E (START): This position starts the engine. When the
engine starts, release the ignition key. The switch
will return to RUN for normal driving.
If the engine is not running, ACCESSORY and RUN
are positions that allow you to operate your electrical
accessories, such as the radio.
Retained Accessory Power (RAP)
With RAP, the power windows, power rear quarter
windows, audio system and the automatic level control
will continue to work up to
10 minutes after the
ignition key is turned to
OFF and none of the doors
are opened.
2-33
Page 159 of 466
3 Instrument Panel
Audio System(s) ...... ................................ 3.63
Setting the Time
....................................... 3-63
Radio with CD
.......................................... 3-64
Radio with Cassette and CD
...................... 3-71
Radio with Six-Disc CD
......... .... , ......... 3-80
Entertainment System
.................... , ......... 3-91
Rear Seat Audio (RSA) (Without Entertainment System)
................... 3-98
Rear Seat Audio (RSA) (With Entertainment System)
... ............ 3.100 Theft-Deterrent
Feature
................................ 3-101
Audio Steering Wheel Controls
...................... 3.102
DVD Distortion
............................................ 3.103
Understanding Radio Reception
.................... 3.103
Care
of Your CDs and DVDs ........................ 3-104
Care
of Your CD and DVD Player ................. 3-104
Cleaning Your DVD Player
........................... 3.105
Cleaning the Video Screen
........................... 3.105
Fixed Mast Antenna
.................................... 3.105
Care
of Your
Cassette Tape Player ............... 3-103
3-2
Page 162 of 466
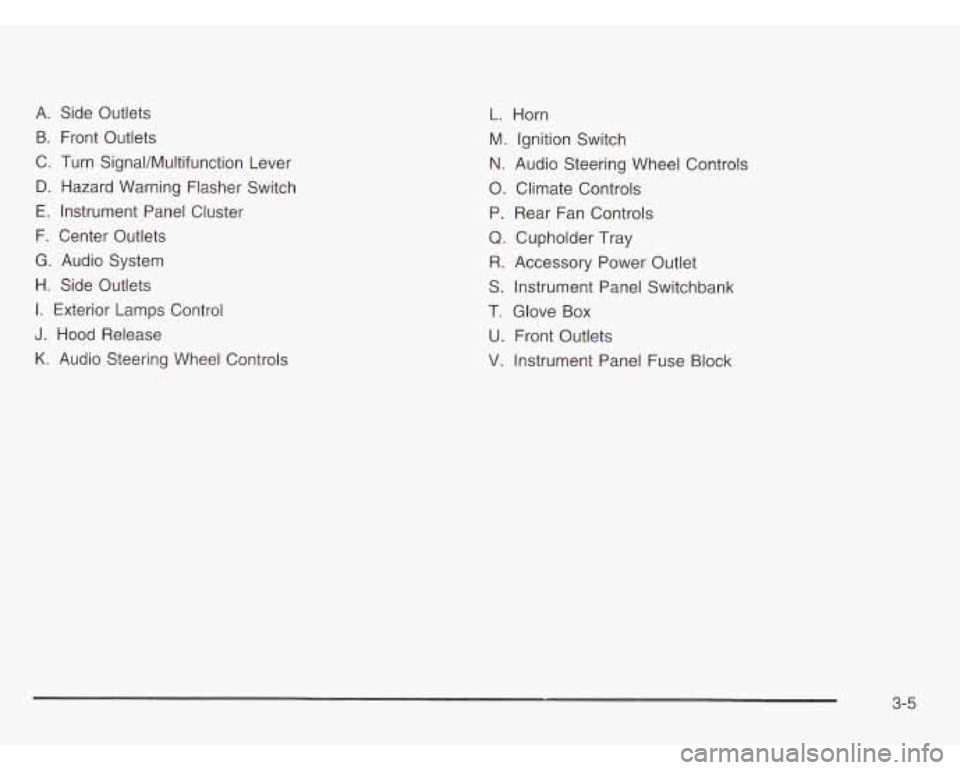
A. Side Outlets
B. Front Outlets
C. Turn SignaVMultifunction Lever
D. Hazard Warning Flasher Switch
E. Instrument Panel Cluster
F. Center Outlets
G. Audio System
H. Side Outlets
I. Exterior Lamps Control
J. Hood Release
K. Audio Steering Wheel Controls
L. Horn
M. Ignition Switch
N. Audio Steering Wheel Controls
0. Climate Controls
P. Rear Fan Controls
Q. Cupholder Tray
R. Accessory Power Outlet
S. Instrument Panel Switchbank
T. Glove Box
U. Front Outlets
V. Instrument Panel Fuse Block
3-5
Page 164 of 466
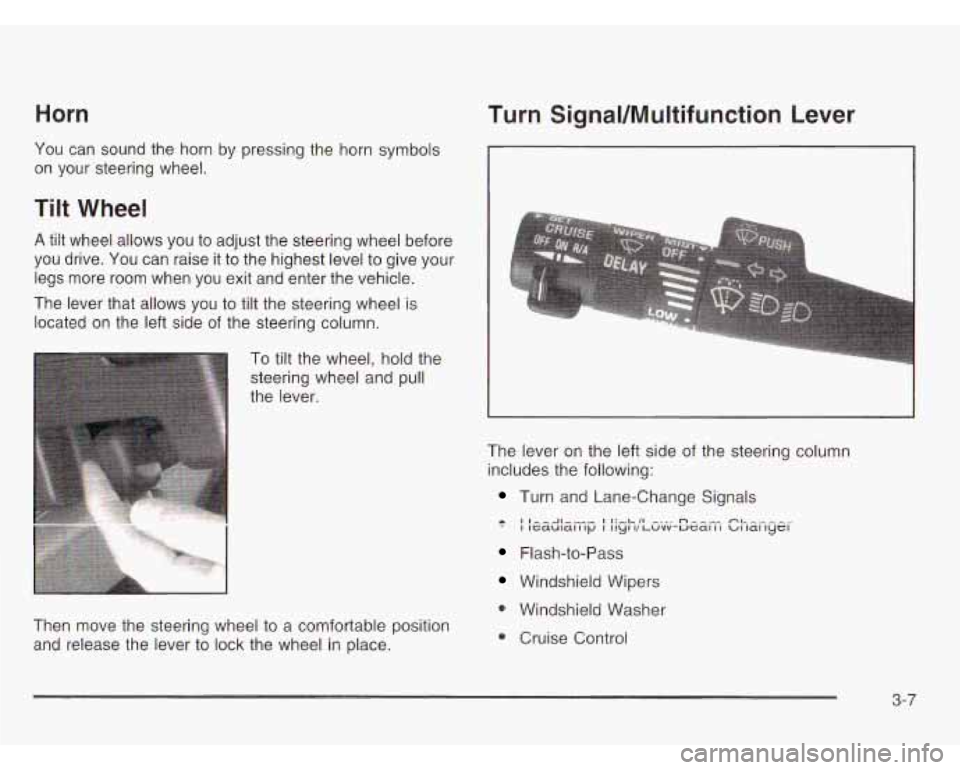
Horn
You can sound the horn by pressing the horn symbols
on your steering wheel.
Tilt Wheel
A tilt wheel allows you to adjust the steering wheel before
you drive. You can raise it to the highest level to give your
legs more room when you exit and enter the vehicle.
The lever that allows you to
tilt the steering wheel is
located on the left side of the steering column.
To tilt the wheel, hold the
steering wheel and pull
the lever.
Turn SignaVMultifunction Lever
Then move the steering wheel to a comfortable position
and release the lever to lock the wheel in place.
1
The lever on the left side of the steering column
includes the following:
Turn and Lane-Change Signals
I I--AI--- I 1:-L II -... n--- -I -_I_._.I I leaulal I ~p I IIYI II Luvv-ucal I I UI la1 lyt-I
Flash-to-Pass
Windshield Wipers
0 Windshield Washer
0 Cruise Controi
3-7
Page 259 of 466
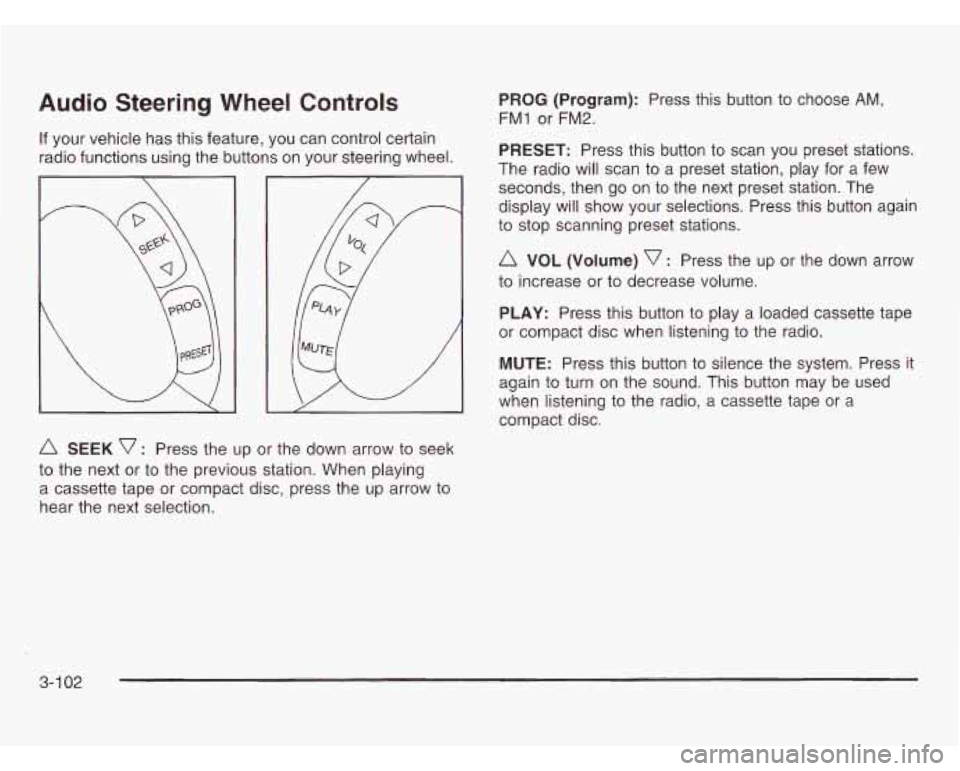
Audio Steering Wheel Controls
If your vehicle has this feature, you can control certain
radio functions using the buttons on your steering wheel.
A SEEK v : Press the up or the down arrow to seek
to the next or to the previous station. When playing
a cassette tape
or compact disc, press the up arrow to
hear the next selection.
PROG (Program): Press this button to choose AM,
FM1 or FM2.
PRESET: Press this button to scan you preset stations.
The radio will scan to a preset station, play for a few
seconds, then go on to the next preset station. The
display will show your selections. Press this button again
to stop scanning preset stations.
A VOL (Volume) v : Press the up or the down arrow
to increase or to decrease volume.
PLAY: Press this button to play a loaded cassette tape
or compact disc when listening to the radio.
MUTE: Press this button to silence the system. Press it
again to turn on the sound. This button may be used
when listening to the radio, a cassette tape or a
compact disc.
3-1 02
Page 264 of 466
Section Driving Your Vehicle
Your
Driving. the Road. and Your Vehicle .......... 4-2
Defensive Driving
........................................... 4.2
Drunken Driving
............................................. 4.3
Braking
......................................................... 4.6
Traction Control System (TCS)
....................... 4.10
Steering
...................................................... 4.12
Off-Road Recovery
....................................... 4.14
Passing
........................................ .... 4.14
Loss of Control
.................................. .... 4.16
Driving at Night
......................................... 4.17
Driving in Rain and on Wet Roads
.............. 4-18
Control of a Vehicle ........................................ 4-6
All-Wheel Drive (AWD) System
....................... 4-1 1 City Driving
.................................................. 4.21
Freeway Driving
............................... ..... 4.22
Before Leaving on a Long Trip
....................... 4-23
Highway Hypnosis
........................................ 4-24
Winter Driving
.............................................. 4.26
Ice or Snow
.............................................. 4-30
Towing .......................................................... 4-32
Towing Your Vehicle
..................................... 4-32
Recreational Vehicle Towing
........................... 4-32
Loading Your Vehicle
.................................... 4-34
Towing a Trailer
.............................. ..... 4-36
Hill
and Mountain Roads
................................ 4-24
If You Are Stuck: In Sand, Mud,
4- 1
Page 272 of 466
Remember: Anti-lock doesn’t change the time you need
to get your foot up to the brake pedal or always
decrease stopping distance.
If you get too close to the
vehicle in front of you, you won’t have time to apply
your brakes
if that vehicle suddenly slows or stops.
Always leave enough room up ahead to stop, even
though you have anti-lock brakes.
Using Anti-Lock
Don’t pump the brakes. Just hold the brake pedal down
firmly and let anti-lock work for you. You may feel a
slight brake pedal pulsation or notice some noise,
but this is normal.
Braking in Emergencies
At some time, nearly every driver gets into a situation
that requires hard braking.
If you have anti-lock, you can steer and brake at the
same time. However,
if you don’t have anti-lock,
your first reaction
- to hit the brake pedal hard
and hold it down
- mav be the wronq thina to do. Your
wheels can stop rolling. Once they do, the vehicle
can’t respond to your steering. Momentum will carry
it in whatever direction it was headed when the wheels
stopped rolling. That could be off the road, into the
very thing you were trying to avoid, or into traffic.
If you don’t have anti-lock, use a “squeeze” braking
technique. This will give you maximum braking while
maintaining steering control. You can do this by pushing
on the brake pedal with steadily increasing pressure.
In an emergency, you will probably want to squeeze
the brakes hard without locking the wheels. If you hear
or feel the wheels sliding, ease
off the brake pedal.
This will help you retain steering control.
If you do have
anti-lock, it’s different. See “Anti-Lock Brakes.”
In many emergencies, steering can help you more than
even the very best braking.
4-9