tow OPEL AMPERA E 2019 Manual user
[x] Cancel search | Manufacturer: OPEL, Model Year: 2019, Model line: AMPERA E, Model: OPEL AMPERA E 2019Pages: 271, PDF Size: 6.7 MB
Page 232 of 271

230Vehicle careVehicle tools
Tools
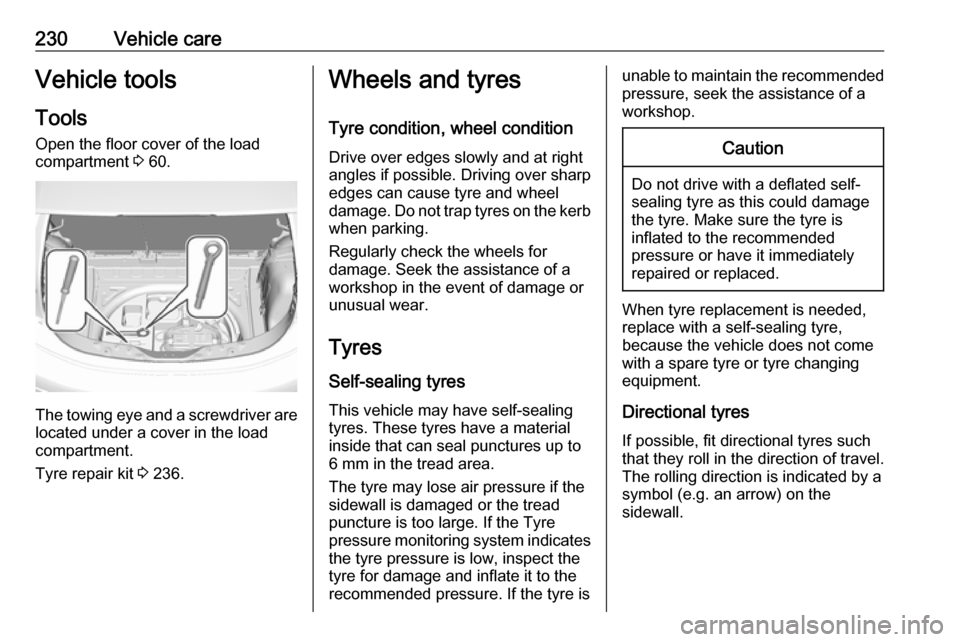
Open the floor cover of the load
compartment 3 60.
The towing eye and a screwdriver are
located under a cover in the load
compartment.
Tyre repair kit 3 236.
Wheels and tyres
Tyre condition, wheel condition Drive over edges slowly and at right
angles if possible. Driving over sharp
edges can cause tyre and wheel
damage. Do not trap tyres on the kerb when parking.
Regularly check the wheels for
damage. Seek the assistance of a
workshop in the event of damage or
unusual wear.
Tyres
Self-sealing tyres This vehicle may have self-sealing
tyres. These tyres have a material
inside that can seal punctures up to
6 mm in the tread area.
The tyre may lose air pressure if the
sidewall is damaged or the tread
puncture is too large. If the Tyre
pressure monitoring system indicates the tyre pressure is low, inspect the
tyre for damage and inflate it to the
recommended pressure. If the tyre isunable to maintain the recommended
pressure, seek the assistance of a
workshop.Caution
Do not drive with a deflated self-
sealing tyre as this could damage
the tyre. Make sure the tyre is
inflated to the recommended
pressure or have it immediately
repaired or replaced.
When tyre replacement is needed,
replace with a self-sealing tyre,
because the vehicle does not come
with a spare tyre or tyre changing
equipment.
Directional tyres
If possible, fit directional tyres such
that they roll in the direction of travel.
The rolling direction is indicated by a
symbol (e.g. an arrow) on the
sidewall.
Page 240 of 271

238Vehicle care
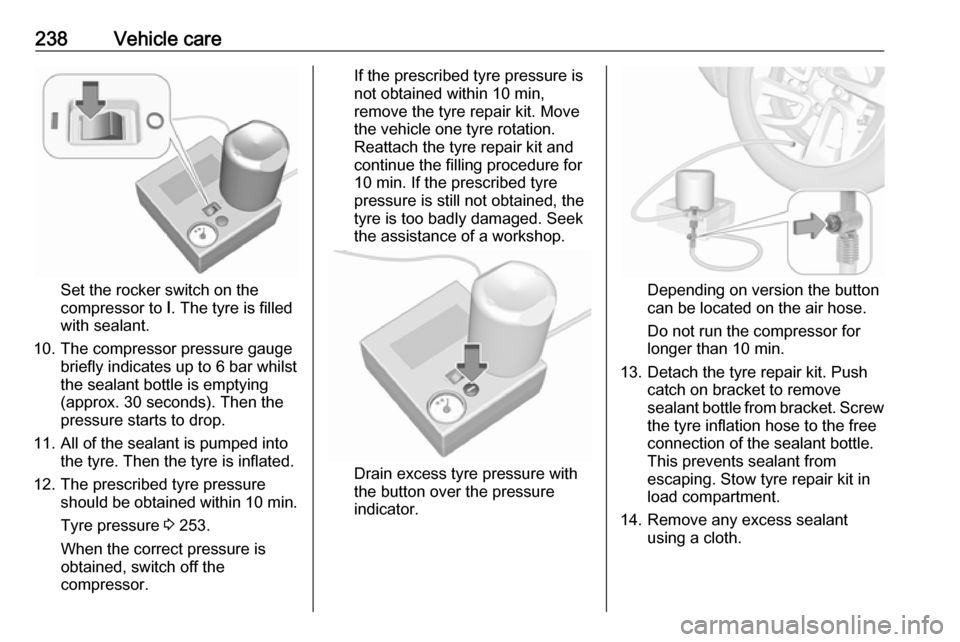
Set the rocker switch on the
compressor to I. The tyre is filled
with sealant.
10. The compressor pressure gauge briefly indicates up to 6 bar whilstthe sealant bottle is emptying
(approx. 30 seconds). Then the
pressure starts to drop.
11. All of the sealant is pumped into the tyre. Then the tyre is inflated.
12. The prescribed tyre pressure should be obtained within 10 min.
Tyre pressure 3 253.
When the correct pressure is
obtained, switch off the
compressor.
If the prescribed tyre pressure is
not obtained within 10 min,
remove the tyre repair kit. Move
the vehicle one tyre rotation.
Reattach the tyre repair kit and
continue the filling procedure for
10 min. If the prescribed tyre
pressure is still not obtained, the
tyre is too badly damaged. Seek
the assistance of a workshop.
Drain excess tyre pressure with
the button over the pressure indicator.
Depending on version the button
can be located on the air hose.
Do not run the compressor for
longer than 10 min.
13. Detach the tyre repair kit. Push catch on bracket to remove
sealant bottle from bracket. Screw
the tyre inflation hose to the free
connection of the sealant bottle.
This prevents sealant from
escaping. Stow tyre repair kit in
load compartment.
14. Remove any excess sealant using a cloth.
Page 241 of 271

Vehicle care23915. Take the label indicatingmaximum permitted speed from
the sealant bottle and affix in the
driver's field of view.
16. Continue driving immediately so that sealant is evenly distributedin the tyre. After driving approx.
10 km (but no more than 10 min),
stop and check tyre pressure.
Screw compressor air hose
directly onto tyre valve and
compressor when doing this.
If tyre pressure is more than
1.3 bar , set it to the correct value.
Repeat the procedure until there
is no more loss of pressure.
If the tyre pressure has fallen
below 1.3 bar, the vehicle must
not be used. Seek the assistance
of a workshop.
17. Stow away tyre repair kit in load compartment.
Reinstall floor cover.
Rear floor storage cover 3 60.
Note
The driving characteristics of the
repaired tyre are severely affected,
therefore have this tyre replaced.
If unusual noise is heard or the
compressor becomes hot, turn
compressor off for at least 30 min.
The built-in safety valve opens at a
pressure of 7 bar.
Note the expiry date of the kit. After
this date its sealing capability is no
longer guaranteed. Pay attention to
storage information on sealant
bottle.
Replace the used sealant bottle. Dispose of the bottle as prescribed
by applicable laws.
The compressor and sealant can be used from approx. -30 °C.The adapters possibly supplied can
be used to pump up other items e.g. footballs, air mattresses, inflatable
dinghies etc. They can be located on
the underside of the compressor. To
remove, screw on compressor air
hose and withdraw adapter.
Page 244 of 271

242Vehicle careTowingTowing the vehicleCaution
Incorrect towing of a disabled
vehicle may cause damage to the
vehicle. The disabled vehicle
should only be towed on a flatbed
car carrier.
Ensure the vehicle is only towed
by well trained technicians.
Wrap a cloth around the tip of a slot
screwdriver to prevent paint damage. Insert the screwdriver in the slot at the
short edge of the cap. Release the
cap by carefully moving the
screwdriver sidewards.
The towing eye is stowed with the vehicle tools 3 230.
Screw in the towing eye anticlockwise
as far as it will go until it stops in a
horizontal position.
Attach a tow rope – or better still a tow
rod – to the towing eye.
The towing eye must only be used for
towing and not for recovering the
vehicle.
Switch on the vehicle to release
steering wheel lock and to permit
operation of brake lights, horn and
windscreen wiper.Caution
Deactivate the driver assistance
systems like active emergency
braking 3 168, otherwise the
vehicle may automatically brake during towing.
Shift the selector lever of the electric
drive unit into N.
Release the electric parking brake.
Caution
Drive slowly. Do not drive jerkily.
Excessive tractive force can
damage the vehicle.
When the vehicle is not running, considerably more force is needed to
brake and steer.
Page 245 of 271

Vehicle care243To prevent the entry of exhaust gases
from the towing vehicle, switch on the
air recirculation and close the
windows.
Seek the assistance of a workshop.
After towing, unscrew the towing eye. Insert cap at the bottom and close.
Towing another vehicle The vehicle is neither designed nor
intended to tow a trailer or another vehicle.Appearance care
Exterior care LocksThe locks are lubricated at the factory
using a high quality lock cylinder
grease. Use de-icing agent only when absolutely necessary, as this has a
degreasing effect and impairs lock
function. After using a de-icing agent,
have the locks regreased by a
workshop.
WashingThe paintwork of your vehicle is
exposed to environmental influences.
Wash and wax your vehicle regularly.
When using automatic vehicle
washes, select a programme that
includes waxing.
Do not apply waxes or polishes to
uncoated plastic, vinyl, rubber,
decals, simulated wood, or flat paint
as damage can occur.Bird droppings, dead insects, resin,
pollen and the like should be cleaned
off immediately, as they contain
aggressive constituents which can cause paint damage.
If using a vehicle wash, comply with
the vehicle wash manufacturer's instructions. The windscreen wiperand rear window wiper must be
switched off. Remove external
accessories such as roof racks etc.
If you wash your vehicle by hand,
make sure that the insides of the
wheel housings are also thoroughly
rinsed out.
Clean edges and folds on opened
doors and the bonnet as well as the
areas they cover.
Clean bright metal mouldings with a
cleaning solution approved for
aluminium to avoid damages.Caution
Always use a cleaning agent with
a pH value of four to nine.
Do not use cleaning agents on hot surfaces.
Page 268 of 271

266Recommended fluids andlubricants ................................ 247
Regenerative braking ...........76, 160
Regional ..................................... 122
Regionalisation ........................... 122
Registered trademarks ...............258
Retained power off .....................150
Reversing lights .........................103
Ride control systems ..................161
Ring tone Changing the ring tone ............136
Ring tone volume ....................115
Roof load ...................................... 62
Roof rack ..................................... 62
S Safety belts ................................... 42
Seat adjustment ............................. 5 Seat belt ........................................ 6
Seat belt reminder .......................77
Seat belts ..................................... 42 Seat heating Seat heating, front .....................41
Seat heating, rear .....................42
Seat position ................................ 38
Self-sealing tyres ........................230
Service ............................... 146, 246
Service display ............................ 77
Service information ....................246
Service vehicle soon .................... 79Side airbag system ......................48
Side blind zone assistant ............180
Sidelights ...................................... 98
Side turn lights ........................... 220
Smartphone ................................ 125
Phone projection .....................131
Smartphone remote function ........27
Software acknowledgement .......256
Software update ......................... 257
Speech recognition .....................132
Speed dial numbers ...................136
Speed limiter......................... 81, 164
Speedometer ............................... 74
Sport mode .................................. 80
Starting and operating ................148
Starting and stopping the vehicle 150
Starting off ................................... 14
Station search............................. 120
Steering wheel adjustment ......7, 65
Steering wheel audio controls ....107
Steering wheel controls ...............65
Storage ......................................... 57
Storage compartments .................57
Sunvisor lights ........................... 104
Sun visors .................................... 36
Switching the Infotainment system on ................................ 109
Symbols ......................................... 3
System settings .......................... 116T
Tail lights ................................... 220
Target charge level .....................196
Temporary charge mode cancel. 196
Temporary charge mode override ................................... 196
Theft-deterrent feature ..............106
Three-point seat belt .................... 43
Tone settings .............................. 114
Tools .......................................... 230
Total vehicle range .......................77
Touch beep volume ....................115
Towing ........................................ 242
Towing another vehicle .............243
Towing the vehicle .....................242
TP volume .................................. 115
Traction Control system ............. 161
Traction Control system off........... 80
Traffic sign assistant .............82, 187
Tread depth ............................... 234
Turn lights ............................ 77, 102
Tyre chains ................................ 236
Tyre designations ......................231
Tyre pressure ............................ 231
Tyre pressure monitoring system ............................... 80, 232
Tyre pressures ........................... 253
Tyre repair kit ............................. 236
Tyres .......................................... 230