tow OPEL AMPERA E 2019 Manual user
[x] Cancel search | Manufacturer: OPEL, Model Year: 2019, Model line: AMPERA E, Model: OPEL AMPERA E 2019Pages: 271, PDF Size: 6.7 MB
Page 17 of 271

In brief15ParkingNote
Do not allow the vehicle to remain in
extreme temperatures for long
periods without being driven or
being plugged in.9 Warning
● Always apply parking brake.
Pull switch m for approx.
1 second and check if the
control indicator m illuminates.
The electric parking brake is applied when control indicator
m illuminates 3 79.
● Switch off the vehicle.
● If the vehicle is on a level surface or uphill slope, apply
the parking brake and set the
selector lever to P before
switching off the vehicle. On an uphill slope, turn the front
wheels away from the kerb.
If the vehicle is on a downhill
slope, apply the parking brake
and set the selector lever to P
before switching off the vehicle.
Turn the front wheels towards
the kerb.
With the selector lever in P,
press POWER m briefly to
switch off the vehicle. Turn the
steering wheel until the
steering wheel lock engages.
● Lock the vehicle with ) on the
electronic key.
Activate the anti-theft alarm
system 3 30.
● The cooling fans may run after the vehicle has been switched off
3 211.
Keys, locks 3 16.
Laying-up the vehicle for a long period of time 3 210.
Page 48 of 271

46Seats, restraintsDE: Nach hinten gerichtete
Kindersitze NIEMALS auf einem Sitz
verwenden, der durch einen davor
befindlichen AKTIVEN AIRBAG
geschützt ist, da dies den TOD oder
SCHWERE VERLETZUNGEN DES
KINDES zur Folge haben kann.
FR: NE JAMAIS utiliser un siège
d'enfant orienté vers l'arrière sur un
siège protégé par un COUSSIN
GONFLABLE ACTIF placé devant lui, sous peine d'infliger des
BLESSURES GRAVES, voire
MORTELLES à l'ENFANT.
ES: NUNCA utilice un sistema de
retención infantil orientado hacia
atrás en un asiento protegido por un
AIRBAG FRONTAL ACTIVO. Peligro de MUERTE o LESIONES GRAVES
para el NIÑO.
RU: ЗАПРЕЩАЕТСЯ
устанавливать детское
удерживающее устройство лицом
назад на сиденье автомобиля,
оборудованном фронтальной
подушкой безопасности, если
ПОДУШКА НЕ ОТКЛЮЧЕНА! Этоможет привести к СМЕРТИ или
СЕРЬЕЗНЫМ ТРАВМАМ
РЕБЕНКА.
NL: Gebruik NOOIT een achterwaarts
gericht kinderzitje op een stoel met
een ACTIEVE AIRBAG ervoor, om
DODELIJK of ERNSTIG LETSEL van het KIND te voorkomen.
DA: Brug ALDRIG en bagudvendt
autostol på et forsæde med AKTIV
AIRBAG, BARNET kan komme i
LIVSFARE eller komme ALVORLIGT
TIL SKADE.
SV: Använd ALDRIG en bakåtvänd
barnstol på ett säte som skyddas med en framförvarande AKTIV AIRBAG.
DÖDSFALL eller ALLVARLIGA
SKADOR kan drabba BARNET.
FI: ÄLÄ KOSKAAN sijoita taaksepäin
suunnattua lasten turvaistuinta
istuimelle, jonka edessä on
AKTIIVINEN TURVATYYNY, LAPSI
VOI KUOLLA tai VAMMAUTUA
VAKAVASTI.
NO: Bakovervendt
barnesikringsutstyr må ALDRI brukes
på et sete med AKTIV
KOLLISJONSPUTE foran, da det kanføre til at BARNET utsettes for
LIVSFARE og fare for ALVORLIGE
SKADER.
PT: NUNCA use um sistema de
retenção para crianças voltado para
trás num banco protegido com um AIRBAG ACTIVO na frente do
mesmo, poderá ocorrer a PERDA DE VIDA ou FERIMENTOS GRAVES na
CRIANÇA.
IT: Non usare mai un sistema di
sicurezza per bambini rivolto
all'indietro su un sedile protetto da
AIRBAG ATTIVO di fronte ad esso:
pericolo di MORTE o LESIONI
GRAVI per il BAMBINO!
EL: ΠΟΤΕ μη χρησιμοποιείτε παιδικό
κάθισμα ασφαλείας με φορά προς τα πίσω σε κάθισμα που προστατεύεται
από μετωπικό ΕΝΕΡΓΟ ΑΕΡΟΣΑΚΟ, διότι το παιδί μπορεί να υποστεί
ΘΑΝΑΣΙΜΟ ή ΣΟΒΑΡΟ
ΤΡΑΥΜΑΤΙΣΜΟ.
PL: NIE WOLNO montować fotelika
dziecięcego zwróconego tyłem do
kierunku jazdy na fotelu, przed
którym znajduje się WŁĄCZONA
PODUSZKA POWIETRZNA.
Niezastosowanie się do tego
Page 63 of 271

Storage61General hint9Warning
For safety reasons, stow all parts
in the load compartment in its
position, always drive with a
closed rear floor cover and, if
possible, with folded up rear
backrests.
Otherwise, vehicle occupants
could be injured by objects being
thrown around in the event of
sharp braking, a sudden change in direction or an accident.
Lashing eyes
The lashing eyes are designed to
secure items against slippage, e.g.
using lashing straps or luggage net.
Warning triangle
Stow the warning triangle in the
vehicle tool box below the rear floor
cover in the load compartment.
First aid kit
Stow the first-aid kit in the load
compartment.
Page 64 of 271

62StorageRoof rack systemRoof rackFor safety reasons and to avoid
damage to the roof, the vehicle
approved roof rack system is
recommended. For further
information contact your workshop.
Follow the installation instructions
and remove the roof rack when not in
use.
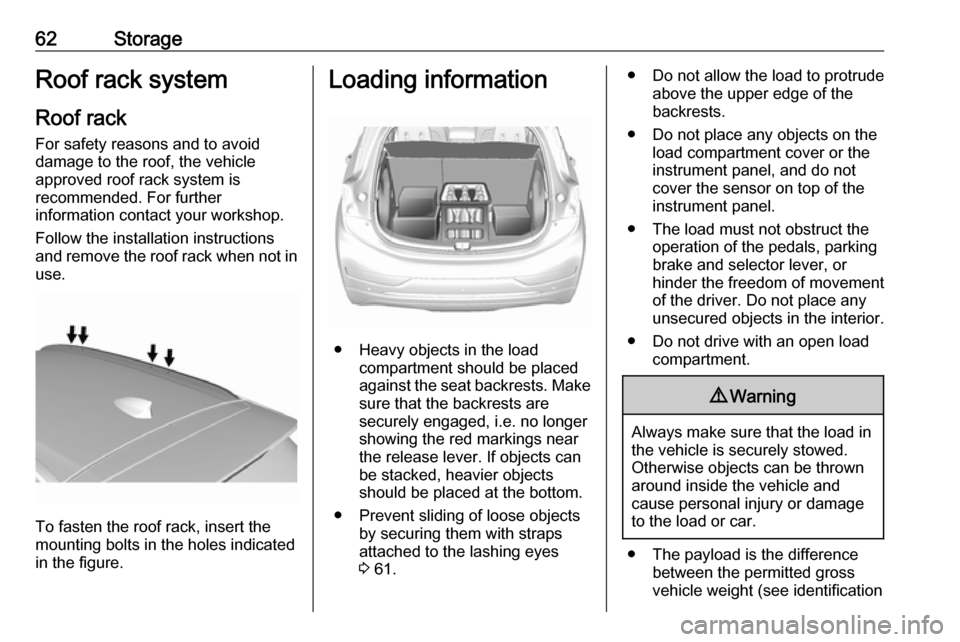
To fasten the roof rack, insert the
mounting bolts in the holes indicated
in the figure.
Loading information
● Heavy objects in the load compartment should be placed
against the seat backrests. Make
sure that the backrests are
securely engaged, i.e. no longer
showing the red markings near the release lever. If objects can
be stacked, heavier objects
should be placed at the bottom.
● Prevent sliding of loose objects by securing them with straps
attached to the lashing eyes
3 61.
● Do not allow the load to protrude
above the upper edge of the
backrests.
● Do not place any objects on the load compartment cover or theinstrument panel, and do not
cover the sensor on top of the instrument panel.
● The load must not obstruct the operation of the pedals, parking
brake and selector lever, or
hinder the freedom of movement of the driver. Do not place any
unsecured objects in the interior.
● Do not drive with an open load compartment.9Warning
Always make sure that the load in
the vehicle is securely stowed.
Otherwise objects can be thrown
around inside the vehicle and
cause personal injury or damage
to the load or car.
● The payload is the difference between the permitted gross
vehicle weight (see identification
Page 147 of 271

Climate control145Air vents
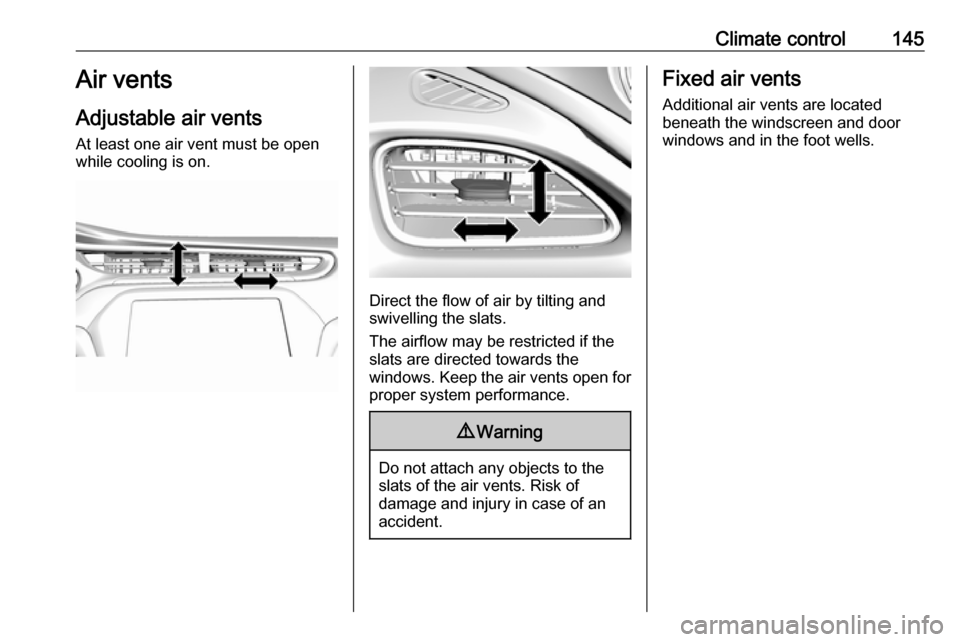
Adjustable air vents At least one air vent must be open
while cooling is on.
Direct the flow of air by tilting and
swivelling the slats.
The airflow may be restricted if the
slats are directed towards the
windows. Keep the air vents open for proper system performance.
9 Warning
Do not attach any objects to the
slats of the air vents. Risk of
damage and injury in case of an
accident.
Fixed air vents
Additional air vents are located
beneath the windscreen and door windows and in the foot wells.
Page 154 of 271

152Driving and operating9Warning
● Always apply parking brake.
Pull switch m for approx.
1 second and check if the
control indicator m illuminates.
The electric parking brake is applied when control indicator
m illuminates 3 79.
● Switch off the vehicle.
● If the vehicle is on a level surface or uphill slope, apply
the parking brake and set the
selector lever to P before
switching off the vehicle. On an uphill slope, turn the front
wheels away from the kerb.
If the vehicle is on a downhill
slope, apply the parking brake
and set the selector lever to P
before switching off the vehicle.
Turn the front wheels towards
the kerb.
With the selector lever in P,
press POWER m briefly to
switch off the vehicle. Turn the
steering wheel until the
steering wheel lock engages.
● Close the windows.
● Lock the vehicle.
● Activate the anti-theft alarm system.
● The engine cooling fans may run
after the vehicle has been
switched off 3 211.
It is not recommended to park with the propulsion system running.
If the vehicle is left with the propulsion
system running, follow the proper
steps to be sure the vehicle will not move.
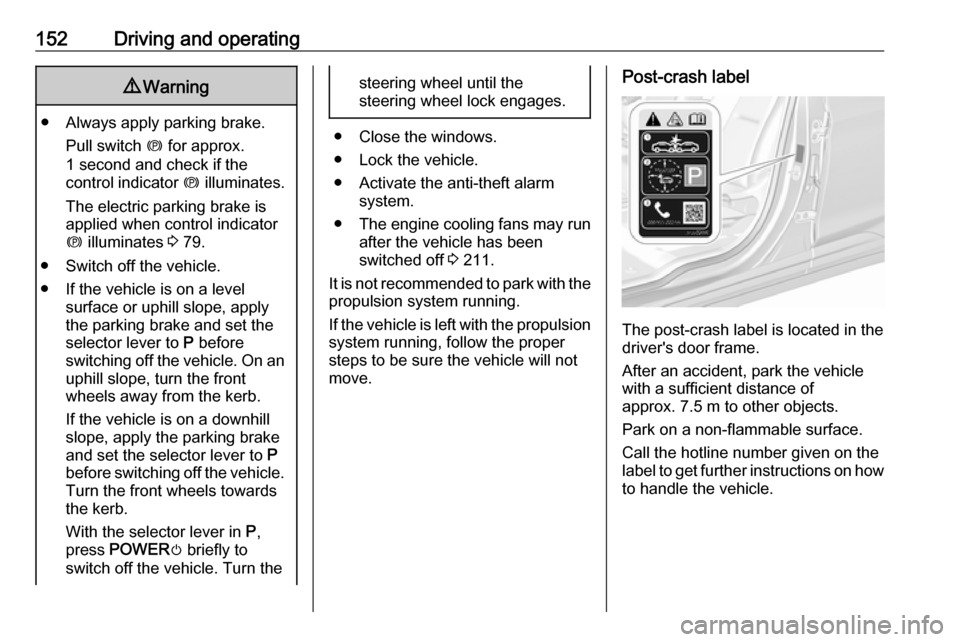
Post-crash label
The post-crash label is located in the
driver's door frame.
After an accident, park the vehicle
with a sufficient distance of
approx. 7.5 m to other objects.
Park on a non-flammable surface.
Call the hotline number given on the
label to get further instructions on how to handle the vehicle.
Page 159 of 271

Driving and operating1575. The indicator should continue toshow N. If it does not, repeat steps
1-4.
6. Exit the vehicle and close the door.
The vehicle is now ready for the
car wash.
Car wash mode (vehicle on) - driver
in vehicle
To place the vehicle in N with the
vehicle on and occupied:
1. Apply the brake pedal.
2. Shift to N.
3. Release the brake pedal. The vehicle is now ready for the
car wash.
Car wash mode (vehicle on) - driver out of vehicle
To place the vehicle in N with the
vehicle on and unoccupied:
1. Apply the brake pedal.2. Open the door.
3. Shift to N.
4. Release the brake pedal.5. The indicator should continue to show N. If it does not, repeat steps
1-4.
6. Exit the vehicle and close the door.
The vehicle is now ready for the
car wash.
The vehicle may have
automatically shifted to P upon re-
entry.Brakes
The brake system comprises two independent brake circuits.
If a brake circuit fails, the vehicle can
still be braked using the other brake
circuit. However, braking effect is
achieved only when the brake pedal
is depressed firmly. Considerably
more force is needed for this. The braking distance is extended. Seek
the assistance of a workshop before
continuing the journey.
When the vehicle is switched off, the
support of the brake servo unit
disappears once the brake pedal has
been depressed once or twice.
Braking effect is not reduced, but
braking requires significantly greater
force. It is especially important to bear this in mind when being towed.
Control indicator R 3 79.
Antilock brake system
Antilock brake system (ABS)
prevents the wheels from locking.
Page 172 of 271

170Driving and operatingnot brake outside of its operatingspeed range and only responds to
detected vehicles.
Forward looking brake assist
In addition to the brake preparation
system and emergency automatic
braking, the forward looking brake
assist function makes the brake assist more sensitive. Therefore,
depressing the brake pedal less
strongly results in immediate hard
braking. This function helps the driver
brake quicker and harder before an
imminent collision.
The system operates up to a speed of 80 km/h.
9 Warning
Active emergency braking is not
designed to apply hard
autonomous braking or to
automatically avoid a collision. It is designed to reduce the vehicle
speed before a collision. It may not
react to animals. After a sudden
lane change, the system needs a
certain time to detect the next
preceding vehicle.
The complete attention of the
driver is always required while
driving. The driver must always be
ready to take action and apply the brakes and steer to avoid
collisions.
Intelligent brake assist
Intelligent brake assist may activate
when the brake pedal is applied
quickly by providing a boost to
braking based on the speed of
approach and distance to a vehicle
ahead.
Minor brake pedal pulsations or pedal movement during this time are normal and the brake pedal should continue
to be applied as required. Intelligent
brake assist will automatically
disengage only when the brake pedal is released.
9 Warning
Intelligent brake assist may
increase vehicle braking in
situations when it may not be
necessary. You could block the
flow of traffic. If this occurs, take
your foot off the brake pedal and
then apply the brakes as needed.
Front pedestrian protection
Front pedestrian protection 3 171.
Deactivation Active emergency braking can be
deactivated in the personalisation
menu in the Info Display 3 90.
If deactivated, a message is
displayed in the Driver Information
Centre.
We recommend to deactivate the system in the following cases:
● when the vehicle is being towed
● before using an automatic car wash with ignition switched on
Page 190 of 271

188Driving and operating
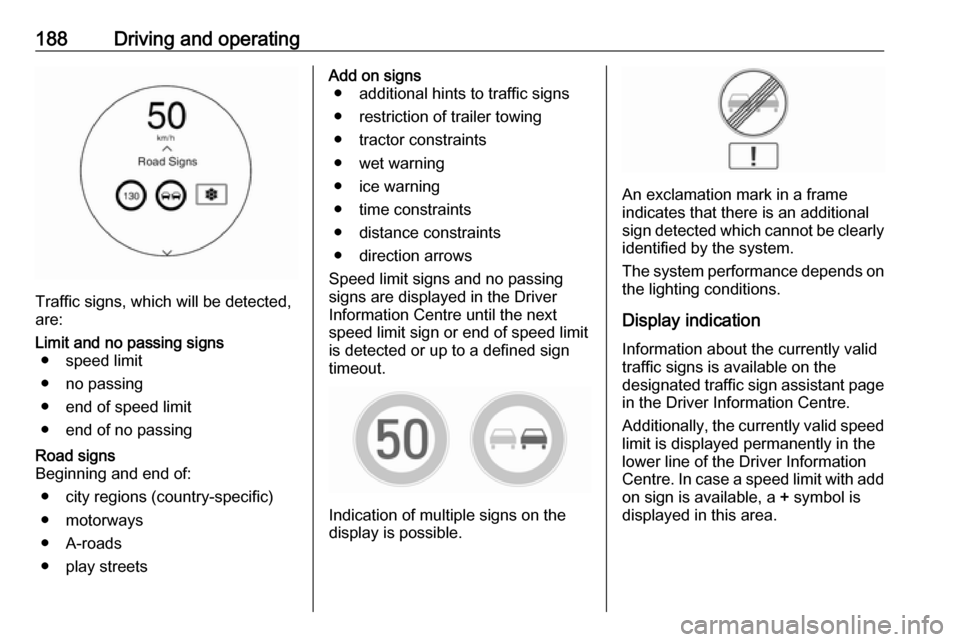
Traffic signs, which will be detected,
are:
Limit and no passing signs ● speed limit
● no passing
● end of speed limit
● end of no passingRoad signs
Beginning and end of:
● city regions (country-specific)● motorways
● A-roads
● play streetsAdd on signs ● additional hints to traffic signs
● restriction of trailer towing
● tractor constraints
● wet warning
● ice warning
● time constraints
● distance constraints
● direction arrows
Speed limit signs and no passing
signs are displayed in the Driver
Information Centre until the next
speed limit sign or end of speed limit
is detected or up to a defined sign
timeout.
Indication of multiple signs on the
display is possible.
An exclamation mark in a frame
indicates that there is an additional
sign detected which cannot be clearly
identified by the system.
The system performance depends on the lighting conditions.
Display indication Information about the currently valid
traffic signs is available on the
designated traffic sign assistant page
in the Driver Information Centre.
Additionally, the currently valid speed limit is displayed permanently in the
lower line of the Driver Information
Centre. In case a speed limit with add
on sign is available, a + symbol is
displayed in this area.
Page 211 of 271

Vehicle care209Vehicle careGeneral Information...................209
Accessories and vehicle modifications .......................... 209
Lifting the vehicle .....................210
Vehicle storage ........................210
End-of-life vehicle recovery .....211
Vehicle checks ........................... 211
Performing work ......................211
Bonnet ..................................... 212
Cooling system ........................213
Washer fluid ............................ 215
Brakes ..................................... 215
Brake fluid ............................... 215
Vehicle battery ......................... 216
Wiper blade replacement ........218
Headlight aiming ......................218
Bulb replacement .......................219
Halogen bulbs ......................... 219
Xenon headlights .....................219
Front turn lights .......................219
Tail lights ................................. 220
Side turn lights ......................... 220
Number plate light ...................221Electrical system ........................222
High voltage devices and wiring ...................................... 222
Electrical system overload .......222
Fuses ....................................... 222
Engine compartment fuse box . 224
Instrument panel fuse box .......227
Vehicle tools .............................. 230
Tools ........................................ 230
Wheels and tyres .......................230
Tyres ....................................... 230
Winter tyres ............................. 231
Tyre designations ....................231
Tyre pressure .......................... 231
Tyre pressure monitoring system .................................... 232
Tread depth ............................. 234
Changing tyre and wheel size . 235
Wheel covers ........................... 235
Tyre chains .............................. 236
Tyre repair kit .......................... 236
Jump starting ............................. 240
Towing ....................................... 242
Towing the vehicle ...................242
Towing another vehicle ...........243
Appearance care .......................243
Exterior care ............................ 243
Interior care ............................. 245General Information
Accessories and vehiclemodifications
We recommend the use of genuine
parts and accessories and factory
approved parts specific for your
vehicle type. We cannot assess or
guarantee reliability of other products - even if they have a regulatory or
otherwise granted approval.
Any modification, conversion or other
changes made to standard vehicle
specifications (including, without
limitation, software modifications,
modifications of the electronic control units) may invalidate the warranty
offered by Opel. Furthermore, such
changes may affect driver assistance
systems and energy consumption.
They may also invalidate the vehicle
operating permit.Caution
When transporting the vehicle on
a train or on a recovery vehicle, the
mud flaps might be damaged.