warning light OPEL AMPERA E 2019 Manual user
[x] Cancel search | Manufacturer: OPEL, Model Year: 2019, Model line: AMPERA E, Model: OPEL AMPERA E 2019Pages: 271, PDF Size: 6.7 MB
Page 11 of 271

In brief91Power windows .....................34
2 Exterior mirrors .....................32
3 Central locking system ..........20
4 Side air vents ...................... 145
5 Turn lights, headlight
flash, low / high beam,
high beam assist .................102
Exit lighting ......................... 104
Parking lights ...................... 102
6 Regeneration on Demand ..160
7 Cruise control .....................163
Speed limiter ....................... 164
Forward collision alert .........166
Heated steering wheel ..........65
8 Instruments .......................... 74
Driver Information Centre ...... 82
9 Forward collision alert
indicator ............................. 166
Front pedestrian alert ..........171
10 Buttons for Driver
Information Centre ................82
11 Windscreen wiper and
washer, rear wiper and
washer ................................. 6612Centre air vents .................. 145
13 Info Display .......................... 85
14 Anti-theft alarm system
status LED ........................... 30
Light sensor .......................... 99
Charging status indicator ....203
15 Glovebox .............................. 57
16 Climate control system ........ 141
17 Hazard warning flashers ....101
Sport mode ........................ 153
Traction Control system .....161
Electronic Stability Control . 162
Parking assist / Advanced
parking assist .....................173
Lane keep assist ................190
18 Power outlet .......................... 69
19 Selector lever ...................... 153
20 USB port
21 Controls for Info Display
operation .............................. 85
22 Parking brake ......................158
23 Power button ....................... 148
24 Steering wheel adjustment ..65
25 Horn ..................................... 6626Bonnet release lever ..........212
27 Fuse box ............................ 227
28 Light switch .......................... 98
Headlight range
adjustment ......................... 101
Rear fog lights ....................102
Instrument illumination .......103
Page 19 of 271
Keys, doors and windows17Radio remote control
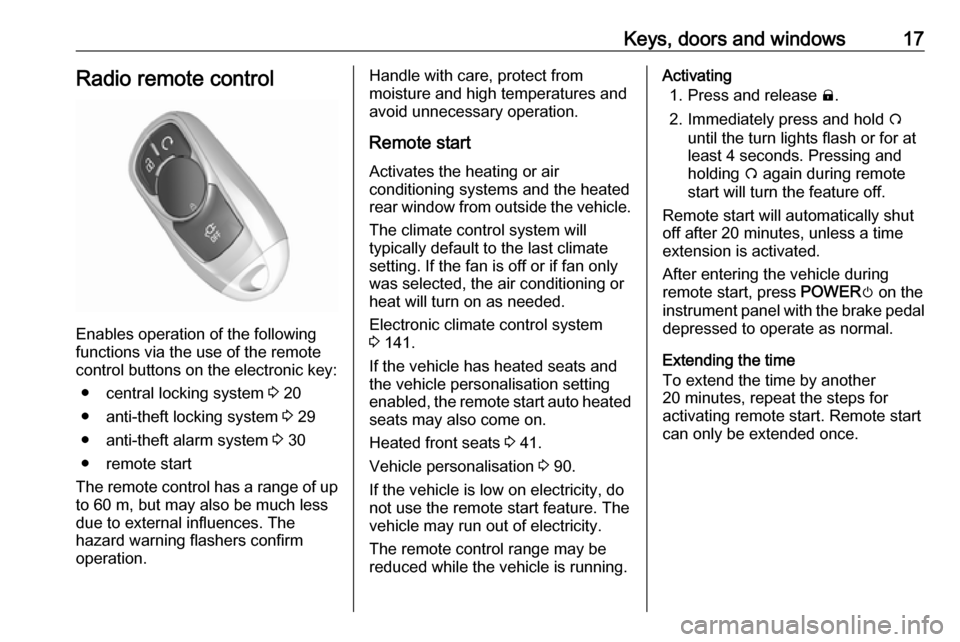
Enables operation of the following
functions via the use of the remote control buttons on the electronic key:
● central locking system 3 20
● anti-theft locking system 3 29
● anti-theft alarm system 3 30
● remote start
The remote control has a range of up
to 60 m, but may also be much less
due to external influences. The
hazard warning flashers confirm
operation.
Handle with care, protect from
moisture and high temperatures and
avoid unnecessary operation.
Remote start
Activates the heating or air
conditioning systems and the heated
rear window from outside the vehicle.
The climate control system will
typically default to the last climate
setting. If the fan is off or if fan only
was selected, the air conditioning or
heat will turn on as needed.
Electronic climate control system
3 141.
If the vehicle has heated seats and
the vehicle personalisation setting
enabled, the remote start auto heated seats may also come on.
Heated front seats 3 41.
Vehicle personalisation 3 90.
If the vehicle is low on electricity, do
not use the remote start feature. The
vehicle may run out of electricity.
The remote control range may be
reduced while the vehicle is running.Activating
1. Press and release ).
2. Immediately press and hold O
until the turn lights flash or for at
least 4 seconds. Pressing and
holding O again during remote
start will turn the feature off.
Remote start will automatically shut
off after 20 minutes, unless a time
extension is activated.
After entering the vehicle during
remote start, press POWERm on the
instrument panel with the brake pedal
depressed to operate as normal.
Extending the time
To extend the time by another
20 minutes, repeat the steps for
activating remote start. Remote start
can only be extended once.
Page 20 of 271
18Keys, doors and windowsCancelling remote start
To cancel remote start, do any of the
following:
● Aim the radio remote control at the vehicle and press and hold
O until the sidelights turn off.
● Turn on the hazard warning flashers.
● Press POWERm on the
instrument panel with the brake
pedal depressed, then press
POWER m again to switch off the
vehicle.
Conditions in which remote start will not work
● An open bonnet.
● Vehicle propulsion system fault conditions.
● High voltage battery fault conditions.
● The selector lever is not in P
(Park).Conditions in which remote start may be cancelled include:
● Vehicle propulsion system or high voltage battery fault
conditions.
● Electric drive unit coolant temperature is too high.
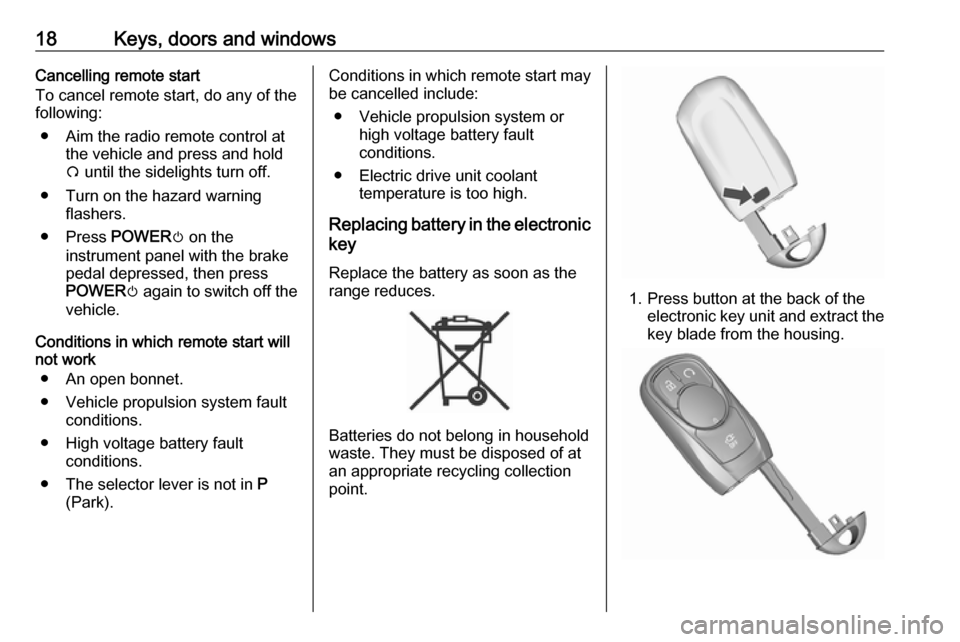
Replacing battery in the electronic key
Replace the battery as soon as the
range reduces.
Batteries do not belong in household
waste. They must be disposed of at
an appropriate recycling collection
point.
1. Press button at the back of the electronic key unit and extract thekey blade from the housing.
Page 29 of 271

Keys, doors and windows279Warning
Use the child locks whenever
children are occupying the rear
seats.
Move the pin in the rear door to the front position. The door cannot be
opened from the inside.
To deactivate, move the pin to the
rear position.
Smartphone remote
function
This feature allows a smartphone to
be connected to the vehicle and
remote vehicle functions to be
requested. Features vary depending
on availability.
Features include: ● Remote commands: Use to lock /
unlock the vehicle, remote start
for the cabin climate, or sound or cancel the horn and flash the
lights.
● Vehicle status: View the vehicle’s
range and high voltage battery
level, charging status, and tyre
pressure.
● Welcome lighting: Request light when approaching the vehicle.
● Location services: Save the parked location or start
navigation at the vehicle’s GPS
coordinates.Setup function ● KeyPass setup
● Managing priority setting ● Modifying priority setting
● RevocationActive remote function ● Door lock / unlock
● Start / stop
● Charge termination
● High voltage battery charge functions
● Temporary charging override
update
● Change the charging mode permanently● Update departure timeschedule
● High voltage battery priority charging activation and
deactivation
● Select charge level / limit preference screen
● Vehicle locator
● Vehicle rangePassive function
Approach detection / welcome
lightingVisual display for vehicle information ● Low high voltage battery indication
● Tyre pressure
● Odometer reading
● Tailgate ajar status
● Electric parking brake status
● Bonnet status
● High voltage battery state of charge status
Page 33 of 271

Keys, doors and windows31Electronic key system: Unlocking the
vehicle by pressing the button on any
exterior door handle deactivates the
anti-theft alarm system.
The electronic key must be outside
the vehicle, within a range of approx.
1 m of the relevant door side.
The system is not deactivated by
unlocking the driver's door with the
key or with the central locking button
in the passenger compartment.
AlarmWhen triggered, the alarm horn
sounds and the hazard warning lights
flash simultaneously. The number
and duration of alarm signals are
stipulated by legislation.
The anti-theft alarm system can be
deactivated by pressing (, by
pressing the button on the door
handle or switching on the vehicle.
A triggered alarm, which has not been interrupted by the driver, will be
indicated by the hazard warning
lights. They will flash quickly three
times the next time the vehicle is
unlocked with the radio remote
control. Additionally, a warningmessage is displayed in the Driver
Information Centre after switching on
the vehicle.
Vehicle messages 3 89.
Immobiliser The system is part of the ignition
switch and checks whether the
vehicle is allowed to be started with the key being used.
The immobiliser is activated
automatically after the electronic key
has been removed from the vehicle.
If control indicator d flashes when the
vehicle is on, there is a fault in the
system. The propulsion system
cannot be started. Switch off the
vehicle and repeat the start attempt.
If control indicator d continues
flashing, attempt to start the
propulsion system using the spare
key and seek the assistance of a
workshop.Note
Radio Frequency Identification
(RFID) tags may cause interference
with the key. Do not have it placed near the key when starting the
vehicle.
Note
The immobiliser does not lock the doors. You should always lock the
vehicle after leaving it and switch on the anti-theft alarm system 3 20,
3 30.
Control indicator d 3 81.
Page 40 of 271
38Seats, restraintsHead restraints on rear seats
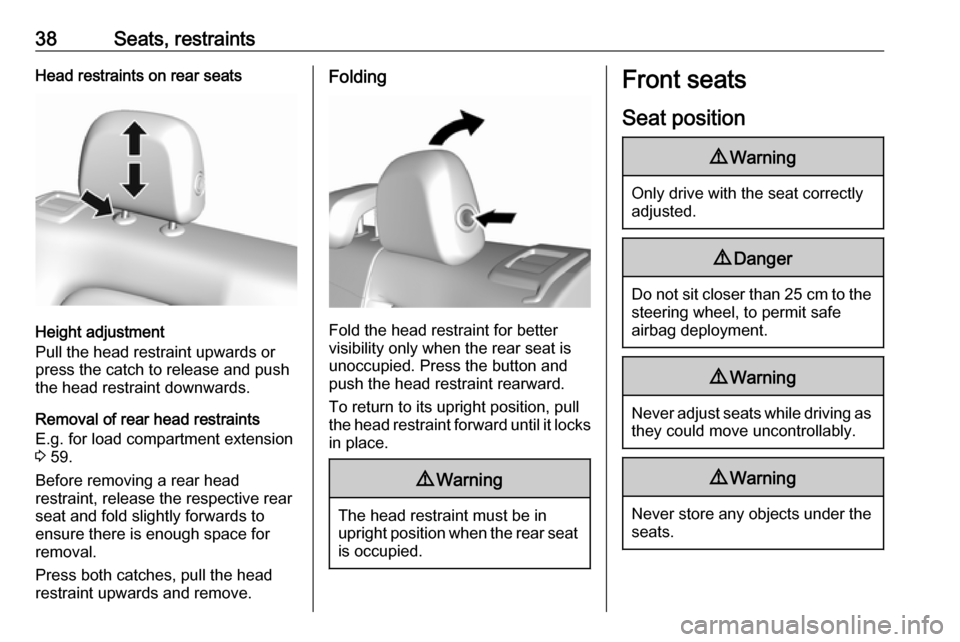
Height adjustment
Pull the head restraint upwards or
press the catch to release and push the head restraint downwards.
Removal of rear head restraints
E.g. for load compartment extension
3 59.
Before removing a rear head
restraint, release the respective rear
seat and fold slightly forwards to
ensure there is enough space for
removal.
Press both catches, pull the head restraint upwards and remove.
Folding
Fold the head restraint for better
visibility only when the rear seat is unoccupied. Press the button and
push the head restraint rearward.
To return to its upright position, pull
the head restraint forward until it locks
in place.
9 Warning
The head restraint must be in
upright position when the rear seat is occupied.
Front seats
Seat position9 Warning
Only drive with the seat correctly
adjusted.
9 Danger
Do not sit closer than 25 cm to the
steering wheel, to permit safe
airbag deployment.
9 Warning
Never adjust seats while driving as
they could move uncontrollably.
9 Warning
Never store any objects under the
seats.
Page 51 of 271
Seats, restraints49
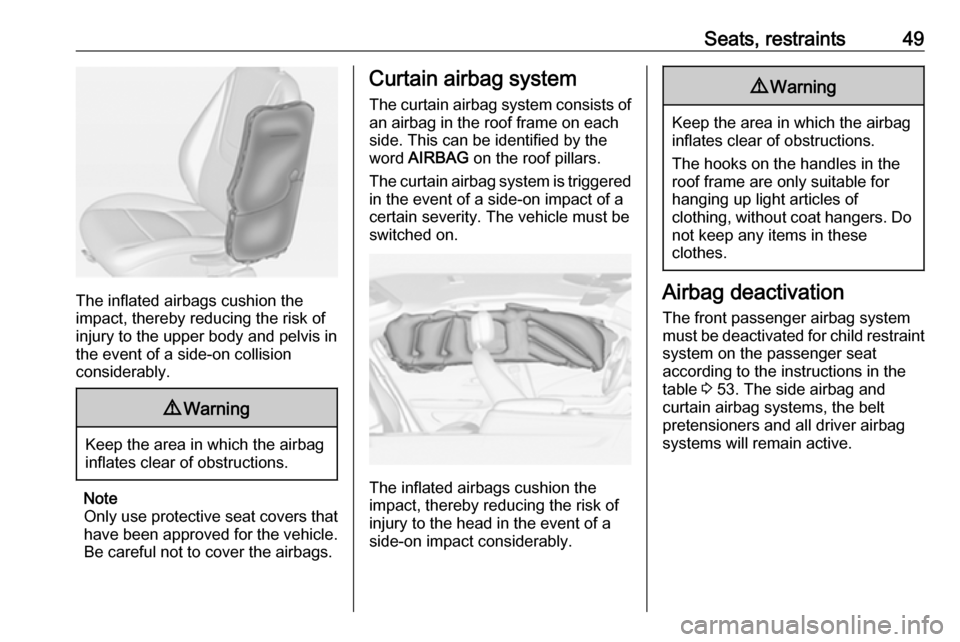
The inflated airbags cushion the
impact, thereby reducing the risk of
injury to the upper body and pelvis in
the event of a side-on collision
considerably.
9 Warning
Keep the area in which the airbag
inflates clear of obstructions.
Note
Only use protective seat covers that
have been approved for the vehicle.Be careful not to cover the airbags.
Curtain airbag system
The curtain airbag system consists of an airbag in the roof frame on each
side. This can be identified by the
word AIRBAG on the roof pillars.
The curtain airbag system is triggered
in the event of a side-on impact of a
certain severity. The vehicle must be
switched on.
The inflated airbags cushion the
impact, thereby reducing the risk of
injury to the head in the event of a
side-on impact considerably.
9 Warning
Keep the area in which the airbag
inflates clear of obstructions.
The hooks on the handles in the
roof frame are only suitable for
hanging up light articles of
clothing, without coat hangers. Do not keep any items in these
clothes.
Airbag deactivation
The front passenger airbag system must be deactivated for child restraint
system on the passenger seat
according to the instructions in the
table 3 53. The side airbag and
curtain airbag systems, the belt
pretensioners and all driver airbag
systems will remain active.
Page 66 of 271

64Instruments and controlsInstruments and
controlsControls ....................................... 65
Steering wheel adjustment ........65
Steering wheel controls .............65
Heated steering wheel ...............65
Horn ........................................... 66
Pedestrian safety alert ...............66
Windscreen wiper and washer ..66
Rear window wiper and washer ...................................... 68
Outside temperature ..................68
Clock ......................................... 69
Power outlets ............................. 69
Inductive charging .....................70
Warning lights, gauges and indi‐ cators ........................................... 72
Instrument cluster ......................72
Speedometer ............................. 74
Odometer .................................. 74
Battery gauge ............................ 74
Driving efficiency gauge ............74
Power indicator gauge ...............76
Regenerative braking ................76
Total vehicle range ....................77
Service display .......................... 77Control indicators ......................77
Turn lights .................................. 77
Seat belt reminder .....................77
Airbag and belt tensioners .........78
Airbag deactivation ....................78
Charging system .......................78
Service vehicle soon .................79
Brake system ............................. 79
Electric parking brake ................79
Electric parking brake fault ........79
Antilock brake system (ABS) .....79
Sport mode ................................ 80
Lane keep assist .......................80
Electronic Stability Control off ...80
Electronic Stability Control and Traction Control system ...........80
Traction Control system off .......80
Tyre pressure monitoring system ...................................... 80
Immobiliser ................................ 81
Vehicle ready ............................. 81
Exterior light .............................. 81
High beam ................................. 81
High beam assist .......................81
Rear fog light ............................. 81
Cruise control ............................ 81
Vehicle detected ahead .............81
Pedestrian detection ..................81
Speed limiter ............................. 81Traffic sign assistant ..................82
Door open .................................. 82
Displays ....................................... 82
Driver Information Centre ..........82
Info Display ................................ 85
Vehicle messages ........................89
Warning chimes .........................90
Battery voltage .......................... 90
Vehicle personalisation ................90
Telematics service .......................93
OnStar ....................................... 93
Page 74 of 271
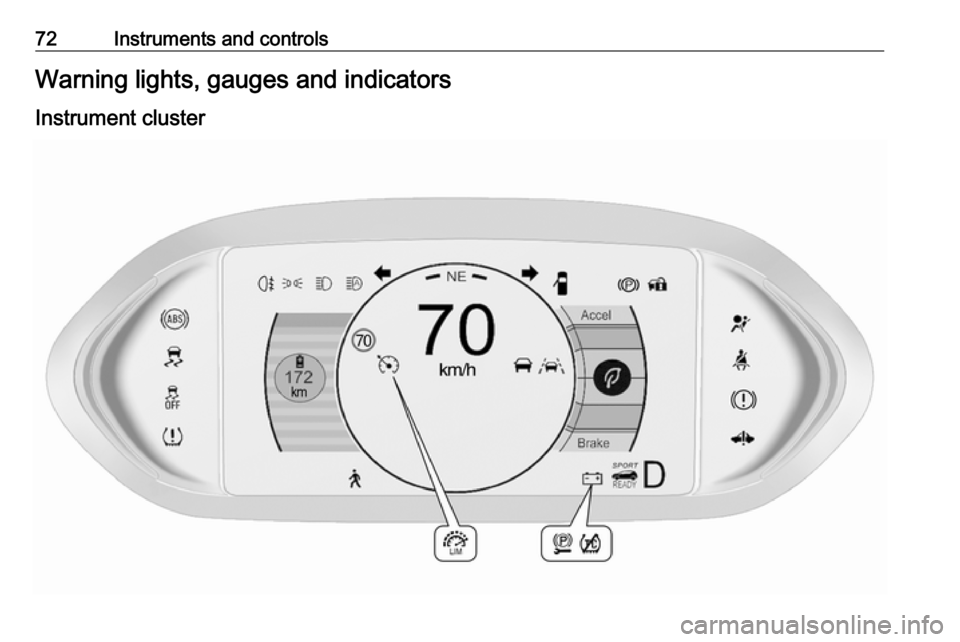
72Instruments and controlsWarning lights, gauges and indicatorsInstrument cluster
Page 79 of 271
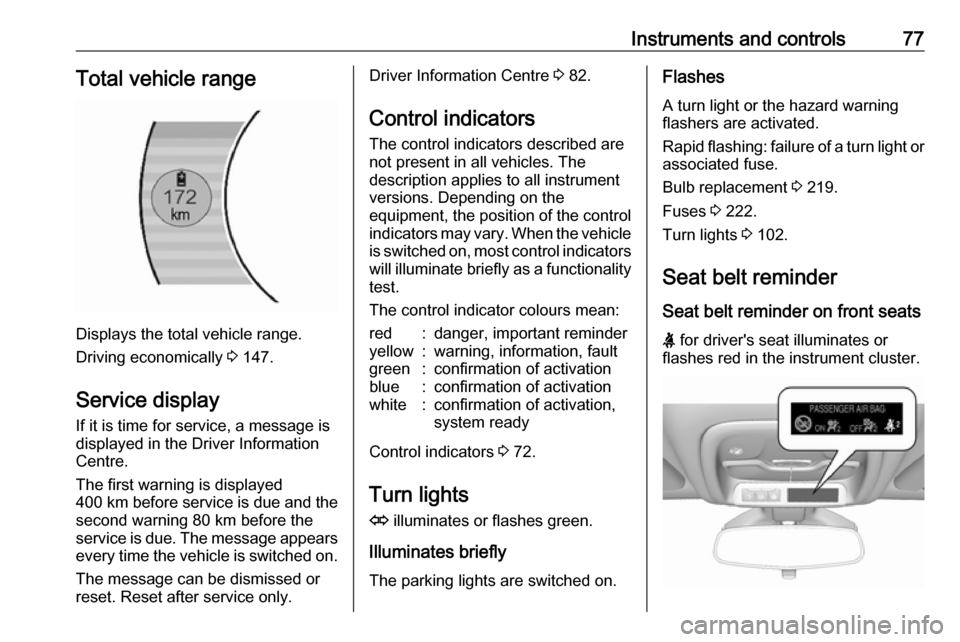
Instruments and controls77Total vehicle range
Displays the total vehicle range.
Driving economically 3 147.
Service display If it is time for service, a message is
displayed in the Driver Information
Centre.
The first warning is displayed
400 km before service is due and the
second warning 80 km before the
service is due. The message appears every time the vehicle is switched on.
The message can be dismissed or
reset. Reset after service only.
Driver Information Centre 3 82.
Control indicators
The control indicators described are
not present in all vehicles. The
description applies to all instrument
versions. Depending on the
equipment, the position of the control indicators may vary. When the vehicle
is switched on, most control indicators
will illuminate briefly as a functionality test.
The control indicator colours mean:red:danger, important reminderyellow:warning, information, faultgreen:confirmation of activationblue:confirmation of activationwhite:confirmation of activation,
system ready
Control indicators 3 72.
Turn lights
O illuminates or flashes green.
Illuminates briefly
The parking lights are switched on.
Flashes
A turn light or the hazard warning
flashers are activated.
Rapid flashing: failure of a turn light or associated fuse.
Bulb replacement 3 219.
Fuses 3 222.
Turn lights 3 102.
Seat belt reminder
Seat belt reminder on front seats
X for driver's seat illuminates or
flashes red in the instrument cluster.