key OPEL ANTARA 2009 Owner's Manual
[x] Cancel search | Manufacturer: OPEL, Model Year: 2009, Model line: ANTARA, Model: OPEL ANTARA 2009Pages: 234, PDF Size: 3.01 MB
Page 115 of 234

Driving and operation115
Driving and operationAutomatic transmission 3
The automatic transmission permits
manual gearshifting (manual mode) or
automatic gearshifting ( automatic mode)
with fully automatic clutch control.
The engine can only be started when the
selector lever is in position P or N. When
starting in P, turn key in ignition switch to
ACC or ON, depress foot brake and press
selector lever button before selecting a
gear.
Do not accelerate whilst gearshifting. If a
gear has been selected and the foot brake
is released without accelerating, the
vehicle will "creep".
Never operate the brake pedal and
accelerator simultaneously. Selecting
D puts the transmission in
automatic mode.
If the selector lever is moved to the left from
position D, manual mode is activated.
Forward gear changes only can then be
made manually by tipping the selector
lever towards + or -.
Automatic transmission
3................. 115
All Wheel Drive.................................... 121
Driving hints ........................................ 127
Save fuel, protect the environment ... 129
Fuels, refuelling ................................... 131
Catalytic converter, exhaust emissions........................................... 133
Drive control systems ......................... 136
Brake system ....................................... 145
Anti-lock Brake System (ABS) u....... 148
Wheels, tyres ....................................... 149
Roof racks 3........................................ 153
Flex-Fix system 3................................ 154
Towing equipment 3 .......................... 164
Towing ................................................. 1679 Warning
Disregard of these instructions may
cause damage to the vehicle and lead to
injuries or endanger life.
Page 119 of 234

Driving and operation119
Parking
Before leaving the vehicle:
zDepress and hold foot brake,
z Apply hand brake,
z Move selector lever to position P,
z Turn key to LOCK position,
z Remove ignition key,
z Engage steering column lock,
z Lock the vehicle.
When the ignition is switched off, the
automatic transmission no longer responds
to movements of the selector lever. Rocking the vehicle
If it becomes necessary to rock the vehicle
to free it from water, ice, sand, mud, snow
or a dip, observe the following:
Check there are no objects or people in the
vicinity before attempting to rock the
vehicle.
Turn the steering wheel fully from left to
right to clear the area around the front
tyres.
Move the selector lever between
R and a
forward gear in a repeat pattern while
applying light pressure to the accelerator
pedal when the vehicle is in gear.
Do not spin the wheels or race the engine
and avoid sudden acceleration.
This applies only in the exceptional
circumstances mentioned above.
If the vehicle cannot be released after
rocking the vehicle several times, your
vehicle may need to be towed.
Towing - see page 174. Manoeuvring the vehicle
To manoeuvre the vehicle back and forth
during attempts to park or in garage
entrances, the creeping movement can be
utilized by releasing the foot brake.
Never actuate the accelerator and brake
pedals simultaneously.
Page 120 of 234
Driving and operation120
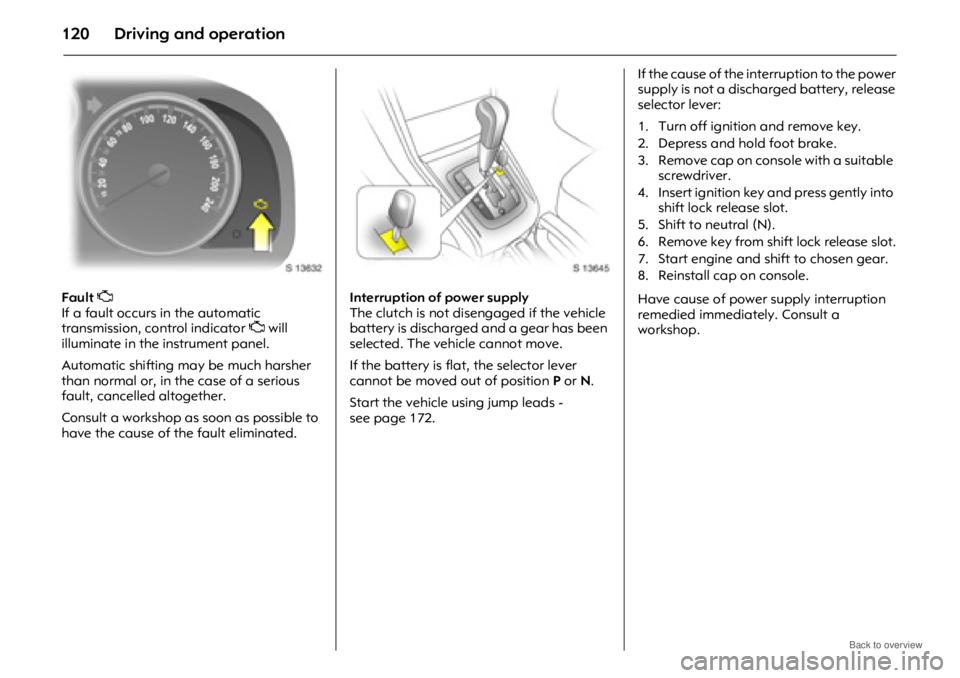
Fault Z
If a fault occurs in the automatic
transmission, control indicator Z will
illuminate in the instrument panel.
Automatic shifting may be much harsher
than normal or, in the case of a serious
fault, cancelled altogether.
Consult a workshop as soon as possible to
have the cause of the fault eliminated. Interruption of power supply
The clutch is not disengaged if the vehicle
battery is discharged and a gear has been
selected. The vehicle cannot move.
If the battery is flat, the selector lever
cannot be moved out of position
P or N.
Start the vehicle using jump leads -
see page 172. If the cause of the interruption to the power
supply is not a discharged battery, release
selector lever:
Have cause of power supply interruption
remedied immediately. Consult a
workshop.
1. Turn off ignition and remove key.
2. Depress and hold foot brake.
3. Remove cap on console with a suitable
screwdriver.
4. Insert ignition key and press gently into shift lock release slot.
5. Shift to neutral (N).
6. Remove key from shift lock release slot.
7. Start engine and shift to chosen gear.
8. Reinstall cap on console.
Page 150 of 234
Driving and operation150
Tyre pressure
Check tyre pressures when cold, at least
every 14 days and prior to any long
journey. Don't forget to check the spare.
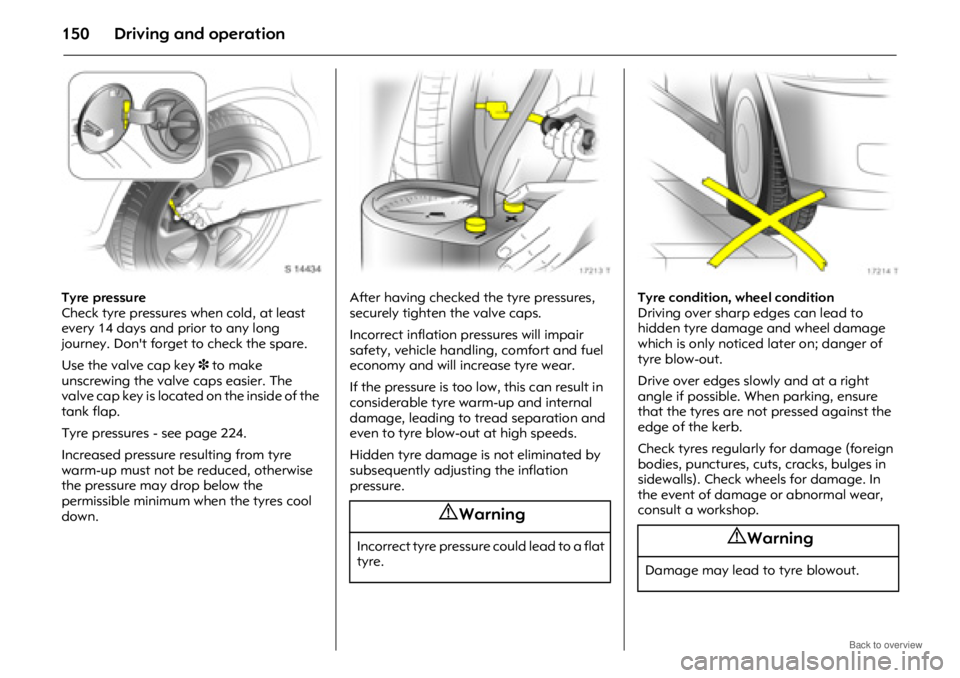
Use the valve cap key 3 to make
unscrewing the valve caps easier. The
valve cap key is located on the inside of the
tank flap.
Tyre pressures - see page 224.
Increased pressure resulting from tyre
warm-up must not be reduced, otherwise
the pressure may drop below the
permissible minimum when the tyres cool
down. After having checked the tyre pressures,
securely tighten the valve caps.
Incorrect inflation pressures will impair
safety, vehicle handling, comfort and fuel
economy and will increase tyre wear.
If the pressure is too low, this can result in
considerable tyre warm-up and internal
damage, leading to tread separation and
even to tyre blow-out at high speeds.
Hidden tyre damage is not eliminated by
subsequently adjusting the inflation
pressure.
Tyre condition, wheel condition
Driving over sharp edges can lead to
hidden tyre damage and wheel damage
which is only noticed later on; danger of
tyre blow-out.
Drive over edges slowly and at a right
angle if possible. When parking, ensure
that the tyres are not pressed against the
edge of the kerb.
Check tyres regularly for damage (foreign
bodies, punctures, cuts, cracks, bulges in
sidewalls). Check wheels for damage. In
the event of damage
or abnormal wear,
consult a workshop.
9 Warning
Incorrect tyre pressure could lead to a flat
tyre.9 Warning
Damage may lead to tyre blowout.
Page 166 of 234
Driving and operation166
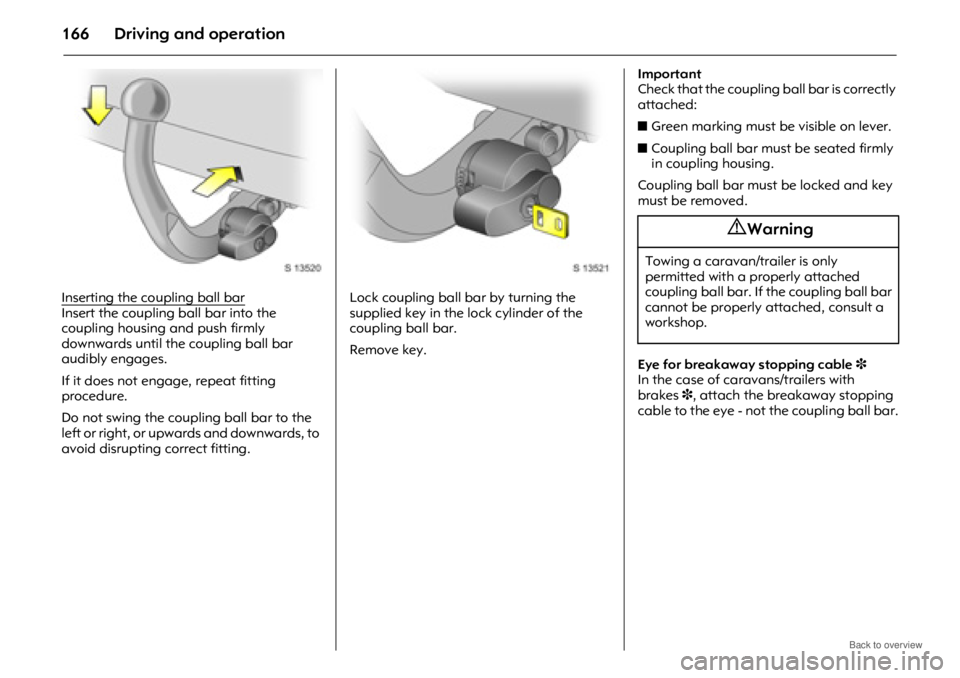
Inserting the coupling ball barInsert the coupling ball bar into the
coupling housing and push firmly
downwards until the coupling ball bar
audibly engages.
If it does not engage, repeat fitting
procedure.
Do not swing the coupling ball bar to the
left or right, or upwards and downwards, to
avoid disrupting correct fitting. Lock coupling ball bar by turning the
supplied key in the lock cylinder of the
coupling ball bar.
Remove key.Important
Check that the coupling ball bar is correctly
attached:
z
Green marking must be visible on lever.
z Coupling ball bar must be seated firmly
in coupling housing.
Coupling ball bar must be locked and key
must be removed.
Eye for breakaway stopping cable 3
In the case of caravans/trailers with
brakes 3, attach the breakaway stopping
cable to the eye - not the coupling ball bar.
9 Warning
Towing a caravan/trailer is only
permitted with a properly attached
coupling ball bar. If the coupling ball bar
cannot be properly attached, consult a
workshop.
Page 167 of 234

Driving and operation167
Dismounting the coupling ball bar
Unlock coupling ball bar and remove key.
Push lever to the left, towards the coupling
ball bar and turn it downwards. Pull
coupling ball bar out of coupling housing.
Remove any rust or dirt from area around
the coupling housing and coupling ball bar
connection before inserting sealing plug in
the hole.
Place the coupling ball bar in the bag
supplied, fasten it wi th the strap and stow
it below the floor cover in the luggage
compartment.
Do not use steam-jet cleaners or other
high-pressure cleaners to clean the
coupling ball bar.
Towing
Caravan/trailer loads1)
The permissible caravan/trailer loads are
vehicle-dependent and engine-dependent
maximum values which must not be
exceeded.
The actual caravan/trailer load is the
difference between the actual gross weight
of the caravan/trailer and the actual
coupling socket load with the caravan/
trailer coupled.
When the caravan/trailer load is being
checked, therefore, on ly the caravan/trailer
wheels - and not the jockey wheel - must be
standing on the weighing apparatus.
The permissible caravan/trailer loads for
your vehicle are given in the vehicle papers.
Unless otherwise stated , they are valid for
gradients up to max. 12%.
The permissible caravan/trailer load should
be fully utilized only by drivers who are
adequately experienced in towing large
caravans/trailers.
The permitted caravan/trailer load applies
up to the specified incline and up to an
altitude of 1000 metres above sea level. Since engine power decreases as altitude
increases because of the air becoming
thinner, therefore reducing climbing ability,
it may not be possible for permissible trailer
loads to be fully utilized in mountainous
territory.
The permitted towing weight decreases by
10% for every 1000 metres of additional
altitude.
The towing weight does not have to be
reduced when driving on roads with slight
inclines (less than 8%, e.g. on motorways).
The actual caravan/trailer load plus the
actual Gross Vehicle Weight must not
exceed the maximum permitted towing
weight. For example, if the permitted Gross
Vehicle Weight is utilised, the caravan/
trailer load must only
be used until the
maximum permitted towing weight is
reached.
The maximum permitted towing weight is
shown on the vehicle id entification plate -
see page 215.
1)Observe national regulations.
Page 175 of 234
Self-help, vehicle care175
Keep tow rope 3 clear of front bumper,
and ensure it is secure ly fixed to the towing
eye at both ends. Pull on the tow rope 3 to
check.
To prevent entry of exhaust fumes from
towing vehicle, switch on air recirculation
mode (see page 109) and close the
windows.
Never let passengers ride in a vehicle that
is being towed.
Never tow a vehicle with damaged parts
that are not secured to the vehicle or if
wheels, brakes or steering are damaged.
Do not tow the vehicle with a tow rope 3 or
tow rod 3 for extended periods, to avoid
damage to the vehicle. Only tow in this
manner on hard-surfaced roads.
For vehicles with automatic transmission 3:
use flatbed or wheel lift equipment only.
Towing can cause severe damage to the
transmission.
Seek the assistance of a workshop. Towing service
Entrust your vehicle only to the towing
service of your choice and obtain an
estimate on towing costs before employing
any towing service. This will prevent
unnecessary expense and possible
insurance problems during claim
processing.
Use flatbed equipment whenever possible.
If vehicle is to be towed using a wheel lift,
tow with all wheels off the road, using a
towing dolly.
Never use sling-type equipment to tow the
vehicle or tow the vehicle with the front or
rear wheels on the road, to avoid causing
serious damage to the vehicle.
Place the gearshift lever in neutral
(automatic transmission 3
in N), switch on
hazard warning lamps, turn key to ignition
switch position ACC and release the
hand brake before towing the vehicle. Towing another vehicle
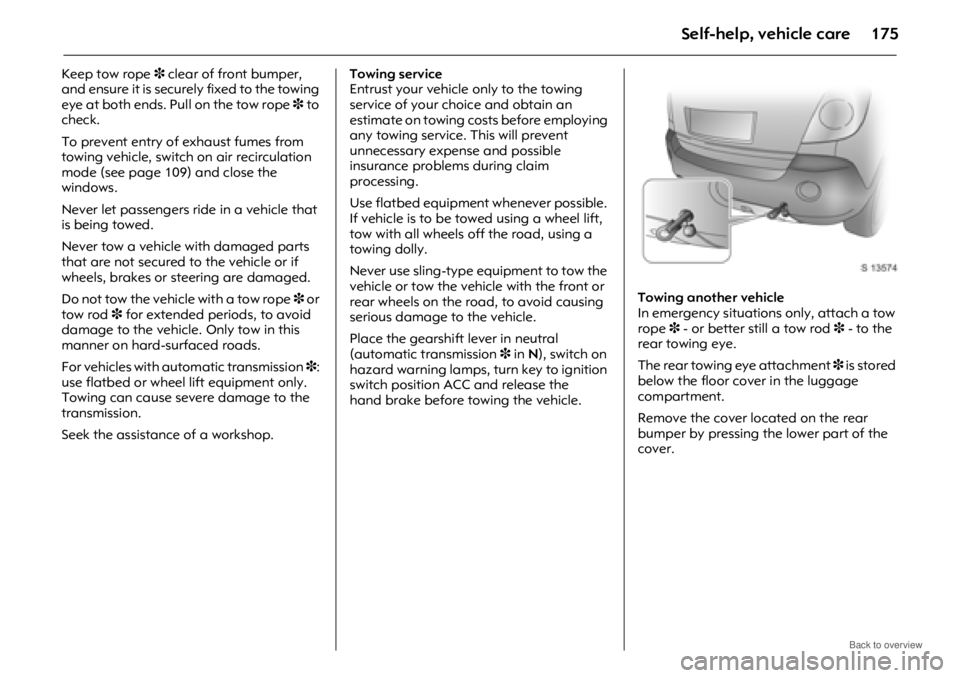
In emergency situations only, attach a tow
rope
3 - or better still a tow rod 3 - to the
rear towing eye.
The rear towing eye attachment 3 is stored
below the floor cover in the luggage
compartment.
Remove the cover located on the rear
bumper by pressing the lower part of the
cover.
Page 194 of 234
Self-help, vehicle care194
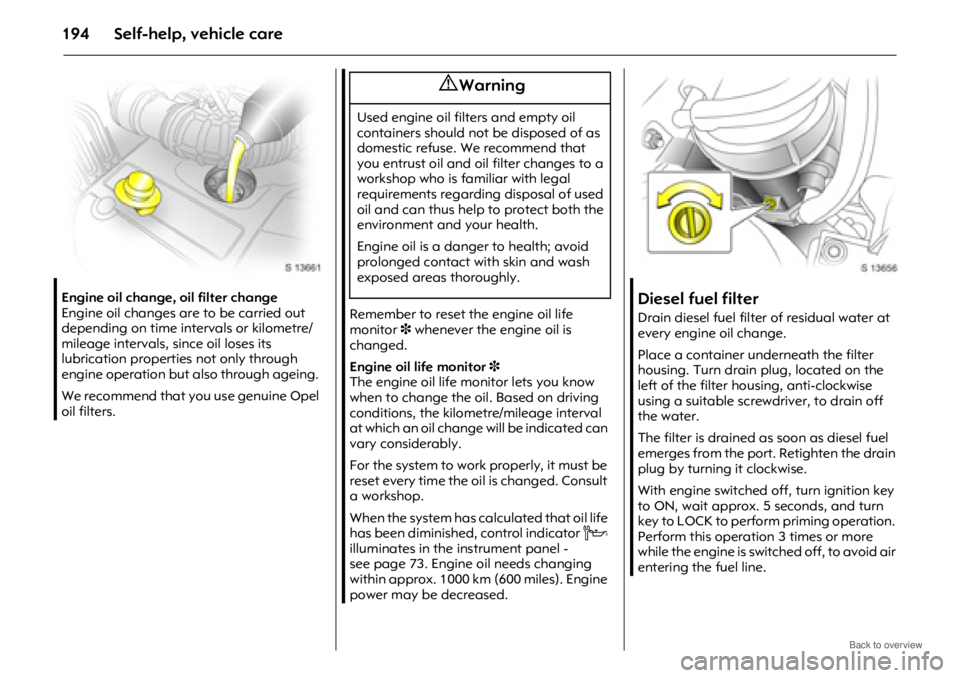
Engine oil change, oil filter change
Engine oil changes are to be carried out
depending on time intervals or kilometre/
mileage intervals, since oil loses its
lubrication properties not only through
engine operation but also through ageing.
We recommend that you use genuine Opel
oil filters.
Remember to reset the engine oil life
monitor 3 whenever the engine oil is
changed.
Engine oil life monitor 3
The engine oil life monitor lets you know
when to change the oil. Based on driving
conditions, the kilometre/mileage interval
at which an oil change will be indicated can
vary considerably.
For the system to work properly, it must be
reset every time the oil is changed. Consult
a workshop.
When the system has calculated that oil life
has been diminished, control indicator C
illuminates in the instrument panel -
see page 73. Engine oil needs changing
within approx. 1000 km (600 miles). Engine
power may be decreased.Diesel fuel filter
Drain diesel fuel filter of residual water at
every engine oil change.
Place a container underneath the filter
housing. Turn drain plug, located on the
left of the filter housing, anti-clockwise
using a suitable screwdriver, to drain off
the water.
The filter is drained as soon as diesel fuel
emerges from the port. Retighten the drain
plug by turning it clockwise.
With engine switched off, turn ignition key
to ON, wait approx. 5 seconds, and turn
key to LOCK to perform priming operation.
Perform this operation 3 times or more
while the engine is switched off, to avoid air
entering the fuel line.
9 Warning
Used engine oil filters and empty oil
containers should not be disposed of as
domestic refuse. We recommend that
you entrust oil and oil filter changes to a
workshop who is familiar with legal
requirements regarding disposal of used
oil and can thus help to protect both the
environment and your health.
Engine oil is a danger to health; avoid
prolonged contact with skin and wash
exposed areas thoroughly.
Page 230 of 234

Index230
D
Dashboard - see Instrument panel ........ 10
Data
................................................. 21, 215
Date
.......................................................... 80
Daytime running lamps
.......................... 94
DCS (Descent Control System)
............. 138
Demisting and defrosting Windows
............................................... 17
With air conditioning system
............ 108
With Electronic Climate Control
....... 113
Descent Control System
........................ 138
Diesel
...................................................... 131
Diesel fuel filter
...................................... 194
Diesel fuel system
.......................... 171, 194
Diesel particle filter
......................... 73, 135
Dipped beam
..................................... 14, 95
Bulb replacement
.............................. 186
Display
..................................................... 76
Display mode
........................................... 87
Door locks
.......................................... 6, 205
Doors
........................................................ 72
Drink holders
............................................ 67
Drive control systems
............................ 136
Driving abroad
...................................... 100
Driving hints
........................................... 127
E
Economical driving ................................ 129
Electric exterior mirrors
....................... 9, 30
Electric sun roof
....................................... 34
Electric windows
...................................... 32
Child safety system
............................. 33
Safety function
.................................... 33
Electrical system
.................................... 181 Electrically adjustable front seat
........... 37
Electronic Climate Control
...... 17, 103, 111
Electronic components
......................... 201
Electronic immobiliser
............................. 22
Electronic Stability Control (ESC)
......... 136
Engine braking assistance
................... 118
Engine code
................................... 216, 217
Engine control indicator
....................... 134
Engine data
........................................... 217
Engine oil
............................................... 213
Additives
............................................ 214
Topping up
........................................ 213
Viscosity
............................................. 214
Engine oil change
.................................. 194
Engine oil filter change
......................... 194
Engine oil level and consumption
........ 192
Engine oil life monitor
..................... 73, 194
Engine oil pressure
.................................. 74
Engine oils
...................................... 192, 216
Engine speed
........................................... 75
Engine wash
.......................................... 205
Environmental protection
............. 194, 201
ESC (Electronic Stability Control)
......... 136
Exhaust control indicator
..................... 134
Exhaust gases
....................................... 135
Exhaust system
...................................... 135
Exterior lamps
.......................................... 94
Exterior mirrors
........................................ 30
F
Fan ................................................. 106, 191
Filling station Capacities
.......................................... 225
Engine oil level
................................... 192
Fuel
............................................. 131, 217
Ignition key
.......................................... 21
Opening the bonnet
......................... 171
Tyre pressure
............................. 130, 224
Vehicle data
...................................... 215
Windscreen washer system
.............. 199
First aid kit
....................................... 68, 177
Flat tyre
................................................. 177
Flex-Fix system
...................................... 154
FlexOrganizer
.......................................... 62
Fog tail lamp
........................................... 96
Bulb replacement
.............................. 188
Fold in exterior mirrors
....................... 9, 30
Foot brake
............................................. 146
Front airbags
........................................... 52
Front door lamps
.................................. 100
Bulb replacement
.............................. 190
Front fog lamps
...................................... 96
Bulb replacement
.............................. 188
Front passenger’s seat airbag
............... 52
Front passenger’s seat undertray
......... 66
Front reading lamps Bulb replacement
.............................. 189
Front seat armrest
.................................. 40
Fuel
........................................................ 131
Fuel consumption
................. 129, 131, 219
Fuel filler cap
......................................... 132
Fuel filter
................................................ 194
Page 232 of 234

Index232
K
Key ............................................................ 21
Extending
............................................. 21
Ignition lock
.......................................... 13
Locking doors
................................ 27, 28
Removing
............................................. 92
Replacement keys
............................... 21
Starting
........................................... 13, 19
Kickdown
........................................ 117, 118
L
Language selection .......................... 80, 86
Lashing eyes
............................................ 61
Leather trim
........................................... 204
Level control system
....................... 97, 143
License plate lamps Bulb replacement
.............................. 189
Light switch
........................................ 13, 94
Lighting
.................................................... 94
Driving abroad
.................................. 100
Loading
....................................63, 168, 221
Locking doors
.................................... 25, 28
Locking from the inside
.......................... 25
Locks
...................................................... 205
Lubricants
...................................... 191, 216
Luggage compartment Bulb replacement
.............................. 190
FlexOrganizer
...................................... 62
Lighting
.............................................. 100
Loading
........................................ 63, 221
Locking
................................................. 26
Safety net
............................................. 60
Storage
................................................. 63
Under floor storage
............................. 63 Luggage compartment cover
................ 59
Lumbar support
.................................. 7, 37
M
Main beam ........................................ 14, 95
Bulb replacement
.............................. 186
Control indicator
........................... 73, 95
Maintenance Air conditioning
................................. 114
All Wheel Drive (AWD)
...................... 126
Antifreeze protection
........................ 195
Battery
................................................ 200
Brake fluid
.......................................... 196
Brakes
................................................. 145
Catalytic converter
............................ 135
Clutch fluid
......................................... 197
Electronic Climate Control
................ 114
Engine oil
............................................ 192
Exhaust
.............................................. 135
Fuel consumption
.............................. 130
Power steering fluid
.......................... 198
Tyre pressure
..................................... 150
Tyres
................................................... 150
Windscreen wipers
............................ 198
Manual transmission
............................... 17
Mechanical anti-theft locking system
... 27
Mirrors
..............................9, 16, 30, 31, 105
Misted windows
............................. 108, 113
Mobile telephones
................................. 102
Muffler, see Exhaust system
................. 135
N
Navigation system .......................... 86, 102
Neutral
............................................... 17, 18
O
Octane numbers ................................... 217
Odometer
................................................ 75
Oil
........................................................... 213
Additives
............................................ 214
Topping up
........................................ 213
Viscosity
............................................. 214
Oil change
............................................. 194
Oil filter change
.................................... 194
Oil level and consumption
................... 192
Oil life monitor
................................. 73, 194
Oil pressure
.............................................. 74
Oils
................................................. 192, 216
Opel Service
........................................... 206
Operating temperature
........................ 128
Outside temperature
........................ 77, 78
Overrun
.................................................. 128
P
Paintwork damage ............................... 203
Park pilot
............................................... 142
Parking
............................................. 20, 119
Parking lamps Bulb replacement
...................... 186, 187
Parking on inclines
................................ 170
Payload
.................................................. 221
Pedals
.................................................... 128
Performance
.......................................... 218
Peripheral lighting
.................................. 98
Petrol
.............................................. 131, 217
Pinking
................................................... 131
Pollen filter
............................................. 114
Power outlets
........................................... 68