key OPEL ANTARA 2009 User Guide
[x] Cancel search | Manufacturer: OPEL, Model Year: 2009, Model line: ANTARA, Model: OPEL ANTARA 2009Pages: 234, PDF Size: 3.01 MB
Page 29 of 234

Locks, doors, windows29
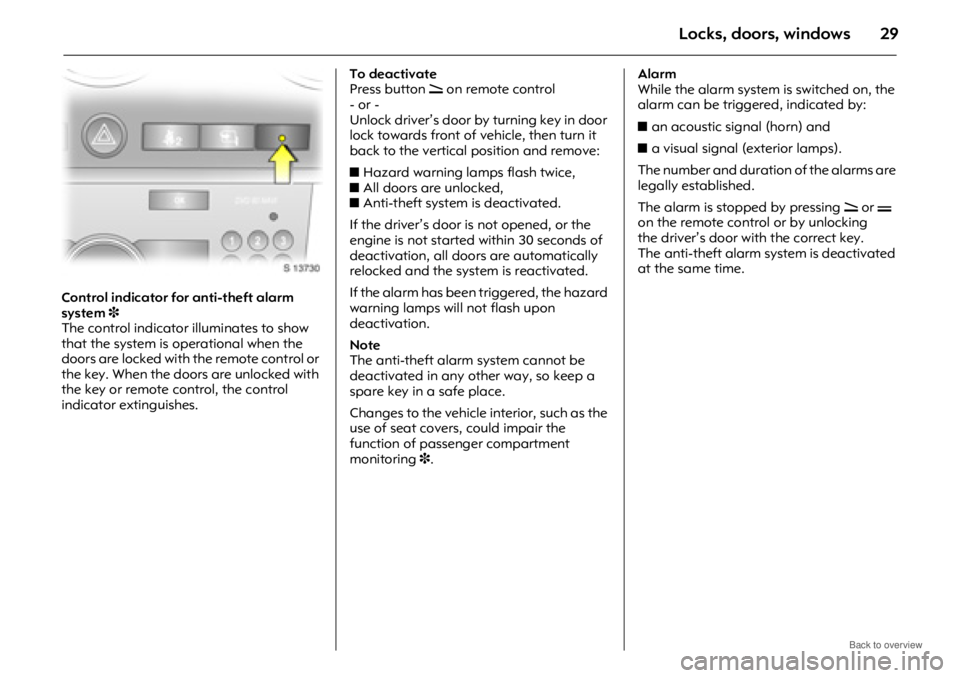
Control indicator for anti-theft alarm
system3
The control indicator illuminates to show
that the system is operational when the
doors are locked with the remote control or
the key. When the doors are unlocked with
the key or remote control, the control
indicator extinguishes. To deactivate
Press button
q on remote control
- or -
Unlock driver’s door by turning key in door
lock towards front of vehicle, then turn it
back to the vertical position and remove:
z Hazard warning lamps flash twice,
z All doors are unlocked,
z Anti-theft system is deactivated.
If the driver’s door is not opened, or the
engine is not started within 30 seconds of
deactivation, all doors are automatically
relocked and the system is reactivated.
If the alarm has been triggered, the hazard
warning lamps will not flash upon
deactivation.
Note
The anti-theft alarm system cannot be
deactivated in any other way, so keep a
spare key in a safe place.
Changes to the vehicle interior, such as the
use of seat covers, could impair the
function of passenger compartment
monitoring 3. Alarm
While the alarm system is switched on, the
alarm can be triggered, indicated by:
z
an acoustic signal (horn) and
z a visual signal (exterior lamps).
The number and duration of the alarms are
legally established.
The alarm is stopped by pressing q or p
on the remote control or by unlocking
the driver’s door with the correct key.
The anti-theft alarm system is deactivated
at the same time.
Page 30 of 234

Locks, doors, windows30
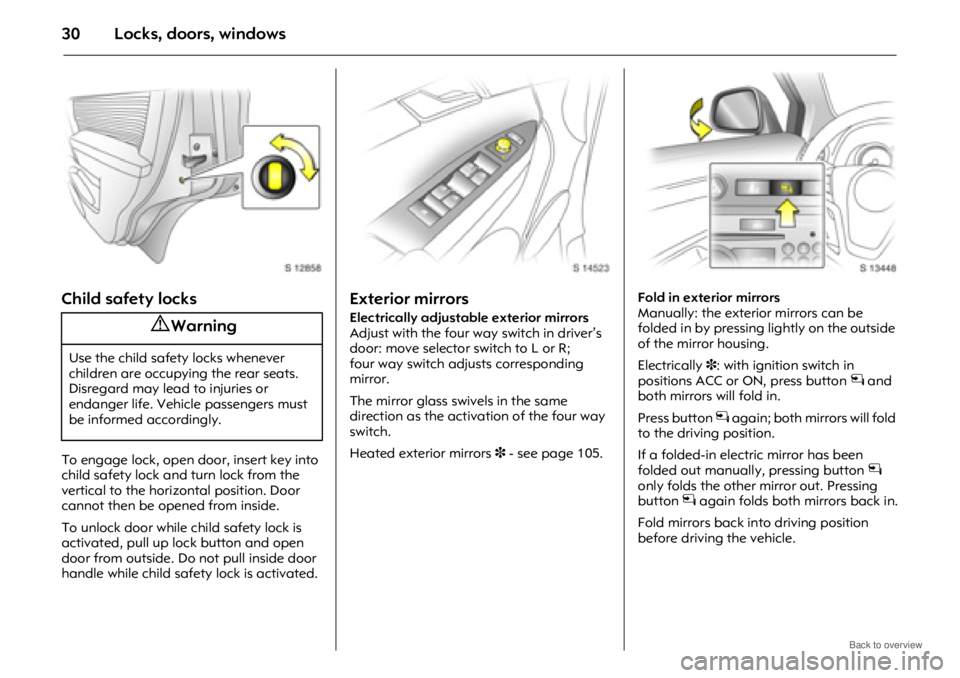
Child safety locks
To engage lock, open door, insert key into
child safety lock and turn lock from the
vertical to the horizontal position. Door
cannot then be opened from inside.
To unlock door while child safety lock is
activated, pull up lock button and open
door from outside. Do not pull inside door
handle while child safety lock is activated.
Exterior mirrors
Electrically adjustable exterior mirrors
Adjust with the four way switch in driver’s
door: move selector switch to L or R;
four way switch adjusts corresponding
mirror.
The mirror glass swivels in the same
direction as the activation of the four way
switch.
Heated exterior mirrors 3 - see page 105. Fold in exterior mirrors
Manually: the exterior mirrors can be
folded in by pressing lightly on the outside
of the mirror housing.
Electrically
3: with ignition switch in
positions ACC or ON, press button n and
both mirrors will fold in.
Press button n again; both mirrors will fold
to the driving position.
If a folded-in electric mirror has been
folded out manually, pressing button n
only folds the other mirror out. Pressing
button n again folds both mirrors back in.
Fold mirrors back in to driving position
before driving the vehicle.9 Warning
Use the child safety locks whenever
children are occupying the rear seats.
Disregard may lead to injuries or
endanger life. Vehicle passengers must
be informed accordingly.
Page 32 of 234

Locks, doors, windows32
Automatic anti-dazzle interior mirror 3
Dazzle is automatically reduced.
With the ignition off, the mirror does not
dim.
Press button on mirror housing to turn
function on. Button will illuminate.
Press button again to turn off.
There are two light sensors in the mirror
housing. To avoid interference and loss of
function, do not cover the sensors or hang
anything on the mirror.
Electric windows
Operational with key in ignition switch
positions ACC or ON. If key is in LOCK
position or removed, windows can be
operated for 10 minutes or until driver’s
door is opened.
Operated via four switches located in the
driver’s door.
For incremental operation, briefly pull or
press the switch.
For automatic 3 opening or closing, pull or
press the switch longer. Pull or press the
switch again to stop the movement.
9 Warning
Care must be taken when operating the
electrically operated door windows.
There is a risk of injury, particularly for
children, and a danger that articles could
become trapped. Vehicle passengers
must be informed accordingly.
If there are children on the rear seats,
press the switch in the driver’s door to
lock rear window operation. Rear
windows can then only be operated via
the driver’s door switches.
Keep a close watch on the windows when
closing them. Ensu re that nothing
becomes trapped in them as they move.
Before leaving the vehicle, remove the
ignition key in order to prevent
unauthorized operation.
Page 34 of 234

Locks, doors, windows34
Sun visors
Use the sun visor to protect from glare by
pulling it up, down or swivelling it to the
side.
Sun visors have vanity mirrors and a ticket
holder 3 on the rear.
When the vanity mirror covers are opened,
the sun visor lamp 3 will illuminate.
Slide/tilt sun roof 3
Operated via switch in roof lining when the
ignition switch is in positions ACC or ON.
With key in LOCK position in the ignition
switch or removed, the slide/tilt sun roof
can be adjusted for up to 10 minutes or
until a door is opened.
For incremental operation, briefly press the
button. For automatic opening or closing,
press and hold the switch. To open
Press switch rearwards; it will open
automatically unless th
e switch is pressed
again in another dire ction, or released.
To close
Press and hold switch forwards. Release
switch when sun roof reaches desired
position.
To tilt
Press and hold switch upwards. Release
switch when sun roof reaches desired
position.
To return sun roof to its original position,
press and hold switch downwards. Release
switch when sun roof reaches desired
position.
Page 46 of 234

Seats, interior46
Using the belts
Fitting the belt
Pull the belt out evenly from the retractor
and guide it over the shoulder, making
certain that it is not twisted.
Insert the latch plate into the buckle.
The seat backrest must not be tilted back
too far (the recommended maximum tilting
angle is approx. 25°).
The lap belt must not be twisted and must
fit snugly across the body. Tension the belt
frequently whilst driving by tugging the
diagonal part of the belt. Keep knees pointing straight forward so
that driver’s side knee bolsters can help
prevent submarining under the seat belt in
the event of a collision.
Bulky clothing prevents
the belt from fitting
properly. The belt must not rest against
hard or fragile objects in the pockets of
your clothing (e.g. ballpoint pens, keys,
spectacles) because these could cause
injury in the event of a collision. Do not
place any objects (e.g. handbags) between
the belt and your body. Front passenger’s seat belt reminder
k3Illuminates for approx. 4 seconds when
ignition is switched on.
When the engine is running, if the front
passenger’s seat is occupied and the belt is
not engaged, the control indicator will
flash for approx. 90 seconds and then
illuminate until the
belt is fastened
correctly (control indicator will extinguish
immediately).
If vehicle speed exceeds approx. 22 km/h
(14 mph), the control indicator will flash for
approx. 90 seconds along with a warning
chime, and then illuminate until front
passenger’s seat belt is fastened.
Control indicator X for driver’s seat belt
reminder - see page 72.9 Warning
On pregnant women in particular,
the lap belt must be positioned as low as
possible across the pelvis in order to
prevent pressure on the abdomen.
Page 74 of 234

Instruments, controls74
aAnti-theft alarm system activation
without monitoring of passenger
compartment and vehicle tilt 3
see page 28.
IEngine oil pressure
Illuminates in red when ignition is switched
on. Extinguishes after engine is started.
Can illuminate intermit tently when idling
with hot engine; must extinguish when
engine speed is increased.
If
it illuminates during driving;
engine oil pressure may be dangerously
low, interrupting engine lubrication and
resulting in damage to the engine and/or
locking of the driving wheels:
z Move out of the flow of traffic as quickly
as possible without impeding other
vehicles,
z Depress clutch,
z Move gearshift lever to neutral
(automatic transmission to N),
z Switch off ignition. Check engine oil level before consulting
a workshop. If the oil level is low, top up
using the specified engine oil - see pages
192, 213, 217.
If the oil level is normal, have a workshop
check the vehicle’s lubricating system.
pAlternator
Illuminates in red when ignition is switched
on. Extinguishes after engine is started.
If
it illuminates during driving:
stop vehicle and switch off engine. The
battery is not being charged and the
engine cooling may be interrupted. The
brake servo unit may cease to be effective.
Interrupt your journey immediately.
Remove key and check drive belt condition
and tensioning before consulting a
workshop.
ZExhaust emissions
Illuminates in yellow when ignition is
switched on. Extinguishes after engine is
started. Can illuminate briefly when
driving; this is normal and does not
indicate a system fault.
If it illuminates when the engine is running
;
fault in emission control system.
The permitted emission limits may be
exceeded. Fuel economy and vehicle
driveability may be impaired.
The control indicator also illuminates if
there is a fault in the diesel particle filter 3.
Consult a workshop as soon as possible.
If it flashes when the engine is running
;
for a fault that can lead to destruction of
the catalytic converter, see page 134.
Consult a workshop as soon as possible.
0Winter program 3
Illuminates in yellow when Winter program
for the automatic transmission is enabled -
see page 117.
9 Warning
When the engine is off, considerably
greater force will be required for braking
and steering.
Do not remove key until vehicle has come
to a standstill, otherwise the steering
column lock could engage unexpectedly.
Page 91 of 234

Instruments, controls91
The desired stop watch display can be
selected from the Optionsmenu3:
Driving Time excl. Stops
The time the vehicle is in motion is
recorded. Stationary ti me is not included.
Driving Time incl. Stops
The time the vehicle is in motion is
recorded. The time the vehicle is stationary
with the key in the ignition switch is
included.
Travel Time
Measurement of the time from manual
activation via Start to manual deactivation
via Reset .
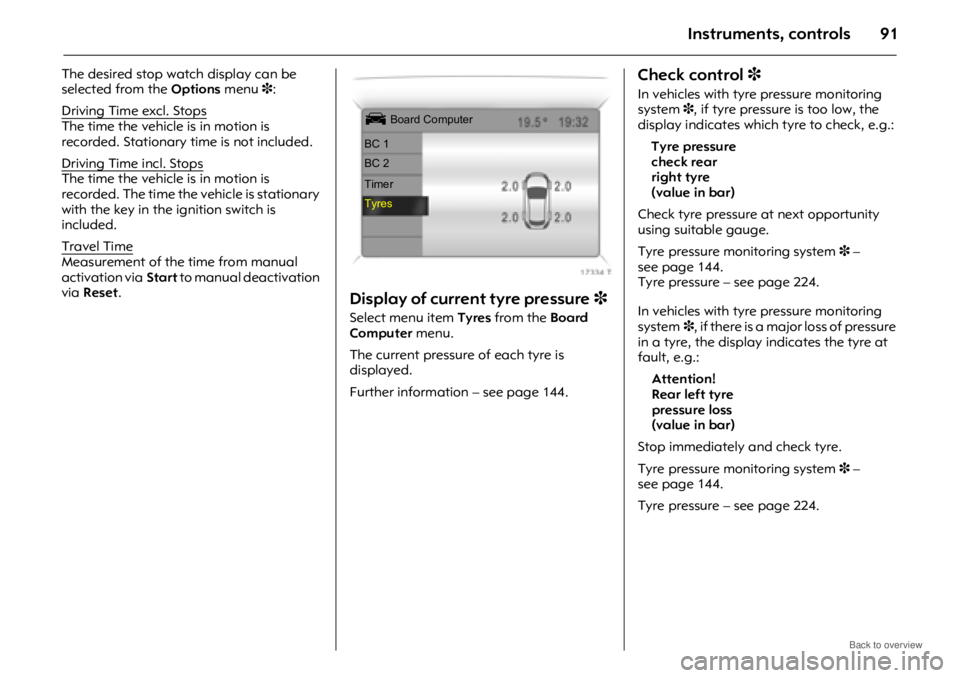
Display of current tyre pressure 3
Select menu item Tyres from the Board
Computer menu.
The current pressure of each tyre is
displayed.
Further information – see page 144.
Check control 3
In vehicles with tyre pressure monitoring
system 3, if tyre pressure is too low, the
display indicates which tyre to check, e.g.:
Tyre pressure
check rear
right tyre
(value in bar)
Check tyre pressure at next opportunity
using suitable gauge.
Tyre pressure monitoring system 3 –
see page 144.
Tyre pressure – see page 224.
In vehicles with tyre pressure monitoring
system 3, if there is a major loss of pressure
in a tyre, the display indicates the tyre at
fault, e.g.:
Attention!
Rear left tyre
pressure loss
(value in bar)
Stop immediately and check tyre.
Tyre pressure monitoring system 3 –
see page 144.
Tyre pressure – see page 224.
Ü Board Computer
BC 1
BC 2
Timer
Tyres
Page 92 of 234

Instruments, controls92
Warning buzzers
While driving:
z when operating th e turn signals.
z if driver’s or passenger’s seat belt 3 is
not engaged when the seat is occupied
and vehicle speed exceeds approx.
22 km/h (14 mph).
When the vehicle is parked and driver’s
door is opened:
z with exterior lamps switched on.
z when the key is in the ignition switch.
6 Seat belt warning chimes -
see pages 46, 72,
driving hints - see page 127,
save fuel, protect the environment -
see page 129.
Windscreen wipers
To activate, move lever upwards.
Press lever down from position J:
single swipe.
Further information - see pages 198, 202,
205. Adjustable wiper interval
To set the wiping interval to a value
between 1 and 10 seconds:
Switch on ignition.
Push lever down from position
J.
Wait the desired interval.
Set the lever to adjustable timed interval
wiper position $.
The interval remains stored until the next
change or the ignition is switched off.
Switching the ignition on and moving the
lever to $ sets the interval to 3.5 seconds.
In this mode, wiping frequency is also
affected by vehicle speed. As vehicle speed
increases, wiping will become more
frequent.
J
=Off
$ =Timed interval wipe
% =Slow
& =Fast
Page 98 of 234

Lighting98
Peripheral lighting
The dipped beam and reversing lamps
illuminate for approx. 30 seconds after the
driver exits the vehicle and closes the door.
To activate function:
If the driver’s door is left open, the lamps
will extinguish after two minutes.
Peripheral lighting can be deactivated by
inserting the key in the ignition switch or by
pulling the turn signal lever towards the
steering wheel again while the driver’s door
is open.
Instrument illumination,
information display illumination
Comes on when ignition is switched on.
Brightness can be adjusted when the
exterior lamps are on: turn wheel to the
right or left until the desired brightness is
obtained.
If driver’s door is opened or q is pressed on
the remote control, instrument panel lamps
will illuminate automatically and stay on
for approx. 30 seconds until ignition switch
is turned to the ACC position.
Display mode 3 - see page 87.
Interior courtesy lamps
Front reading lamps, rear interior lamps
and luggage compartm ent lamps function
as courtesy lighting and illuminate when
the doors or tailgate are opened.
If doors or tailgate remain opened, the
lamps stay illuminated for approx.
10 minutes.
Once all doors and the tailgate are closed,
the courtesy lamps dim gradually after
approx. 10 seconds.
By pressing button d, both front reading
lamps and the rear interior lamps
illuminate.
Press the button again to turn the lamps
off.
1. Switch off ignition.
2. Remove ignition key.
3. Open driver’s door.
4. Pull turn signal lever towards
steering wheel.
Page 100 of 234

Lighting100
Luggage compartment lamps
Come on when a door or the tailgate is
opened. Front door lamps
Come on when a door is opened.
Once all doors are closed, the front door
lamps extinguish after approx. 10 seconds.
If the doors are left open, the lamps will
stay on for approx. 10 minutes.
Front door lamps can
also be turned off
immediately by pressing button
K in the
roof lining.
Ignition switch illumination
Comes on when you open a door.
Ignition switch illumination can also be
turned off immediately by pressing
button
K in the roof lining.
Sun visor lamps 3
Come on when vanity mirror covers are
opened. See page 34.
Ashtray illumination
The portable front ashtray, located in the
front drink holder, illuminates depending
on outside light conditions. See page 68.
Glove compartment illumination
Comes on when the glove compartment is
opened. See page 64.
Battery discharge protection
To prevent battery from becoming
discharged, the extern al lamps turn off
automatically approx. 10 minutes after the
ignition is switched off.
Battery discharge protecti on will not work if
the lamps are turned on 10 minutes after
the ignition has been switched off; the key
cannot be removed from the ignition switch
until the battery is recharged.
Headlamps when driving abroad
The asymmetrical dipped beam increases
the field of vision on the near side of the
lane.
When driving in coun tries which drive on
the opposite side of the road, this causes
glare for oncoming traffic.
For temporary periods, to avoid glare the
headlamp pattern should be adjusted
down to the horizontal position.
Have the headlamps adjusted by a
workshop.