ESP OPEL ANTARA 2009 Owners Manual
[x] Cancel search | Manufacturer: OPEL, Model Year: 2009, Model line: ANTARA, Model: OPEL ANTARA 2009Pages: 234, PDF Size: 3.01 MB
Page 9 of 234

In brief9
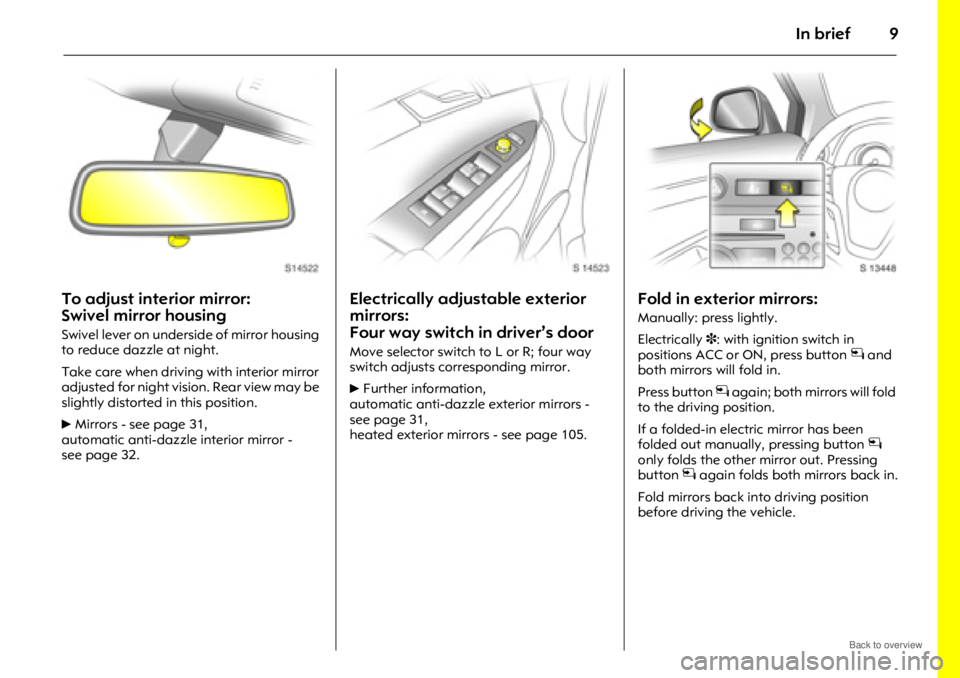
To adjust interior mirror:
Swivel mirror housing
Swivel lever on underside of mirror housing
to reduce dazzle at night.
Take care when driving with interior mirror
adjusted for night vision. Rear view may be
slightly distorted in this position.
6 Mirrors - see page 31,
automatic anti-dazzle interior mirror -
see page 32.
Electrically adjustable exterior
mirrors:
Four way switch in driver’s door
Move selector switch to L or R; four way
switch adjusts corresponding mirror.
6 Further information,
automatic anti-dazzle exterior mirrors -
see page 31,
heated exterior mirrors - see page 105.
Fold in exterior mirrors:
Manually: press lightly.
Electrically 3: with ignition switch in
positions ACC or ON, press button n and
both mirrors will fold in.
Press button n again; both mirrors will fold
to the driving position.
If a folded-in electric mirror has been
folded out manually, pressing button n
only folds the other mirror out. Pressing
button n again folds both mirrors back in.
Fold mirrors back in to driving position
before driving the vehicle.
Page 19 of 234

In brief19
Starting the engine:
Manual transmission in neutral,
Depress clutch and foot brake,
Automatic transmission in P or N,
Do not accelerate
Petrol engines:
TurnkeytoSTARTand release it
Diesel engines:
Turn key to ON, when preheating
control indicator N
extinguishes
1), turn key to START
and release it
Key returns automatically to ON position
when released. Start attempts should not last longer than
15 seconds. If engine does not start, wait
10 seconds before repeating starting
procedure.
The increased engine
speed automatically
returns to normal idling speed as the
engine temperature rises.
Drive at a moderate speed, especially in
cold weather, until normal engine
operating temperatures have been
reached.
6 Electronic immobiliser - see page 22,
diesel fuel system - see page 171,
further information - see pages 127, 129,
131.
Releasing the hand brake:
Raise lever slightly,
press release button,
lower lever fully
To reduce operating forces, depress foot
brake at the same time.
Do not drive with hand brake on, to avoid
damage to brakes on the rear wheels. Do
not apply hand brake while vehicle is in
motion or as a substitute for the foot brake.
Drive carefully, economically and with the
environment in mind. While driving, do not
do anything that could distract you.
6 Hand brake - see page 147.
1)Preheating system switches on only if outside
temperature is low.
Page 30 of 234

Locks, doors, windows30
Child safety locks
To engage lock, open door, insert key into
child safety lock and turn lock from the
vertical to the horizontal position. Door
cannot then be opened from inside.
To unlock door while child safety lock is
activated, pull up lock button and open
door from outside. Do not pull inside door
handle while child safety lock is activated.
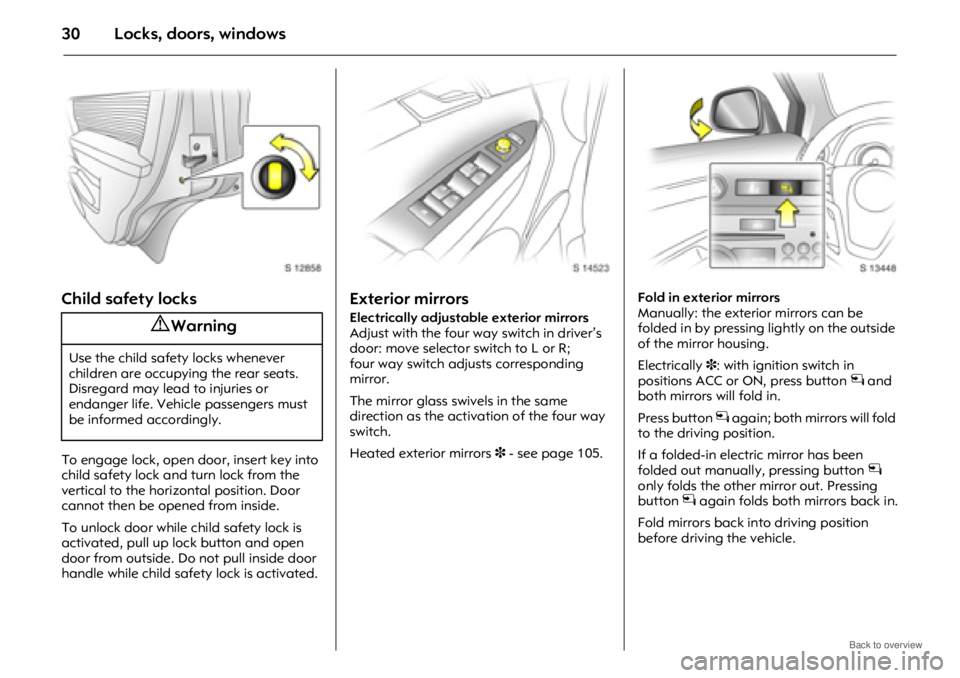
Exterior mirrors
Electrically adjustable exterior mirrors
Adjust with the four way switch in driver’s
door: move selector switch to L or R;
four way switch adjusts corresponding
mirror.
The mirror glass swivels in the same
direction as the activation of the four way
switch.
Heated exterior mirrors 3 - see page 105. Fold in exterior mirrors
Manually: the exterior mirrors can be
folded in by pressing lightly on the outside
of the mirror housing.
Electrically
3: with ignition switch in
positions ACC or ON, press button n and
both mirrors will fold in.
Press button n again; both mirrors will fold
to the driving position.
If a folded-in electric mirror has been
folded out manually, pressing button n
only folds the other mirror out. Pressing
button n again folds both mirrors back in.
Fold mirrors back in to driving position
before driving the vehicle.9 Warning
Use the child safety locks whenever
children are occupying the rear seats.
Disregard may lead to injuries or
endanger life. Vehicle passengers must
be informed accordingly.
Page 54 of 234

Seats, interior54
Side airbags 3
The side airbags are identified by the word
"Airbag" on the outboard sides of the front
seat backrests, and protect front seat
occupants in the event of a severe side
impact.
The side airbag system comprises:
z an airbag with inflator in the outboard
sides of the driver's and front
passenger's seat backrests,
z the control electronics,
z the side impact sensors,
z the airbag systems control indicator v in
the instrument panel. The side airbag system will be triggered:
z
depending on the severity of the
accident,
z depending on the type of impact,
z within the range show n in the illustration,
z independently of the front airbag
system. When triggered, the side
airbag inflates in
milliseconds and forms a safety cushion for
the driver and/or front passenger in the
respective door area. The risk of injury to
the upper body and pelvis in the event of a
side impact is thereby substantially
reduced.
9 Warning
There must be no objects in the area in
which the airbag inflates or in the area
between the seat backrests and the
vehicle body.
Do not place hands, arms or other body
parts on the covers of the airbag systems.
Important information - see page 57.
The three-point seat belt must always be
correctly fitted - see page 43.
Page 55 of 234

Seats, interior55
The side airbags will not be triggered in the
event of:
zthe ignition being switched off,
z frontal collisions,
z accidents in which the vehicle overturns,
if lateral impact is insufficient for side
airbag deployment,
z collisions involving a rear impact,
z collisions involving a side impact outside
the passenger cell.
Curtain airbags
The curtain airbag system is identified by
the word "Airbag" on the roof frame, and
protects front seat and rear outboard seat
occupants in the event of a severe side
impact.
The curtain airbag system comprises:
zan airbag with inflator in the roof frame
above the doors on the driver’s and
passenger’s side respectively,
z the control electronics,
z the side impact sensors,
z the airbag systems control indicator v in
the instrument panel. The curtain airbag system will be triggered:
z
depending on the severity of the
accident,
z depending on the type of impact,
z within the range shown in the illustration,
z together with the side airbag system,
z independently of the front airbag
system.
Page 56 of 234

Seats, interior56
When triggered, the curtain airbag inflates
in milliseconds and provides a safety
barrier in the head area on the respective
side of the vehicle. This reduces the risk of
injury to the head considerably in the event
of a side impact.The curtain airbags will not be triggered in
the event of:
z
the ignition being switched off,
z frontal collisions,
z accidents in which the vehicle overturns,
if lateral impact is insufficient for curtain
airbag deployment,
z collisions involving a rear impact,
z collisions involving a side impact outside
the passenger cell.
Airbag control indicator v
The front airbag system, side airbag
system 3 and curtain airbag system
are monitored electronically together with
the belt tensioners, and their operational
readiness is shown by the red control
indicator v in the instrument panel.
When the ignition is switched on, the
control indicator flashes several times then
extinguishes. If it does not flash, stays lit,
illuminates or flashes whilst driving, there is
a fault in the airbag systems or with the
belt tensioners. The systems might not
therefore be triggered in the event of an
accident (see also page 45).
9 Warning
There must be no objects in the area in
which the airbag inflates. Do not place
hands, arms or other body parts on the
covers of the airbag systems.
Never secure anything to the roof by
routing ropes through the doors or
windows, to avoid obst ructing inflation of
the curtain airbags.
Important information – see page 57.
The three-point seat belt must always be
correctly fitted – see page 43.
Page 57 of 234

Seats, interior57
The system's integral self-diagnosis facility
allows faults to be quickly remedied.Important
z
Accessories not released for your vehicle
type and other objects must not be
affixed or placed in the area in which the
airbags inflate, as they could cause
injury when the airbags are triggered.
z Do not place any objects between the
airbag systems and the vehicle
occupants; danger of injury.
z Only use the hooks on the assist grips in
the roof frame to hang up light articles of
clothing or coat hangers. Do not place
any objects in the pockets of the hanging
items; risk of injury.
z Do not stick or place anything on the
steering wheel, instrument panel, front
seat backrests in the vicinity of the
airbags and seat areas or cover them
with other materials.
z The airbag systems and belt tensioner
control electronics can be found in the
centre console area. In order to avoid
malfunctions, do not store magnetic
objects in this area. z
Use only a dry cloth or interior cleaner to
clean the steering wheel, instrument
panel, front seat backrests, roof frame
and seat area of the front seats. Do not
use any aggressive cleaning agents.
z Only protective covers which are
approved for your vehicle with side
airbags 3 may be fitted on the front
seats. When fitting the protective covers,
make sure that the airbag units on the
outboard sides of the front seat
backrests are not covered.
z The airbag systems are triggered
independently of each other, depending
on the severity of the accident and the
type of impact. The side airbag system 3
and the curtain airbag system are
triggered together.
z During off-road driving especially,
airbags can also inflate in moderate to
severe non-collision situations such as
when slamming the undercarriage or
other solid components of the vehicle in
a dip in the driving surface.
z Each airbag can be triggered only once.
Once triggered, an airbag must be
replaced immediately by a workshop.
9 Warning
Have the cause of the fault remedied by
a workshop.
9 Warning
Disregard of these instructions may lead
to injuries or endanger life.
Page 62 of 234

Seats, interior62
FlexOrganizer 3
Flexible system for dividing the luggage
compartment or securing loads.
The system consists of:
zadapters
z variable partition net
z mesh pockets for the side walls
z hooks in the luggage compartment
Components are mounted in the two guide
rails in the side walls of the luggage
compartment by means of adapters or
hooks. Variable partition netInsert an adapter in
each rail: fold up
handle plate, insert adapter in upper and
lower groove of rails, move to desired
position.
To lock the adapter, swivel the handle
plate up. Compress the rods of the
partition net slight ly and insert in
corresponding openings of the adapter.
The longer rod must be inserted in the
upper adapter. Hooks and mesh pocketInsert the hooks in the desired position in
the rails: insert the
hook in the upper
groove on the rail and press in the lower
groove. The mesh pocket can be hung from
the hooks.
Removing
Press the partition net rods together and
remove from the adapters.
Adapter: fold open the retainer, release the
adapter from the lower groove and remove
from the upper groove.
Release the hooks from the rails.
Page 72 of 234

Instruments, controls72
o
Electronic immobiliser
Illuminates in red when ignition is
switched on, then extinguishes.
If it remains illuminated after the ignition is
on, there is a fault in the immobiliser
system; the engine cannot be started -
see page 22.
9Door open
Illuminates in red when a door is open.
3Engine electronics,
transmission electronics 3
Illuminates in yellow when ignition is
switched on, then extinguishes.
If it illuminates
during driving;
there may be a fault in the engine or
transmission electronics: interrupt your
journey and consult a workshop as soon as
possible.
Further information - see page 134.
vAirbag systems 3 , belt tensioners
see pages 44, 52.
1Tailgate open
Illuminates in red when ignition is
switched on, then extinguishes.
Illuminates when tailgate is open or not
securely latched.
Tailgate - see page 26.
XDriver’s seat belt reminder
Illuminates in red when ignition is
switched on, then extinguishes.
When the engine is runn ing, if driver’s seat
belt is not engaged, it will flash for approx.
90 seconds and then illuminate until
driver’s seat belt is fastened.
If vehicle speed exceeds approx. 22 km/h
(14 mph), control indicator will flash for
approx. 90 seconds along with a warning
chime and then remains illuminated until
driver’s seat belt is fastened.
Seat belts - see page 43.
OTurn signal lamps
The relevant control indicator flashes in
green when the turn signal is on.
Rapid flash; failure of a turn signal bulb or
the corresponding fuse or failure of a trailer
turn signal bulb 3. Both control indicators
flash when the hazard warning lamps are
active.
Further information - see pages 14, 95.
Bulb replacement - see page 185.
Fuses - see page 181.
YLow fuel level
Illuminates in yellow when ignition is
switched on, then extinguishes.
If it illuminates during dr iving; fuel level low:
fill up fuel tank as soon as possible.
Never let the tank run dry.
Erratic fuel supply can cause catalytic
converter to overheat - see page 133.
Diesel engines: if the tank has been run dry,
bleed the fuel system as described on
page 171.
Refuelling - see page 132.
Fuel tank capacity - see page 225.
Page 86 of 234

Instruments, controls86
Correcting time 3With the navigation system, date and time
are set automatically upon receipt of a
GPS
1) satellite signal. If the displayed time
does not match local time, it can be
corrected manually or automatically by
receiving an RDS
2) time signal 3.
Some RDS transmitters do not send correct
time signals. If the incorrect time is
displayed often, deactivate automatic
time synchronisation 3 and set the time
manually.
To correct time with the help of RDS, select
menu item Synchron. clock automatical.
from the Time, Date menu.
The box in front of Synchron. clock
automatical. will be ticked:
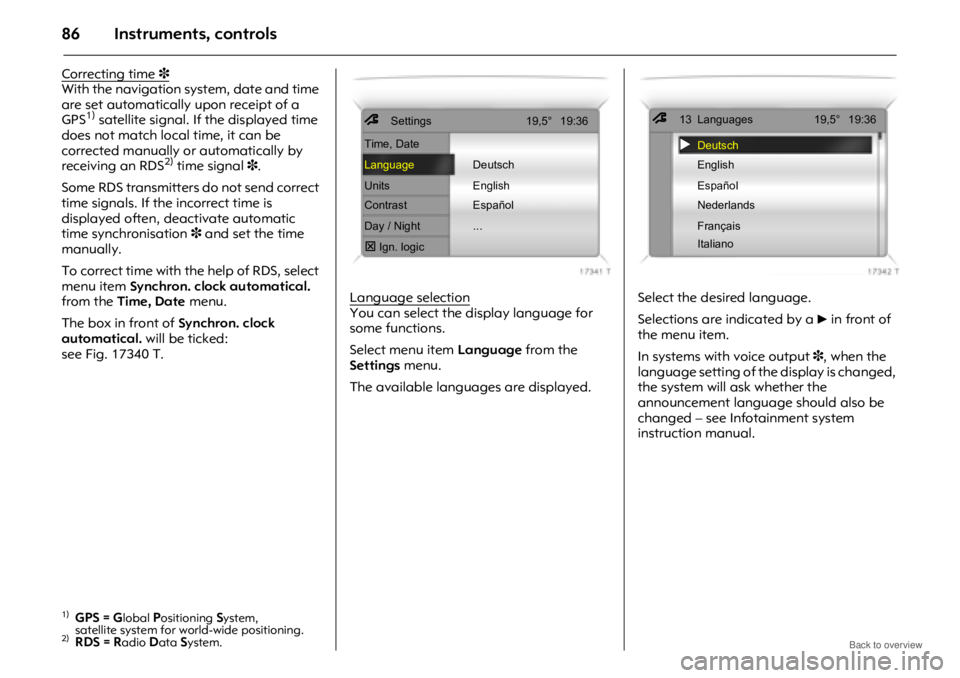
see Fig. 17340 T. Language selection
You can select the display language for
some functions.
Select menu item
Language from the
Settings menu.
The available langua ges are displayed. Select the desired language.
Selections are indicated by a
6 in front of
the menu item.
In systems with voice output 3, when the
language setting of the display is changed,
the system will ask whether the
announcement language should also be
changed – see Infotainment system
instruction manual.
1)GPS = Global Positioning System,
satellite system for w orld-wide positioning.
2)RDS = Radio Data System.
7
77 7Settings 19,5° 19:36
Time, Date
Language Deutsch
Units English
Contrast Español
Day / Night ...
�6
�6�6 �6 Ign. logic
7
77 713 Languages 19,5° 19:36
�XDeutsch
English
Español
Nederlands
Français
Italiano