key OPEL ANTARA 2017.5 Manual user
[x] Cancel search | Manufacturer: OPEL, Model Year: 2017.5, Model line: ANTARA, Model: OPEL ANTARA 2017.5Pages: 225, PDF Size: 6.2 MB
Page 59 of 225

Storage57Glovebox
The glovebox will illuminate when
opened.
The glovebox partition can be
removed from its groove. Store the
partition in the groove on the far left- hand side of the glovebox.
The glovebox should be closed whilst driving.
Lockable glovebox Lock and unlock the glovebox with thekey.
Cupholders
Cupholders are located in the front ofthe centre console.
The cupholder is flexible, allowing
different size drink containers to be
stored.
Additional cupholders are located in
the centre rear seat armrest. Fold
down the armrest to access the
cupholder.
Sunglasses storage
To open: push the rear part of the
cover.
To close: pull up cover and push it
until it latches into place.
Do not use for storing heavy objects.
Underseat storage Front passenger seat undertray
Pull up on front of tray then pull it
forwards. Push the tray towards the
seat to return it to its original position.
Page 75 of 225

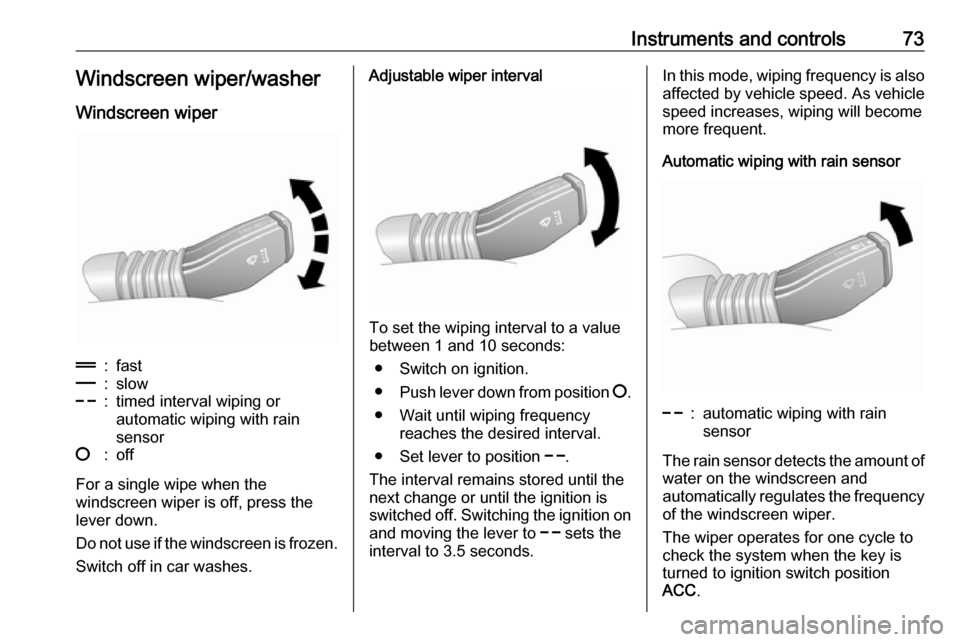
Instruments and controls73Windscreen wiper/washerWindscreen wiper&:fast%:slow$:timed interval wiping or
automatic wiping with rain
sensor§:off
For a single wipe when the
windscreen wiper is off, press the
lever down.
Do not use if the windscreen is frozen.
Switch off in car washes.
Adjustable wiper interval
To set the wiping interval to a value
between 1 and 10 seconds:
● Switch on ignition.
● Push lever down from position §.
● Wait until wiping frequency reaches the desired interval.
● Set lever to position $.
The interval remains stored until the
next change or until the ignition is
switched off. Switching the ignition on
and moving the lever to $ sets the
interval to 3.5 seconds.
In this mode, wiping frequency is also
affected by vehicle speed. As vehicle speed increases, wiping will become
more frequent.
Automatic wiping with rain sensor$:automatic wiping with rain
sensor
The rain sensor detects the amount of water on the windscreen and
automatically regulates the frequency
of the windscreen wiper.
The wiper operates for one cycle to
check the system when the key is
turned to ignition switch position
ACC .
Page 86 of 225

84Instruments and controls9Danger
Risk of fatal injury for a child using
a child restraint system together
with activated front passenger
airbag.
Risk of fatal injury for an adult
person with deactivated front
passenger airbag.
Airbag deactivation 3 50.
Charging system p illuminates red.
Illuminates when the ignition is
switched on and extinguishes shortly after the engine starts. If it does not
illuminate, seek the assistance of a
workshop.
Illuminates when the engine is
running
Stop vehicle and switch off engine.
Battery is not charging. Engine
cooling may be interrupted. The
brake servo unit may cease to be
effective.
Interrupt your journey immediately.
Remove key and check drive belt
condition and tensioning before
seeking the assistance of a
workshop.
Malfunction indicator light Z illuminates or flashes yellow.
Illuminates when the ignition is
switched on and extinguishes shortly
after the engine starts. If it does not
illuminate, seek the assistance of a
workshop.
Can illuminate briefly when driving;
this is normal and does not indicate a system fault.
Illuminates when the engine is
running
Fault in the emission control system.
The permitted emission limits may be exceeded. Fuel economy and vehicle
driveability may be impaired. Seek
the assistance of a workshop
immediately.
Control indicator Z also illuminates if
there is a fault in the diesel particle
filter 3 129 or with the automatictransmission 3 138. Seek the
assistance of a workshop as soon as
possible.
Ensure the fuel filler cap is screwed in completely 3 150.
Flashes when the engine is
running
Fault that could lead to catalytic
converter damage 3 130 . Ease up on
the accelerator until the flashing
stops. Seek the assistance of a
workshop immediately.
Service vehicle soon g illuminates yellow.
Illuminates when the engine is
running to indicate a fault in the
engine or transmission electronics.
The electronics switch to an
emergency running programme, fuel
consumption may be increased and
vehicle handling may be impaired.
In some cases, the fault can be
eliminated by switching the engine off
and back on again. If g illuminates
again after restarting the engine, the vehicle may need a service.
Page 91 of 225

Instruments and controls89Illuminates when the engine is
runningCaution
Engine lubrication may be
interrupted. This may result in
damage to the engine and/or
locking of the drive wheels.
1. Depress clutch.
2. Select neutral gear, set selector lever to N.
3. Move out of the flow of traffic as quickly as possible without
impeding other vehicles.
4. Switch off ignition.
9 Warning
When the engine is off,
considerably more force is needed
to brake and steer. During an
Autostop the brake servo unit will still be operational.
Do not remove key until vehicle is
stationary, otherwise the steeringwheel lock could engage
unexpectedly.
Check oil level before seeking the
assistance of a workshop 3 159.
Change engine oil
¢ illuminates yellow.
When the engine is started, ¢
illuminates briefly. If it does not
illuminate, seek the assistance of a
workshop.
The engine oil life monitor lets you know when to change the oil. Control
indicator ¢ illuminates to indicate
that engine oil life has been
diminished and the oil needs
changing.
Based on driving conditions, the
interval at which an oil change will be indicated can vary considerably.
Change oil within 1000 km. Engine
power may be decreased.
Once the engine oil has been
changed 3 159, the engine oil life
monitor needs to be reset. Seek the assistance of a workshop.
Low engine oil level
S illuminates yellow.
When the ignition is switched on, S
illuminates briefly. If it does not
illuminate, seek the assistance of a
workshop.
Illuminates during driving
Oil level is low: top up oil to specified
level 3 159.
Fuel economy mode s illuminates green.
Depending on version, s
illuminates when fuel economy mode
is switched on 3 122.
Low fuel Y illuminates yellow.
Page 101 of 225

Instruments and controls99Always day design; black or coloured
text on a light background.
Always night design ; white or
coloured text on a dark background.
Selections are indicated by a o in
front of the menu item.
Ignition logic
See Infotainment manual.Vehicle messages
Warning chimes When starting the engine or whilst
driving
Only one warning chime will sound at a time.
The warning chime regarding
unfastened seat belts has priority
over any other warning chime.
● If seat belt is not fastened.
● When operating the turn and lane-change signals.
● When the vehicle is being driven and the electrical parking brake isapplied 3 143.
● When releasing the electrical parking brake without applying
the foot brake 3 90.
● If there is a fault in the braking system 3 85.
● If the parking assist detects an object 3 148.● During automatic self-cleaning of
the diesel particle filter 3 129.
● In vehicles equipped with engine overspeed warning; when
vehicle speed exceeds 120 km/h
3 91.
When the vehicle is parked and/or the driver's door is opened
● When the key is in the ignition switch.
● With exterior lights on.
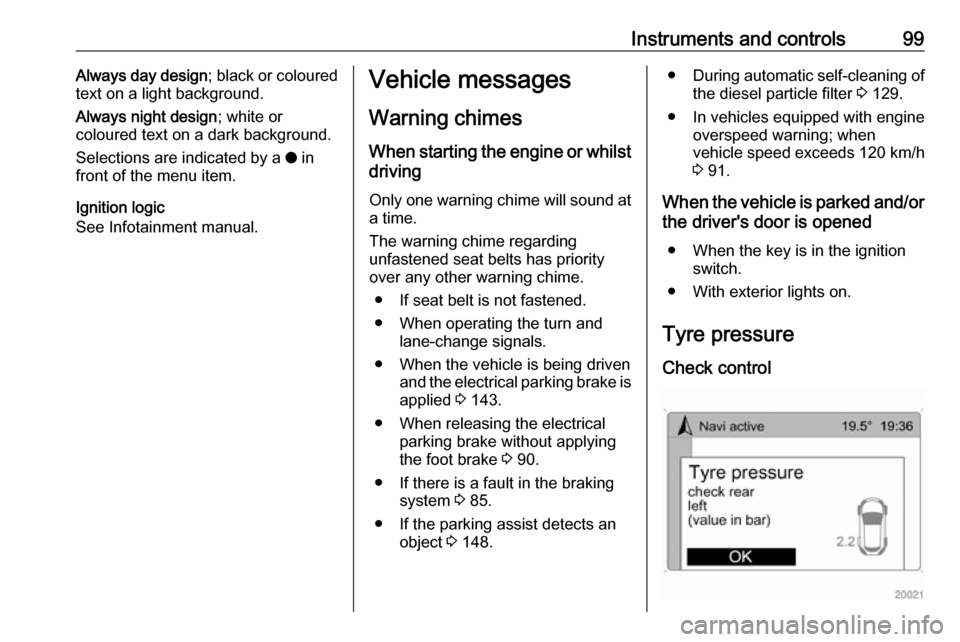
Tyre pressure
Check control
Page 106 of 225

104Instruments and controls
To reset all information of a trip
computer, select menu item All
values . After resetting, "- - -" is
displayed for the trip computer
information selected. The
recalculated values are displayed
after a brief delay.
Stop watch
Select menu item Timer from the
Board Computer menu. The Timer
menu is displayed.
To start, select menu item Start. To
reset, select menu item Reset.
The desired stop watch display can
be selected from the Options menu:
Driving Time excl. Stops : The time the
vehicle is in motion is recorded.
Stationary time is not included.
Driving Time incl. Stops : The time the
vehicle is in motion is recorded. The
time the vehicle is stationary with the
key in the ignition switch is included.
Travel Time : Measurement of the
time from manual activation via Start
to manual deactivation via Reset.
Interruption of power supply If the power supply has been
interrupted or if the battery voltage has dropped too low, the values
stored in the trip computer will be lost.
Page 114 of 225

112LightingRear reading lights
Left and right rear reading lights are
individually operable. Press to
activate and deactivate.
Sunvisor lights Illuminates when the vanity mirror
cover is opened 3 33.
Lighting features
Entry lighting
Welcome lighting Depending upon outside light
conditions, when unlocking the
vehicle with the remote control the hazard warning lights flash twice and
the exterior and interior lights
illuminate for 20 seconds. This
function facilitates locating the vehicle
when it is dark.
Exit lighting The low beam and reversing lights
illuminate for 30 seconds after the
driver exits the vehicle and closes the
door.Switching on
1. Switch off ignition.
2. Remove ignition key.
3. Open driver's door.
4. Pull turn signal lever.
5. Close driver's door.
If the driver's door is not closed the
lights switch off after two minutes.
Exit lighting can be deactivated by
inserting the key in the ignition switch or by pulling the turn signal lever
again while the driver's door is open.
Page 115 of 225

Lighting113Battery discharge protectionTo prevent the battery from becoming
discharged, the exterior lights turn off automatically 10 minutes after the
ignition is switched off.
Battery discharge protection will not
work if the lights are turned on
10 minutes after the ignition has been
switched off; the key cannot be
removed from the ignition switch until the battery is recharged.
Page 127 of 225

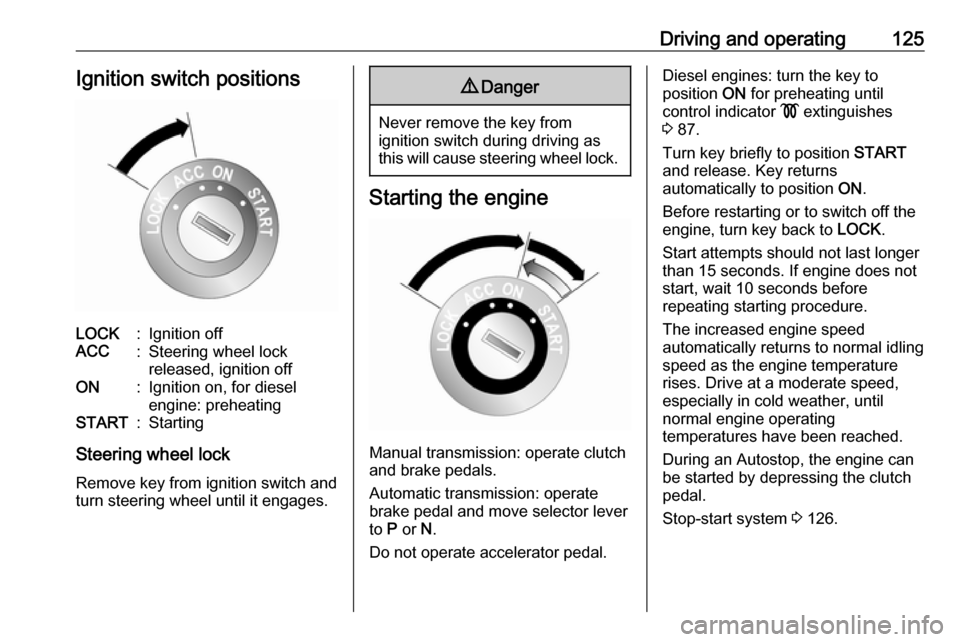
Driving and operating125Ignition switch positionsLOCK:Ignition offACC:Steering wheel lock
released, ignition offON:Ignition on, for diesel
engine: preheatingSTART:Starting
Steering wheel lock
Remove key from ignition switch and
turn steering wheel until it engages.
9 Danger
Never remove the key from
ignition switch during driving as
this will cause steering wheel lock.
Starting the engine
Manual transmission: operate clutch
and brake pedals.
Automatic transmission: operate
brake pedal and move selector lever
to P or N.
Do not operate accelerator pedal.
Diesel engines: turn the key to
position ON for preheating until
control indicator ! extinguishes
3 87.
Turn key briefly to position START
and release. Key returns
automatically to position ON.
Before restarting or to switch off the engine, turn key back to LOCK.
Start attempts should not last longer
than 15 seconds. If engine does not
start, wait 10 seconds before
repeating starting procedure.
The increased engine speed
automatically returns to normal idling
speed as the engine temperature
rises. Drive at a moderate speed,
especially in cold weather, until
normal engine operating
temperatures have been reached.
During an Autostop, the engine can
be started by depressing the clutch
pedal.
Stop-start system 3 126.
Page 128 of 225

126Driving and operatingStarting the vehicle at low
temperatures
In extremely cold temperatures, i.e.
below -20 °С, it may be necessary to
crank the engine for up to
30 seconds for it to start.
Turn key to position START and hold
until engine starts. Start attempts
should not last longer than
30 seconds. If engine does not start, wait 10 seconds before repeatingstarting procedure.
Ensure the engine oil is of the correct viscosity, the correct fuel is used,
vehicle services are performed
regularly and the battery is sufficiently
charged.
Turbo engine warm-up Upon start-up, engine available
torque may be limited for a short time,
especially when the engine
temperature is cold. The limitation is
to allow the lubrication system to fully protect the engine.Overrun cut-off
The fuel supply is automatically cut-
off during overrun, i.e. when the
vehicle is driven with a gear engaged
but accelerator is released.
Stop-start system The stop-start system helps to save
fuel and to reduce the exhaust
emissions. When conditions allow, it
switches off the engine as soon as the
vehicle is at a low speed or at a
standstill, e.g. at a traffic light or in a
traffic jam. It starts the engine
automatically as soon as the clutch is depressed. A vehicle battery sensor
ensures that an Autostop is only performed if the vehicle battery is
sufficiently charged for a restart.
Activation
The stop-start system is available as soon as the engine is started, the
vehicle starts-off and the conditions
as stated below in this section are
fulfilled.Deactivation
Deactivate the stop-start system
manually by pressing s. The
deactivation is indicated when the
LED in the button extinguishes.
Fuel economy mode 3 122.
Autostop If the vehicle is at a low speed or at a
standstill, activate an Autostop as
follows:
● Depress the clutch pedal
● set the lever to neutral
● release the clutch pedal