engine OPEL ANTARA 2017.5 Manual user
[x] Cancel search | Manufacturer: OPEL, Model Year: 2017.5, Model line: ANTARA, Model: OPEL ANTARA 2017.5Pages: 225, PDF Size: 6.2 MB
Page 162 of 225

160Vehicle careWe recommend the use of the same
grade of engine oil that was used at
the last oil change.
The engine oil level must not exceed the MAX mark on the dipstick.Caution
Overfilled engine oil must be
drained or suctioned out.
Capacities 3 211, Engine oil quality/
viscosity 3 202.
Fit the cap on straight and tighten it.
Control indicators for engine oil
pressure I 3 88, engine oil life ¢
3 89, and low engine oil S 3 89.
Once the engine oil has been
changed, the engine oil life monitor needs to be reset. Seek the
assistance of a workshop.
Engine coolant
The coolant provides freeze
protection down to approx. -28 °C. In
northern countries with very low
temperatures the factory filled coolant provides frost protection down to
approx. -37 °C.Caution
Only use approved antifreeze.
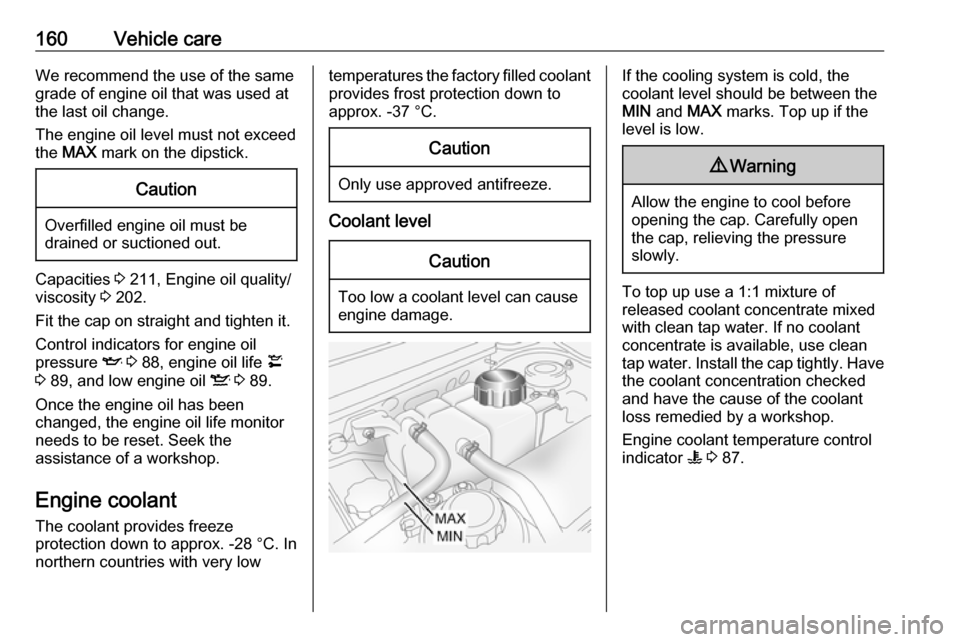
Coolant level
Caution
Too low a coolant level can cause engine damage.
If the cooling system is cold, the
coolant level should be between the
MIN and MAX marks. Top up if the
level is low.9 Warning
Allow the engine to cool before
opening the cap. Carefully open
the cap, relieving the pressure
slowly.
To top up use a 1:1 mixture of
released coolant concentrate mixed
with clean tap water. If no coolant
concentrate is available, use clean
tap water. Install the cap tightly. Have the coolant concentration checked
and have the cause of the coolant
loss remedied by a workshop.
Engine coolant temperature control
indicator W 3 87.
Page 164 of 225

162Vehicle careBrake fluid9Warning
Brake fluid is poisonous and
corrosive. Avoid contact with eyes, skin, fabrics and painted surfaces.
The brake fluid level must be between
the MIN and MAX marks.
When topping up, ensure maximum cleanliness as contamination of the
brake fluid can lead to brake system
malfunctions. Have the cause of the
loss of brake fluid remedied by a
workshop.
Caution
Only use high-performance brake
fluid approved for the vehicle.
Brake fluid 3 202.
Brake fluid level control indicator R
3 85.
Clutch fluid
9 Warning
Clutch fluid is poisonous and
corrosive. Avoid contact with eyes, skin, fabrics and painted surfaces.
If the fluid in the reservoir falls below
the MIN mark, seek the assistance of
a workshop.
Clutch fluid 3 202.
Vehicle battery The vehicle battery is maintenance-
free provided that the driving profile
allows sufficient charging of the
battery. Short-distance-driving and
frequent engine starts can discharge
the vehicle battery. Avoid the use of
unnecessary electrical consumers.
Page 166 of 225

164Vehicle careNote
Using an AGM vehicle battery
different from the original Opel
vehicle battery may result in a lower performance of the stop-start
system.
We recommend that you have the
vehicle battery replaced by a
workshop.
Stop-start system 3 126.
Charging the vehicle battery9 Warning
On vehicles with stop-start
system, ensure that the charging potential does not exceed
14.6 volts when using a battery
charger. Otherwise the vehicle
battery might be damaged.
Jump starting 3 194.
Warning label
Meaning of symbols:
● No sparks, naked flames or smoking.
● Always shield eyes. Explosive gases can cause blindness or
injury.
● Keep the vehicle battery out of reach of children.
● The vehicle battery contains sulfuric acid which could cause
blindness or serious burn
injuries.
● See the Owner's Manual for further information.
● Explosive gas may be present in the vicinity of the vehicle battery.
Diesel fuel filter
Drain diesel fuel filter of residual
water at every engine oil change.
Place a container underneath the
filter housing. Turn drain plug
anticlockwise using a suitable
screwdriver, to drain off the water.
The filter is drained as soon as diesel fuel emerges from the port. Retighten
the drain plug by turning it clockwise.
Page 167 of 225

Vehicle care165With engine switched off, turn ignition
key to ON, wait approx. 5 seconds,
and turn key to LOCK to perform
priming operation. Perform this
operation 3 times or more while the
engine is switched off, to avoid air
entering the fuel line.
Check diesel fuel filter at shorter
intervals if the vehicle is subjected to
extreme operating conditions.
If there is water in the diesel fuel filter, control indicator U illuminates in the
instrument cluster 3 90. Drain the
water immediately.
Diesel fuel system bleeding
If the fuel tank has been run dry, the
diesel fuel system must be bled.
Switch on the ignition three times for
15 seconds at a time. Then crank the
engine for a maximum of
40 seconds. If the engine will not start, wait at least 10 seconds before trying
again. If the engine fails to start, seek the assistance of a workshop.Wiper blade replacement
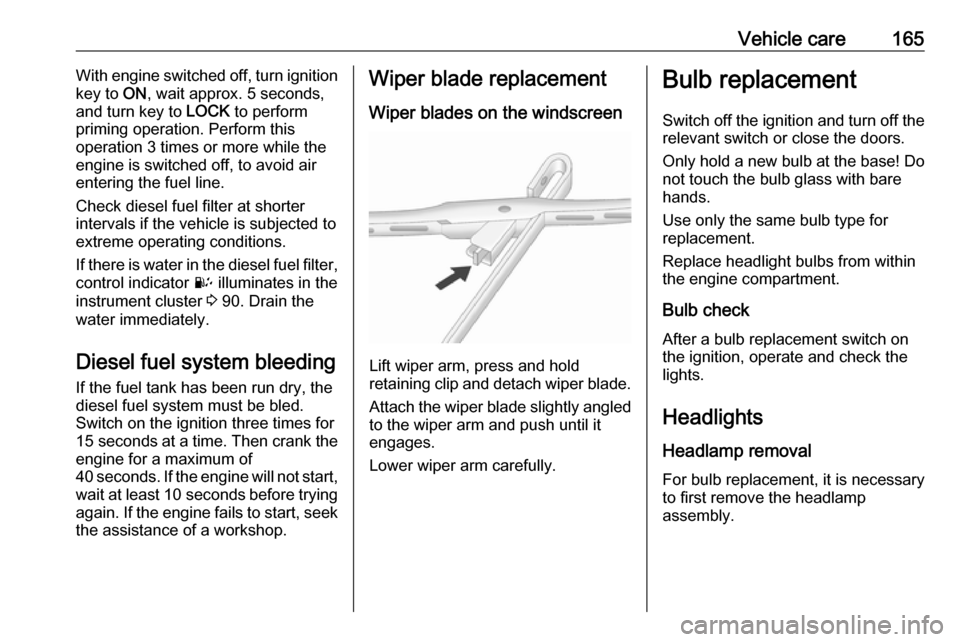
Wiper blades on the windscreen
Lift wiper arm, press and hold
retaining clip and detach wiper blade.
Attach the wiper blade slightly angled
to the wiper arm and push until it
engages.
Lower wiper arm carefully.
Bulb replacement
Switch off the ignition and turn off the
relevant switch or close the doors.
Only hold a new bulb at the base! Do not touch the bulb glass with bare
hands.
Use only the same bulb type for
replacement.
Replace headlight bulbs from within
the engine compartment.
Bulb check
After a bulb replacement switch on
the ignition, operate and check the
lights.
Headlights Headlamp removal
For bulb replacement, it is necessary
to first remove the headlamp
assembly.
Page 173 of 225

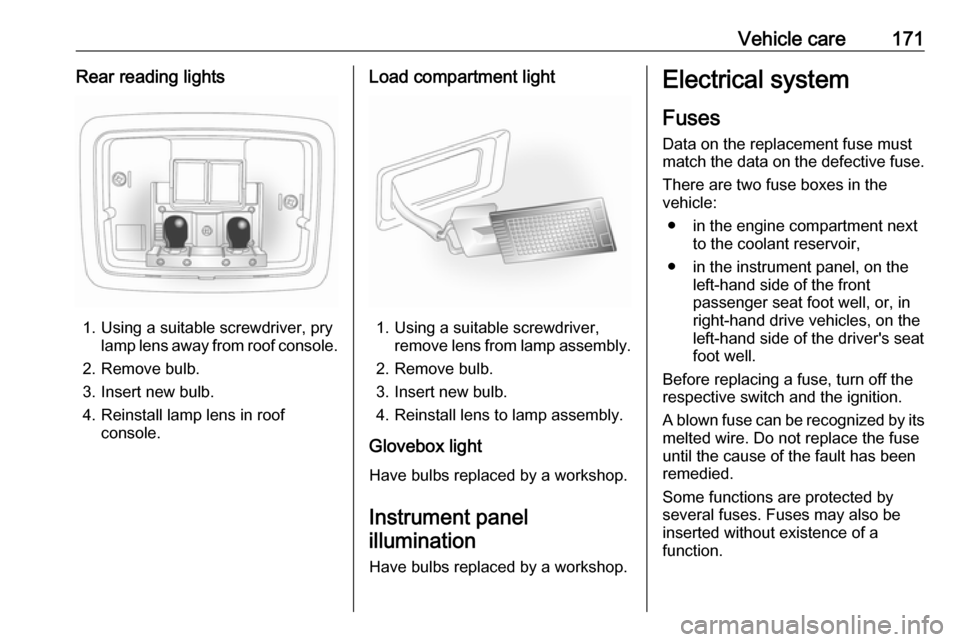
Vehicle care171Rear reading lights
1. Using a suitable screwdriver, prylamp lens away from roof console.
2. Remove bulb.
3. Insert new bulb.
4. Reinstall lamp lens in roof console.
Load compartment light
1. Using a suitable screwdriver,remove lens from lamp assembly.
2. Remove bulb.
3. Insert new bulb.
4. Reinstall lens to lamp assembly.
Glovebox light
Have bulbs replaced by a workshop.
Instrument panel
illumination
Have bulbs replaced by a workshop.
Electrical system
Fuses Data on the replacement fuse must
match the data on the defective fuse.
There are two fuse boxes in the
vehicle:
● in the engine compartment next to the coolant reservoir,
● in the instrument panel, on the left-hand side of the front
passenger seat foot well, or, in
right-hand drive vehicles, on the
left-hand side of the driver's seat
foot well.
Before replacing a fuse, turn off the
respective switch and the ignition.
A blown fuse can be recognized by its melted wire. Do not replace the fuse
until the cause of the fault has been
remedied.
Some functions are protected by
several fuses. Fuses may also be
inserted without existence of a
function.
Page 174 of 225

172Vehicle careNote
Not all fuse box descriptions in this
manual may apply to your vehicle.
When inspecting the fuse box, refer to the fuse box label.
It is advisable to carry a full set of
spare fuses. Spare fuses can be
stored in the engine compartment
fuse box.
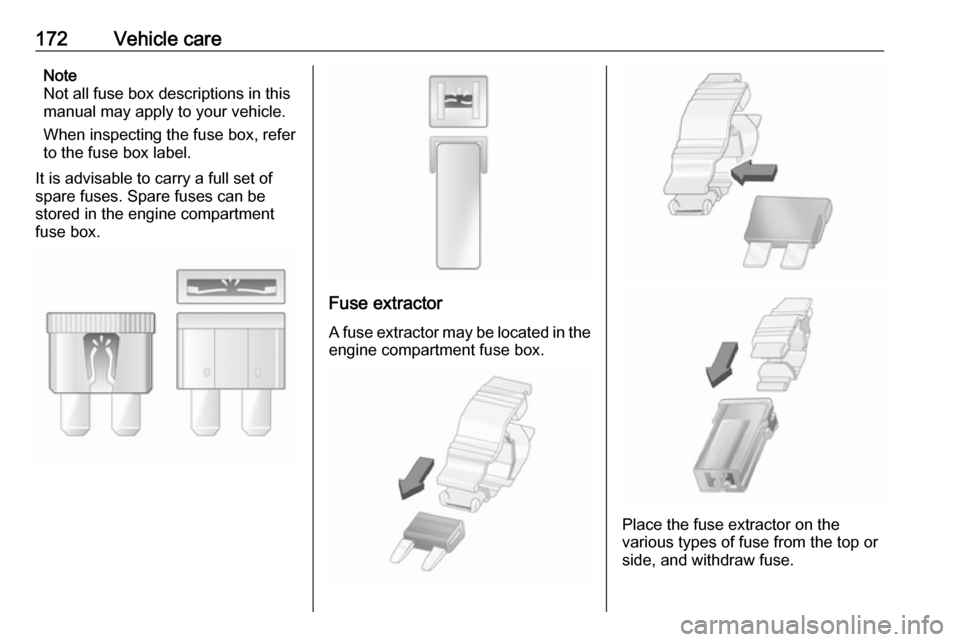
Fuse extractor
A fuse extractor may be located in the engine compartment fuse box.
Place the fuse extractor on the
various types of fuse from the top or
side, and withdraw fuse.
Page 175 of 225

Vehicle care173Engine compartment fusebox
The fuse box is located next to the
coolant reservoir in the engine
compartment.
To open, disengage cover and tilt
upwards.
Page 177 of 225

Vehicle care175FuseCircuitABSAnti-lock Brake
SystemA/CClimate control,
air conditioning
systemAUX PUMPAuxiliary pumpBATT1Instrument panel
fuse boxBATT2Instrument panel
fuse boxBATT3Instrument panel
fuse boxBCMBody Control
ModuleDEF HTRDiesel Exhaust
Fluid HeaterECM1Engine Control
ModuleECM2Engine Control
ModuleFuseCircuitECM PWR TRNEngine Control
Module, Power‐
trainENG SNSREngine sensorsEPBElectrical
parking brakeFRT FOGFront fog lightsFRT WPRFront wiperFUEL/VACFuel pump,
vacuum pumpHDLP WASHERHeadlight
washerHI BEAM LTHigh beam (left-
hand)HI BEAM RTHigh beam
(right-hand)HORNHornHTD WASH/MIRHeated washer
fluid, heated
exterior mirrorsIGN COIL BIgnition coilFuseCircuitLO BEAM LTLow beam (left-
hand)LO BEAM RTLow beam (right-
hand)NOX SNSRNOX SensorPRK LP LTParking light
(left-hand)PRK LP RT/LIFT
GATEParking light
(right-hand), tail‐
gatePWM FANPulse width
modulation fanREAR DEFOGHeated rear
windowREAR WPRRear wiperSPARE–STOP LAMPBrake lightsSTRTRStarter
Page 184 of 225

182Vehicle careThe maximum speed is achievable atkerb weight with driver (75 kg) plus
125 kg payload. Optional equipment
could reduce the maximum speed of
the vehicle.
Performance 3 208.
Tyre pressure
Check the pressure of cold tyres at least every 14 days and before any
long journey. Do not forget the spare
wheel. This also applies to vehicles
with tyre pressure monitoring system.
Use the valve cap key to make
unscrewing the valve caps easier.
The valve cap key is located on the
inside of the tank flap.
Tyre pressure 3 212.
The tyre pressure data refers to cold
tyres. It applies to summer and winter tyres.
Always inflate the spare tyre to the
pressure specified for full load.
The ECO tyre pressure serves to
achieve the smallest amount of fuel
consumption possible.Incorrect tyre pressures will impair
safety, vehicle handling, comfort and
fuel economy and will increase tyre
wear.
Tyre pressures differ depending on
various options. For the correct tyre
pressure value, follow the procedure
below:
1. Identify the engine identifier code.
Engine data 3 207.
2. Identify the respective tyre.
The tyre pressure tables show all
possible tyre combinations 3 212.
For the tyres approved for your
vehicle, refer to the EEC Certificate of
Conformity provided with your vehicle
or other national registration
documents.
The driver is responsible for correct
adjustment of tyre pressure.9 Warning
If the pressure is too low, this can
result in considerable tyre warm-
up and internal damage, leading to tread separation and even to tyre
blow-out at high speeds.
9 Warning
For specific tyres the
recommended tyre pressure as
shown in the tyre pressure table may exceed the maximum tyre
pressure as indicated on the tyre.
Never exceed the maximum tyre
pressure as indicated on the tyre.
If the tyre pressure must be reduced
or increased on a vehicle with tyre
pressure monitoring system, switch
off ignition.
Temperature dependency
The tyre pressure depends on the
temperature of the tyre. During
driving, tyre temperature and
pressure increase. Tyre pressure
values provided on the tyre
information label and tyre pressure
chart are valid for cold tyres, which means at 20 °C.
The pressure increases by nearly
10 kPa for a 10 °C temperature
increase. This must be considered
when warm tyres are checked.
Page 190 of 225

188Vehicle care9Warning
Do not drive faster than 80 km/h.
Do not use for a lengthy period.
Steering and handling may be
affected.
If you have a flat tyre:
Apply the electrical parking brake
3 143 and engage first gear, reverse
gear or P.
The tyre repair kit is in a storage
compartment below the floor cover in the load compartment.
To remove the tyre repair kit, open the
tailgate.
Pull the floor cover handle upwards
3 68.
Vehicle tools 3 179.
Caution
Do not allow objects to protrude
above the top of the rear floor
storage compartment, to avoid
damage to the storage area and
the load compartment floor.
1. Release the sealant filler hose 1
and the power plug 2.
2. Unscrew valve cap from defective
tyre.
Screw the sealant filler hose onto
the tyre valve.
3. Connect the power plug to the power outlet. Unplug all items
from other power outlets.
4. Switch on ignition. To avoid discharging the battery, werecommend running the engine.5. Turn the selector switch anticlockwise to the sealant +
air position.