parking sensors OPEL ANTARA 2017.5 Manual user
[x] Cancel search | Manufacturer: OPEL, Model Year: 2017.5, Model line: ANTARA, Model: OPEL ANTARA 2017.5Pages: 225, PDF Size: 6.2 MB
Page 89 of 225

Instruments and controls87Ultrasonic parking assist
r illuminates yellow.
Fault in system
or
Fault due to sensors that are dirty or
covered by ice or snow
or
Interference due to external sources of ultrasound. Once the source of
interference is removed, the system
will operate normally.
Have the cause of the fault in the
system remedied by a workshop.
Ultrasonic parking assist 3 148.
Electronic Stability Control
b illuminates or flashes yellow.
When the engine is started, b
illuminates briefly. If it does not
illuminate, seek the assistance of a
workshop.Illuminates
Fault in the system. Continued driving
is possible. Driving stability, however,
may deteriorate depending on road
surface conditions.
Have the cause of the fault remedied
by a workshop.
Flashes
The system is actively engaged.
Engine output may be reduced and
the vehicle may be braked
automatically to a small degree.
Electronic Stability Control 3 145.
Electronic Stability Control
off
t illuminates yellow.
When the ignition is switched on, t
illuminates briefly. If it does not
illuminate, seek the assistance of a
workshop.
Illuminates when ESC has been
switched off manually by pressing button t on the centre console.
Electronic Stability Control 3 145.Engine coolant temperature
W illuminates red.
When the engine is started, W
illuminates briefly. If it does not
illuminate, seek the assistance of a
workshop.
Illuminates when the engine is
running
Stop vehicle and switch off engine.Caution
Coolant temperature too high.
Check coolant level 3 160.
If there is sufficient coolant, seek the
assistance of a workshop.
Preheating
! illuminates yellow.
Preheating is activated. Only
activates when outside temperature
is low. Start the engine when control
indicator extinguishes.
Page 151 of 225

Driving and operating149The system consists of four ultrasonic
parking sensors in both the front and
rear bumpers.
Control indicator r 3 87.
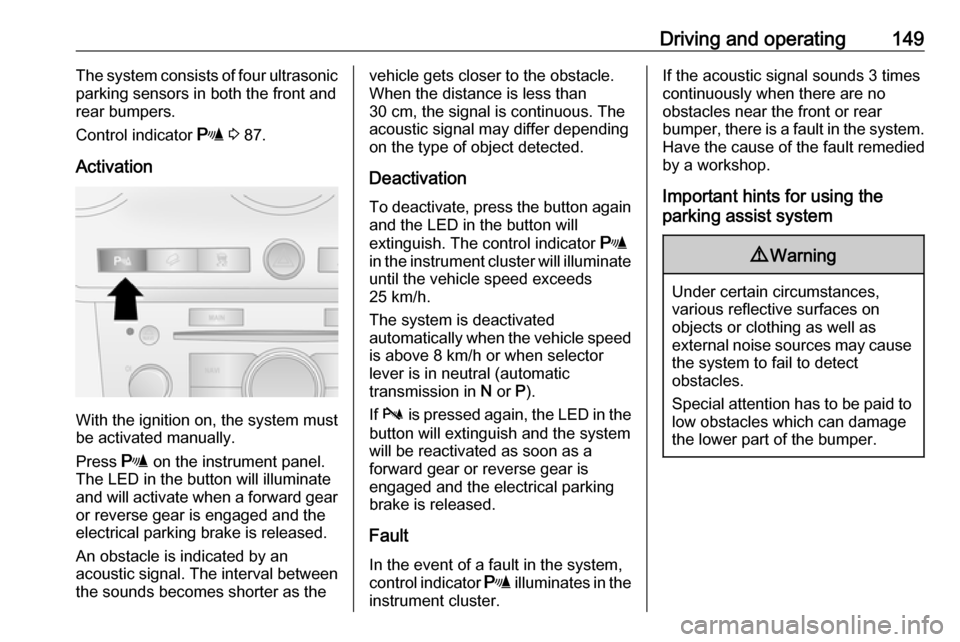
Activation
With the ignition on, the system must
be activated manually.
Press r on the instrument panel.
The LED in the button will illuminate
and will activate when a forward gear
or reverse gear is engaged and the
electrical parking brake is released.
An obstacle is indicated by an
acoustic signal. The interval between
the sounds becomes shorter as the
vehicle gets closer to the obstacle.
When the distance is less than
30 cm, the signal is continuous. The
acoustic signal may differ depending
on the type of object detected.
Deactivation To deactivate, press the button again
and the LED in the button will
extinguish. The control indicator r
in the instrument cluster will illuminate
until the vehicle speed exceeds
25 km/h.
The system is deactivated
automatically when the vehicle speed is above 8 km/h or when selector
lever is in neutral (automatic
transmission in N or P).
If b is pressed again, the LED in the
button will extinguish and the system
will be reactivated as soon as a
forward gear or reverse gear is
engaged and the electrical parking brake is released.
Fault
In the event of a fault in the system,
control indicator r illuminates in the
instrument cluster.If the acoustic signal sounds 3 times
continuously when there are no
obstacles near the front or rear
bumper, there is a fault in the system. Have the cause of the fault remedied
by a workshop.
Important hints for using the
parking assist system9 Warning
Under certain circumstances,
various reflective surfaces on
objects or clothing as well as
external noise sources may cause the system to fail to detect
obstacles.
Special attention has to be paid to
low obstacles which can damage
the lower part of the bumper.
Page 152 of 225

150Driving and operatingCaution
Performance of the system can bereduced when sensors are
covered, e.g. by ice or snow.
Performance of the parking assist
system can be reduced due to
heavy loading.
Special conditions apply if there
are taller vehicles in the vicinity
(e.g. off-road vehicles, mini vans,
vans). Object identification and correct distance indication in the
upper part of these vehicles
cannot be guaranteed.
Objects with a very small reflection
cross-section, e.g. objects of
narrow size or soft materials, may
not be detected by the system.
Parking assist systems do not
detect objects outside the
detection range.
Fuel
Fuel for diesel engines
Only use diesel fuel that complies
with EN 590.
In countries outside the European
Union use Euro-Diesel fuel with a
sulphur concentration below 50 ppm.Caution
Use of fuel that does not comply
with EN 590 or similar can lead to engine power loss, increased
wear or engine damage and loss
of warranty.
Do not use marine diesel oils, heating
oils, Aquazole and similar diesel-
water emulsions. Diesel fuels must
not be diluted with fuels for petrol
engines.
Refuelling9 Danger
Before refuelling, switch off engine
and any external heaters with
combustion chambers. Switch off
any mobile phones.
Follow the operating and safety
instructions of the filling station
when refuelling.
9 Danger
Fuel is flammable and explosive.
No smoking. No naked flames or
sparks.
If you can smell fuel in your
vehicle, have the cause of this
remedied immediately by an
authorized dealer.
Caution
In case of misfuelling, do not
switch on ignition.
Page 177 of 225

Vehicle care175FuseCircuitABSAnti-lock Brake
SystemA/CClimate control,
air conditioning
systemAUX PUMPAuxiliary pumpBATT1Instrument panel
fuse boxBATT2Instrument panel
fuse boxBATT3Instrument panel
fuse boxBCMBody Control
ModuleDEF HTRDiesel Exhaust
Fluid HeaterECM1Engine Control
ModuleECM2Engine Control
ModuleFuseCircuitECM PWR TRNEngine Control
Module, Power‐
trainENG SNSREngine sensorsEPBElectrical
parking brakeFRT FOGFront fog lightsFRT WPRFront wiperFUEL/VACFuel pump,
vacuum pumpHDLP WASHERHeadlight
washerHI BEAM LTHigh beam (left-
hand)HI BEAM RTHigh beam
(right-hand)HORNHornHTD WASH/MIRHeated washer
fluid, heated
exterior mirrorsIGN COIL BIgnition coilFuseCircuitLO BEAM LTLow beam (left-
hand)LO BEAM RTLow beam (right-
hand)NOX SNSRNOX SensorPRK LP LTParking light
(left-hand)PRK LP RT/LIFT
GATEParking light
(right-hand), tail‐
gatePWM FANPulse width
modulation fanREAR DEFOGHeated rear
windowREAR WPRRear wiperSPARE–STOP LAMPBrake lightsSTRTRStarter
Page 187 of 225

Vehicle care185If the tyre pressure is to be reduced or
increased, switch off the ignition. Tyre
pressures 3 182, 3 212.
General information The use of commercially available
liquid tyre repair kits can impair the
function of the system. Factory-
approved tyre repair kits can be used.
Tyre repair kit 3 187.
Operating electronic devices or being close to facilities using similar wave
frequencies could disrupt the tyre
pressure monitoring system.
The tyre pressure monitoring system
valve cores and sealing rings must be
replaced each time the tyres are
changed.
Tyre pressure sensor matching
process
Each tyre pressure sensor has a
unique identification code. The
identification code must be matched
to a new tyre/wheel position after
rotating the tyres or replacing one or
more of the tyre pressure sensors.The tyre pressure sensor matching
process should also be performed
after replacing a spare tyre with a
road tyre containing a tyre pressure
sensor. The control indicator w and
the warning message should
extinguish at the next ignition cycle.
The sensors are matched to the tyre/
wheel positions, using a TPMS
relearn tool, in the following order:
● left front tyre
● right front tyre
● right rear tyre
● left rear tyre
Consult your workshop for service or
to purchase a relearn tool.
There are two minutes to match the
first tyre/wheel position, and
five minutes overall to match all four
tyre/wheel positions. If it takes longer, the matching process stops and must
be restarted.The tyre pressure sensor matching
process is as follows:
1. Apply the electrical parking brake 3 143 ; on vehicles with automatic
transmission move the selector
lever to position P.
2. Turn the ignition on 3 125.
3. Initiate the TPMS Learn Mode by simultaneously pressing p and
q on the radio remote control,
- or -
Press INFO on the Infotainment
system until a tyre learn message appears on the Info-display.
Press and hold OK.
The horn sounds twice and the left front turn signal also illuminates
as confirmation that Learn Mode
has been enabled.
4. Start with the left front tyre. 5. Place the relearn tool against the tyre sidewall, near the valve stem.
Then press the button to activate
the tyre pressure sensor. A horn
chirp confirms that the sensor
identification code has been