steering wheel OPEL ANTARA 2017.5 Owner's Guide
[x] Cancel search | Manufacturer: OPEL, Model Year: 2017.5, Model line: ANTARA, Model: OPEL ANTARA 2017.5Pages: 225, PDF Size: 6.2 MB
Page 103 of 225

Instruments and controls101Board-Info-Display 3 92.
Instantaneous consumption
Display of the instantaneous
consumption.
Display changes depending on
speed:
Display in l/h:below 13 km/hDisplay in
l/100 km:above 13 km/h
Average consumption
Display of average consumption. The measurement can be reset at any
time.
Effective consumption
Display of the amount of fuel
consumed. The measurement can be reset at any time.
Average speed
Display of average speed. The
measurement can be reset at any
time.
Stoppages in the journey with the
ignition off are not included in the
calculations.
Distance travelled
Display of distance travelled. The
measurement can be reset at any
time.
RangeRange is calculated from current fuel
tank content and instantaneous
consumption. The display shows average values.
After refuelling, the range is updated
automatically after a brief delay.If the fuel in the tank allows less than
50 km of travel, the warning Range
appears on the display.
If the fuel in the tank allows less than
30 km of travel, the warning Refuel!
appears on the display.
Acknowledge the menu item 3 92.
Resetting trip computer
information
Select the desired trip computer
information and reset by pressing the left adjuster wheel on the steering
wheel or the OK button on the
Infotainment system.
Stop watch
Page 104 of 225
102Instruments and controlsUsing the arrow buttons:
To start, press left arrow button to
select menu item Start and press OK
button to start/stop. To reset, press left arrow button to select menu item
Reset and press OK button.
Using the left adjuster wheel on the
steering wheel:
To start, select menu item Start and
press to start/stop. To reset, select
menu item Reset and press to confirm
command.
Interruption of power supply
If the power supply has been
interrupted or if the battery voltage
has dropped too low, the values
stored in the trip computer will be lost.Trip computer in Graphic-
Info-Display or Colour-Info-Display
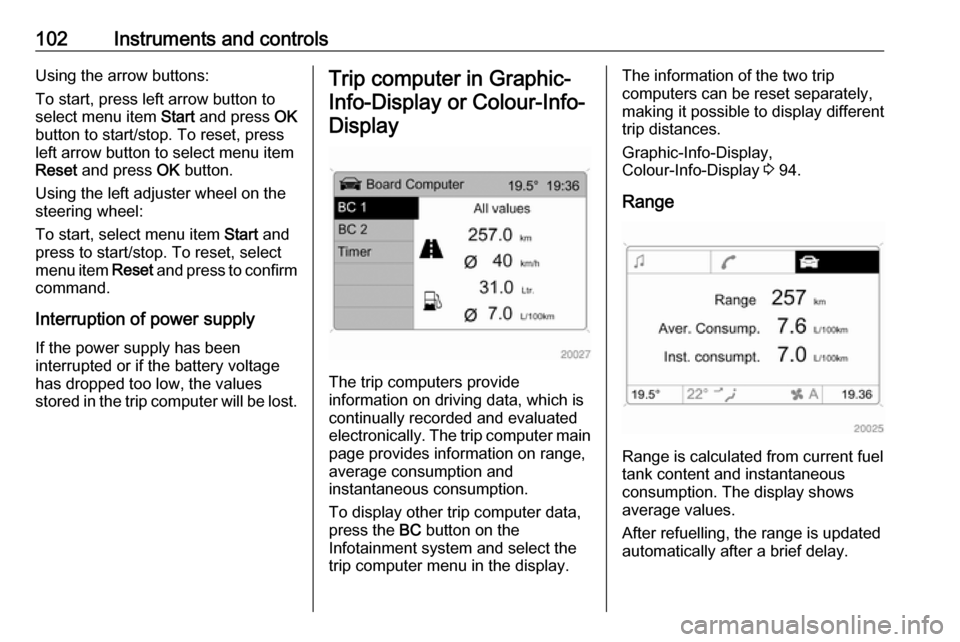
The trip computers provide
information on driving data, which is
continually recorded and evaluated electronically. The trip computer main page provides information on range,
average consumption and
instantaneous consumption.
To display other trip computer data,
press the BC button on the
Infotainment system and select the
trip computer menu in the display.
The information of the two trip
computers can be reset separately,
making it possible to display different
trip distances.
Graphic-Info-Display,
Colour-Info-Display 3 94.
Range
Range is calculated from current fuel
tank content and instantaneous
consumption. The display shows average values.
After refuelling, the range is updated
automatically after a brief delay.
Page 105 of 225

Instruments and controls103
If the fuel in the tank allows less than
50 km of travel, the warning Range
appears on the display.
If the fuel in the tank allows less than
30 km of travel, the warning Refuel!
appears on the display.
Acknowledge the menu item 3 94.
Instantaneous consumption
Display of the instantaneous
consumption.
Display changes depending on
speed:
Display in l/h:below 13 km/hDisplay in
l/100 km:above 13 km/hDistance travelled
Display of distance travelled. The
measurement can be reset at any
time.
Average speed
Display of average speed. The
measurement can be reset at any
time.
Stoppages in the journey with the ignition off are not included in the
calculations.
Effective consumption Display of the amount of fuel
consumed. The measurement can be
reset at any time.
Average consumption Display of average consumption. Themeasurement can be reset at any
time.Resetting trip computer
information
Select BC 1 or BC 2 from the trip
computer menu.
Select the desired trip computer
information and reset by pressing the left adjuster wheel on the steering
wheel or the OK button on the
Infotainment system.
Page 110 of 225
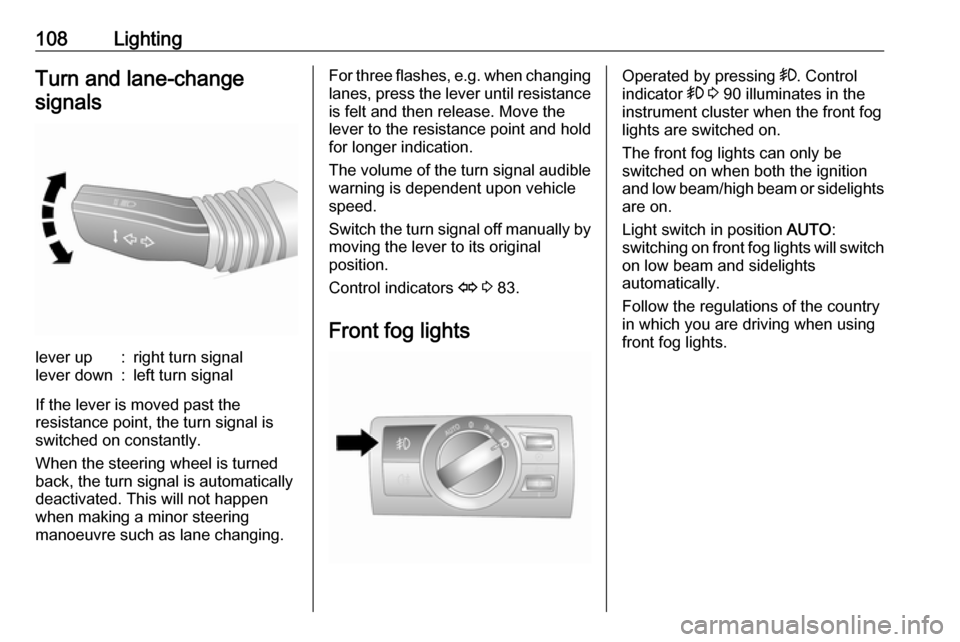
108LightingTurn and lane-changesignalslever up:right turn signallever down:left turn signal
If the lever is moved past the
resistance point, the turn signal is
switched on constantly.
When the steering wheel is turned
back, the turn signal is automatically
deactivated. This will not happen
when making a minor steering
manoeuvre such as lane changing.
For three flashes, e.g. when changing
lanes, press the lever until resistance is felt and then release. Move the
lever to the resistance point and hold for longer indication.
The volume of the turn signal audible
warning is dependent upon vehicle
speed.
Switch the turn signal off manually by moving the lever to its original
position.
Control indicators O 3 83.
Front fog lightsOperated by pressing >. Control
indicator > 3 90 illuminates in the
instrument cluster when the front fog
lights are switched on.
The front fog lights can only be
switched on when both the ignition
and low beam/high beam or sidelights are on.
Light switch in position AUTO:
switching on front fog lights will switch
on low beam and sidelights
automatically.
Follow the regulations of the country
in which you are driving when using
front fog lights.
Page 124 of 225
122Driving and operatingDriving and
operatingDriving hints ............................... 122
Driving economically ...............122
Control of the vehicle ...............123
Steering ................................... 124
Starting and operating ...............124
New vehicle running-in ............124
Ignition switch positions ...........125
Starting the engine ..................125
Overrun cut-off ........................ 126
Stop-start system ....................126
Parking .................................... 128
Engine exhaust .......................... 129
Diesel particle filter ..................129
Catalytic converter ...................130
AdBlue ..................................... 131
Automatic transmission ..............136
Transmission display ...............136
Selector lever .......................... 136
Sport mode .............................. 137
Manual mode ........................... 138
Electronic driving programmes 138
Fault ........................................ 138
Interruption of power supply ....139Manual transmission ..................139
Drive systems ............................ 140
All-wheel drive ......................... 140
Brakes ........................................ 142
Antilock brake system .............142
Parking brake .......................... 143
Brake assist ............................. 144
Hill start assist ......................... 144
Ride control systems .................145
Electronic Stability Control ......145
Descent control system ...........146
Automatic level control ............147
Driver assistance systems .........147
Cruise control .......................... 147
Parking assist .......................... 148
Fuel ............................................ 150
Fuel for diesel engines ............150
Refuelling ................................ 150
Fuel consumption - CO 2-
Emissions ............................... 151
Trailer hitch ................................ 152
General information .................152
Driving characteristics and
towing tips .............................. 152
Trailer towing ........................... 153
Towing equipment ...................153
Trailer stability assist ...............155Driving hints
Driving economically Fuel economy mode
Fuel economy mode is a function that optimises fuel consumption. It affects,
e.g., engine power and torque,
acceleration and gear shift indication.
Manual transmissionActivation
Press s on the instrument panel;
LED in the button illuminates to
indicate activation.
Page 126 of 225

124Driving and operatingPedals
To ensure the pedal travel is
uninhibited, there must be no mats in
the area of the pedals.
SteeringCaution
Never leave the steering wheel on
full lock when the vehicle is
stationary, as this may damage
the power steering pump.
If power steering assist is lost
because the engine stops or due to a system malfunction, the vehicle can
be steered but may require increased
effort.
Electric power steering Electric power steering does not havepower steering fluid. Regular
maintenance is not required.
Note
If the steering wheel is turned until it
reaches the end of its travel, and is
held in that position for an extended
period of time, power steering assist
may be reduced. If used for an
extended period of time, power
steering assist may be reduced.
Normal use of the power steering
assist should return when the
system cools down.
If power steering assist is lost due to
a system malfunction, the vehicle can
be steered but may require increased
effort. Seek the assistance of a
workshop.
Control indicator 2 3 86.Starting and operating
New vehicle running-in Do not brake unnecessarily hard for
the first few journeys.
During the first drive, smoke may
occur because of wax and oil
evaporating off the exhaust system. Park the vehicle in the open for a
while after the first drive and avoid
inhaling the fumes.
During the running-in period fuel and
engine oil consumption may be
higher and the cleaning process of the diesel particle filter may take
place more often. Autostop may be
inhibited to allow for charging of the
battery.
Diesel particle filter 3 129.
Page 127 of 225
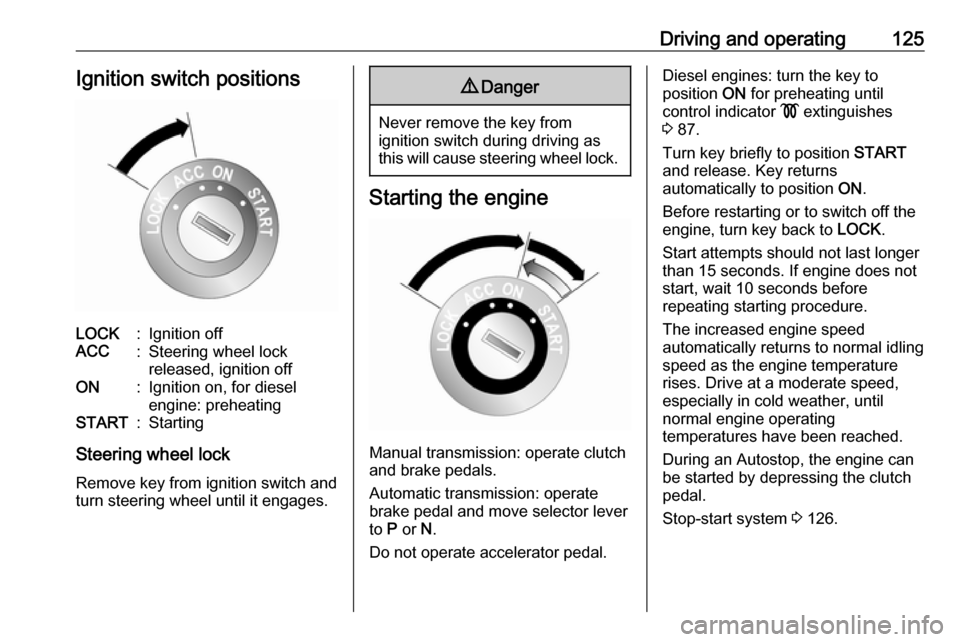
Driving and operating125Ignition switch positionsLOCK:Ignition offACC:Steering wheel lock
released, ignition offON:Ignition on, for diesel
engine: preheatingSTART:Starting
Steering wheel lock
Remove key from ignition switch and
turn steering wheel until it engages.
9 Danger
Never remove the key from
ignition switch during driving as
this will cause steering wheel lock.
Starting the engine
Manual transmission: operate clutch
and brake pedals.
Automatic transmission: operate
brake pedal and move selector lever
to P or N.
Do not operate accelerator pedal.
Diesel engines: turn the key to
position ON for preheating until
control indicator ! extinguishes
3 87.
Turn key briefly to position START
and release. Key returns
automatically to position ON.
Before restarting or to switch off the engine, turn key back to LOCK.
Start attempts should not last longer
than 15 seconds. If engine does not
start, wait 10 seconds before
repeating starting procedure.
The increased engine speed
automatically returns to normal idling
speed as the engine temperature
rises. Drive at a moderate speed,
especially in cold weather, until
normal engine operating
temperatures have been reached.
During an Autostop, the engine can
be started by depressing the clutch
pedal.
Stop-start system 3 126.
Page 130 of 225
128Driving and operatingIf the selector lever is shifted out of
neutral before depressing the clutch
first, control indicator - illuminates.
Control indicator - 3 90.
Restart of the engine by the stop- start system
The selector lever must be in neutral to enable an automatic restart.
If one of the following conditions occurs during an Autostop, the
engine will be restarted automatically
by the stop-start system.
● The stop-start system is manually deactivated
● the bonnet is opened
● the driver's seat belt is unfastened and the driver's door
is opened
● the engine temperature is too low
● the charging level of the vehicle battery is below a defined level
● the brake vacuum is not sufficient
● the vehicle is driven at least at walking speed
● the defrosting function is activated● the climate control systemrequests an engine start
● the air conditioning is manually switched on
If an electrical accessory, e.g. a
portable CD player, is connected to
the power outlet, a brief power drop
during restart might be noticeable.
Parking9 Warning
● Do not park the vehicle on an
easily ignitable surface. The
high temperature of the
exhaust system could ignite the
surface.
● Always apply the electrical parking brake.
Pull switch m.
The electric parking brake is
applied when control indicator
m illuminates 3 85.
For maximum force, e.g.
parking with a trailer or on
inclines, pull switch m twice.
● Switch off the engine.
● If the vehicle is on a level surface or uphill slope, engage
first gear or move the selector
lever to P before removing the
ignition key. On an uphill slope, turn the front wheels away from
the kerb.
If the vehicle is on a downhill
slope, engage reverse gear or
move the selector lever to P
before removing the ignition
key. Turn the front wheels
towards the kerb.
● Close windows and sunroof.
● Turn the ignition key to position
LOCK , push key into ignition
switch and remove.
For vehicles with automatic
transmission, depress foot
brake and shift into P before
pushing key into ignition switch and removing.
Turn the steering wheel until
the steering wheel lock is felt to
engage.
Page 143 of 225

Driving and operating141you might in a conventional vehicle.
Strong crosswinds can affect the
normal steering of the vehicle. Drive
slower under strong crosswind
conditions.
Off-road driving ● Avoid protruding objects (such as
rocks or tree stumps) that may
damage the underbody and tyres of your vehicle.
● Test the brakes after operating in
mud, to clear excess mud from
the braking surfaces.
● Grip the steering wheel when travelling over rough terrain.
Terrain conditions can cause
rapid and unexpected movement in the steering.
The ground clearance, ramp angle,
angle of approach and departure and wading depth need to be considered,
especially in hilly conditions and
when wading, to prevent the vehicle
becoming stuck and possibly
damaged.
Vehicle dimensions 3 209.
Towing the vehicle 3 196.Driving through water
Do not exceed the maximum wading
depth 3 209.
Check the depth of water: choose the
lowest entry and departure angles
before entering. Maintain a steady
engine speed, to help prevent water
from entering the exhaust system, but do not exceed 5 km/h, to avoid
splashing the water.
Drive with the flow wherever possible,
not against it. If you have to drive
against the flow, try to drive at an
angle to it, so that the leading corner
of the vehicle will help deflect water
from the engine compartment. Avoid
splashing the water - if the ignition
system becomes wet, the engine may
stall.
Avoid water entering the air intake
system 3 120. If water enters the air
intake system, engine seizure with severe costly damage may result.
Test the brakes after leaving the
water - wet brakes are less effective
than dry ones. Perform the service
operations for wading , involving
checks for water contamination, at
the earliest opportunity.Service checks after wading
Check for the ingress of water into the following:
● Brake fluid reservoir
● Air cleaner element
● Engine
● Transmission
● Axles
● Interior of vehicle
Renew any lubricating oil or hydraulic
fluid that has a milky appearance,
indicating contamination with water.
Cleaning
Clean the vehicle thoroughly and as
soon as possible after driving off-
road.
Do not let mud remain dry on any part
of the vehicle as it becomes abrasive and can damage paint, glass, seals,
bearings and brake components. If
left to build up, mud can seriously
affect the airflow through and over
mechanical components and cause
localised overheating and failure of
parts, especially in the engine
compartment.
Page 148 of 225

146Driving and operatingTrailer stability assist
If the system detects snaking
movements, engine power is reduced
and the vehicle/trailer combination is
selectively braked until the snaking ceases. While system is working keep
steering wheel as still as possible.
Fault
If there is a fault in the system the
control indicator b illuminates
continuously. The system is not
operational.
Have the cause of the fault remedied
by a workshop.
Descent control system The Descent control system (DCS)
allows the vehicle to travel at a low
speed without depressing the foot
brake. The vehicle will automatically
decelerate to a low speed and remain
at that speed when the system is
activated. Some noise or vibration
from the brake system may be
apparent when the system is active.Caution
Use only when descending steep
grades while driving off-road. Do
not use when driving on normal
road surfaces. Unnecessary
usage of the DCS function, such
as while driving on normal roads,
may damage the brake system
and the ESC function.
Activation
At speeds below approx. 50 km/h,
press u. The green control indicator
u flashes in the instrument cluster, to
show DCS is in operation. DCS will
not activate at speeds above
50 km/h, even if the button is pressed.
Deactivation
Press u again. The green control
indicator u extinguishes. Depressing
the foot brake or accelerator will also
cause the system to be deactivated.
Fault
The yellow control indicator u flashes
to indicate that the system is not
ready for conditions to operate, due to the high temperature (approx.
350 - 400 °C) of friction material,
through severe or repeated braking. It
will extinguish when the temperature
drops below 350 °C.
The yellow control indicator u
illuminates when there is a
malfunction in the system, due to the
extremely high temperature
(over 400 °C) of friction material,
through severe or repeated braking. It will extinguish when the temperaturedrops below 350 °C. These