ECO mode OPEL ASTRA K 2019.5 Manual user
[x] Cancel search | Manufacturer: OPEL, Model Year: 2019.5, Model line: ASTRA K, Model: OPEL ASTRA K 2019.5Pages: 311, PDF Size: 9.52 MB
Page 123 of 311
Instruments and controls1218'' Colour Info DisplaySelecting menus and settings
There are three options to operate the
display:
● via buttons below the display
● by touching the touchscreen with
the finger
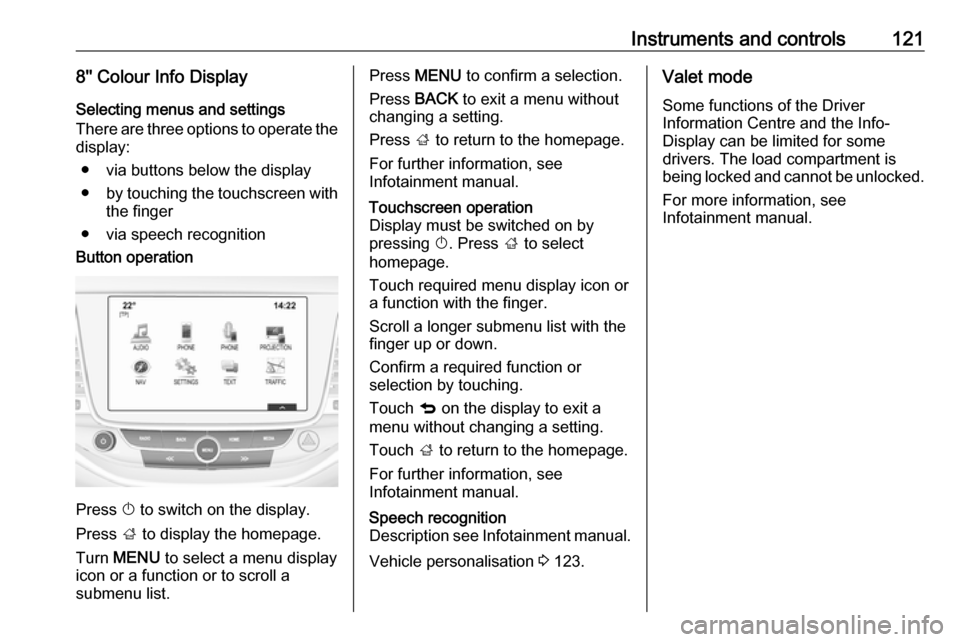
● via speech recognitionButton operation
Press X to switch on the display.
Press ; to display the homepage.
Turn MENU to select a menu display
icon or a function or to scroll a
submenu list.
Press MENU to confirm a selection.
Press BACK to exit a menu without
changing a setting.
Press ; to return to the homepage.
For further information, see
Infotainment manual.Touchscreen operation
Display must be switched on by
pressing X. Press ; to select
homepage.
Touch required menu display icon or a function with the finger.
Scroll a longer submenu list with the
finger up or down.
Confirm a required function or
selection by touching.
Touch q on the display to exit a
menu without changing a setting.
Touch ; to return to the homepage.
For further information, see
Infotainment manual.Speech recognition
Description see Infotainment manual.
Vehicle personalisation 3 123.
Valet mode
Some functions of the Driver
Information Centre and the Info-
Display can be limited for some
drivers. The load compartment is
being locked and cannot be unlocked.
For more information, see
Infotainment manual.
Page 127 of 311

Instruments and controls125Duration upon exit of vehicle:
Activates or deactivates and
changes the duration of exit
lighting.
Left or Right Hand Traffic :
Changes between lighting for left or right-hand traffic.
Adaptive Forward Lighting :
Changes the settings of the
functions of the LED headlights.
● Power Door Locks
Stop door lock if door open :
Activates or deactivates the door locking function while a door is
open.
Auto Door Lock : Activates or
deactivates the automatic door
locking function after switching
on ignition.
Delayed Door Lock : Activates or
deactivates the delayed door
locking function. This feature
delays the actual locking of the
doors until all doors are closed.
● Remote Lock, Unlock, and Start
Remote Unlock Feedback :
Activates or deactivates thehazard warning flasher feedback whilst unlocking.
Remote Lock Feedback :
Changes what kind of feedback
is given when locking the vehicle.
Remote Door Unlock : Changes
the configuration to unlock only
the driver's door or the whole
vehicle whilst unlocking.
Auto Relock Doors : Activates or
deactivates the automatic relock
function after unlocking without
opening the vehicle.
Remote Window Operation :
Activates or deactivates the
operation of power windows with
remote control.
Passive Door Unlock : Changes
the configuration to unlock only
the driver's door or the whole
vehicle whilst unlocking.
Passive Door Lock : Activates or
deactivates the passive locking
function. This feature locks the
vehicle automatically after
several seconds if all doors have
been closed and an electronickey has been removed from the
vehicle.
Remote Left in Vehicle Alarm :
Activates or deactivates the
warning chime when the
electronic key remains in the
vehicle.
● Restore Factory Settings :
Resets all settings to the default settings.
● Valet Mode :
See Infotainment manual.
Personal settings 7" Colour Info Display
Press ;, select Settings and then
Vehicle on the touchscreen.
Page 139 of 311
Lighting137
Each LED on right or left side is
triggered or faded out particularly according to the traffic situation. This
gives the best light distribution
without dazzling other road users.
High beam is switched on
automatically at a speed above
50 km/h. High beam is switched off at a speed below 35 km/h, but highbeam assist remains active.
Motorway mode
High beam assist includes a special
motorway mode. When driving faster
than 105 km/h on motorways for a
certain time, the light beam becomes
smaller to avoid dazzling of oncoming
traffic.
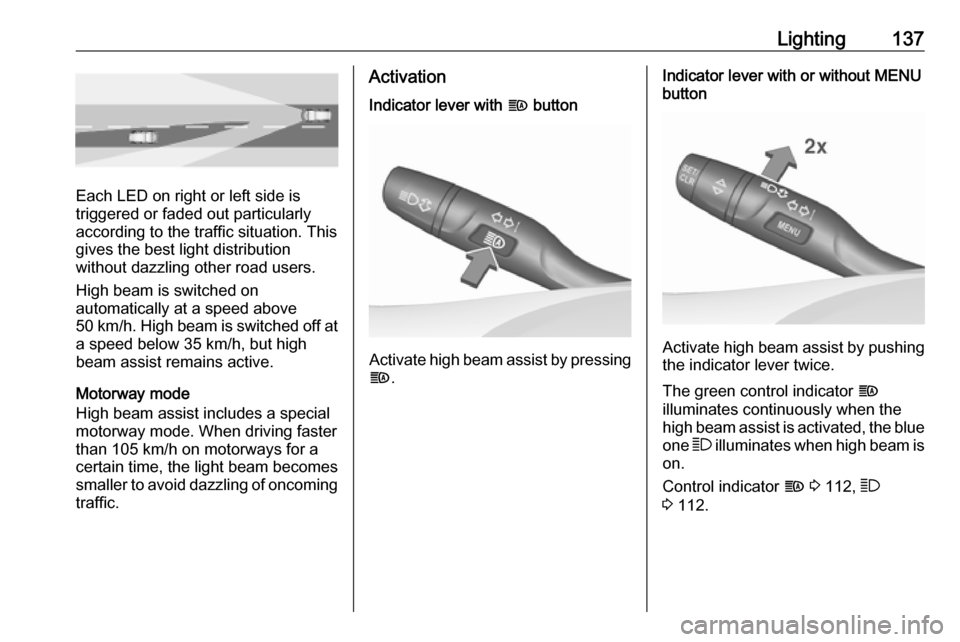
ActivationIndicator lever with f button
Activate high beam assist by pressing
f .
Indicator lever with or without MENU
button
Activate high beam assist by pushing the indicator lever twice.
The green control indicator f
illuminates continuously when the
high beam assist is activated, the blue
one 7 illuminates when high beam is
on.
Control indicator f 3 112, 7
3 112.
Page 153 of 311
Climate control151Heated exterior mirrors Ü 3 40.
Heated seats ß 3 54.
Ventilated seats A 3 54.
Heated steering wheel A 3 92.
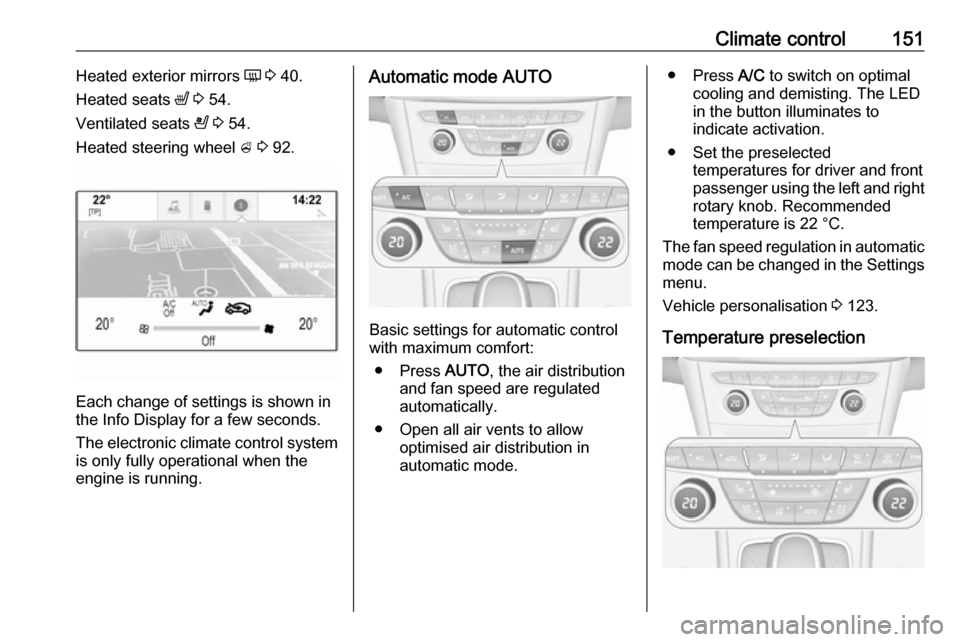
Each change of settings is shown in
the Info Display for a few seconds.
The electronic climate control system
is only fully operational when the
engine is running.
Automatic mode AUTO
Basic settings for automatic control
with maximum comfort:
● Press AUTO, the air distribution
and fan speed are regulated
automatically.
● Open all air vents to allow optimised air distribution in
automatic mode.
● Press A/C to switch on optimal
cooling and demisting. The LED in the button illuminates to
indicate activation.
● Set the preselected temperatures for driver and front
passenger using the left and right
rotary knob. Recommended
temperature is 22 °C.
The fan speed regulation in automatic mode can be changed in the Settings menu.
Vehicle personalisation 3 123.
Temperature preselection
Page 161 of 311
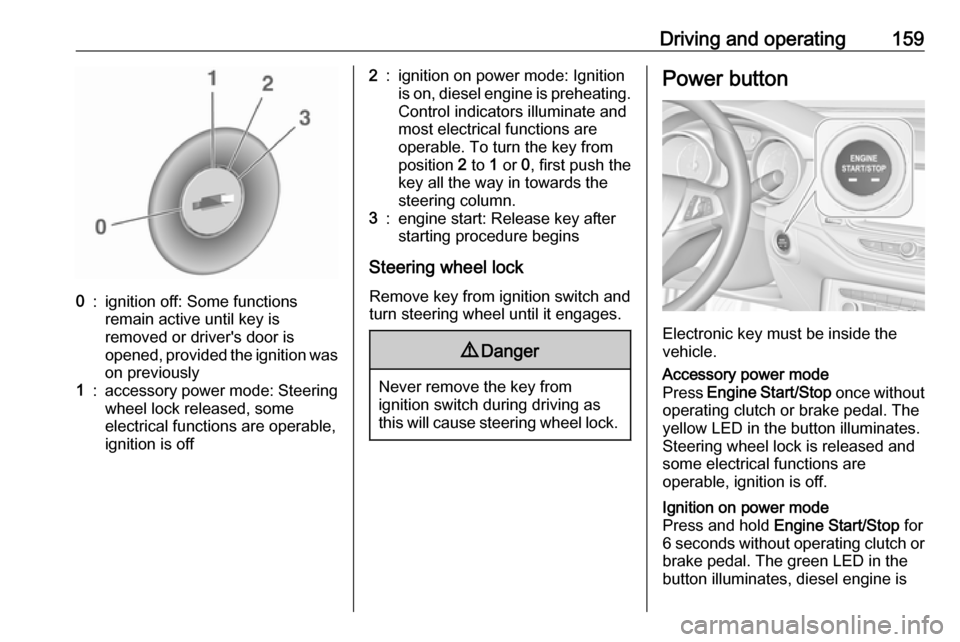
Driving and operating1590:ignition off: Some functions
remain active until key is
removed or driver's door is
opened, provided the ignition was
on previously1:accessory power mode: Steering wheel lock released, some
electrical functions are operable,
ignition is off2:ignition on power mode: Ignition
is on, diesel engine is preheating.
Control indicators illuminate and
most electrical functions are
operable. To turn the key from
position 2 to 1 or 0, first push the
key all the way in towards the steering column.3:engine start: Release key after
starting procedure begins
Steering wheel lock
Remove key from ignition switch and
turn steering wheel until it engages.
9 Danger
Never remove the key from
ignition switch during driving as
this will cause steering wheel lock.
Power button
Electronic key must be inside the
vehicle.
Accessory power mode
Press Engine Start/Stop once without
operating clutch or brake pedal. The yellow LED in the button illuminates.
Steering wheel lock is released and
some electrical functions are
operable, ignition is off.Ignition on power mode
Press and hold Engine Start/Stop for
6 seconds without operating clutch or brake pedal. The green LED in the
button illuminates, diesel engine is
Page 162 of 311
160Driving and operatingpreheating. Control indicators
illuminate and most electrical
functions are operable.Engine start
Press Engine Start/Stop briefly while:
● manual transmission: operating clutch pedal,
● automatic transmission: operating brake pedal with
selector lever in P or N.
Starting the engine 3 161.Ignition off
Press Engine Start/Stop briefly when
Autostop is activated or when engine is running and vehicle is stationary.
Automatic transmission: apply the
parking brake and engage P.
Press Engine Start/Stop briefly
without operating clutch or brake pedal when in ignition on power
mode.
Some functions remain active until
driver's door is opened, provided the
ignition was on previously.Emergency shut off during driving
Press Engine Start/Stop for longer
than 2 seconds or press twice briefly
within 5 seconds 3 161.
Steering wheel lock The steering wheel lock activates
automatically when:
● The vehicle is stationary.
● The ignition has been switched off.
● The driver's door is opened.
To release steering wheel lock, open
and close driver's door and switch on accessory mode or start the engine
directly.9 Warning
If the vehicle battery is discharged,
the vehicle must not be towed,
tow-started or jump-started as the
steering wheel lock cannot be
disengaged.
Operation on vehicles with
electronic key system in case of
failure
If either the electronic key fails or the
battery of the electronic key is weak,
the Driver Information Centre may
display No Remote Detected or
Replace Battery in Remote Key when
you try to start the vehicle.
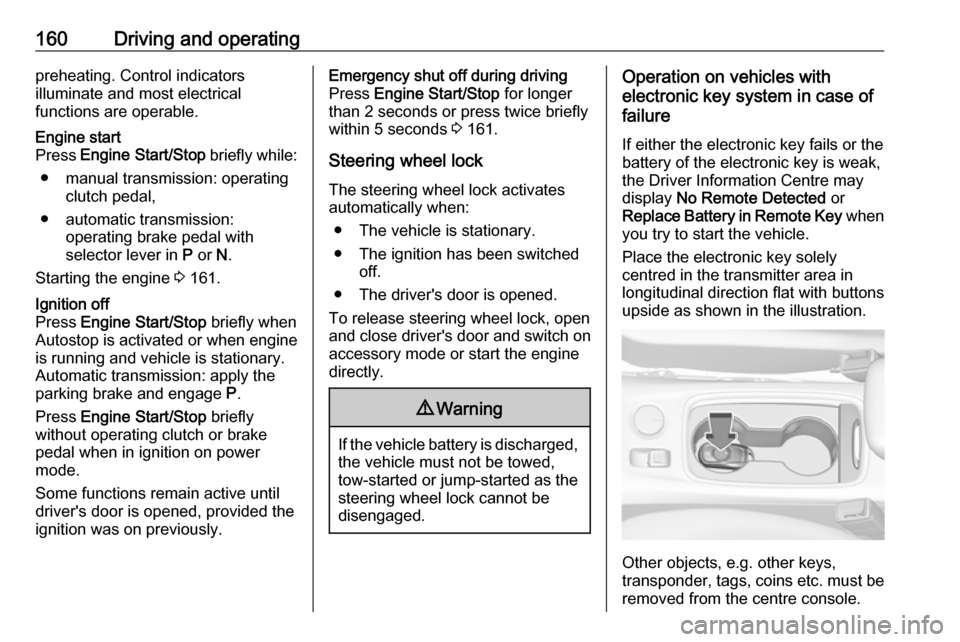
Place the electronic key solely
centred in the transmitter area in
longitudinal direction flat with buttons
upside as shown in the illustration.
Other objects, e.g. other keys,
transponder, tags, coins etc. must be removed from the centre console.
Page 175 of 311
Driving and operating173The engine can only be started with
the lever in position P or N. When
position N is selected, press the brake
pedal or apply the parking brake
before starting.
Do not accelerate while engaging a
gear. Never depress the accelerator
pedal and brake pedal at the same
time.
When a gear is engaged, the vehicle
slowly begins to creep when the
brake is released.
Engine braking To utilise the engine braking effect,select a lower gear in good time when
driving downhill, see manual mode.
Rocking the vehicle Rocking the vehicle is only
permissible if the vehicle is stuck in
sand, mud or snow. Move the selector
lever between D and R in a repeat
pattern. Do not race the engine and
avoid sudden acceleration.Parking
Apply the parking brake and engageP .
The ignition key can only be removed
when the selector lever is in position
P .
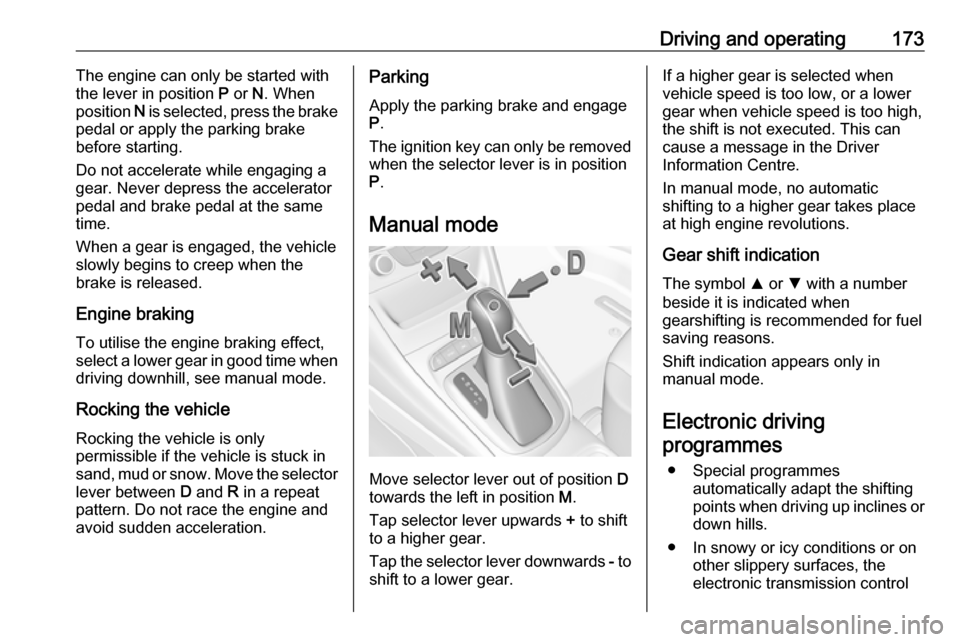
Manual mode
Move selector lever out of position D
towards the left in position M.
Tap selector lever upwards + to shift
to a higher gear.
Tap the selector lever downwards - to
shift to a lower gear.
If a higher gear is selected when
vehicle speed is too low, or a lower
gear when vehicle speed is too high,
the shift is not executed. This can
cause a message in the Driver
Information Centre.
In manual mode, no automatic
shifting to a higher gear takes place
at high engine revolutions.
Gear shift indication
The symbol R or S with a number
beside it is indicated when
gearshifting is recommended for fuel
saving reasons.
Shift indication appears only in
manual mode.
Electronic driving programmes
● Special programmes automatically adapt the shifting
points when driving up inclines or
down hills.
● In snowy or icy conditions or on other slippery surfaces, the
electronic transmission control
Page 176 of 311
174Driving and operatingenables the driver to select
manually first, second or third
gear for starting off.
Kickdown Pressing down the accelerator pedal
beyond the kickdown detent will lead
to maximum acceleration
independent of the selected driving
mode. The transmission shifts to a
lower gear depending on engine
speed and shifts to a higher gear at
high engine revolutions.
Fault
In the event of a fault a message is
displayed in the Driver Information Centre.
Vehicle messages 3 122.
Electronic transmission control
enables only fourth gear. The
transmission no longer shifts
automatically.
Have the cause of the fault remedied
by a workshop.Interruption of power supply
In the event of an interruption of
power supply, the selector lever
cannot be moved out of the P
position. The ignition key cannot be
removed from the ignition switch.
If the vehicle battery is discharged,
start the vehicle using jump leads
3 270.
If the vehicle battery is not the cause
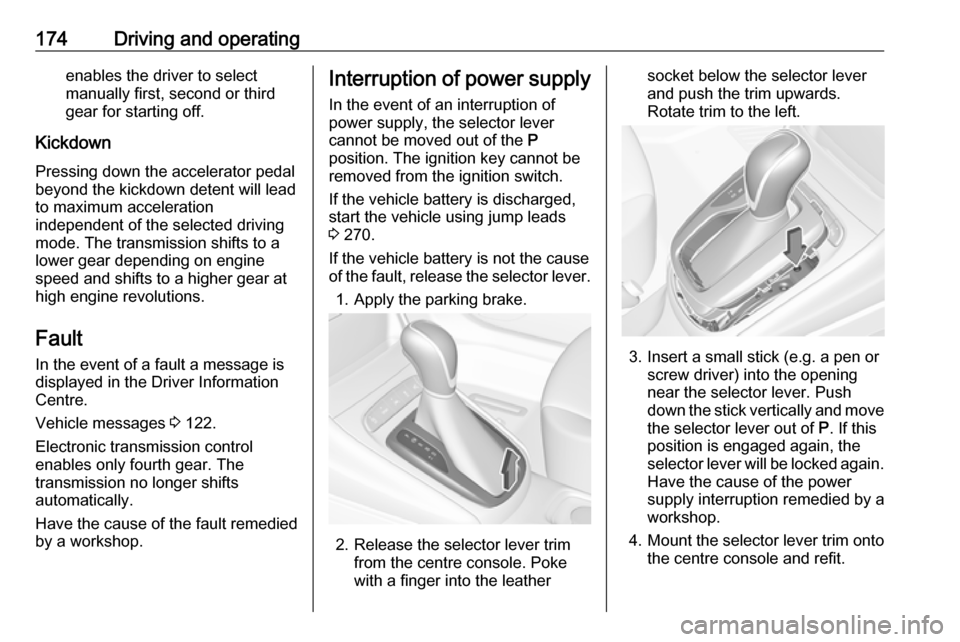
of the fault, release the selector lever.
1. Apply the parking brake.
2. Release the selector lever trim from the centre console. Poke
with a finger into the leather
socket below the selector lever
and push the trim upwards.
Rotate trim to the left.
3. Insert a small stick (e.g. a pen or screw driver) into the opening
near the selector lever. Push
down the stick vertically and move
the selector lever out of P. If this
position is engaged again, the
selector lever will be locked again.
Have the cause of the power
supply interruption remedied by a
workshop.
4. Mount the selector lever trim onto
the centre console and refit.
Page 180 of 311

178Driving and operatingFunctionality check
When the vehicle is not moving, the
electric parking brake might be
applied automatically. This is done to
check the system.
Fault
Failure mode of electric parking brake
is indicated by a control indicator j
and by a vehicle message which is
displayed in the Driver Information
Centre.
Vehicle messages 3 122.
Apply electric parking brake: pull and
hold the switch m for more than
5 seconds. If control indicator m
illuminates, electric parking brake is
applied.
Release electric parking brake: push and hold the switch m for more than
2 seconds. If control indicator m
extinguishes, electric parking brake is
released.
Control indicator m flashes: electric
parking brake is not fully applied or
released. When continuously
flashing, release electric parking
brake and retry applying.Brake assist
If brake pedal is depressed quickly
and forcefully, maximum brake force
is automatically applied.
Operation of brake assist might
become apparent by a pulse in the
brake pedal and a greater resistance
when depressing the brake pedal.
Maintain steady pressure on the
brake pedal as long as full braking is
required. Maximum brake force is
automatically reduced when brake
pedal is released.
Hill start assist The system helps prevent unintendedmovement when driving away on
inclines.
When releasing the brake pedal after
stopping on an incline, brakes remain on for further two seconds. The
brakes release automatically as soon
as the vehicle begins to accelerate.Ride control systems
Traction Control system The Traction Control system (TC) is a component of the Electronic Stability
Control (ESC).
TC improves driving stability when
necessary, regardless of the type of
road surface or tyre grip, by
preventing the drive wheels from
spinning.
As soon as the drive wheels starts to spin, engine output is reduced and
the wheel spinning the most is braked
individually. This considerably
improves the driving stability of the
vehicle on slippery road surfaces.
TC is operational after each engine
start as soon as the control indicator
b extinguishes.
When TC operates b flashes.
Page 198 of 311

196Driving and operatingThe feature uses various inputs (e.g.
camera sensor, radar sensor, brake
pressure, vehicle speed) to calculate
the probability of a frontal collision.9 Warning
This system is not intended to
replace the driver responsibility for driving the vehicle and looking
ahead. Its function is limited to
supplemental use only to reduce
the vehicle speed before a
collision.
The system may not react for
pedestrians or animals. After a
sudden lane change, the system
needs a certain time to detect the
next preceding vehicle.
The driver shall always be ready to take action and apply the brakes
and steer to avoid collisions.
Functionality
If equipped only with front camera the active emergency braking operates in
forward gear above walking speed up to 85 km/h.
With radar sensor active emergency
braking operates in forward gear
above walking speed at all speeds.
A precondition is that forward collision
alert with front camera system is not
deactivated by pressing V on the
steering wheel 3 192 or, with radar
sensor, that it is not deactivated in the
vehicle personalisation menu 3 123.
The system includes: ● brake preparation system
● emergency automatic braking
● forward looking brake assist
● intelligent brake assist (only with radar sensor)
Brake preparation system
When approaching a vehicle ahead
so quickly that a collision is likely, the brake preparation system slightlypressurises the brakes. This reduces
the response time, when a manual or automatic braking is requested.
The brake system is prepared so that
braking can occur more rapidly.If equipped only with front camera the system operates up to a speed of
80 km/h.
Emergency automatic braking After activation of brake preparation
system and just before the imminent
collision, this function automatically
applies limited braking to reduce the
impact speed of the collision or
prohibit a crash. Depending on the
situation, the vehicle may
automatically brake moderately or
hard. This front automatic braking can
only occur if a vehicle ahead is
detected, indicated by the vehicle
ahead indicator A 3 192.
If equipped only with front camera the
system operates up to a speed of
60 km/h.
Below a speed of 40 km/h the system can apply full braking.
Emergency automatic braking may
slow the vehicle to a complete stop to
try to avoid a potential crash. If this
happens, emergency automatic
braking may engage the electric
parking brake to hold the vehicle at a