steering OPEL ASTRA K 2019 User Guide
[x] Cancel search | Manufacturer: OPEL, Model Year: 2019, Model line: ASTRA K, Model: OPEL ASTRA K 2019Pages: 317, PDF Size: 9.56 MB
Page 94 of 317
92Instruments and controlsControlsSteering wheel adjustment
Unlock lever, adjust steering wheel,
then engage lever and ensure it is
fully locked.
Do not adjust steering wheel unless
vehicle is stationary and steering
wheel lock has been released.
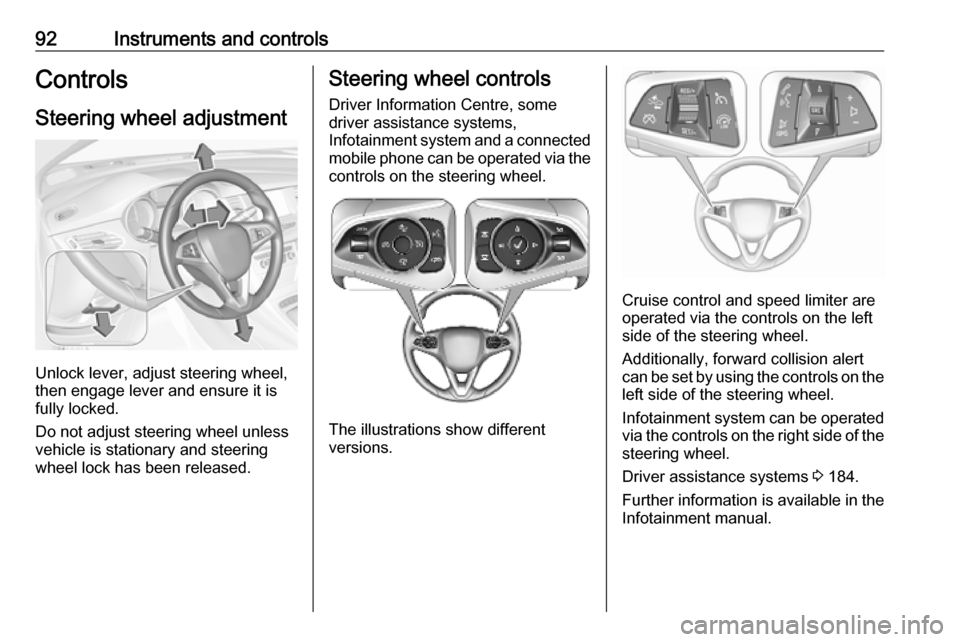
Steering wheel controls
Driver Information Centre, some
driver assistance systems,
Infotainment system and a connected mobile phone can be operated via the
controls on the steering wheel.
The illustrations show different
versions.
Cruise control and speed limiter are
operated via the controls on the left
side of the steering wheel.
Additionally, forward collision alert
can be set by using the controls on the
left side of the steering wheel.
Infotainment system can be operated
via the controls on the right side of the
steering wheel.
Driver assistance systems 3 184.
Further information is available in the
Infotainment manual.
Page 95 of 317
Instruments and controls93Heated steering wheel
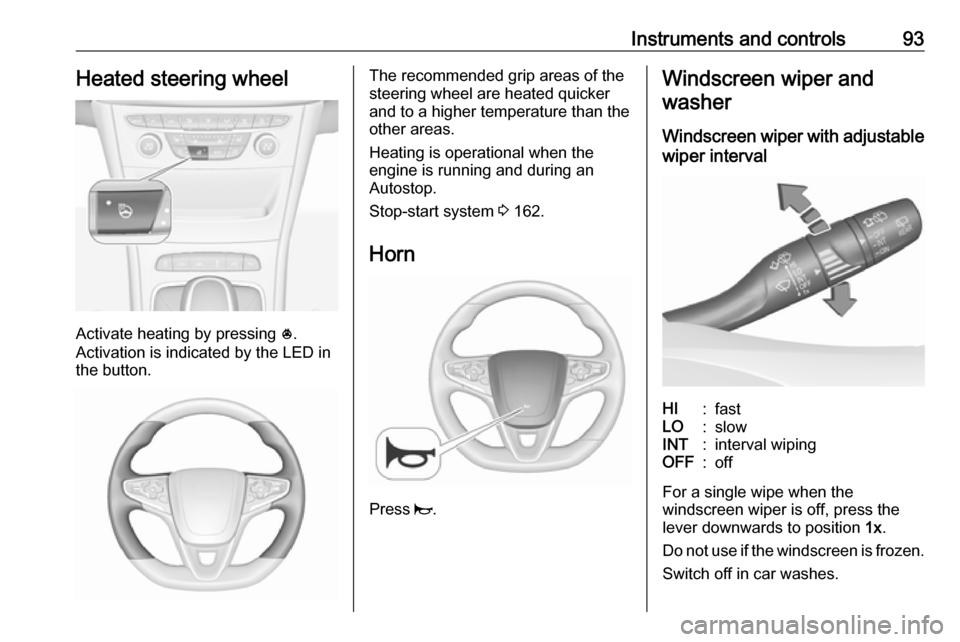
Activate heating by pressing *.
Activation is indicated by the LED in
the button.
The recommended grip areas of the
steering wheel are heated quicker
and to a higher temperature than the
other areas.
Heating is operational when the
engine is running and during an
Autostop.
Stop-start system 3 162.
Horn
Press j.
Windscreen wiper and
washer
Windscreen wiper with adjustable
wiper intervalHI:fastLO:slowINT:interval wipingOFF:off
For a single wipe when the
windscreen wiper is off, press the
lever downwards to position 1x.
Do not use if the windscreen is frozen.
Switch off in car washes.
Page 106 of 317
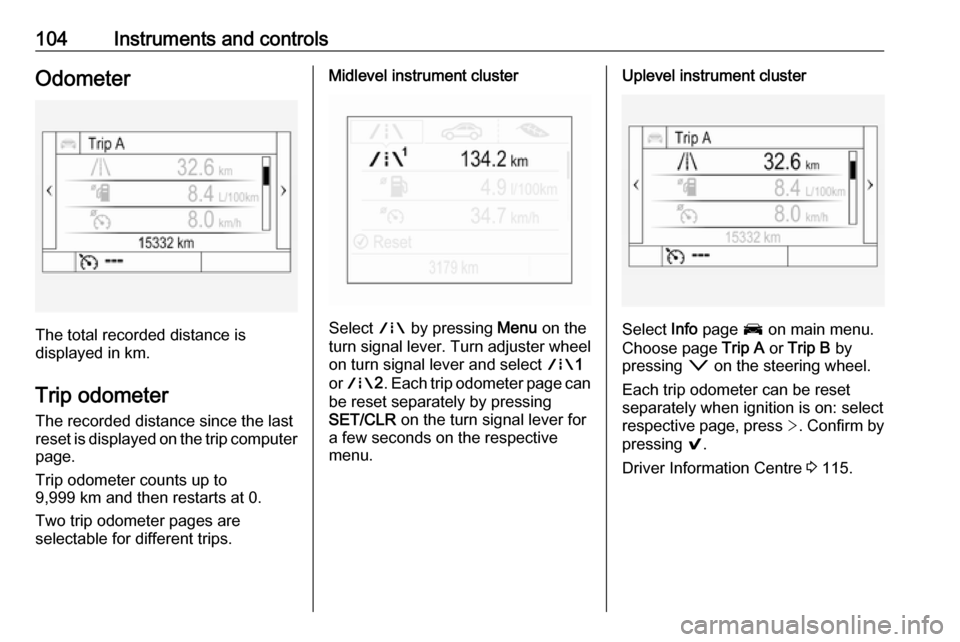
104Instruments and controlsOdometer
The total recorded distance is
displayed in km.
Trip odometer The recorded distance since the last
reset is displayed on the trip computer
page.
Trip odometer counts up to
9,999 km and then restarts at 0.
Two trip odometer pages are
selectable for different trips.
Midlevel instrument cluster
Select ; by pressing Menu on the
turn signal lever. Turn adjuster wheel
on turn signal lever and select ;1
or ; 2. Each trip odometer page can
be reset separately by pressing
SET/CLR on the turn signal lever for
a few seconds on the respective
menu.
Uplevel instrument cluster
Select Info page J on main menu.
Choose page Trip A or Trip B by
pressing o on the steering wheel.
Each trip odometer can be reset separately when ignition is on: select
respective page, press >. Confirm by
pressing 9.
Driver Information Centre 3 115.
Page 110 of 317

108Instruments and controlsOn Uplevel display select Info Menu
by pressing p on steering wheel.
Press P to select Remaining Oil
Life page.
Remaining oil life duration is indicated
in percentage.
ResetOn Midlevel display press SET/CLR
on turn signal lever for several
seconds to reset. The ignition must be
switched on but engine not running.
On Uplevel display press > on
steering wheel to open the subfolder. Select Reset and confirm by pressing
9 for several seconds. The ignition
must be switched on but engine not
running.
The system must be reset every time
the engine oil is changed to allow
proper functionality. Seek the
assistance of a workshop.
Next service
A message appears in the Driver
Information Centre, when
maintenance of the vehicle is
required. Have maintenance workcarried out by a workshop within one
week or 500 km, whichever occurs first.
Service information 3 278.
Control indicators The control indicators described are
not present in all vehicles. The
description applies to all instrument
versions. Depending on the
equipment, the position of the control
indicators may vary. When the
ignition is switched on, most control
indicators will illuminate briefly as a
functionality test.
The control indicator colours mean:red:danger, important reminderyellow:warning, information, faultgreen:confirmation of activationblue:confirmation of activationwhite:confirmation of activation
See all control indicators on different
instrument clusters 3 100.
Turn lights
O illuminates or flashes green.
Illuminates briefly
The parking lights are switched on.
Flashes
A turn signal or the hazard warning flashers are activated.
Rapid flashing: failure of a turn signal light or associated fuse, failure of turn
signal light on trailer.
Bulb replacement 3 237, Fuses
3 247.
Turn signals 3 141.
Seat belt reminder
Seat belt reminder on front seats X for driver's seat illuminates or
flashes red in the instrument cluster.
Page 115 of 317
Instruments and controls113Illuminates when the engine is
runningCaution
Engine lubrication may be
interrupted. This may result in
damage to the engine and/or
locking of the drive wheels.
1. Depress clutch.
2. Select neutral gear.
3. Move out of the flow of traffic as quickly as possible without
impeding other vehicles.
4. Switch off ignition.
9 Warning
When the engine is off,
considerably more force is needed
to brake and steer.
During an Autostop, the brake
servo unit will still be operational.
Do not remove key until vehicle is stationary, otherwise the steeringwheel lock could engage
unexpectedly.
Keep engine turned off and let the
vehicle be towed to a workshop
3 232.
Low fuel Y illuminates or flashes yellow.
Illuminates
Level in fuel tank is too low.
Flashes
Fuel used up. Refuel immediately.
Never run the tank dry.
Refuelling 3 221.
Catalytic converter 3 168.
Bleeding the diesel fuel system
3 236.
Immobiliser
d flashes yellow.
Fault in the immobiliser system. The
engine cannot be started.
Exterior light 8 illuminates green.The exterior lights are on 3 135.
High beam C illuminates blue.
Illuminated when high beam is on or
during headlight flash 3 136.
High beam assist f illuminates green.
The high beam assist is activated,
see LED headlights 3 137.
LED headlights
f illuminates or flashes yellow.
Illuminates
Fault in the system.
Seek the assistance of a workshop.
Flashes
System is switched to symmetrical
low beam.
Page 118 of 317
116Instruments and controls
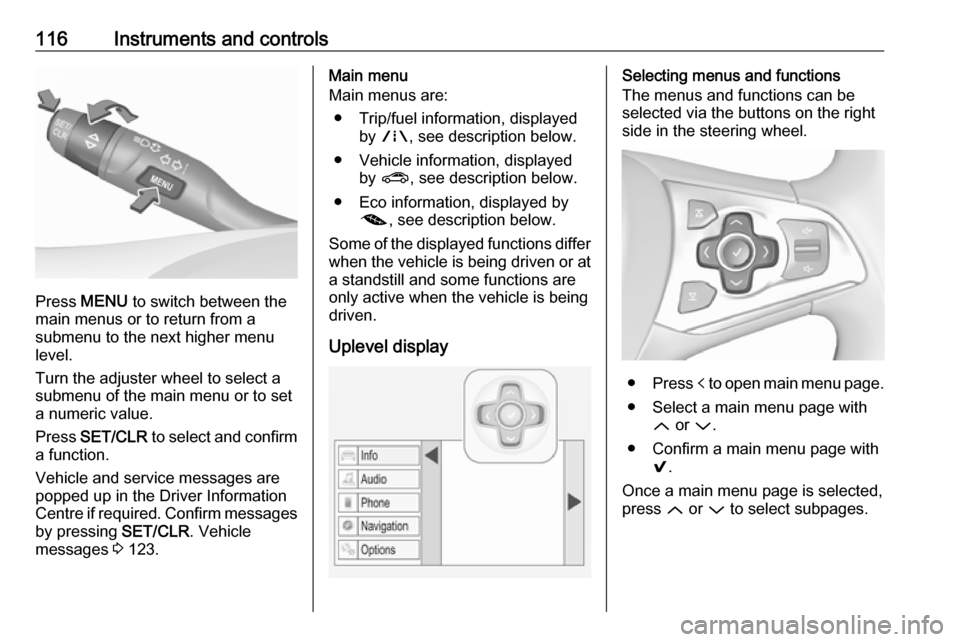
Press MENU to switch between the
main menus or to return from a
submenu to the next higher menu
level.
Turn the adjuster wheel to select a
submenu of the main menu or to set
a numeric value.
Press SET/CLR to select and confirm
a function.
Vehicle and service messages are
popped up in the Driver Information
Centre if required. Confirm messages
by pressing SET/CLR. Vehicle
messages 3 123.
Main menu
Main menus are:
● Trip/fuel information, displayed by ; , see description below.
● Vehicle information, displayed by ? , see description below.
● Eco information, displayed by @ , see description below.
Some of the displayed functions differ when the vehicle is being driven or at
a standstill and some functions are
only active when the vehicle is being
driven.
Uplevel displaySelecting menus and functions
The menus and functions can be
selected via the buttons on the right
side in the steering wheel.
● Press p to open main menu page.
● Select a main menu page with Q or P.
● Confirm a main menu page with 9.
Once a main menu page is selected,
press Q or P to select subpages.
Page 125 of 317
Instruments and controls123Valet mode
Some functions of the Driver
Information Centre and the Info-
Display can be limited for some
drivers. The load compartment is
being locked and cannot be unlocked.
For more information, see
Infotainment manual.Vehicle messages
Messages are indicated in the Driver
Information Centre, in some cases
together with a warning chime.
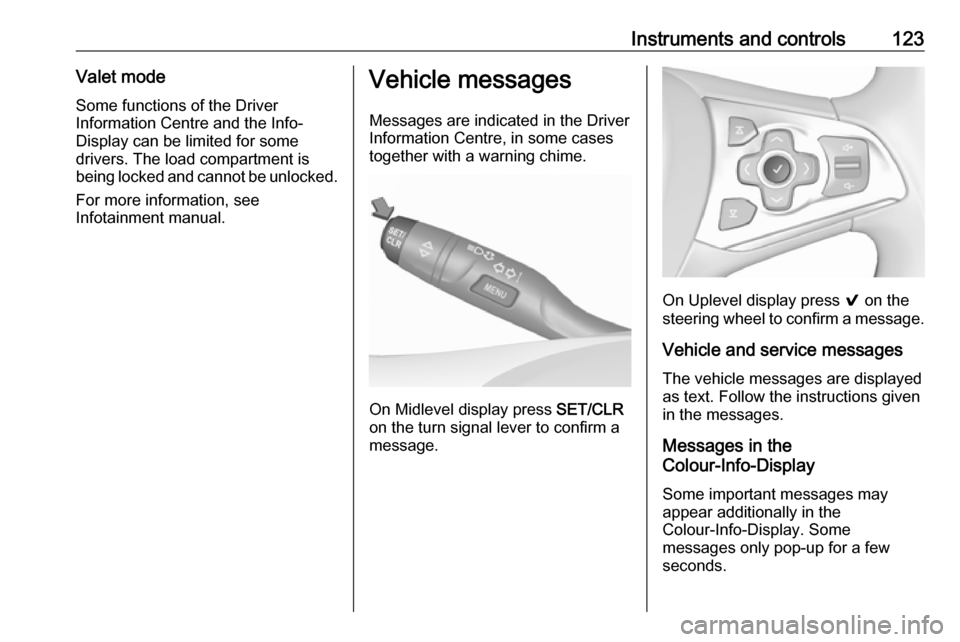
On Midlevel display press SET/CLR
on the turn signal lever to confirm a
message.
On Uplevel display press 9 on the
steering wheel to confirm a message.
Vehicle and service messages
The vehicle messages are displayed
as text. Follow the instructions given
in the messages.
Messages in the
Colour-Info-Display
Some important messages may
appear additionally in the
Colour-Info-Display. Some
messages only pop-up for a few
seconds.
Page 140 of 317
138LightingThe following lighting functions are
available with light switch in position
AUTO or 9.
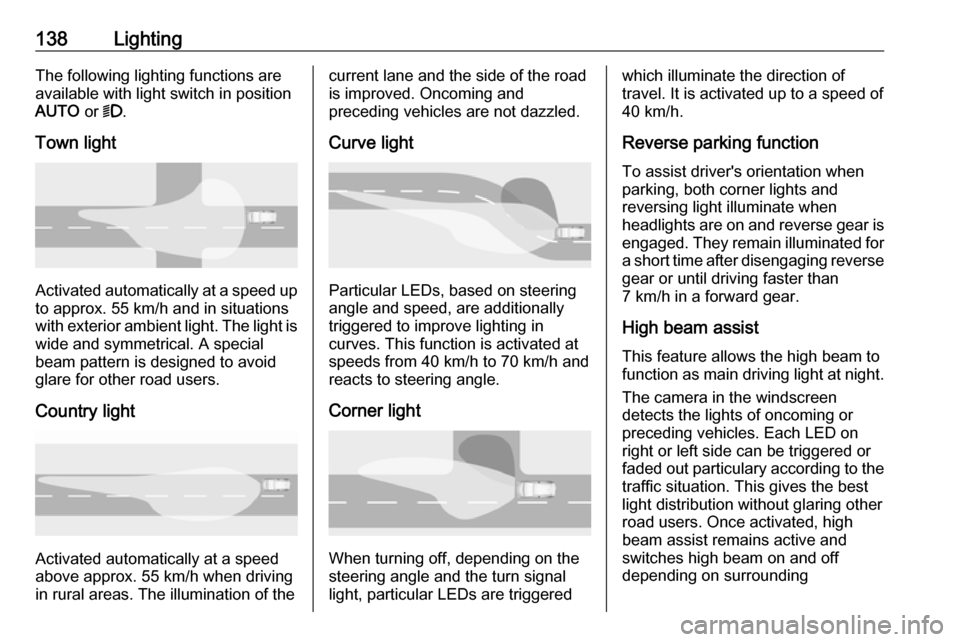
Town light
Activated automatically at a speed up to approx. 55 km/h and in situations
with exterior ambient light. The light is
wide and symmetrical. A special
beam pattern is designed to avoid
glare for other road users.
Country light
Activated automatically at a speed
above approx. 55 km/h when driving
in rural areas. The illumination of the
current lane and the side of the road is improved. Oncoming and
preceding vehicles are not dazzled.
Curve light
Particular LEDs, based on steering
angle and speed, are additionally
triggered to improve lighting in
curves. This function is activated at
speeds from 40 km/h to 70 km/h and
reacts to steering angle.
Corner light
When turning off, depending on the
steering angle and the turn signal light, particular LEDs are triggered
which illuminate the direction of
travel. It is activated up to a speed of
40 km/h.
Reverse parking function To assist driver's orientation when
parking, both corner lights and
reversing light illuminate when
headlights are on and reverse gear is
engaged. They remain illuminated for
a short time after disengaging reverse gear or until driving faster than
7 km/h in a forward gear.
High beam assist This feature allows the high beam to
function as main driving light at night.
The camera in the windscreen
detects the lights of oncoming or
preceding vehicles. Each LED on
right or left side can be triggered or
faded out particulary according to the
traffic situation. This gives the best
light distribution without glaring other
road users. Once activated, high
beam assist remains active and
switches high beam on and off
depending on surrounding
Page 143 of 317
Lighting141
The illustrations show different
versions.
In the event of an accident with airbag
deployment, the hazard warning
flashers are activated automatically.
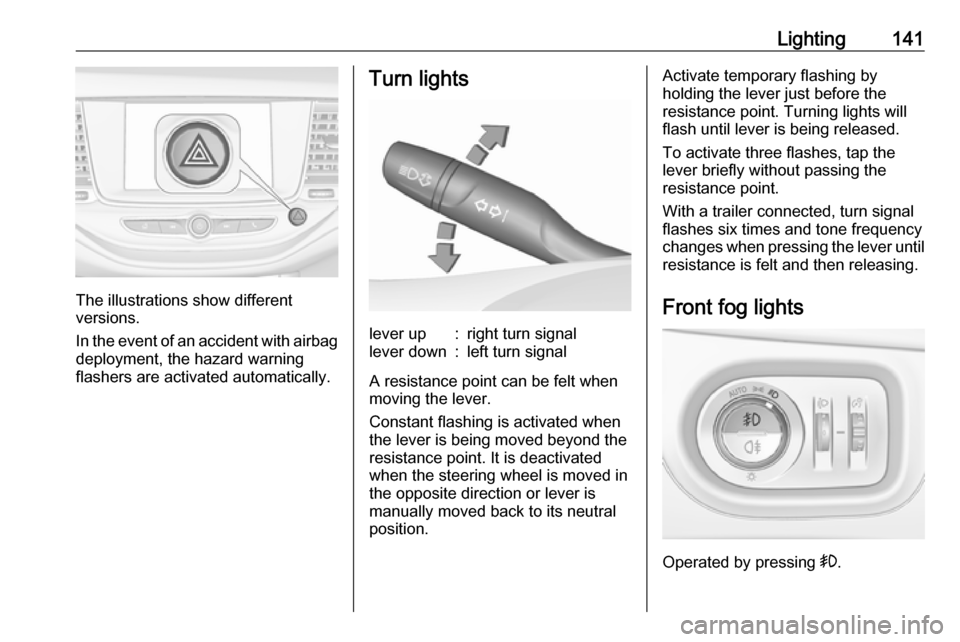
Turn lightslever up:right turn signallever down:left turn signal
A resistance point can be felt when
moving the lever.
Constant flashing is activated when
the lever is being moved beyond the
resistance point. It is deactivated
when the steering wheel is moved in
the opposite direction or lever is
manually moved back to its neutral
position.
Activate temporary flashing by
holding the lever just before the
resistance point. Turning lights will
flash until lever is being released.
To activate three flashes, tap the
lever briefly without passing the
resistance point.
With a trailer connected, turn signal
flashes six times and tone frequency
changes when pressing the lever until
resistance is felt and then releasing.
Front fog lights
Operated by pressing >.
Page 148 of 317
146Climate controlClimate controlClimate control systems.............146
Heating and ventilation system 146
Air conditioning system ...........147
Electronic climate control system .................................... 149
Auxiliary heater ........................154
Air vents ..................................... 154
Adjustable air vents .................154
Fixed air vents ......................... 154
Maintenance .............................. 155
Air intake ................................. 155
Pollen filter ............................... 155
Air conditioning regular
operation ................................ 155
Service .................................... 155Climate control systems
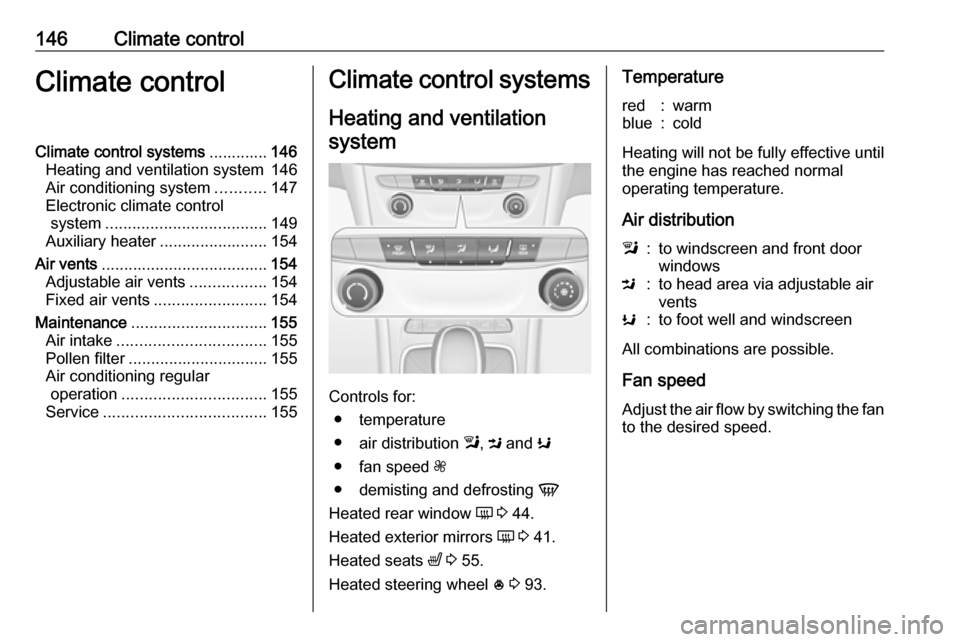
Heating and ventilation system
Controls for: ● temperature
● air distribution l, M and K
● fan speed Z
● demisting and defrosting V
Heated rear window Ü 3 44.
Heated exterior mirrors Ü 3 41.
Heated seats ß 3 55.
Heated steering wheel * 3 93.
Temperaturered:warmblue:cold
Heating will not be fully effective until
the engine has reached normal
operating temperature.
Air distribution
l:to windscreen and front door
windowsM:to head area via adjustable air
ventsK:to foot well and windscreen
All combinations are possible.
Fan speed Adjust the air flow by switching the fan
to the desired speed.