steering OPEL ASTRA K 2019 Service Manual
[x] Cancel search | Manufacturer: OPEL, Model Year: 2019, Model line: ASTRA K, Model: OPEL ASTRA K 2019Pages: 317, PDF Size: 9.56 MB
Page 220 of 317
218Driving and operatingDeactivation
The system is deactivated by
pressing a; the LED in the button
extinguishes.
The system is deactivated
automatically when a trailer is
detected.
Fault
The system performance may be
affected by:
● Windscreen not clean or affected
by foreign items, e.g. stickers
● Close vehicles ahead
● Banked roads
● Winding or hilly roads
● Road edges
● Roads with poor lane markings
● Sudden lighting changes
● Adverse environmental conditions e.g. heavy rain or
snow
● Vehicle modifications, e.g. tyres.Switch off the system if the system is
disturbed by tar marks, shadows,
road cracks, temporary or
construction lane markings, or other
road imperfections.9 Warning
Always keep your attention on the
road and maintain proper vehicle
position within the lane, otherwise
vehicle damage, injury or death
could occur.
Lane keep assist does not
continuously steer the vehicle.
The system may not keep the
vehicle in the lane or give an alert,
even if a lane marking is detected.
The steering of the lane keep
assist may not be sufficient to
avoid a lane departure.
The system may not detect hands-
off driving due to external
influences (road condition and
surface, weather etc). The driver
has full responsibility to control the
vehicle and is always required to keep the hands on the steeringwheel while driving.
Using the system while towing a
trailer or on slippery roads could
cause loss of control of the vehicle
and a crash. Switch the system off.
Page 226 of 317

224Driving and operatingTrailer hitch
General information
Only use towing equipment that has
been approved for your vehicle.
Entrust retrofitting of towing
equipment to a workshop. It may be
necessary to make changes that
affect the cooling system, heat
shields or other equipment.
The bulb outage detection function for trailer brake light cannot detect a
partial bulb outage, e.g. in case of four
times five watt bulbs, the function only detects lamp outage when only a
single five Watt lamp remains or none
remain.
Fitting of towing equipment could
cover the opening of the towing eye.
If this is the case use the coupling ball bar for towing. Always keep the
coupling ball bar in the vehicle when
not in use.Driving characteristics and
towing tips
Before attaching a trailer, lubricatethe coupling ball. However, do not do
so if a stabiliser, which acts on the
coupling ball, is being used to reduce snaking movements.
During trailer towing do not exceed a
speed of 80 km/h. A maximum speed
of 100 km/h is only appropriate if an
oscillation damper is used and the
permissible gross trailer weight does
not exceed the vehicle’s curb weight.
For trailers with low driving stability
and caravan trailers, the use of an
oscillation damper is strongly
recommended.
If the trailer starts snaking, drive more
slowly, do not attempt to correct the
steering and brake sharply if
necessary.
When driving downhill, drive in the
same gear as if driving uphill and
drive at a similar speed.
Adjust tyre pressure to the value
specified for full load 3 295.Trailer towing
Trailer loadsThe permissible trailer loads are
vehicle and engine-dependent
maximum values which must not be
exceeded. The actual trailer load is the difference between the actual
gross weight of the trailer and the
actual coupling socket load with the
trailer coupled.
The permissible trailer loads are
specified in the vehicle documents. In
general, they are valid for gradients
up to 12%.
The permissible trailer load applies
up to the specified incline and at sea
level. Since engine power decreases
as altitude increases due to the air
becoming thinner, therefore reducing
climbing ability, the permissible gross train weight also decreases by 10%for every 1000 metres of altitude. The gross train weight does not have to be
reduced when driving on roads with
slight inclines (less than 8%, e.g.
motorways).
Page 230 of 317
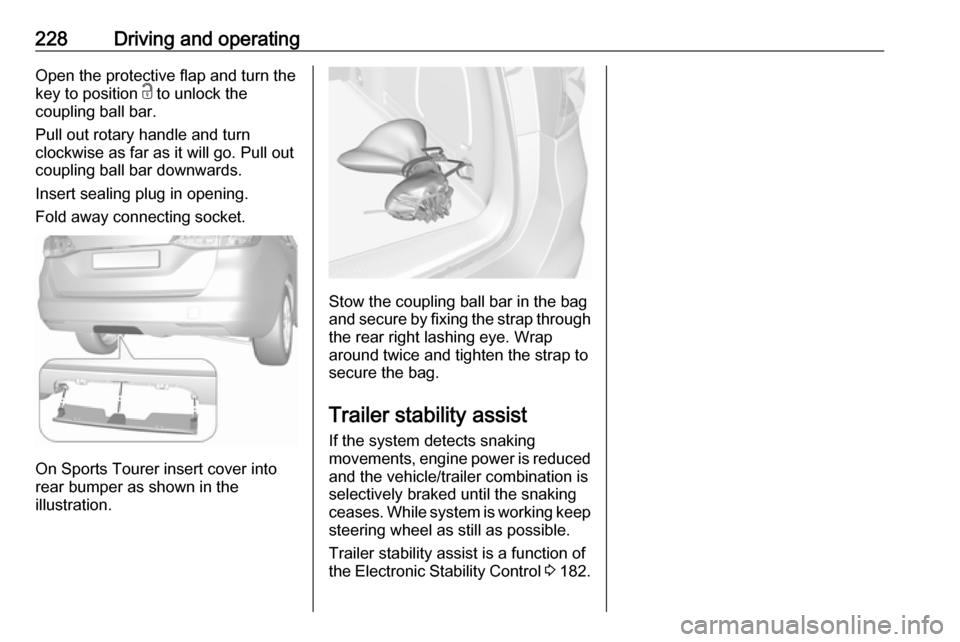
228Driving and operatingOpen the protective flap and turn the
key to position c to unlock the
coupling ball bar.
Pull out rotary handle and turn
clockwise as far as it will go. Pull out coupling ball bar downwards.
Insert sealing plug in opening.
Fold away connecting socket.
On Sports Tourer insert cover into
rear bumper as shown in the
illustration.
Stow the coupling ball bar in the bag
and secure by fixing the strap through the rear right lashing eye. Wrap
around twice and tighten the strap to
secure the bag.
Trailer stability assist
If the system detects snaking
movements, engine power is reduced
and the vehicle/trailer combination is selectively braked until the snaking
ceases. While system is working keep
steering wheel as still as possible.
Trailer stability assist is a function of
the Electronic Stability Control 3 182.
Page 252 of 317
250Vehicle careNo.Circuit32DC transformer/LED display/
Electrical heater/Climate
control/Glow plug controller33Anti theft warning horn34Horn35Power outlet load compartment36Right high beam (Halogen)/
Right low beam (LED)37Left high beam (Halogen)38LED headlight/Automatic head‐
light range adjustment39Front fog light40Central Gateway Module41Water in fuel sensor/Water
pump42Manual headlight range adjust‐
ment43Fuel pump44Rear view camera/Inside rear
view mirror/Trailer moduleNo.Circuit45LED headlight left/Automatic
headlight range adjustment left46Instrument cluster47Steering column lock48Rear wiper49Outside rearview mirror50LED headlight right/Automatic
headlight range adjustment
right51Left low beam (LED)52Engine control module/Trans‐
mission control module53Diesel exhaust system54Windscreen wiper55Electrical rear seat folding56–57–
After having changed defective fuses,
close the fuse box cover and press
until it engages.
If the fuse box cover is not closed
correctly, malfunction may occur.
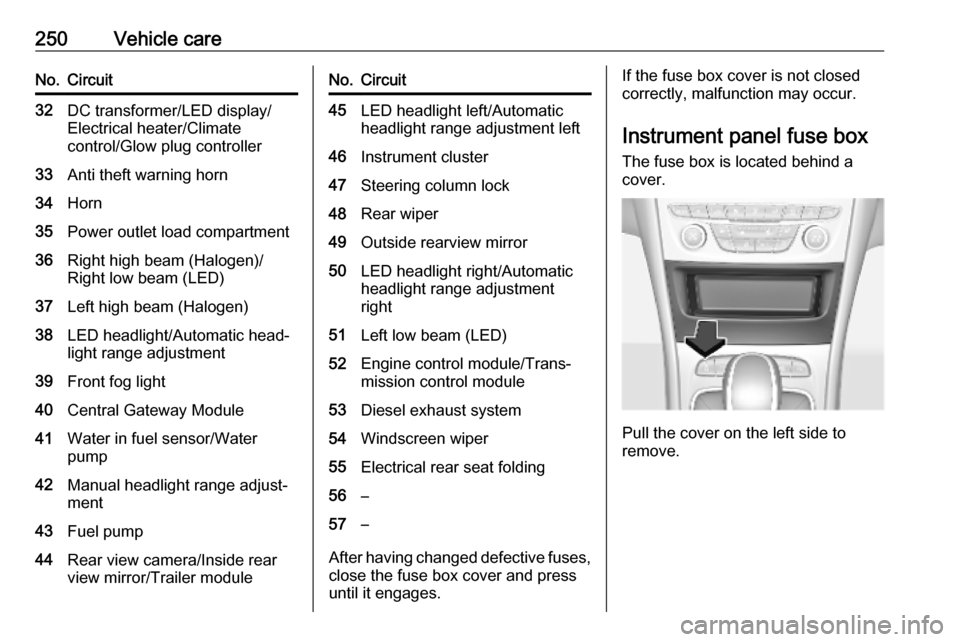
Instrument panel fuse boxThe fuse box is located behind a
cover.
Pull the cover on the left side to
remove.
Page 253 of 317
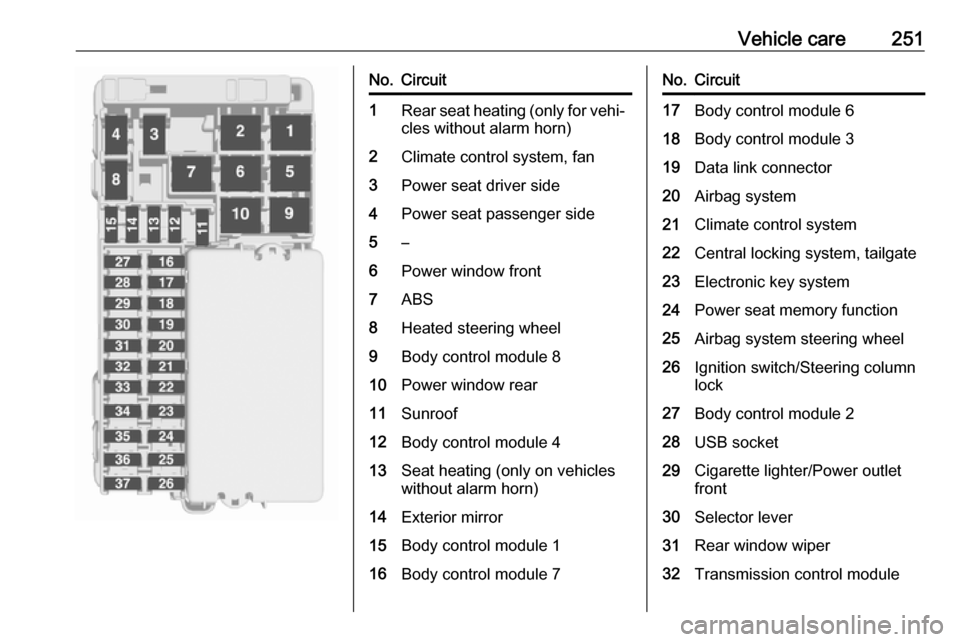
Vehicle care251No.Circuit1Rear seat heating (only for vehi‐cles without alarm horn)2Climate control system, fan3Power seat driver side4Power seat passenger side5–6Power window front7ABS8Heated steering wheel9Body control module 810Power window rear11Sunroof12Body control module 413Seat heating (only on vehicles
without alarm horn)14Exterior mirror15Body control module 116Body control module 7No.Circuit17Body control module 618Body control module 319Data link connector20Airbag system21Climate control system22Central locking system, tailgate23Electronic key system24Power seat memory function25Airbag system steering wheel26Ignition switch/Steering column
lock27Body control module 228USB socket29Cigarette lighter/Power outlet
front30Selector lever31Rear window wiper32Transmission control module
Page 262 of 317
260Vehicle carewheel and left side rear wheel. Theturn signal light at the current active
position is illuminated until sensor is
matched.
Consult a workshop for service. There are two minutes to match the first
wheel position, and five minutes
overall to match all four wheel
positions. If it takes longer, the
matching process stops and must be
restarted.
The tyre pressure sensor matching
process is:
1. Apply the parking brake.
2. Turn the ignition on.
3. On vehicles with automatic transmission: set the selector
lever to P.
On vehicles with manual
transmission: select neutral.
4. Midlevel display: Use MENU on the turn signal
lever to select the Vehicle
Information Menu ? in the
Driver Information Centre.
Uplevel display:Press p on the steering wheel to
open main menu page.
Select the Info page with Q or P.
Confirm with 9.
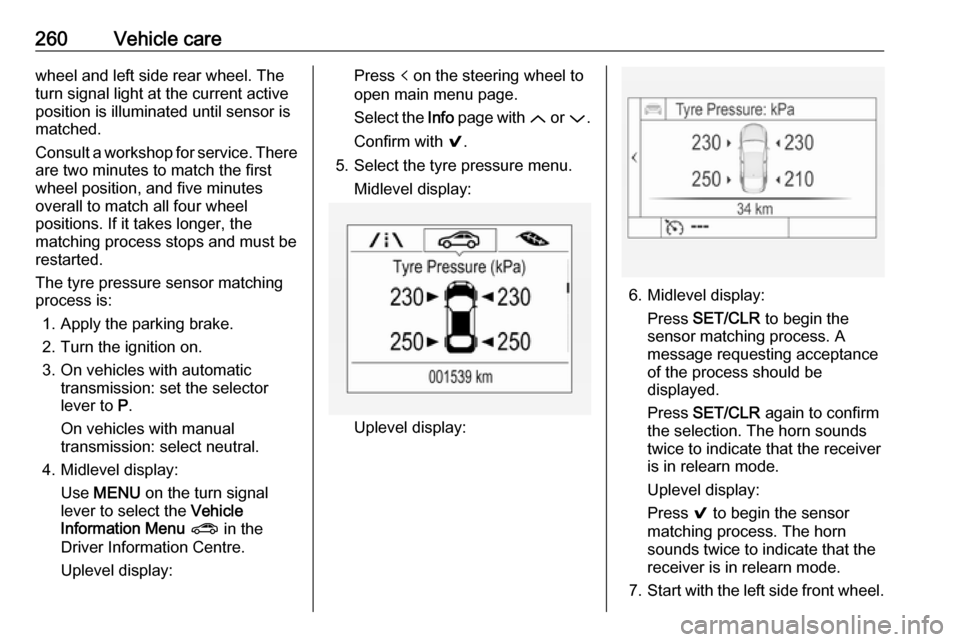
5. Select the tyre pressure menu. Midlevel display:
Uplevel display:
6. Midlevel display:Press SET/CLR to begin the
sensor matching process. A
message requesting acceptance
of the process should be
displayed.
Press SET/CLR again to confirm
the selection. The horn sounds
twice to indicate that the receiver
is in relearn mode.
Uplevel display:
Press 9 to begin the sensor
matching process. The horn
sounds twice to indicate that the receiver is in relearn mode.
7. Start with the left side front wheel.
Page 265 of 317
Vehicle care2639Warning
Do not drive faster than 80 km/h.
Do not use for a lengthy period.
Steering and handling may be
affected.
If you have a flat tyre:
Apply the parking brake and engage
first gear, reverse gear or P.
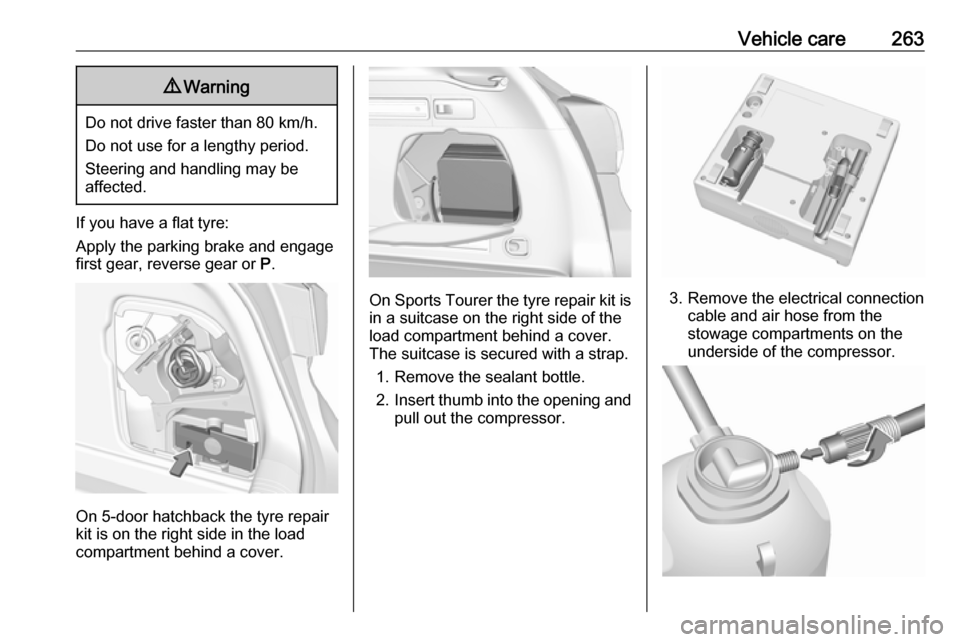
On 5-door hatchback the tyre repair
kit is on the right side in the load
compartment behind a cover.
On Sports Tourer the tyre repair kit is
in a suitcase on the right side of the
load compartment behind a cover.
The suitcase is secured with a strap.
1. Remove the sealant bottle.
2. Insert thumb into the opening and
pull out the compressor.3. Remove the electrical connection cable and air hose from the
stowage compartments on the
underside of the compressor.
Page 275 of 317
Vehicle care273Towing
Towing the vehicle
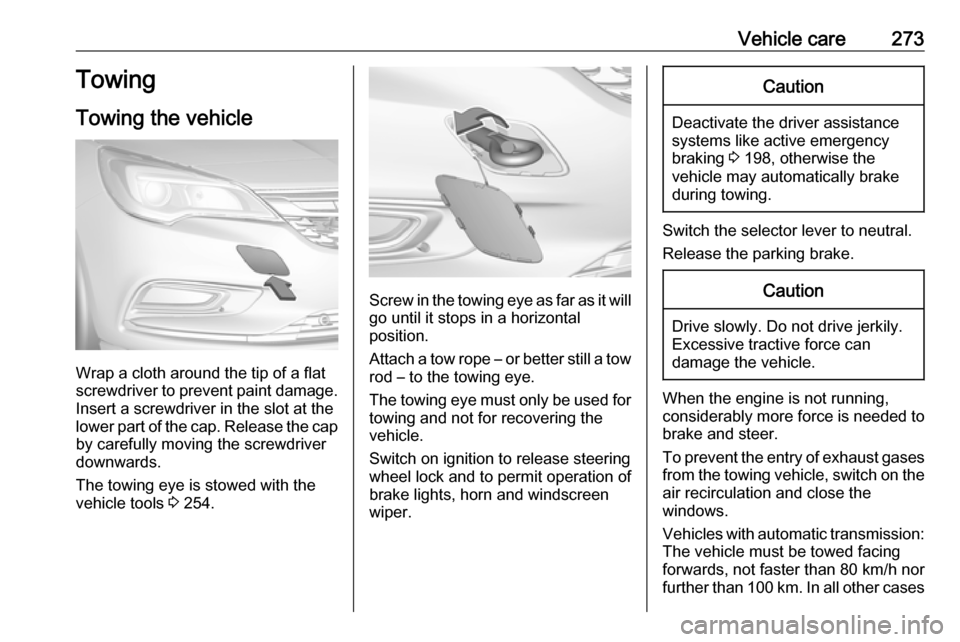
Wrap a cloth around the tip of a flat
screwdriver to prevent paint damage.
Insert a screwdriver in the slot at the
lower part of the cap. Release the cap
by carefully moving the screwdriver
downwards.
The towing eye is stowed with the
vehicle tools 3 254.
Screw in the towing eye as far as it will
go until it stops in a horizontal
position.
Attach a tow rope – or better still a tow rod – to the towing eye.
The towing eye must only be used for
towing and not for recovering the
vehicle.
Switch on ignition to release steering wheel lock and to permit operation of
brake lights, horn and windscreen
wiper.
Caution
Deactivate the driver assistance
systems like active emergency
braking 3 198, otherwise the
vehicle may automatically brake during towing.
Switch the selector lever to neutral.
Release the parking brake.
Caution
Drive slowly. Do not drive jerkily.
Excessive tractive force can
damage the vehicle.
When the engine is not running,
considerably more force is needed to
brake and steer.
To prevent the entry of exhaust gases from the towing vehicle, switch on the
air recirculation and close the
windows.
Vehicles with automatic transmission: The vehicle must be towed facing
forwards, not faster than 80 km/h nor further than 100 km. In all other cases
Page 309 of 317

Customer information307Comfort and infotainment
functions
Comfort settings and custom settings
can be stored in the vehicle and
changed at any time.
Depending on the equipment level in
question, these include
● seat and steering wheel position settings
● chassis and air conditioning settings
● custom settings such as interior lighting
You can input your own data in the
infotainment functions for your
vehicle as part of the selected
features.
Depending on the equipment level in
question, these include
● multimedia data such as music, videos or photos for playback in
an integrated multimedia system
● address book data for use with an
integrated hands-free system or an integrated navigation system● input destinations
● data on the use of online services
This data for comfort and
infotainment functions can be stored
locally in the vehicle or be kept on a
device that you have connected to the
vehicle ( e.g. a smartphone, USB stick
or MP3 player). Data that you have input yourself can be deleted at any
time.
This data can only be transmitted out
of the vehicle at your request,
particularly when using online
services in accordance with the
settings selected by you.
Smartphone integration, e.g.
Android Auto or Apple CarPlay
If your vehicle is equipped
accordingly, you can connect your
smartphone or another mobile device
to the vehicle so that you can control
it via the controls integrated in the
vehicle. The smartphone image and
sound can be output via the
multimedia system in this case. At the same time, specific information is
transmitted to your smartphone.
Depending on the type of integration,this includes data such as position
data, day / night mode and other
general vehicle information. For more
information, please see the operating
instructions for the vehicle /
infotainment system.
Integration allows selected
smartphone apps to be used, such as navigation or music playback. No
further integration is possible
between smartphone and vehicle, in
particular active access to vehicle
data. The nature of further data
processing is determined by the
provider of the app used. Whether
you can define settings, and if so
which ones, is dependent on the app
in question and your smartphone's
operating system.
Page 314 of 317

312Head restraint adjustment .............8
Head restraints ............................ 47
Heated mirrors ............................. 41
Heated rear window ..................... 44
Heated steering wheel .................93
Heating .................................. 55, 57
Heating and ventilation system . 146
High beam ......................... 113, 136
High beam assist ........................113
Hill start assist ........................... 181
Horn ....................................... 14, 93
I
Identification plate .....................282
Ignition switch positions .............157
Immobiliser .......................... 39, 113
Indicators .................................... 103
Info Display ................................. 121
Information displays.................... 115
Instrument cluster ......................100
Instrument panel fuse box .........250
Instrument panel illumination .....247
Instrument panel illumination control .................................... 143
Instrument panel overview ........... 10
Interior care ............................... 276
Interior lighting ............................ 143
Interior lights ...................... 143, 247
Interior mirrors .............................. 41Interruption of power supply ......174
Introduction .................................... 3
J Jump starting ............................. 271
K Key, memorised settings ..............25
Keys ............................................. 21
Keys, locks ................................... 21
L
Lane keep assist ................111, 216
Lashing eyes ............................... 82
LED headlights ...................113, 137
Lighting features .........................144
Light switch ................................ 135
Load compartment ................31, 74
Load compartment cover .............80
Load compartment fuse box ......252
Loading information .....................89
Low fuel ..................................... 113
M
Malfunction indicator light ..........110
Manual anti-dazzle ......................41
Manual mode .....................173, 177
Manual seat adjustment ...............49
Manual transmission .................. 174
Manual transmission automated 175
Manual windows ..........................42Massage....................................... 56
Maximum speed ......................... 256
Memorised settings ......................25
Midlevel display .......................... 115
Mirror adjustment ........................... 9
Misted light covers .....................142
N Natural gas ......................... 105, 221
New vehicle running-in ..............157
Number plate light .....................246
O
Object detection systems ...........201
Odometer ................................... 104 Oil, engine .......................... 279, 284
OnStar ........................................ 131
Outside temperature ....................96
Overrun cut-off ........................... 162
P Parking ................................ 19, 165
Parking assist ............................ 201
Parking brake ............................ 179
Parking lights ............................. 142
Particulate filter ........................... 167
Performance .............................. 289
Performing work ........................231
Pollen filter ................................. 155
Power button .............................. 158
Power outlets ............................... 98