OPEL ASTRA K 2020 Manual user
Manufacturer: OPEL, Model Year: 2020, Model line: ASTRA K, Model: OPEL ASTRA K 2020Pages: 305, PDF Size: 27.84 MB
Page 231 of 305

Vehicle care229when using a battery charger.
Otherwise the vehicle battery may be damaged.
Jump starting 3 263.
Discharge protection
Battery voltage
When the vehicle battery voltage is running low, a warning message will
appear in the Driver Information
Centre.
When the vehicle is being driven, the
load reduction function temporarily
deactivates certain functions, e.g. the heated rear window.
The deactivated functions are
reactivated automatically as soon as
conditions permit.
Idle boost
If charging of the vehicle battery is
required due to battery condition, the
power output of the generator must
be increased. This will be achieved by
an idle boost which may be audible.
A message appears in the Driver
Information Centre.
Power outlet
The power outlets are deactivated in
the event of low vehicle battery
voltage.
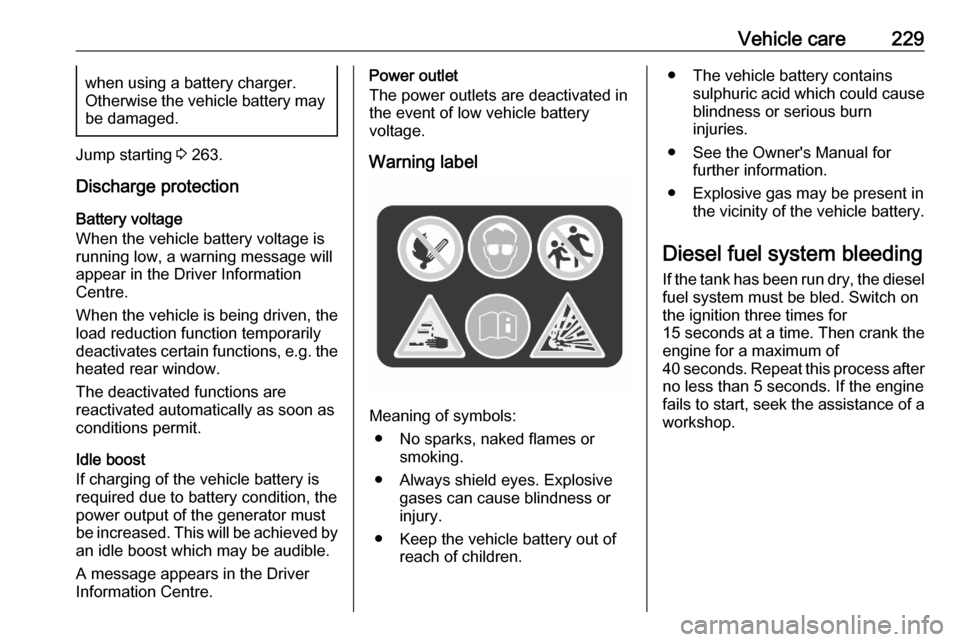
Warning label
Meaning of symbols: ● No sparks, naked flames or smoking.
● Always shield eyes. Explosive gases can cause blindness or
injury.
● Keep the vehicle battery out of reach of children.
● The vehicle battery containssulphuric acid which could cause
blindness or serious burn
injuries.
● See the Owner's Manual for further information.
● Explosive gas may be present in the vicinity of the vehicle battery.
Diesel fuel system bleeding If the tank has been run dry, the diesel
fuel system must be bled. Switch on
the ignition three times for
15 seconds at a time. Then crank the
engine for a maximum of 40 seconds. Repeat this process after
no less than 5 seconds. If the engine fails to start, seek the assistance of a
workshop.
Page 232 of 305

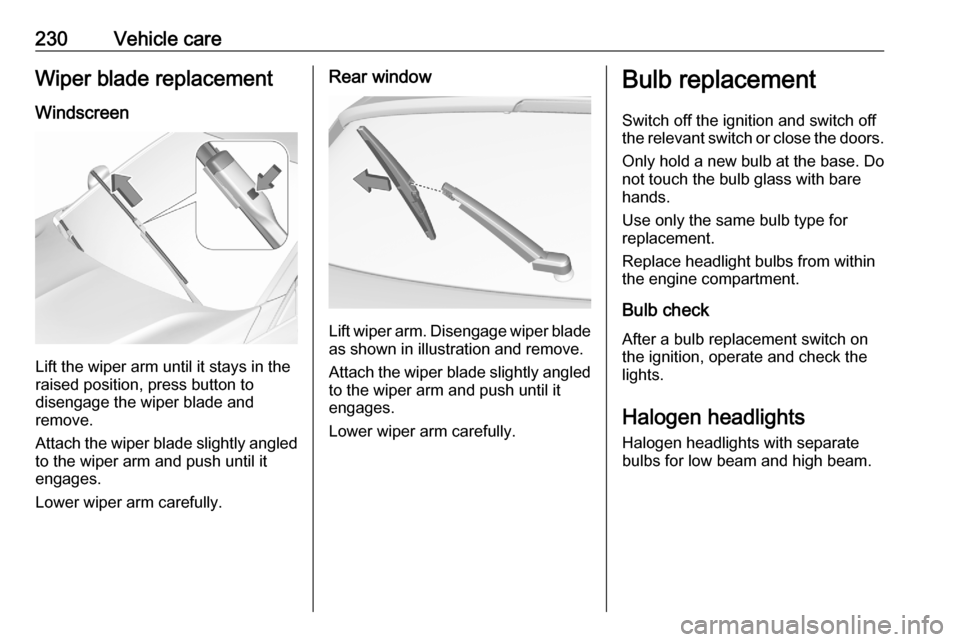
230Vehicle careWiper blade replacementWindscreen
Lift the wiper arm until it stays in the
raised position, press button to
disengage the wiper blade and
remove.
Attach the wiper blade slightly angled
to the wiper arm and push until it
engages.
Lower wiper arm carefully.
Rear window
Lift wiper arm. Disengage wiper blade as shown in illustration and remove.
Attach the wiper blade slightly angled
to the wiper arm and push until it
engages.
Lower wiper arm carefully.
Bulb replacement
Switch off the ignition and switch off
the relevant switch or close the doors.
Only hold a new bulb at the base. Do not touch the bulb glass with bare
hands.
Use only the same bulb type for
replacement.
Replace headlight bulbs from within
the engine compartment.
Bulb check
After a bulb replacement switch on
the ignition, operate and check the
lights.
Halogen headlights Halogen headlights with separate
bulbs for low beam and high beam.
Page 233 of 305

Vehicle care231
Low beam (1) outer bulb.
High beam ( 2) inner bulb.
Low beam (1)
1. Rotate the cap anticlockwise and remove it.
2. Disengage spring clip fromretainer by pulling. Withdraw the
bulb holder from the reflector
housing.
3. Detach the bulb from the bulb holder and replace the bulb.
4. Insert the bulb holder, engaging the two lugs into the reflector
housing and rotate clockwise to
secure.
5. Push spring clip back in place. 6. Fit the cap and rotate clockwise.
Page 234 of 305

232Vehicle careHigh beam (2)
1. Rotate the cap anticlockwise andremove it.
2. Disengage spring clip fromretainer by moving it forward and
to the side. Swivel spring clip
downwards.
3. Withdraw the bulb holder from the
reflector housing.
4. Detach the bulb from the bulb holder and replace the bulb.
5. Insert the bulb holder and install spring clip.
Fit the cap and rotate clockwise.
Front turn lights
In case of defective LEDs, have them replaced by a workshop.
Side light
In case of defective LEDs, have them replaced by a workshop.
Daytime running light
In case of defective LEDs, have them replaced by a workshop.
Front fog lights The bulbs are accessible from the
underside of the vehicle.
1. Undo screw with a screwdriver and remove the faceplate.
Page 235 of 305

Vehicle care233
2. Disengage the plug connector bypressing the retaining lug.
3. Remove and replace the bulb unit
and attach the plug connector.
Note that the bulb and the socket
are one unit and have to be
changed together.
4. Insert the bulb socket into the light
assembly by turning clockwise
and engage.
5. Mount the light assembly by tightening the screws.
6. Attach the faceplate and tighten the screw.
Tail lights
5-door Hatchback
1. Release the cover on the respective side and remove it.
2. Vehicles with tyre repair kit: To replace bulbs on the right side,
first unscrew the plastic nut and
take out the insert with the sealant
bottle.
3. Unscrew the plastic securing nut from the inside by hand.
Page 236 of 305

234Vehicle care
4. Carefully withdraw tail lightassembly from recess and
remove.
5. Detach the cable from the retainer.
6.Press the three retaining lugs and
remove the bulb carrier from the
light assembly.
7. Remove and replace the bulbs:
Turn light ( 1)
Tail light/brake light ( 2)
On version with LED tail lights and
LED brake lights, only turn light
bulb ( 1) can be removed and
replaced.
8. Attach the bulb carrier to the light assembly.
9. Attach the cable to the retainer.
10. Attach the light assembly to the vehicle body and tighten the
securing nut from the inside of the load compartment. Attach cover.
Depending on the version, tail lights
and brake lights are designed as
LEDs. In case of failure, have LEDs
replaced by a workshop.
Page 237 of 305

Vehicle care235Light assembly in the tailgate
1. Release the cover in the tailgateand remove it.
2. Unscrew the plastic securing nutby hand.
3. Carefully withdraw the lightassembly from the recesses and
remove.
4. Detach the plug from the light assembly.
5.Press the three retaining lugs and
remove the bulb carrier from the
light assembly.
Page 238 of 305

236Vehicle careOn version with LED tail lights, theposition of the retaining lugs is
slightly different.
6. Remove and replace the bulb:
Tail light ( 1)
Rear fog light ( 2) (left side)
Reverse light ( 2) (right side)
On version with LED tail lights
only reverse light bulb ( 1) can be
removed and replaced.
7. Insert the bulb carrier into the tail light assembly. Attach plug to the
light assembly. Fit light assembly
on the tailgate and tighten the
screw from the inside. Attach
cover.
Depending on the version, tail lights are designed as LEDs. In case of failure, have LEDs replaced by aworkshop.
Sports Tourer
1. Release and open the cover on the respective side.
Page 239 of 305

Vehicle care2372. Unscrew both plastic securingnuts from the inside by hand.
3. Carefully withdraw tail light assembly from recess and
remove.
4. Detach the cable from the retainer.
5. Standard tail lights:
Release the retaining lugs and
remove the bulb carrier from the
light assembly.
6. Remove and replace the bulbs:
Tail light / brake light ( 1)
Turn light ( 2)
7. Insert the bulb carrier into the light
assembly.
8. LED tail lights:
On version with LED tail lights and
LED brake lights, only the turn
light bulb can be replaced:
remove bulb holder in the light
assembly by turning. Replace
bulb in the bulb holder.
Page 240 of 305

238Vehicle care9. Attach the cable to the retainer.
10. Attach the light assembly to the vehicle body and tighten the
securing nuts from the inside of
the load compartment. Attach
cover.
Depending on the version, tail lights
and brake lights are designed as
LEDs. In case of failure, have LEDs
replaced by a workshop.
Light assembly in the tailgate
1. Release the cover in the tailgate and remove it.
2. Unscrew the plastic securing nutby hand.
3. Carefully withdraw the lightassembly from the recesses and
remove.
4. Press the three retaining lugs and
remove the bulb carrier from the
light assembly.
5. Remove and replace the bulb: